Steampunk Harley - Tamiya 1/6 HD FLH Classic 'extreme' kit bash (Very Photo Heavy)
+17
Geezerman
GaryDainton
Mence
RetiredMike
Nipponrookie
Mr Hirakawa
Ace
kpnuts
hotrodmax
Skid
dublin boy
harron68
disabled modeler
Speed Racer 65
KatsZenJammer
Shelby
A5h
21 posters
Page 13 of 25
Page 13 of 25 •  1 ... 8 ... 12, 13, 14 ... 19 ... 25
 Re: Steampunk Harley - Tamiya 1/6 HD FLH Classic 'extreme' kit bash (Very Photo Heavy)
Just a big thumbs up !! I'm out of words !! Just great !!


Geezerman- Advanced Member

- Posts : 3651
Join date : 2013-02-24
Age : 89
Location : Gulf coast of central Florids
 Re: Steampunk Harley - Tamiya 1/6 HD FLH Classic 'extreme' kit bash (Very Photo Heavy)
Grazie Mille for the kind comments and encouragement 
Well, inspired by the detailing of the front forks I decided to similarly adorn the rear yoke though with much lower saturation.


Making the underside detail for the secondary fork brace.


Detail in place. I should mention that recently I re-learned that the front forks were the first part I started working on at the beginning of all this. It is a relief to know they're almost done, after almost 3 years, lol.

Finally getting around to the axle nut/bolt detail. Basically I fitted some detail caps onto the nuts that came with the kit, this is the rear wheel pin by the way.

Axle shaft 'bolts' added to the nuts. The plastic axle is for the front wheel. You can sort of make out the threading on the bolts which was cut in using a small metal nut of the proper size.
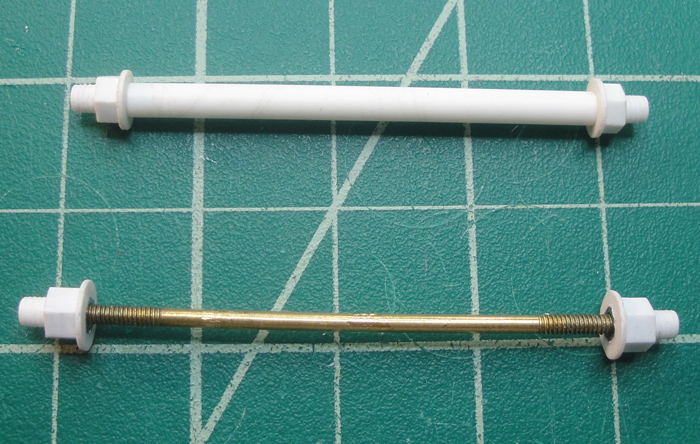
Finally, because these are axle bolts, cotter pin nut restraints.

The condenser! Here's a shot of it with the end caps in place. I also flattened the buttons in the middle in preparation for something, probably hex-nut related, to be added later. Still not sure what it will be exactly, though.

Filling in the bottom part of the cylinder.
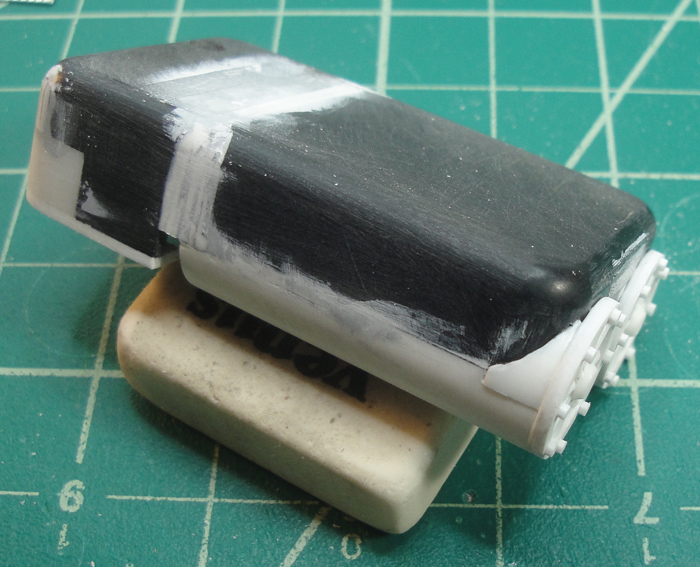
The 'receiver' further along and adding a cross-cylinder detail. As this is the underside I'm trying to keep the perspective properly aligned which means I spend a lot of time holding the piece in front of my squinting eyes, lol.

I should mention that the pics were in a real mish mash chronologically, all of this stuff was happening at the same time. I sorted them into respective sections to make it easier to follow ... for myself more than anything
Just keep swimming ...

Well, inspired by the detailing of the front forks I decided to similarly adorn the rear yoke though with much lower saturation.


Making the underside detail for the secondary fork brace.


Detail in place. I should mention that recently I re-learned that the front forks were the first part I started working on at the beginning of all this. It is a relief to know they're almost done, after almost 3 years, lol.

Finally getting around to the axle nut/bolt detail. Basically I fitted some detail caps onto the nuts that came with the kit, this is the rear wheel pin by the way.

Axle shaft 'bolts' added to the nuts. The plastic axle is for the front wheel. You can sort of make out the threading on the bolts which was cut in using a small metal nut of the proper size.

Finally, because these are axle bolts, cotter pin nut restraints.

The condenser! Here's a shot of it with the end caps in place. I also flattened the buttons in the middle in preparation for something, probably hex-nut related, to be added later. Still not sure what it will be exactly, though.

Filling in the bottom part of the cylinder.

The 'receiver' further along and adding a cross-cylinder detail. As this is the underside I'm trying to keep the perspective properly aligned which means I spend a lot of time holding the piece in front of my squinting eyes, lol.

I should mention that the pics were in a real mish mash chronologically, all of this stuff was happening at the same time. I sorted them into respective sections to make it easier to follow ... for myself more than anything

Just keep swimming ...

KatsZenJammer- Resident member

- Posts : 2600
Join date : 2016-05-20
Age : 57
Location : Vancouver, BC
 Re: Steampunk Harley - Tamiya 1/6 HD FLH Classic 'extreme' kit bash (Very Photo Heavy)
Love the pins, great work Kats. 

GaryDainton- Advanced Member

- Posts : 4433
Join date : 2014-03-06
Age : 57
Location : Bolton UK
 Re: Steampunk Harley - Tamiya 1/6 HD FLH Classic 'extreme' kit bash (Very Photo Heavy)
What better way to start a new Monday morning than with a full mug of coffee and reviewing this post from the beginning !
I am in a state of renewed flabergastation !!


**** editing, I started this reply after page 1. I stopped to make a couple of pieces of toast for breakfast and refill my mug This means I'll have drank the whole pot and will have to make another so Shazz will have some when she gets up. I'll be peeing well into lunch time !
**** editing, Holy crap! I am approaching 3 hours of reading and absorbing the photographs and only getting thru page 4! Shazz is up and I just can't do this in one setting !

I am in a state of renewed flabergastation !!


**** editing, I started this reply after page 1. I stopped to make a couple of pieces of toast for breakfast and refill my mug This means I'll have drank the whole pot and will have to make another so Shazz will have some when she gets up. I'll be peeing well into lunch time !
**** editing, Holy crap! I am approaching 3 hours of reading and absorbing the photographs and only getting thru page 4! Shazz is up and I just can't do this in one setting !

Last edited by Geezerman on Mon 01 May 2017, 2:15 pm; edited 1 time in total

Geezerman- Advanced Member

- Posts : 3651
Join date : 2013-02-24
Age : 89
Location : Gulf coast of central Florids
 Re: Steampunk Harley - Tamiya 1/6 HD FLH Classic 'extreme' kit bash (Very Photo Heavy)
Awesome work Kats....makes me think maybe you could scratch build your own 1 to 1 bike.
disabled modeler- Intermediate Member

- Posts : 979
Join date : 2016-05-22
Age : 60
Location : Quincy,IL. USA
 Re: Steampunk Harley - Tamiya 1/6 HD FLH Classic 'extreme' kit bash (Very Photo Heavy)
Muchas Gracias for the kind comments and encouragement, fellows 
Another hiatus from posting due to other projects and stuff but here we go. This first two pics are of the 'T-splitter' being added to the receiver for the condenser.


The first of the braces for the piston cylinder starts to take shape, this one will sit forward of the cylinder along the frame.

And the hiatus from building in order for me to build and paint a 'Gnome Door' for the tree in front of our place gave me an opportunity to set up the painting zone and shoot some primer onto some more of the steamcycle parts. Here's the stuff ready to be primed.
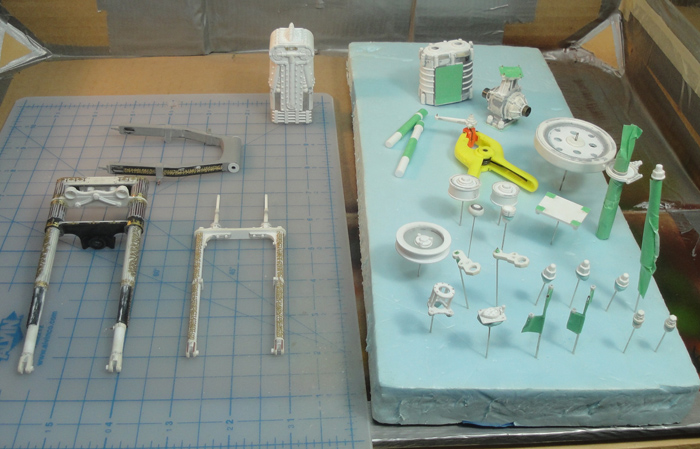
And after. It should be noted this is a 'check primer' coat, more to see the gaps I missed and the little flaws I couldn't see. Overall I was happy with the way things turned out.

Further work on the cylinder brace, trying to work in some 'flair' instead of just making it purely utilitarian.

Adding support 'bands' to the condenser set up.


The tabs to make the receiver bands look more like attached brackets.

Finally a shot of the Gnome Door, just because. The paint was almost all done with airbrush, only the initial 'primer' coat and some final dry brushing were regular brush work. The shingles were recovered scraps of textured plastic sheet, the wood was mostly scraps except for a couple of sheets of Revell Craft Plywood (the 1/16th thickness) which was used for the door planking. The decorations are old earrings and the doorknob is an old button. The hinges were formed from cheap thread pullers. All of it was given multiple layers of acrylic matte clear coat (also AB). A nice chance to get in some time playing with the airbrush and it fulfilled milady's wish, always a good thing.

And so it goes, slow progress, re-thinking, proceeding, and all that fun stuff which makes scratch building that oddly comforting combination of smooth sailing and riding the tempest. Or maybe I'm just deluding myself in order to not realize how much work I still have to do, lol.
Just keep swimming ...

Another hiatus from posting due to other projects and stuff but here we go. This first two pics are of the 'T-splitter' being added to the receiver for the condenser.


The first of the braces for the piston cylinder starts to take shape, this one will sit forward of the cylinder along the frame.

And the hiatus from building in order for me to build and paint a 'Gnome Door' for the tree in front of our place gave me an opportunity to set up the painting zone and shoot some primer onto some more of the steamcycle parts. Here's the stuff ready to be primed.

And after. It should be noted this is a 'check primer' coat, more to see the gaps I missed and the little flaws I couldn't see. Overall I was happy with the way things turned out.

Further work on the cylinder brace, trying to work in some 'flair' instead of just making it purely utilitarian.

Adding support 'bands' to the condenser set up.


The tabs to make the receiver bands look more like attached brackets.

Finally a shot of the Gnome Door, just because. The paint was almost all done with airbrush, only the initial 'primer' coat and some final dry brushing were regular brush work. The shingles were recovered scraps of textured plastic sheet, the wood was mostly scraps except for a couple of sheets of Revell Craft Plywood (the 1/16th thickness) which was used for the door planking. The decorations are old earrings and the doorknob is an old button. The hinges were formed from cheap thread pullers. All of it was given multiple layers of acrylic matte clear coat (also AB). A nice chance to get in some time playing with the airbrush and it fulfilled milady's wish, always a good thing.

And so it goes, slow progress, re-thinking, proceeding, and all that fun stuff which makes scratch building that oddly comforting combination of smooth sailing and riding the tempest. Or maybe I'm just deluding myself in order to not realize how much work I still have to do, lol.
Just keep swimming ...

KatsZenJammer- Resident member

- Posts : 2600
Join date : 2016-05-20
Age : 57
Location : Vancouver, BC
 Re: Steampunk Harley - Tamiya 1/6 HD FLH Classic 'extreme' kit bash (Very Photo Heavy)
The details are really 'popping' with the primer on Kats, the parts look really good, can't be much filling or further work to tidy them up.

GaryDainton- Advanced Member

- Posts : 4433
Join date : 2014-03-06
Age : 57
Location : Bolton UK
 Re: Steampunk Harley - Tamiya 1/6 HD FLH Classic 'extreme' kit bash (Very Photo Heavy)
Steampunk parts all look great !!
The gnome door looks like a fun thing to do. As is my habit of not throwing anything away, I have a whole sawbench shelf loaded with small scraps of wood. Might have to give the gnome thing a go !
Nice to get another update on the bike build.
Cheers,
Clay


The gnome door looks like a fun thing to do. As is my habit of not throwing anything away, I have a whole sawbench shelf loaded with small scraps of wood. Might have to give the gnome thing a go !
Nice to get another update on the bike build.
Cheers,
Clay


Geezerman- Advanced Member

- Posts : 3651
Join date : 2013-02-24
Age : 89
Location : Gulf coast of central Florids
 Re: Steampunk Harley - Tamiya 1/6 HD FLH Classic 'extreme' kit bash (Very Photo Heavy)
Domo arigato for the kind comments and encouragement 
Clay - the gnome/fairy door thing is catching on here and there, the Net has a lot of cool stuff that's not on Pinterest, lol. It is definitely fun and the neighbourhood kids (of a certain age range) get a kick out of it.
The front bracket/brace for the engine cylinder develops further - test fitting before drilling holes for pins.
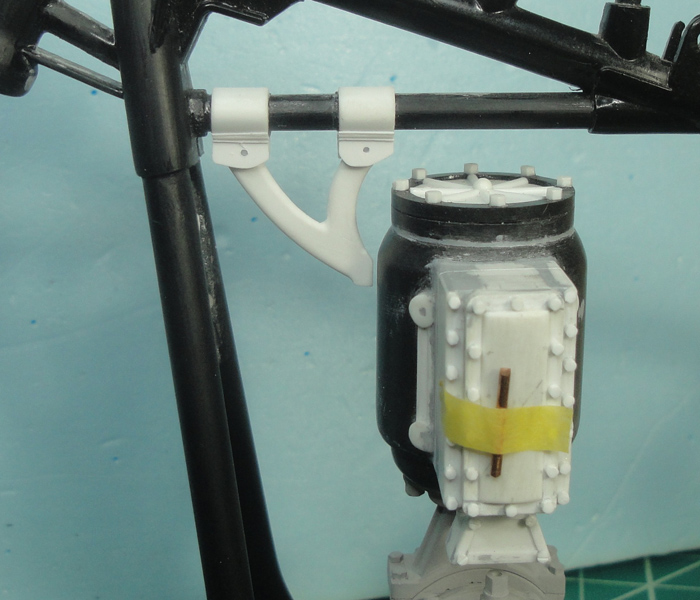
After drilling and making the bolt heads for the brass pins.

Mounting point on the cylinder body worked up. I had to use CA instead of MEK because the black plastic of the cylinder doesn't respond to MEK.


Bracket/brace in place. Using pins makes it easily removable for painting and such. There will also be another bracket/brace behind the cylinder as well.

Options for additional detail to the condenser - the bits are all from the original kit. I wound up using the black piece and the remnant from the transmission side cover, the pump looking thing will have to wait a while longer.

After modification and shaping, I liked the look though I haven't a clue what they might represent as far as actual workings go. At this time I'm thinking the feed to the boiler will come from the black piece.

With the third anniversary of this build approaching next week I thought it would be nice to have the condenser mounted to the frame even if it wasn't finished. Here's the clamp rings in place and the mounting tabs for the condenser in process.

At this point I'd put on the clamp flanges and drilled the rear two mounts.

Mounts stuck with peel off adhesive for an alignment check.

Alignment holes drilled and pieces 'tacked' into place with the tiniest amount of MEK.

Much fiddling later ... yup, it took quite a bit of tiny adjustments to get it to line up because the alignment holes were just a bit off. I also mounted the rear fender to show how small the gap is - something I had planned but I didn't think it would be so small. Oh well, thankfully the rear fender is static.

As mentioned earlier, next week is the Steamcycle Build's third birthday and per my own tradition I will be doing the Great Big Test Fit and taking pics. I hope to get some more little detail work accomplished before that but it suddenly became summer here after a miserable not-winter (some call it spring) and so it's getting busy at home and work, lol.
Just keep swimming ...

Clay - the gnome/fairy door thing is catching on here and there, the Net has a lot of cool stuff that's not on Pinterest, lol. It is definitely fun and the neighbourhood kids (of a certain age range) get a kick out of it.
The front bracket/brace for the engine cylinder develops further - test fitting before drilling holes for pins.

After drilling and making the bolt heads for the brass pins.

Mounting point on the cylinder body worked up. I had to use CA instead of MEK because the black plastic of the cylinder doesn't respond to MEK.


Bracket/brace in place. Using pins makes it easily removable for painting and such. There will also be another bracket/brace behind the cylinder as well.

Options for additional detail to the condenser - the bits are all from the original kit. I wound up using the black piece and the remnant from the transmission side cover, the pump looking thing will have to wait a while longer.

After modification and shaping, I liked the look though I haven't a clue what they might represent as far as actual workings go. At this time I'm thinking the feed to the boiler will come from the black piece.

With the third anniversary of this build approaching next week I thought it would be nice to have the condenser mounted to the frame even if it wasn't finished. Here's the clamp rings in place and the mounting tabs for the condenser in process.

At this point I'd put on the clamp flanges and drilled the rear two mounts.

Mounts stuck with peel off adhesive for an alignment check.

Alignment holes drilled and pieces 'tacked' into place with the tiniest amount of MEK.

Much fiddling later ... yup, it took quite a bit of tiny adjustments to get it to line up because the alignment holes were just a bit off. I also mounted the rear fender to show how small the gap is - something I had planned but I didn't think it would be so small. Oh well, thankfully the rear fender is static.

As mentioned earlier, next week is the Steamcycle Build's third birthday and per my own tradition I will be doing the Great Big Test Fit and taking pics. I hope to get some more little detail work accomplished before that but it suddenly became summer here after a miserable not-winter (some call it spring) and so it's getting busy at home and work, lol.
Just keep swimming ...

KatsZenJammer- Resident member

- Posts : 2600
Join date : 2016-05-20
Age : 57
Location : Vancouver, BC
 Re: Steampunk Harley - Tamiya 1/6 HD FLH Classic 'extreme' kit bash (Very Photo Heavy)
Steady progress and sublime work, very much looking forward to the test fit.

GaryDainton- Advanced Member

- Posts : 4433
Join date : 2014-03-06
Age : 57
Location : Bolton UK
 Re: Steampunk Harley - Tamiya 1/6 HD FLH Classic 'extreme' kit bash (Very Photo Heavy)
Each installment is SO welcomed !
Looking forward to the anniversary photo.


Looking forward to the anniversary photo.


Geezerman- Advanced Member

- Posts : 3651
Join date : 2013-02-24
Age : 89
Location : Gulf coast of central Florids
 Re: Steampunk Harley - Tamiya 1/6 HD FLH Classic 'extreme' kit bash (Very Photo Heavy)
Loving every update. Wonderful stuff.
Guest- Guest
 The Steamcycle's 3rd Birthday
Danke Schoen for the kind comments and encouragement guys! 
Well, before the day I managed to get in some work on the condenser. Here's some inset slotted hex bolt heads.

And some more hex nuts, lol, including the bigger water feed receptacle.

Happy Third Birthday! Actually the official start date is May 29th, 2014, but I'm working that day, lol. We start with the top down view ...

Followed by the pirouette ...


Finally a couple of close in shots of the mechanicals - you can sort of see the little flint striker sitting by the flywheel.


There's still a bit of detailing to the condenser to go yet - at this point I feel like I'm cresting a rather large hill. Oh, there's still lots of stuff to do yet, the water pump and assorted other plumbing plus linkages, belts, gears and what not. And of course the water and fuel tanks plus all the pressure gauges, valves, exhaust and sundry bits.
Then after that, or perhaps even during, will be the remaining accessories which will hopefully include a rifle, pistol, knife, gloves, brass goggles (de rigueur in the Steampunk realm), maybe a hat and then the tools which will include the starter for the boiler (a fireplace poker with a wad of oil soaked material tied to the end), wrenches, pliers, screwdrivers, maybe some socket wrenches, hammer and anything else which catches my fancy. Plus the 'bedrolls' or saddlebags which will be compact and affixed to various parts of the frame where I can fit them on but these will be add ons and so I won't be making them 'integral' to the cycle itself.
And that blank, bare, empty right handlebar is making me wonder about what sort of accessorizing I might pull off to make it more busy. I've already ruled out things like a brake lever, throttle control or anything like that due to the nature of the set up. I was going to put the flint striker there but it proved to be too big to mount properly. Maybe a small kit bag or something - further consideration is definitely required.
Anyway, thanks to everyone who's followed along this far. Three years seems like a long time (because it is) but it's really been three years of weekends with occasional mid week work. That and the limitations of my work space have insured that this sort of thing will take longer than I expect. I'm hoping that by the 4th Birthday I'll have started painting in earnest though I feel it would be too much to ask to have this completed by then. But one never knows what's over that hill until one gets there ... maybe I'll be given a blessing by the Goddess of Craftwork ...
Just Keep Swimming ...

Well, before the day I managed to get in some work on the condenser. Here's some inset slotted hex bolt heads.

And some more hex nuts, lol, including the bigger water feed receptacle.

Happy Third Birthday! Actually the official start date is May 29th, 2014, but I'm working that day, lol. We start with the top down view ...

Followed by the pirouette ...


Finally a couple of close in shots of the mechanicals - you can sort of see the little flint striker sitting by the flywheel.


There's still a bit of detailing to the condenser to go yet - at this point I feel like I'm cresting a rather large hill. Oh, there's still lots of stuff to do yet, the water pump and assorted other plumbing plus linkages, belts, gears and what not. And of course the water and fuel tanks plus all the pressure gauges, valves, exhaust and sundry bits.
Then after that, or perhaps even during, will be the remaining accessories which will hopefully include a rifle, pistol, knife, gloves, brass goggles (de rigueur in the Steampunk realm), maybe a hat and then the tools which will include the starter for the boiler (a fireplace poker with a wad of oil soaked material tied to the end), wrenches, pliers, screwdrivers, maybe some socket wrenches, hammer and anything else which catches my fancy. Plus the 'bedrolls' or saddlebags which will be compact and affixed to various parts of the frame where I can fit them on but these will be add ons and so I won't be making them 'integral' to the cycle itself.
And that blank, bare, empty right handlebar is making me wonder about what sort of accessorizing I might pull off to make it more busy. I've already ruled out things like a brake lever, throttle control or anything like that due to the nature of the set up. I was going to put the flint striker there but it proved to be too big to mount properly. Maybe a small kit bag or something - further consideration is definitely required.
Anyway, thanks to everyone who's followed along this far. Three years seems like a long time (because it is) but it's really been three years of weekends with occasional mid week work. That and the limitations of my work space have insured that this sort of thing will take longer than I expect. I'm hoping that by the 4th Birthday I'll have started painting in earnest though I feel it would be too much to ask to have this completed by then. But one never knows what's over that hill until one gets there ... maybe I'll be given a blessing by the Goddess of Craftwork ...
Just Keep Swimming ...

KatsZenJammer- Resident member

- Posts : 2600
Join date : 2016-05-20
Age : 57
Location : Vancouver, BC
 Re: Steampunk Harley - Tamiya 1/6 HD FLH Classic 'extreme' kit bash (Very Photo Heavy)
That looks absolutely fantastic Kats. How about a rear view mirror on the handlebar?

GaryDainton- Advanced Member

- Posts : 4433
Join date : 2014-03-06
Age : 57
Location : Bolton UK
 Re: Steampunk Harley - Tamiya 1/6 HD FLH Classic 'extreme' kit bash (Very Photo Heavy)
Fantastic project !!
The foresight and the skill making all thee parts is to be envied !
Thank you for sharing !!!


The foresight and the skill making all thee parts is to be envied !
Thank you for sharing !!!


Geezerman- Advanced Member

- Posts : 3651
Join date : 2013-02-24
Age : 89
Location : Gulf coast of central Florids
 Re: Steampunk Harley - Tamiya 1/6 HD FLH Classic 'extreme' kit bash (Very Photo Heavy)
Dank u wel for the kind comments and encouragement 
Gary - a mirror ... this definitely gave me reason to smack my delinquent brain, lol. So obvious yet I fell right into a huge blind spot, pun intended.
Thank you for the heads up
So while the old subconscious and conscious both mulled over upcoming parts and the logistics of it all (and beat itself up over not having thought of a mirror) I worked up the rear brace for the engine cylinder. Pretty much the same techniques as the front brace with only a single arm instead of two.


After a lot of thinking I figured it would be best to work up the tanks and associated bits, or at least get a start on that stuff.

The first of the major cuts.
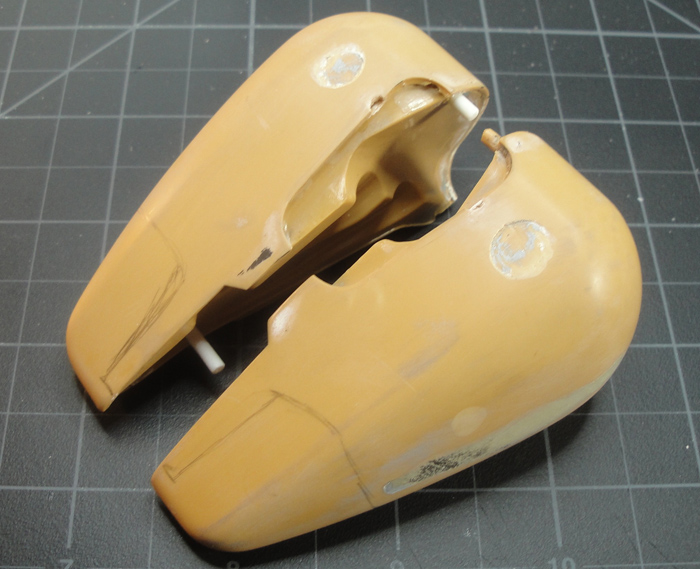

The bottom cut away.

More stuff from the Bugatti - wheel tubs cut loose to add to the tank.


The reduction of the tanks is to accommodate the shifter(s) which will sit in close to the saddle on the right side. I'm still mulling over options for gap on the left side which will result. Although I've tried to maintain symmetry on the rear portions I'm thinking the fronts might wind up asymmetrical. The inner panels extending back from the curve will eventually be cut away - but first I need to work up a new way to secure the rear half to the frame. After that comes the front mount points ...
Just keep swimming ...

Gary - a mirror ... this definitely gave me reason to smack my delinquent brain, lol. So obvious yet I fell right into a huge blind spot, pun intended.
Thank you for the heads up

So while the old subconscious and conscious both mulled over upcoming parts and the logistics of it all (and beat itself up over not having thought of a mirror) I worked up the rear brace for the engine cylinder. Pretty much the same techniques as the front brace with only a single arm instead of two.


After a lot of thinking I figured it would be best to work up the tanks and associated bits, or at least get a start on that stuff.

The first of the major cuts.


The bottom cut away.

More stuff from the Bugatti - wheel tubs cut loose to add to the tank.


The reduction of the tanks is to accommodate the shifter(s) which will sit in close to the saddle on the right side. I'm still mulling over options for gap on the left side which will result. Although I've tried to maintain symmetry on the rear portions I'm thinking the fronts might wind up asymmetrical. The inner panels extending back from the curve will eventually be cut away - but first I need to work up a new way to secure the rear half to the frame. After that comes the front mount points ...
Just keep swimming ...

KatsZenJammer- Resident member

- Posts : 2600
Join date : 2016-05-20
Age : 57
Location : Vancouver, BC
 Re: Steampunk Harley - Tamiya 1/6 HD FLH Classic 'extreme' kit bash (Very Photo Heavy)
Brilliant work on the tank Kats, I feel you have reached a point in the build where real progress can be seen with every additional update (hope you feel the same lol). Although an epic project, forward momentum can clearly be seen to be maintained.
Here's to the next update.
Here's to the next update.


GaryDainton- Advanced Member

- Posts : 4433
Join date : 2014-03-06
Age : 57
Location : Bolton UK
 Re: Steampunk Harley - Tamiya 1/6 HD FLH Classic 'extreme' kit bash (Very Photo Heavy)
Boy ! This update takes anticipation to an exciting new high !!
I am anxious to see what Steampunk gadgetry will be added to that tank as well as other areas !!!
MAN, this is so COOL !!!


I am anxious to see what Steampunk gadgetry will be added to that tank as well as other areas !!!
MAN, this is so COOL !!!


Geezerman- Advanced Member

- Posts : 3651
Join date : 2013-02-24
Age : 89
Location : Gulf coast of central Florids
 Re: Steampunk Harley - Tamiya 1/6 HD FLH Classic 'extreme' kit bash (Very Photo Heavy)
Thanks muchly for the kind comments and encouragement, guys 
Some additional detail added to the condenser, which is almost done. Which is to say the further detailing is still being mulled over, lol.

Starting the filling in of the gaps. Not sure about what kind of Steampunk detailing will come but one of the things planned is to modify the front end of the left side tank ... a weird idea which is evolving slowly at this time.

Early stage of laminating bits of thin styrene sheet and you can see the new rear tank mount taking shape.

Tank mounting tabs being added
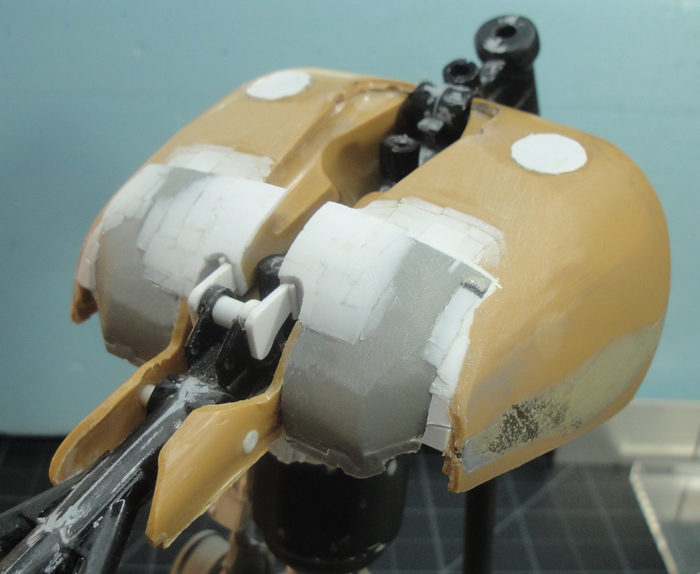
Posts affixed after much fiddling and adjusting - the usual obstacles, lol.

Filling in the gap which the speedometer assembly sits on top of. I'm still wanting to use the kit speedo set up with slight mods - it has a Steampunk look already. But the mounting/setting will be done differently.

Cutting off the kit rear mounts and filling the space in the frame. The hole is large enough that I used both MEK and CA for stability.

Filling/laminating continues.

From here will be the bottom of the tanks as well as the previously mentioned front of the left tank. Also, although I mentioned I was thinking about the tank detailing I'm pretty sure that the decorative side of it will be more of the PE I used on the forks. The functional bits are still mentally unformed, I'm hoping time will help clear the fog.
Just keep swimming ...

Some additional detail added to the condenser, which is almost done. Which is to say the further detailing is still being mulled over, lol.

Starting the filling in of the gaps. Not sure about what kind of Steampunk detailing will come but one of the things planned is to modify the front end of the left side tank ... a weird idea which is evolving slowly at this time.

Early stage of laminating bits of thin styrene sheet and you can see the new rear tank mount taking shape.

Tank mounting tabs being added

Posts affixed after much fiddling and adjusting - the usual obstacles, lol.

Filling in the gap which the speedometer assembly sits on top of. I'm still wanting to use the kit speedo set up with slight mods - it has a Steampunk look already. But the mounting/setting will be done differently.

Cutting off the kit rear mounts and filling the space in the frame. The hole is large enough that I used both MEK and CA for stability.

Filling/laminating continues.

From here will be the bottom of the tanks as well as the previously mentioned front of the left tank. Also, although I mentioned I was thinking about the tank detailing I'm pretty sure that the decorative side of it will be more of the PE I used on the forks. The functional bits are still mentally unformed, I'm hoping time will help clear the fog.
Just keep swimming ...

KatsZenJammer- Resident member

- Posts : 2600
Join date : 2016-05-20
Age : 57
Location : Vancouver, BC
 Re: Steampunk Harley - Tamiya 1/6 HD FLH Classic 'extreme' kit bash (Very Photo Heavy)
Stirling work Kats. 


GaryDainton- Advanced Member

- Posts : 4433
Join date : 2014-03-06
Age : 57
Location : Bolton UK

Geezerman- Advanced Member

- Posts : 3651
Join date : 2013-02-24
Age : 89
Location : Gulf coast of central Florids
 Re: Steampunk Harley - Tamiya 1/6 HD FLH Classic 'extreme' kit bash (Very Photo Heavy)
Many thanks for the kind comments and encouragement, fellows 
Not surprisingly there's been some work but not too many photo worthy moments as the work has mostly been laminating, filing, sanding, repeat endlessly. Slow as it has been, the rear bottom portions have finally been added. These were parts from the front bottom of the tanks relocated and Frankensteined in place.

A view of the topsides after I'd reached the point of putty.

More of the underside starts developing. The inserts were hacked from the original tank bottoms, resized and so forth.

While waiting for glue to cure I started on the left side tank asymmetry mod. I cut the circle piece from the kit's primary drive cover, the bits of ring from the old headlight shroud and I'm considering incorporating the engine piece also shown - though the jury's still debating at this point.

Test fit of the circle bit - the plan is to make this the top of a cylindrical tank for fuel while the rear portion of the tank set up will be for extra water.

Summer heat has hit hard so I've been wilting quite a bit ... me no like too hot, lol. Plus the increase in doing other stuff associated with good weather has slowed me down, but I've got no complaints. I'm using the opportunity to let the brain wander freely for a bit, maybe something interesting will result
Just keep swimming ...

Not surprisingly there's been some work but not too many photo worthy moments as the work has mostly been laminating, filing, sanding, repeat endlessly. Slow as it has been, the rear bottom portions have finally been added. These were parts from the front bottom of the tanks relocated and Frankensteined in place.

A view of the topsides after I'd reached the point of putty.

More of the underside starts developing. The inserts were hacked from the original tank bottoms, resized and so forth.

While waiting for glue to cure I started on the left side tank asymmetry mod. I cut the circle piece from the kit's primary drive cover, the bits of ring from the old headlight shroud and I'm considering incorporating the engine piece also shown - though the jury's still debating at this point.

Test fit of the circle bit - the plan is to make this the top of a cylindrical tank for fuel while the rear portion of the tank set up will be for extra water.

Summer heat has hit hard so I've been wilting quite a bit ... me no like too hot, lol. Plus the increase in doing other stuff associated with good weather has slowed me down, but I've got no complaints. I'm using the opportunity to let the brain wander freely for a bit, maybe something interesting will result

Just keep swimming ...

KatsZenJammer- Resident member

- Posts : 2600
Join date : 2016-05-20
Age : 57
Location : Vancouver, BC
 Re: Steampunk Harley - Tamiya 1/6 HD FLH Classic 'extreme' kit bash (Very Photo Heavy)
The tank is really coming together, great stuff Kats.

GaryDainton- Advanced Member

- Posts : 4433
Join date : 2014-03-06
Age : 57
Location : Bolton UK
 Re: Steampunk Harley - Tamiya 1/6 HD FLH Classic 'extreme' kit bash (Very Photo Heavy)
As usual, each much anticipated update adds to how utterly cool this project is !!
Thanks for sharing !


Thanks for sharing !


Geezerman- Advanced Member

- Posts : 3651
Join date : 2013-02-24
Age : 89
Location : Gulf coast of central Florids
 Re: Steampunk Harley - Tamiya 1/6 HD FLH Classic 'extreme' kit bash (Very Photo Heavy)
Thanks for the kind comments and encouragement! 
Well, more of the same in terms of work on the tank - which is to say, lots of not-photo-worthy repetition and stuff but every now and again I snapped a shot of the progress.
Starting with the work on the bottoms, this first shot shows how a desire for symmetry can mess with the plans. I wasn't thinking clearly one late night and it was only the next day I realized my error.

And a view after the correction. You can see how the 'insets' are not symmetrical which was the plan to begin with, lol.

Filling in gaps and starting to develop the cylindrical fuel tank portion.

More filling and also utilizing cut off bits for the front curve of the primary water tank.

Continuing the front curve on the primary water tank and starting the 'offset' on the fuel tank cylinder.

Rounding the curve on the primary water tank and wondering if I needed more on the fuel tank.

And more filling in and setting up shapes for further development. Plus I added another layer to the fuel tank which seems to be sufficient.

As you can guess a lot of the 'slowness' of this part is simply working out the curves. The cylinder was easy, just glue in bunches of square rod at first followed by layers of strips laminated over it. The primary water tank curves are a bit more tetchy, one of the methods I've been using is to get a rough fit, affix piece with MEK then reinforce with gobbets of CA. The CA works pretty good as it is harder than putty and helps reinforce the seams. I'm hoping the experience with the primary water tank will help when I get to underside of the fuel cylinder tank portion.
Just keep swimming ...

Well, more of the same in terms of work on the tank - which is to say, lots of not-photo-worthy repetition and stuff but every now and again I snapped a shot of the progress.
Starting with the work on the bottoms, this first shot shows how a desire for symmetry can mess with the plans. I wasn't thinking clearly one late night and it was only the next day I realized my error.

And a view after the correction. You can see how the 'insets' are not symmetrical which was the plan to begin with, lol.

Filling in gaps and starting to develop the cylindrical fuel tank portion.

More filling and also utilizing cut off bits for the front curve of the primary water tank.

Continuing the front curve on the primary water tank and starting the 'offset' on the fuel tank cylinder.

Rounding the curve on the primary water tank and wondering if I needed more on the fuel tank.

And more filling in and setting up shapes for further development. Plus I added another layer to the fuel tank which seems to be sufficient.

As you can guess a lot of the 'slowness' of this part is simply working out the curves. The cylinder was easy, just glue in bunches of square rod at first followed by layers of strips laminated over it. The primary water tank curves are a bit more tetchy, one of the methods I've been using is to get a rough fit, affix piece with MEK then reinforce with gobbets of CA. The CA works pretty good as it is harder than putty and helps reinforce the seams. I'm hoping the experience with the primary water tank will help when I get to underside of the fuel cylinder tank portion.
Just keep swimming ...

KatsZenJammer- Resident member

- Posts : 2600
Join date : 2016-05-20
Age : 57
Location : Vancouver, BC
Page 13 of 25 •  1 ... 8 ... 12, 13, 14 ... 19 ... 25
 Similar topics
» A Steamcycle - an extreme kit bash/scratch build
» Tamiya 1/6 Harley Davidson Fat Boy Lo
» Tamiya 1/6 Harley Davidson FLH1200
» Steampunk Ducati
» '57 Salvage bash-up
» Tamiya 1/6 Harley Davidson Fat Boy Lo
» Tamiya 1/6 Harley Davidson FLH1200
» Steampunk Ducati
» '57 Salvage bash-up
Page 13 of 25
Permissions in this forum:
You cannot reply to topics in this forum