Steampunk Harley - Tamiya 1/6 HD FLH Classic 'extreme' kit bash (Very Photo Heavy)
+17
Geezerman
GaryDainton
Mence
RetiredMike
Nipponrookie
Mr Hirakawa
Ace
kpnuts
hotrodmax
Skid
dublin boy
harron68
disabled modeler
Speed Racer 65
KatsZenJammer
Shelby
A5h
21 posters
Page 25 of 25
Page 25 of 25 •  1 ... 14 ... 23, 24, 25
disabled modeler- Intermediate Member

- Posts : 979
Join date : 2016-05-22
Age : 60
Location : Quincy,IL. USA
 Re: Steampunk Harley - Tamiya 1/6 HD FLH Classic 'extreme' kit bash (Very Photo Heavy)
Outstanding work, sir!

RetiredMike- Advanced Member

- Posts : 3525
Join date : 2013-04-27
Age : 73
Location : Valparaiso, Indiana
 Re: Steampunk Harley - Tamiya 1/6 HD FLH Classic 'extreme' kit bash (Very Photo Heavy)
Many thanks for the kind comments and encouragement, gentlemen 
Well, it is pretty much the 5th Anniversary of this concept - though I did not actually start in on the 'build' until May 29, 2014 some Facebook Memories have reminded me that I was percolating some sort of insane, involved and incredibly troublesome ideas the week before.
As it turns out the Great Big Test Fit thing will not be happening for this anniversary due to the fact that the Final Assembly demands a different approach so I will try to post up a round of 'show off' photos later though the steam cycle will not be complete.
Got the secondary drive belt on without too much grief. The leather kind of bows upwards off the sprockets but a bit of double sided (ATG) tape helps to settle them in a little better.

The tanks go on. Also, the majority of the plumbing is now in place. Still missing in these photos is the upper part of the front brake cable, the rear view mirror, the console and the fenders. The rear fender will have to wait a while to be emplaced as I need to complete the tail lamp and mount it before affixing the fender to the frame.
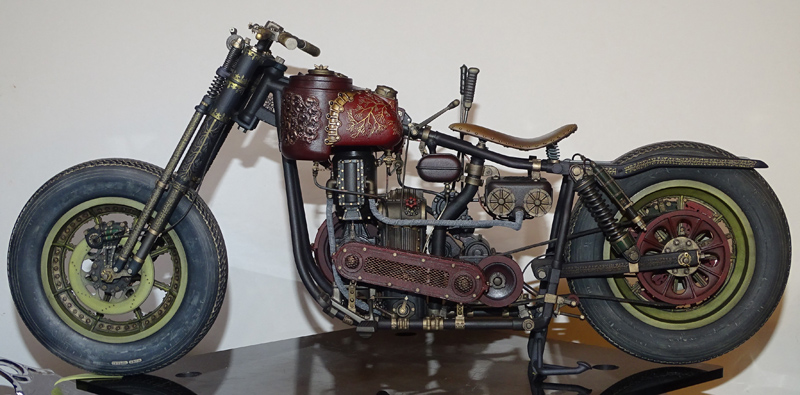

Lamp bits with base coats. The two reflector dishes got Alclad pale gold, the front lamp got Vallejo brass and the rear lamp got Vallejo steel.

After a coat of clear matte (clear gloss on the reflectors) the initial hand brush dirtying gets done. From here will be the shading and selective glossing and so on.

Usually in these postscripts I babble on about plans, but life has been throwing busy at me so the only plans I have are to try to complete this thing without wrecking it. Eventually there will be need to think about the dio base and accessories but until then I will stay focused on the impending end of this extended journey.
And as a way to celebrate May 29th as the 'official' anniversary day milady and I will be dining with an old friend I haven't seen in person in over 30 years - she's been living in Glasgow for most of that time. So I might end up posting the 'brag shots' either before or after the day itself.
Good lord ... it feels weird to be this close to the finish.
Nothing exceeds like excess.

Well, it is pretty much the 5th Anniversary of this concept - though I did not actually start in on the 'build' until May 29, 2014 some Facebook Memories have reminded me that I was percolating some sort of insane, involved and incredibly troublesome ideas the week before.
As it turns out the Great Big Test Fit thing will not be happening for this anniversary due to the fact that the Final Assembly demands a different approach so I will try to post up a round of 'show off' photos later though the steam cycle will not be complete.
Got the secondary drive belt on without too much grief. The leather kind of bows upwards off the sprockets but a bit of double sided (ATG) tape helps to settle them in a little better.

The tanks go on. Also, the majority of the plumbing is now in place. Still missing in these photos is the upper part of the front brake cable, the rear view mirror, the console and the fenders. The rear fender will have to wait a while to be emplaced as I need to complete the tail lamp and mount it before affixing the fender to the frame.


Lamp bits with base coats. The two reflector dishes got Alclad pale gold, the front lamp got Vallejo brass and the rear lamp got Vallejo steel.

After a coat of clear matte (clear gloss on the reflectors) the initial hand brush dirtying gets done. From here will be the shading and selective glossing and so on.

Usually in these postscripts I babble on about plans, but life has been throwing busy at me so the only plans I have are to try to complete this thing without wrecking it. Eventually there will be need to think about the dio base and accessories but until then I will stay focused on the impending end of this extended journey.
And as a way to celebrate May 29th as the 'official' anniversary day milady and I will be dining with an old friend I haven't seen in person in over 30 years - she's been living in Glasgow for most of that time. So I might end up posting the 'brag shots' either before or after the day itself.
Good lord ... it feels weird to be this close to the finish.
Nothing exceeds like excess.

KatsZenJammer- Resident member

- Posts : 2600
Join date : 2016-05-20
Age : 57
Location : Vancouver, BC
 Re: Steampunk Harley - Tamiya 1/6 HD FLH Classic 'extreme' kit bash (Very Photo Heavy)
Looks absolutely amazing, ill watch out for the 'brag shots' 

GaryDainton- Advanced Member

- Posts : 4433
Join date : 2014-03-06
Age : 57
Location : Bolton UK
 Re: Steampunk Harley - Tamiya 1/6 HD FLH Classic 'extreme' kit bash (Very Photo Heavy)
Absolutly OUTSTANDING Katz, this simply ROCKS! I'm really digging all the colours.
Guest- Guest
 Re: Steampunk Harley - Tamiya 1/6 HD FLH Classic 'extreme' kit bash (Very Photo Heavy)
Thank you for the years of kind comments and encouragement, everyone 
The Fifth Anniversary
Though all the parts are not yet assembled I decided to do the anniversary thing with what exists as is. Not included are the fenders, lamps and the rear view mirror. And it felt correct to have it sitting on the dio base, also as it exists at this time. So without further ado ...

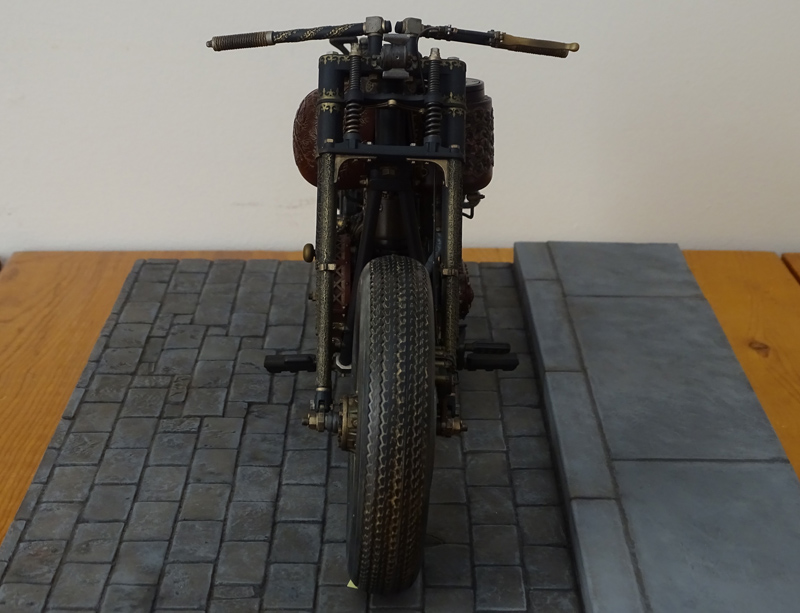


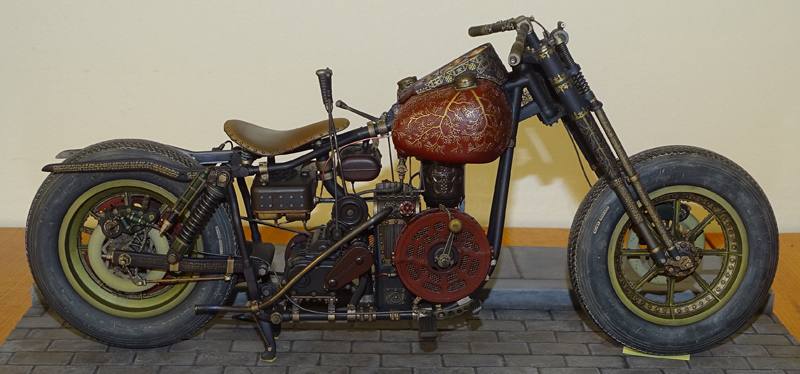
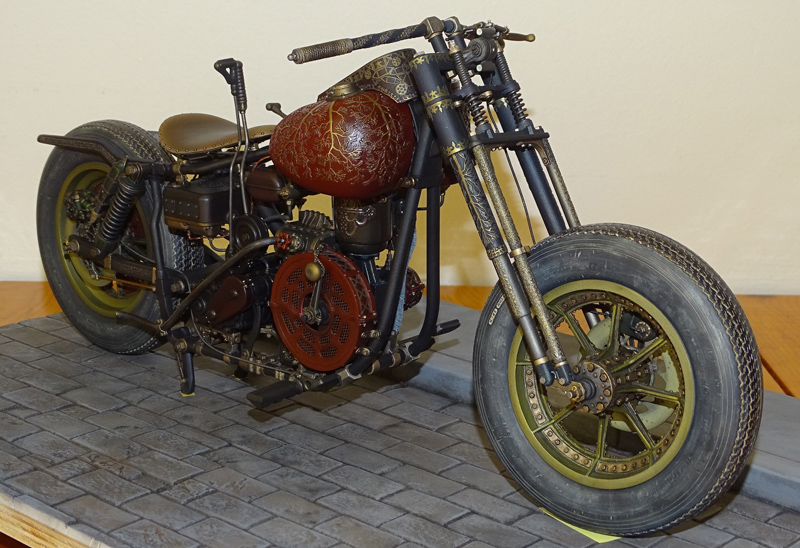
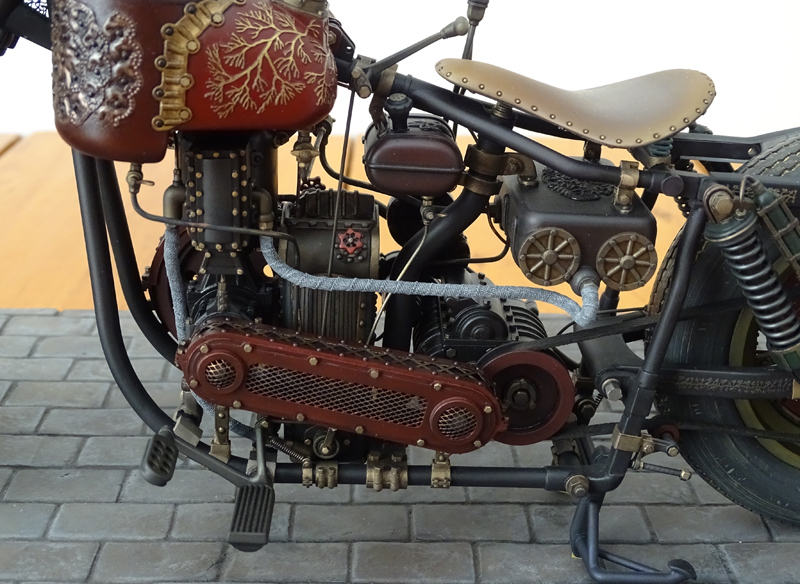

Five years - it is kind of nuts, truly. The auto flash chose not to fire on some of the shots hence the differences in brightness and contrast. The observant will note that the alignment of the steamcycle to the kerb is in accordance with the UK way of driving. And I don't like to brag, so I won't. It's enough to state that I am feeling very good about how this is turning out.
No progress shots of the lamps yet, this has been one busy week and so I'm hoping to sneak in some work bench time this weekend.
And that means that soon I will finally be able to mark this build as complete - the dio and accessories are a different matter.
Nothing exceeds like excess.

The Fifth Anniversary
Though all the parts are not yet assembled I decided to do the anniversary thing with what exists as is. Not included are the fenders, lamps and the rear view mirror. And it felt correct to have it sitting on the dio base, also as it exists at this time. So without further ado ...


Five years - it is kind of nuts, truly. The auto flash chose not to fire on some of the shots hence the differences in brightness and contrast. The observant will note that the alignment of the steamcycle to the kerb is in accordance with the UK way of driving. And I don't like to brag, so I won't. It's enough to state that I am feeling very good about how this is turning out.
No progress shots of the lamps yet, this has been one busy week and so I'm hoping to sneak in some work bench time this weekend.
And that means that soon I will finally be able to mark this build as complete - the dio and accessories are a different matter.
Nothing exceeds like excess.

KatsZenJammer- Resident member

- Posts : 2600
Join date : 2016-05-20
Age : 57
Location : Vancouver, BC
 Re: Steampunk Harley - Tamiya 1/6 HD FLH Classic 'extreme' kit bash (Very Photo Heavy)
Absolutely stunning Kats, I don't want to sow any seeds of complication but have you considered LED's in the lamps, I have seen flickering ones that would simulate candles and look like a carriage lamp.
Sorry lol.
Sorry lol.

GaryDainton- Advanced Member

- Posts : 4433
Join date : 2014-03-06
Age : 57
Location : Bolton UK

RetiredMike- Advanced Member

- Posts : 3525
Join date : 2013-04-27
Age : 73
Location : Valparaiso, Indiana
 Re: Steampunk Harley - Tamiya 1/6 HD FLH Classic 'extreme' kit bash (Very Photo Heavy)
incredible.......only word i can come up with

beowulf- Resident member

- Posts : 2469
Join date : 2013-05-02
Age : 63
Location : Monkey Hanger Town, UK
 Re: Steampunk Harley - Tamiya 1/6 HD FLH Classic 'extreme' kit bash (Very Photo Heavy)
A great big Thank You for years of support and encouragement during my personal odyssey 
Gary - actually we discussed LED's before, probably during the Voyager lighting you did. I loved the flickering light idea but the intention of the 'presentation' was that the steam cycle was parked, possibly being maintenanced. And those lamps took so long to make as it was that I didn't want to spend an additional 3 to 4 months wiring them up, lol.
And after so long it is now time for ...
The Last WIP Post!
This is a chunky one - we begin with the tail lamp parts after shading grey and some more brush dirtying.

The head lamp parts at the same stage of development.

Tail lamp parts at the ready for assembly stage.
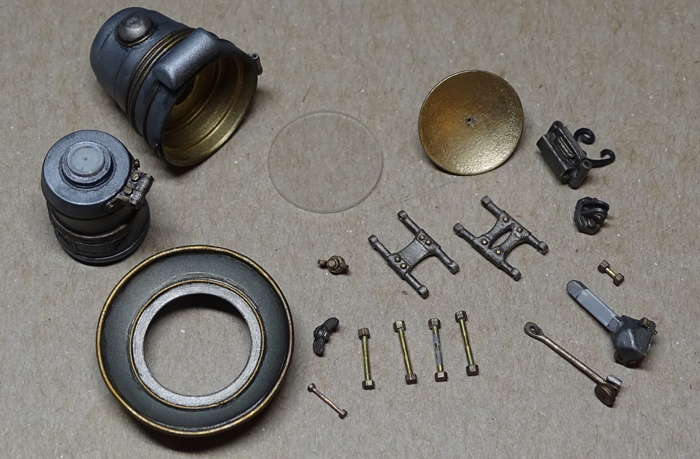
Assembled and ready to mount.


Mounting the tail lamp mount to the rear fender.

Mounted. The only other thing is to get some semi gloss black onto the exposed plastic portions and the rear fender is ready to go on.

The head lamp parts at the ready to assemble stage.

And assembled.


Head lamp mounted.

Front fender in place.

Rear fender in place - two views of the mostly complete assembly.


Rear view mirror in place and the assembly is now complete *insert sounds of disbelief*
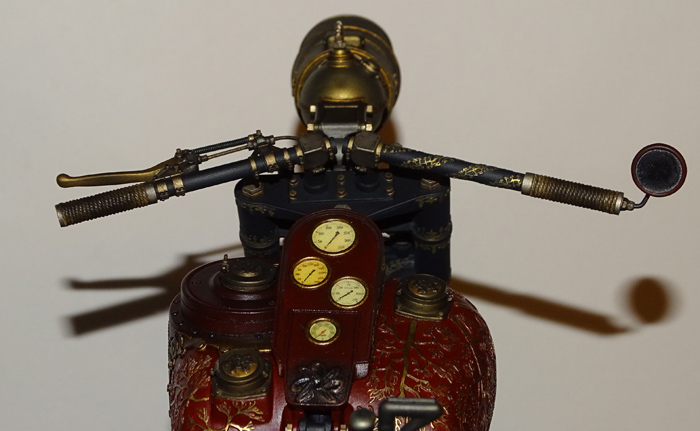
And that's it for this WIP. All that's left is the detail dirtying and staining, coverage of glue shine and stuff like that so the next set of pics will be in the complete model category, a first for me.
Overall I am very happy with how it came together at the end. Given that this was a freestyle sort of build there was never any certainty that things would work the way I hoped, even during final assembly. The sense of relief at this point is very palatable and welcome.
That and the passionate conviction that I will never ever take on such a long and involved project in the future
Thanks again for the steady support and encouragement.
The End

Gary - actually we discussed LED's before, probably during the Voyager lighting you did. I loved the flickering light idea but the intention of the 'presentation' was that the steam cycle was parked, possibly being maintenanced. And those lamps took so long to make as it was that I didn't want to spend an additional 3 to 4 months wiring them up, lol.
And after so long it is now time for ...
The Last WIP Post!
This is a chunky one - we begin with the tail lamp parts after shading grey and some more brush dirtying.

The head lamp parts at the same stage of development.

Tail lamp parts at the ready for assembly stage.

Assembled and ready to mount.


Mounting the tail lamp mount to the rear fender.

Mounted. The only other thing is to get some semi gloss black onto the exposed plastic portions and the rear fender is ready to go on.

The head lamp parts at the ready to assemble stage.

And assembled.


Head lamp mounted.

Front fender in place.

Rear fender in place - two views of the mostly complete assembly.


Rear view mirror in place and the assembly is now complete *insert sounds of disbelief*

And that's it for this WIP. All that's left is the detail dirtying and staining, coverage of glue shine and stuff like that so the next set of pics will be in the complete model category, a first for me.
Overall I am very happy with how it came together at the end. Given that this was a freestyle sort of build there was never any certainty that things would work the way I hoped, even during final assembly. The sense of relief at this point is very palatable and welcome.
That and the passionate conviction that I will never ever take on such a long and involved project in the future

Thanks again for the steady support and encouragement.
The End

KatsZenJammer- Resident member

- Posts : 2600
Join date : 2016-05-20
Age : 57
Location : Vancouver, BC
 Re: Steampunk Harley - Tamiya 1/6 HD FLH Classic 'extreme' kit bash (Very Photo Heavy)
Simply stunning Kats, a triumphant build of epic proportion. I cant wit to see the completed model on the base, you should be incredibly proud of this piece my friend.

GaryDainton- Advanced Member

- Posts : 4433
Join date : 2014-03-06
Age : 57
Location : Bolton UK
 Re: Steampunk Harley - Tamiya 1/6 HD FLH Classic 'extreme' kit bash (Very Photo Heavy)
Simply stunning, an extraordinary achievement Katz!
Guest- Guest
 Re: Steampunk Harley - Tamiya 1/6 HD FLH Classic 'extreme' kit bash (Very Photo Heavy)
Congratulations on an epic build. An odyssey of fantastic detailing. The front headlamp is superb.


RetiredMike- Advanced Member

- Posts : 3525
Join date : 2013-04-27
Age : 73
Location : Valparaiso, Indiana
 Re: Steampunk Harley - Tamiya 1/6 HD FLH Classic 'extreme' kit bash (Very Photo Heavy)
Incredible work my friend 

kpnuts- Resident member

- Posts : 1676
Join date : 2015-01-29
 Re: Steampunk Harley - Tamiya 1/6 HD FLH Classic 'extreme' kit bash (Very Photo Heavy)
i so appreciate you sharing this with all of us. So many times i have seen others start ambitious projects like this never to see them completed. It was an amazing journey and the end result does not disappoint. Bravo to you Kats and your awesome steam punk Harley.

Speed Racer 65- Intermediate Member

- Posts : 865
Join date : 2015-08-06
Location : Louisville KY
 Re: Steampunk Harley - Tamiya 1/6 HD FLH Classic 'extreme' kit bash (Very Photo Heavy)
Sure would like to see the finished model.
Sam- Resident member

- Posts : 2016
Join date : 2013-02-23
Age : 57
Location : Back in Toledo, Oregon
Ron234 likes this post
Page 25 of 25 •  1 ... 14 ... 23, 24, 25
 Similar topics
» A Steamcycle - an extreme kit bash/scratch build
» Tamiya 1/6 Harley Davidson Fat Boy Lo
» Tamiya 1/6 Harley Davidson FLH1200
» Steampunk Ducati
» '57 Salvage bash-up
» Tamiya 1/6 Harley Davidson Fat Boy Lo
» Tamiya 1/6 Harley Davidson FLH1200
» Steampunk Ducati
» '57 Salvage bash-up
Page 25 of 25
Permissions in this forum:
You cannot reply to topics in this forum