
Steampunk Harley - Tamiya 1/6 HD FLH Classic 'extreme' kit bash (Very Photo Heavy)
Page 23 of 25 •  1 ... 13 ... 22, 23, 24, 25
 ![]()
Re: Steampunk Harley - Tamiya 1/6 HD FLH Classic 'extreme' kit bash (Very Photo Heavy)
![]() by KatsZenJammer Fri 15 Feb 2019, 10:31 pm
by KatsZenJammer Fri 15 Feb 2019, 10:31 pm

So here's some of the accessory bits after a coat of clear matte then some shading grey. Next comes the painting of the details and dirtying.

So I realized I could go vertical and put two pics side by side which makes viewing somewhat easier. This is after some Alclad magnesium was added to portions followed by selective shot shading grey and everything got a coat of clear matte.


Hand brushed detailing. The usual cast of colours as previously seen in a similar theme with the addition of Tamiya acrylic gunmetal for the rivet heads.


PE details re-exposed and hand brushed dirtying/staining.


And the neglected topside finally gets a view. After this is more clear matte then some more shading/dirtying and any touch ups that are required.

There's still more stuff to be done both to the boiler/burner and the accessories but its getting close to the final turn for these bits. After that will be either the transmission or the condenser - still haven't flipped the coin yet.
Nothing exceeds like excess.

KatsZenJammer- Resident member

- Posts : 2600
Join date : 2016-05-20
Age : 57
Location : Vancouver, BC
Re: Steampunk Harley - Tamiya 1/6 HD FLH Classic 'extreme' kit bash (Very Photo Heavy)
![]() by GaryDainton Sat 16 Feb 2019, 8:41 am
by GaryDainton Sat 16 Feb 2019, 8:41 am

GaryDainton- Advanced Member
- Posts : 4433
Join date : 2014-03-06
Age : 56
Location : Bolton UK
Re: Steampunk Harley - Tamiya 1/6 HD FLH Classic 'extreme' kit bash (Very Photo Heavy)
![]() by Skid Sat 16 Feb 2019, 10:11 am
by Skid Sat 16 Feb 2019, 10:11 am
 Is all I can say.
_________________
Al.
Constructive criticism is always welcome.
“Success always demands a greater effort.” Winston Churchill
"Success is failure turned inside out" Unknown

Skid- Admin
- Posts : 7129
Join date : 2013-02-15
Age : 75
Location : Newcastle. Good Old Blighty. -

Re: Steampunk Harley - Tamiya 1/6 HD FLH Classic 'extreme' kit bash (Very Photo Heavy)
![]() by Sam Mon 18 Feb 2019, 2:36 am
by Sam Mon 18 Feb 2019, 2:36 am
Skid wrote:
I have been following this build from the beginning and waiting to see the finish before saying a whole lot....but Al summed it up for me also.

Sam- Resident member
- Posts : 1963
Join date : 2013-02-23
Age : 57
Location : Back in Toledo, Oregon
Re: Steampunk Harley - Tamiya 1/6 HD FLH Classic 'extreme' kit bash (Very Photo Heavy)
![]() by KatsZenJammer Sat 23 Feb 2019, 6:17 pm
by KatsZenJammer Sat 23 Feb 2019, 6:17 pm
The accessories get some hand brush detailing added, as well as some spot dirtying.

And some dirtying and stuff for the boiler burner.

Some more AB shading grey followed by clear matte and semi-gloss for specific portions, like the handles. And I finally arranged the bits to correspond to right side and left side.

After some consideration I chose to stop the painting at this point - there will be some finalizing stuff after assembly of course. But here's the test fitting to see how it all works together.


Once again I can report personal satisfaction with how this portion turned out - and the sense of relief that comes with it (Yaaay! I didn't muck it up!).
Next comes the transmission and shifter set up. At this point I have the bits set up for painting but I haven't laid down base primer coats or anything due to life stuff like snow, events and a minor slip and slide down some stairs whilst doing laundry, lol. Didn't cause serious injury but I did have a few days of aching shoulders, back and butt which kind of curtailed work bench time.
Nothing exceeds like excess.
KatsZenJammer- Resident member
- Posts : 2600
Join date : 2016-05-20
Age : 57
Location : Vancouver, BC
Re: Steampunk Harley - Tamiya 1/6 HD FLH Classic 'extreme' kit bash (Very Photo Heavy)
![]() by GaryDainton Sat 23 Feb 2019, 7:24 pm
by GaryDainton Sat 23 Feb 2019, 7:24 pm
A project such as this should not be jeopardised by laundry, please refrain from further activities which contain an element of risk until the build is complete.

Progress is evident and the enjoyment in following along is as great as when you started. Keep it up my friend.
GaryDainton- Advanced Member
- Posts : 4433
Join date : 2014-03-06
Age : 56
Location : Bolton UK
Re: Steampunk Harley - Tamiya 1/6 HD FLH Classic 'extreme' kit bash (Very Photo Heavy)
![]() by KatsZenJammer Sun 03 Mar 2019, 2:17 am
by KatsZenJammer Sun 03 Mar 2019, 2:17 am
As for not doing laundry, while milady may sympathize with your sentiments, however, it's still not a reasonable enough excuse to get out of chores (plus the snow has all melted already)

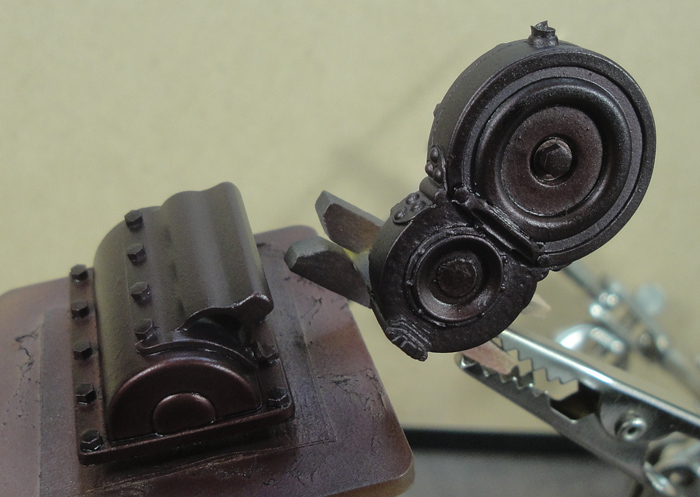
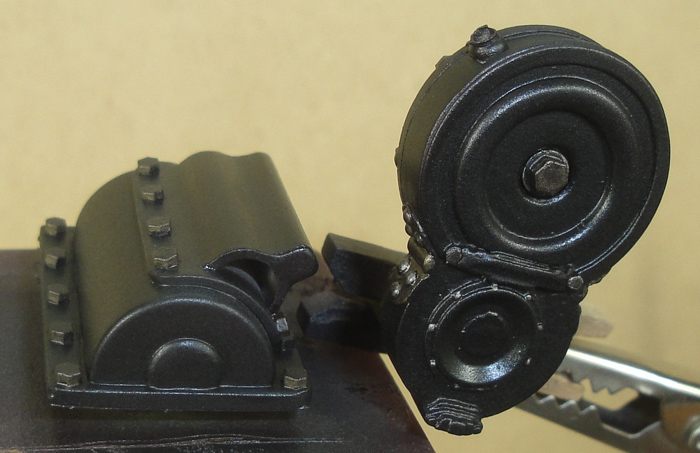
The transmission, shifter and water pump assemblies now hit the booth. I'm trying something different here, starting with Vallejo metallics instead of Alclad. This is steel and bright brass selectively shot as a base coat onto the transmission housing.

After a coat of clear matte comes Golden transparent pthalo blue. This is after about 5 thin coats.

Clear matte followed by many thin coats of Golden shading grey.

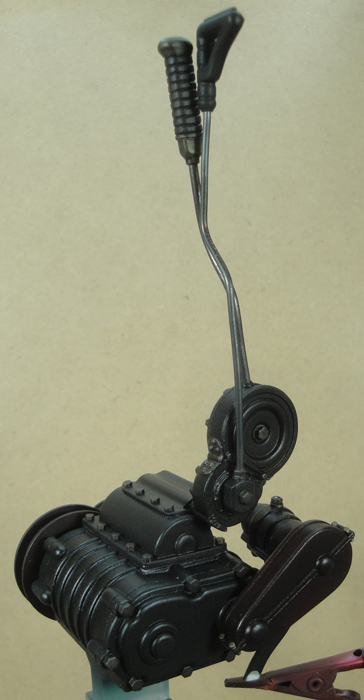
The shifter assembly parts with Vallejo steel and bright brass base coating.
Clear matte followed by Createx transparent deep red - multiple coats until the saturation was deemed enough. There's also some Golden transparent dioxazine purple at play.
Clear matte followed by multiple coats of Golden shading grey.
Shifter handles, handle mount and axle 'cage' with Vallejo steel and bright brass.

After some Golden shading grey, I deliberately 'soaked' the handle mount and axle cage.

After yet more shading grey. The handles will be getting further development for the grips and such.

The water pump pulley cover, water pump and mounting brace. The pulley cover will get the 'burgundy-ish body colour' treatment and is base coated with Tamiya rust red.

Pulley cover with Createx deep red overcoats, water pump gets the blue and the brace with shading grey.

Pulley cover after some dioxazine purple followed by shading grey. Water pump after some purple and shading grey as well. Brace after more shading grey.

Next will come the hand brushing of details and selective dirtying and that will be followed by much more shading grey and perhaps even some black wash AB coats to bring the transmission housing and shifter assembly to near black - similar to the way I did the frame but these parts will be getting a semi-gloss finish so I wanted the base black to have some differentiation from the frame.
After this the plan is to start on the condenser and the secondary fuel tank. Both of those are going to have gloss finishes on portions and so it will be good practice before I start on the main 'body' colour portions.
Nothing exceeds like excess.
KatsZenJammer- Resident member
- Posts : 2600
Join date : 2016-05-20
Age : 57
Location : Vancouver, BC
Re: Steampunk Harley - Tamiya 1/6 HD FLH Classic 'extreme' kit bash (Very Photo Heavy)
![]() by NISMOR34 Sun 03 Mar 2019, 3:32 am
by NISMOR34 Sun 03 Mar 2019, 3:32 am

NISMOR34- New Member

- Posts : 164
Join date : 2016-07-21
Age : 47
Location : Claremont, NC USA
Re: Steampunk Harley - Tamiya 1/6 HD FLH Classic 'extreme' kit bash (Very Photo Heavy)
![]() by GaryDainton Sun 03 Mar 2019, 10:39 am
by GaryDainton Sun 03 Mar 2019, 10:39 am
Nice steady progress Kats and I enjoy seeing work on the small details.
GaryDainton- Advanced Member
- Posts : 4433
Join date : 2014-03-06
Age : 56
Location : Bolton UK
Re: Steampunk Harley - Tamiya 1/6 HD FLH Classic 'extreme' kit bash (Very Photo Heavy)
![]() by KatsZenJammer Sat 09 Mar 2019, 9:26 pm
by KatsZenJammer Sat 09 Mar 2019, 9:26 pm
Moving further along, additional detail painting followed by clear matte then more shading grey to get everything to the proper 'black-ish' tone followed by clear matte then selective application of semi gloss and gloss clear. I should note at this point that the transmission housing has been shown upside down this whole time because that was the easiest way to mount it for painting.


The shifter assembly after the aforementioned steps. The glossy finish looks uniform in these photos but to the eye the variance in the gloss is more pronounced.

The bits in process. The straight handle grip was done using Testors flat rubber for the base followed by Humbrol flat browns and tans to give it a sort of leather-ish appearance.


The water pump assembly. I used gloss on the pump and pulley cover mostly then 'shaded' portions with semi-gloss to give it an appearance of subtle wear.


And calling it 'done for now' until the assembly stuff happens - which means the morale boosting test fit. I brought out the drive sprockets for this because ... just because. The subtle difference in the 'blackness' of the transmission housing and the shifter assembly is not very obvious - which was the plan so call that a success. The water pump isn't in its exact alignment and won't be until its set onto the frame.

A view from the front - not really needed but what the heck.

Before I set everything up for this post there was a brief review of the remaining bits wherein I realized there are a lot of little tiny bits yet to come. And also the realization that there was the need for a finicky mounting set up to paint the secondary fuel tank and the condenser. The plan is to move onto those two things and maybe some of the small stuff as well. But the progress is definitely there and the feeling of overwhelming obstacles is lessening.
Of course I still have to continue the stalled development of the dio base (and assorted planned accessories).
Note: the colour scheme for this has so far been very dark and dirty. This is due to the 'backstory' of this build - basically that Steampunk Victorian England is 'a world lit only by fire' and thus severely polluted. There are images from back in the day which really show why London was nicknamed The Smoke - the fictional world in which the steamcycle runs is likely more so by an order of magnitude. So, everything is covered in soot.
Now to figure out the finicky mounting stuff.
Nothing exceeds like excess.
KatsZenJammer- Resident member
- Posts : 2600
Join date : 2016-05-20
Age : 57
Location : Vancouver, BC
Re: Steampunk Harley - Tamiya 1/6 HD FLH Classic 'extreme' kit bash (Very Photo Heavy)
![]() by Speed Racer 65 Sat 09 Mar 2019, 9:48 pm
by Speed Racer 65 Sat 09 Mar 2019, 9:48 pm

Speed Racer 65- Intermediate Member

- Posts : 865
Join date : 2015-08-06
Location : Louisville KY
Re: Steampunk Harley - Tamiya 1/6 HD FLH Classic 'extreme' kit bash (Very Photo Heavy)
![]() by Mr Hirakawa Sat 09 Mar 2019, 9:50 pm
by Mr Hirakawa Sat 09 Mar 2019, 9:50 pm

Mr Hirakawa- Resident member
- Posts : 1528
Join date : 2015-11-11
Age : 52
Re: Steampunk Harley - Tamiya 1/6 HD FLH Classic 'extreme' kit bash (Very Photo Heavy)
![]() by GaryDainton Sun 10 Mar 2019, 10:33 am
by GaryDainton Sun 10 Mar 2019, 10:33 am
GaryDainton- Advanced Member
- Posts : 4433
Join date : 2014-03-06
Age : 56
Location : Bolton UK
Re: Steampunk Harley - Tamiya 1/6 HD FLH Classic 'extreme' kit bash (Very Photo Heavy)
![]() by RetiredMike Sun 10 Mar 2019, 3:56 pm
by RetiredMike Sun 10 Mar 2019, 3:56 pm
Carry on, sir.

RetiredMike- Advanced Member
- Posts : 3525
Join date : 2013-04-27
Age : 73
Location : Valparaiso, Indiana
Re: Steampunk Harley - Tamiya 1/6 HD FLH Classic 'extreme' kit bash (Very Photo Heavy)
![]() by KatsZenJammer Sat 16 Mar 2019, 10:45 pm
by KatsZenJammer Sat 16 Mar 2019, 10:45 pm
Mike - just thought I'd mention something in case I haven't already - for a lot of the shading grey use I go the route of applying multiple thin coats and dilute the pigment accordingly to the colour target. So each bit is kind of new recipe of its own. It takes more time to get the result this way but it gives you way more control over the depth and darkness and all that, harder to accidentally 'black out' parts you didn't want to.
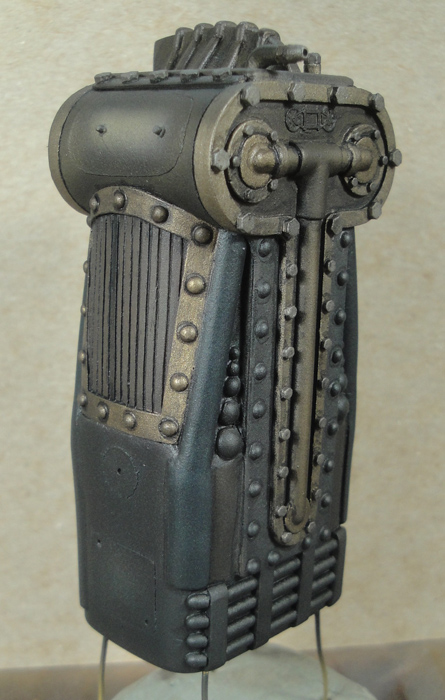
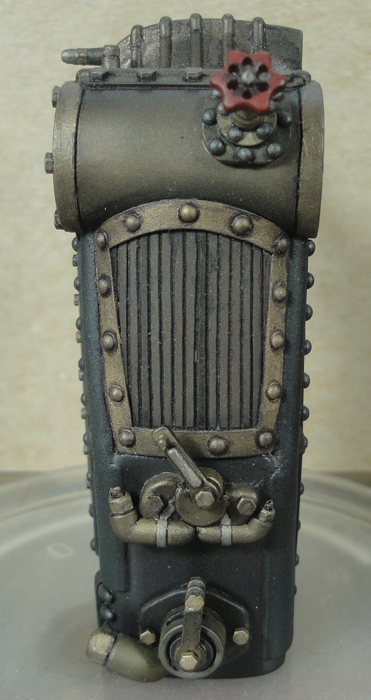
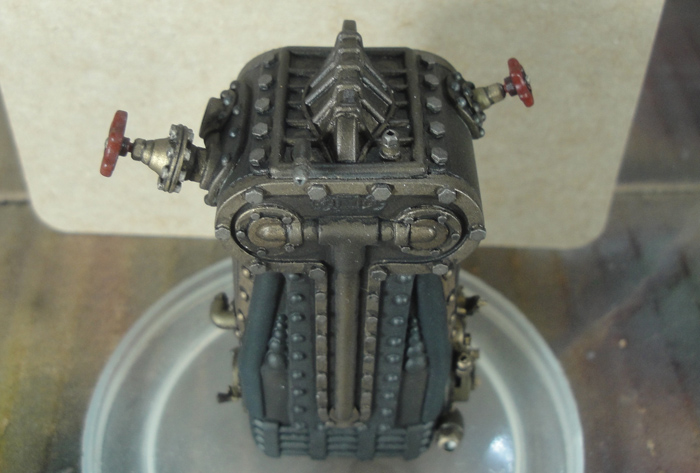
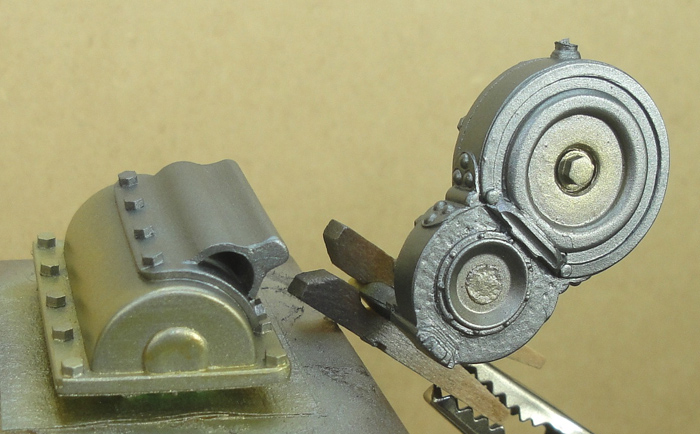
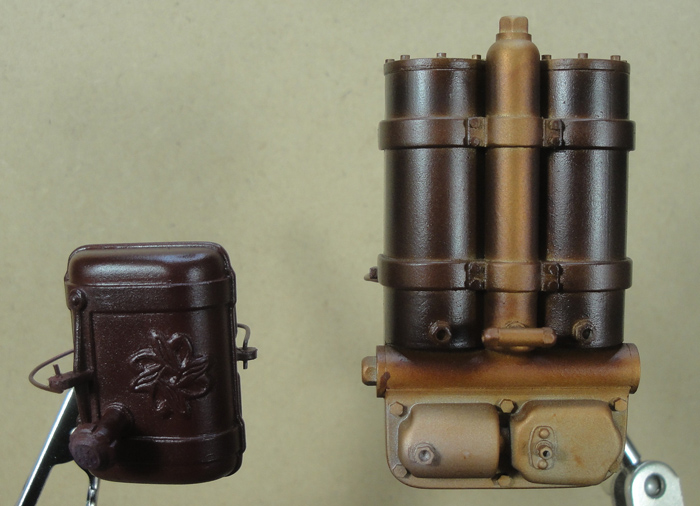
Next up, the condenser and secondary fuel tank. First the base coat - Tamiya acrylic rust red for the tank and Vallejo acrylic steel and bright brass for the condenser.


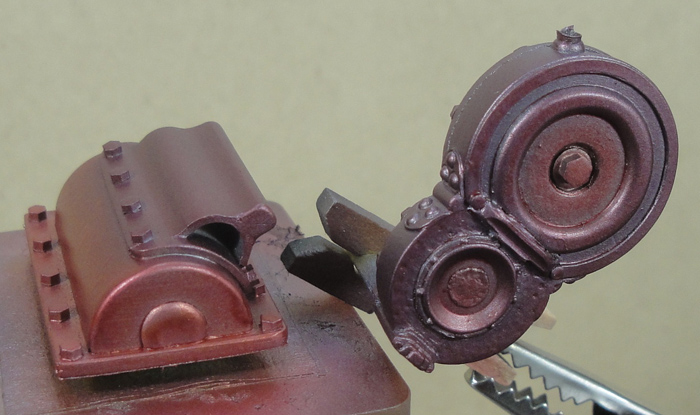
The tank gets coats of transparent alizarin crimson and transparent deep red. The condenser gets (in order) transparent burnt sienna, transparent brown iron oxide and transparent red iron oxide. Note the selective application on the bottom of the condenser to isolate certain portions. Also, this photo was taken after the clear matte coat, I usually try to take pics without the matte overlay during the process stages.


The tank gets transparent dioxazine purple and the condenser gets transparent shading grey. In both cases I applied coats until I achieved the saturation I wanted and once again the bottom of the condenser was shot selectively to further separate the parts.

Some little bits also enter the spray booth, the flywheel crank arm in this case. Base coated with Vallejo acrylic steel and bright brass.
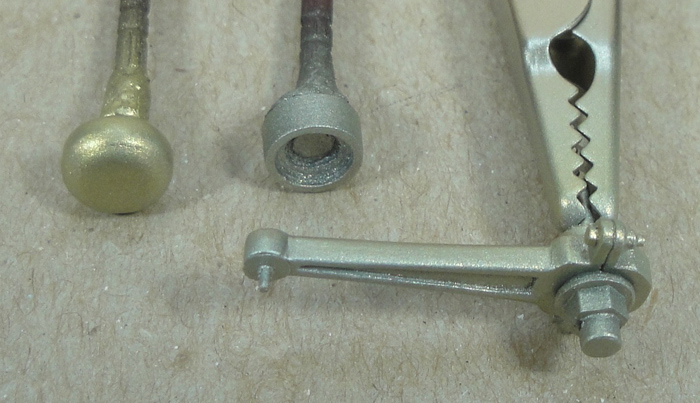
The knob gets some transparent red iron oxide followed by shading grey. The base and the arm get some brushed in shading followed by shading grey.

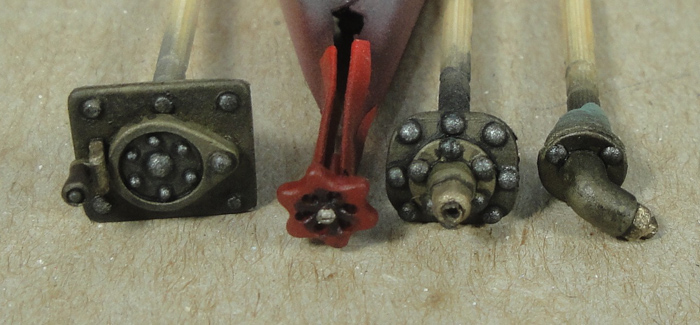
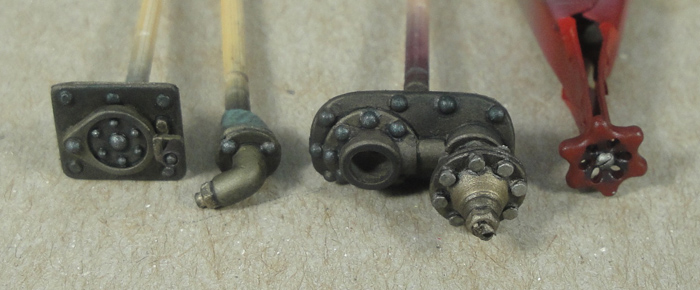
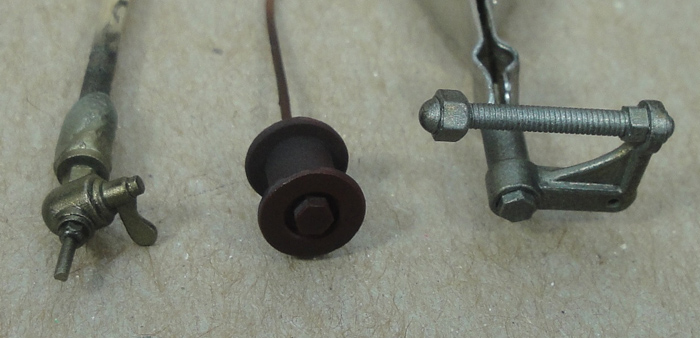
Here's the drive belt tensioner parts and the valve for the secondary fuel tank, rust red for the roller and steel or bright brass for the other bits.

The roller gets something transparent which I have forgotten, probably alazarin crimson from the look of it, followed by shading grey. The other bits get shading grey with some small selective excess deliberately shot in.
Following the pattern I've fallen into, next will come some hand work, painting details or exposing the metal detail portions. I suspect the condenser has a ways to go yet but the rest should come together without too much difficulty.
Plans for the next thing to do will be a lot of small bits, footrests, throttle and brake foot levers, all the accompanying linkages and such. After that will come the shrouds for the drive belt and flywheel, I think. Then the current hope is to paint the front and rear lamps, followed by the 'body colour' portion.
Of course this is subject to change at any time, lol.
Nothing exceeds like excess.
KatsZenJammer- Resident member
- Posts : 2600
Join date : 2016-05-20
Age : 57
Location : Vancouver, BC
Re: Steampunk Harley - Tamiya 1/6 HD FLH Classic 'extreme' kit bash (Very Photo Heavy)
![]() by GaryDainton Sun 17 Mar 2019, 8:16 am
by GaryDainton Sun 17 Mar 2019, 8:16 am
GaryDainton- Advanced Member
- Posts : 4433
Join date : 2014-03-06
Age : 56
Location : Bolton UK
Re: Steampunk Harley - Tamiya 1/6 HD FLH Classic 'extreme' kit bash (Very Photo Heavy)
![]() by RetiredMike Sun 17 Mar 2019, 1:23 pm
by RetiredMike Sun 17 Mar 2019, 1:23 pm
RetiredMike- Advanced Member
- Posts : 3525
Join date : 2013-04-27
Age : 73
Location : Valparaiso, Indiana
Re: Steampunk Harley - Tamiya 1/6 HD FLH Classic 'extreme' kit bash (Very Photo Heavy)
![]() by KatsZenJammer Sat 23 Mar 2019, 11:16 pm
by KatsZenJammer Sat 23 Mar 2019, 11:16 pm
The hand brush detailing with the usual line up of enamels. The cotter pin for the crank arm has been inserted and bent at this point.

Hand brush dirtying followed by clear matte followed by AB shading grey then more clear matte and these are 'done' until some final touches after assembly.

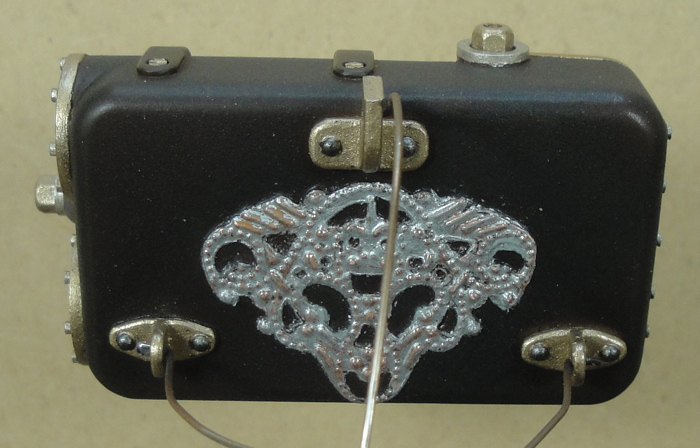
Hand brush detailing and exposure of the metal detailing. The fill cap embellishment is PE but the tank ones are jewelry craft charms which explains the difference in colour.

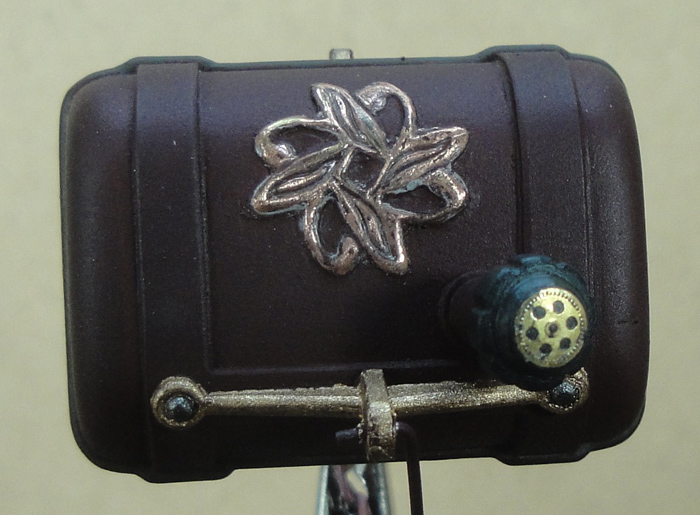
After the whole dirtying regimen. Test fit of the valve as well, I'm holding off on fixing it in place so avoid accidental breakage.


The condenser - I used an unknown Humbrol colour for the small tank thing in the middle of the underside, kind of a matte lavender. I wish I could remember what I got it for, lol.
For the final clear coat I went with Tamiya semi-gloss applied lightly on the main housing and part of the underside but left off spraying on other parts of the underside which were already matte. And some plumbing is now in place.


Next, as planned, are the foot rests and the assorted bits and bits. All of it still needs to be set up for the booth - that ought to take some time, lol. I might even choose to start the shrouds at the same time, the onset of spring has resulted in some optimistic irrationality on my part.
Nothing exceeds like excess.
KatsZenJammer- Resident member
- Posts : 2600
Join date : 2016-05-20
Age : 57
Location : Vancouver, BC
Re: Steampunk Harley - Tamiya 1/6 HD FLH Classic 'extreme' kit bash (Very Photo Heavy)
![]() by kpnuts Sun 24 Mar 2019, 7:19 am
by kpnuts Sun 24 Mar 2019, 7:19 am
kpnuts- Resident member
- Posts : 1676
Join date : 2015-01-29
Re: Steampunk Harley - Tamiya 1/6 HD FLH Classic 'extreme' kit bash (Very Photo Heavy)
![]() by GaryDainton Sun 24 Mar 2019, 10:07 am
by GaryDainton Sun 24 Mar 2019, 10:07 am
GaryDainton- Advanced Member
- Posts : 4433
Join date : 2014-03-06
Age : 56
Location : Bolton UK
Re: Steampunk Harley - Tamiya 1/6 HD FLH Classic 'extreme' kit bash (Very Photo Heavy)
![]() by disabled modeler Sun 24 Mar 2019, 11:45 am
by disabled modeler Sun 24 Mar 2019, 11:45 am
disabled modeler- Intermediate Member
- Posts : 979
Join date : 2016-05-22
Age : 60
Location : Quincy,IL. USA
Re: Steampunk Harley - Tamiya 1/6 HD FLH Classic 'extreme' kit bash (Very Photo Heavy)
![]() by RetiredMike Sun 24 Mar 2019, 2:02 pm
by RetiredMike Sun 24 Mar 2019, 2:02 pm

RetiredMike- Advanced Member
- Posts : 3525
Join date : 2013-04-27
Age : 73
Location : Valparaiso, Indiana
Re: Steampunk Harley - Tamiya 1/6 HD FLH Classic 'extreme' kit bash (Very Photo Heavy)
![]() by KatsZenJammer Sun 31 Mar 2019, 9:45 pm
by KatsZenJammer Sun 31 Mar 2019, 9:45 pm
So a smaller post this week as a result of renewed work on the dio base for this thing, but there is progress.
Included in this shot are the foot rests, rear brake foot lever assembly, foot throttle assembly and the fuel throttle assembly that sits in front of the saddle. These got base coats of Alclad magnesium, pale gold and brass.

After the usual shading and hand brushed detailing.

The console and panel face - both got matte black as a primer then the panel face was hit with heavily diluted Badger red.

Next comes a few thin coats of Tamiya hull red. From here will be the different transparent tints to get it somewhere near but not exactly like the 'body' panels.

As the progression continues I'm having to debate whether I want to do the fenders and tanks or the lamps next. There are positive reasons for either decision, logistically and all that, so it really comes down to preference. I wish it was easier to make up my mind.
Nothing exceeds like excess.
KatsZenJammer- Resident member
- Posts : 2600
Join date : 2016-05-20
Age : 57
Location : Vancouver, BC
Re: Steampunk Harley - Tamiya 1/6 HD FLH Classic 'extreme' kit bash (Very Photo Heavy)
![]() by GaryDainton Mon 01 Apr 2019, 8:59 am
by GaryDainton Mon 01 Apr 2019, 8:59 am
GaryDainton- Advanced Member
- Posts : 4433
Join date : 2014-03-06
Age : 56
Location : Bolton UK
Re: Steampunk Harley - Tamiya 1/6 HD FLH Classic 'extreme' kit bash (Very Photo Heavy)
![]() by KatsZenJammer Sun 07 Apr 2019, 5:04 pm
by KatsZenJammer Sun 07 Apr 2019, 5:04 pm
However, the constant mulling and considering has resulted in a determination that the Last things that should be painted are the lamps. So after the shrouds and bits are done the tanks and fenders will finally move into focus. Stay tuned, your patience will be rewarded.
So here's the fuel throttle lever, foot throttle lever and rear brake lever with assorted bits in their 'pretty much done test fit' stage.

The console gets some additional wash detailing around the PE bits before further red coats go on. This is different from the previous experiments with the burgundy-ish colour process.

After some more coats of various reds and a touch of transparent purple. The console sides were given a bit more purple while the console face plate areas stayed closer to red.

Expose the PE and metal detailing and paint the gauge rings with Humbrol gold. Test fit of the console face.
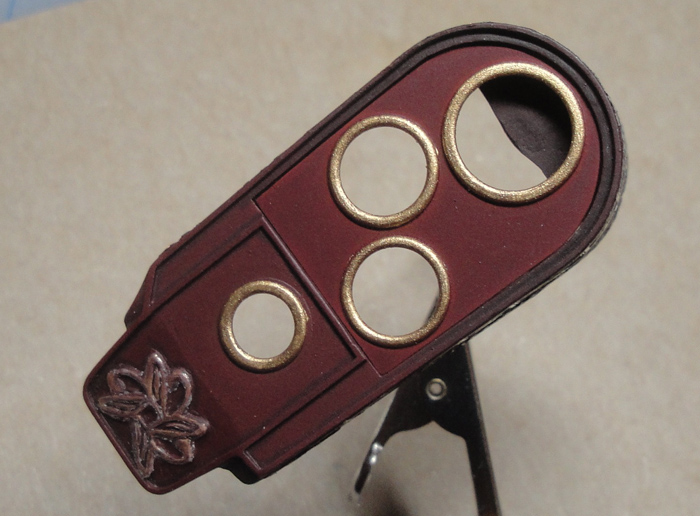
PE exposed. Still a bit of clean up on the edges then will come some clear matte followed by a bit of shading grey. The plan is to leave the console a bit shinier than the stuff that's come before.

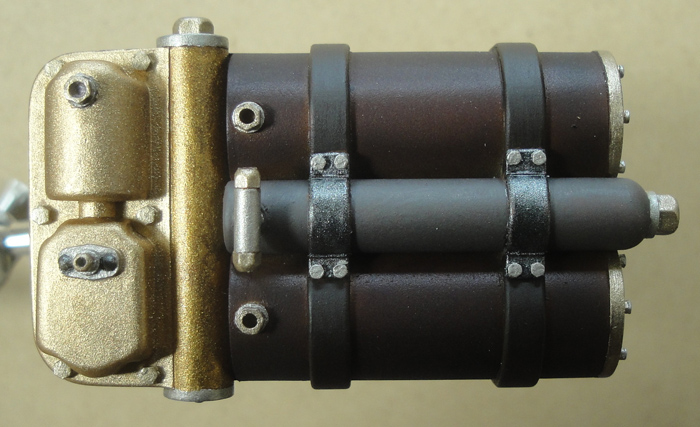
And whilst the collating and organization of the next bits to be painted occurred I found these wrapped steam pipes which have been awaiting the next steps patiently. The wrap is black book binding tape with an application of semi-dry Tamiya acrylic dark grey followed by dry brush Tamiya acrylic sky grey.

Speaking of collating and organizing - as previously stated the next bits to hit the booth are the shrouds and assorted bits but also I've set up the fuel/water tank fill caps and valves.
At the same time as this I've been puttering with the dio base playing with colour ideas for the paver stones.
But this week might be sporadic and not so productive as milady and myself are celebrating the fact that we've been happily unmarried for 21 years so there are plans for some excursions. How much time and attention I can give to the build will vary based on factors like the weather and our collective energy levels ... and the ever present possibility of spontaneous random events.
Nothing exceeds like excess.
KatsZenJammer- Resident member
- Posts : 2600
Join date : 2016-05-20
Age : 57
Location : Vancouver, BC
Re: Steampunk Harley - Tamiya 1/6 HD FLH Classic 'extreme' kit bash (Very Photo Heavy)
![]() by Sponsored content
by Sponsored content
Sponsored content
Page 23 of 25 • 1 ... 13 ... 22, 23, 24, 25 ![]()
» Tamiya 1/6 Harley Davidson Fat Boy Lo
» Tamiya 1/6 Harley Davidson FLH1200
» Steampunk Ducati
» '57 Salvage bash-up
|
|
|