
Steampunk Harley - Tamiya 1/6 HD FLH Classic 'extreme' kit bash (Very Photo Heavy)
Page 22 of 25 •  1 ... 12 ... 21, 22, 23, 24, 25
 ![]()
Re: Steampunk Harley - Tamiya 1/6 HD FLH Classic 'extreme' kit bash (Very Photo Heavy)
![]() by GaryDainton Mon 19 Nov 2018, 12:02 pm
by GaryDainton Mon 19 Nov 2018, 12:02 pm


GaryDainton- Advanced Member

- Posts : 4433
Join date : 2014-03-06
Age : 56
Location : Bolton UK
Re: Steampunk Harley - Tamiya 1/6 HD FLH Classic 'extreme' kit bash (Very Photo Heavy)
![]() by KatsZenJammer Sun 25 Nov 2018, 9:42 pm
by KatsZenJammer Sun 25 Nov 2018, 9:42 pm

Yeah, I'm thinking burgundy or something close to it but first some updates.
The shocks got a coat of shading grey followed by clear matte. Then it was finally time to affix the plumbing with epoxy. There's some beading and glistening edges from the dried epoxy but I plan to incorporate that as part of the hydraulic fluid leakage aspect of final detailing.

And here they are. In terms of eye view this photo is closer to real than the previous, the shocks were heavily dirtied to not only knock down the green but also set up the hydraulic fluid leakage and staining previously mentioned. Now they go into safe storage until assembly time.

The brake callipers get a body coat and some brushed detailing. Testor's Model Master metallic dark green for the bodies, Testor's Model Master series bright brass across the tops just to change it up a bit, plus some touches of Testor's gunmetal matte here and there.
The rest of the bits get painted. Here I reverted to the off-gold and off-silver mixes once again.

Following the recipe of brush griming followed by AB shading grey then clear matte. Next will be some more detail painting, specifically the hex nuts on the brackets, and some spot griming to reflect hydraulic leakage.

As previously mentioned, the colour of the fenders and tank portions is locked down into the realm of burgundy. The plan is to do them all at once ... once I've found the right base colour, lol. I've been looking and thinking and though the tinting top coats have been acquired the base is still not set. There's also the matter of the brass ornamentation on the fenders - at first the plan was to paint the plastic before setting the ornamentals but that's been shifting towards setting it all in place first and using the same exposing technique as with the glued on PE detailing.
But before that looms the wheels and tyres. The wheels are sitting and staring at me, begging me to settle on a colour schema, while the tyres are daring me to try and paint really old scale model rubber. This may be a good time for a short 'step back and assess' period ... or not.
Nothing exceeds like excess.

KatsZenJammer- Resident member
- Posts : 2600
Join date : 2016-05-20
Age : 57
Location : Vancouver, BC
Re: Steampunk Harley - Tamiya 1/6 HD FLH Classic 'extreme' kit bash (Very Photo Heavy)
![]() by kpnuts Mon 26 Nov 2018, 6:36 am
by kpnuts Mon 26 Nov 2018, 6:36 am
kpnuts- Resident member
- Posts : 1676
Join date : 2015-01-29
Re: Steampunk Harley - Tamiya 1/6 HD FLH Classic 'extreme' kit bash (Very Photo Heavy)
![]() by GaryDainton Mon 26 Nov 2018, 12:23 pm
by GaryDainton Mon 26 Nov 2018, 12:23 pm
GaryDainton- Advanced Member
- Posts : 4433
Join date : 2014-03-06
Age : 56
Location : Bolton UK
Re: Steampunk Harley - Tamiya 1/6 HD FLH Classic 'extreme' kit bash (Very Photo Heavy)
![]() by KatsZenJammer Sun 02 Dec 2018, 10:49 pm
by KatsZenJammer Sun 02 Dec 2018, 10:49 pm
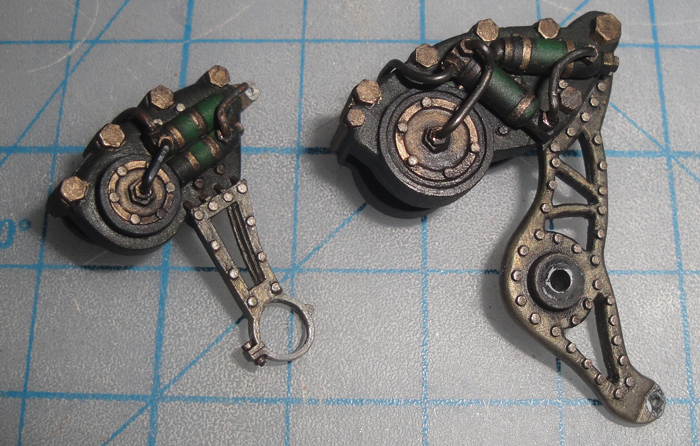
The brake calliper assemblies get 'specific' griming and dirtying. The focus was to add the kind of gunk that would occur with not perfectly sealed hydraulics as well as general road griming. This was followed by a coat of clear matte before a last shot of shading grey.

Pretty much done at this point. The shading grey was used to darken specific areas and knock down anything that I deemed too shiny followed by more clear matte. After that cured the plumbing was installed permanently. Now they await assembly.


The leap was finally made and the wheels begin to see the light of day in the paint booth. Before this they were cleaned up a touch, trying to catch anything missed previously, then given a two part primer coat of dark grey and black Tamiya acrylic matte. The black is on the outer perimeter while the spokes and hubs are grey.
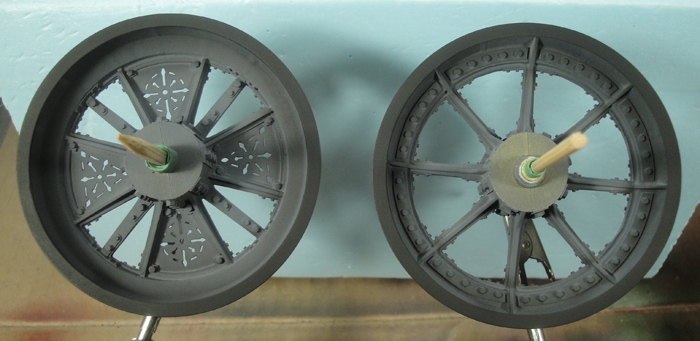
The base coat is Alclad magnesium. It wasn't laid on too thick as its just there for undertone.

The colour base is Alclad gold/titanium. Note that I left the front wheel hub magnesium. This is after 3 coats of the gold/titanium. I had thought of doing more but when examined after a couple of hours the look was satisfactory for this stage. This will be followed by clear matte then the detailing work begins. Please Note that I let the Alclad cure for 48 hours before applying the Vallejo acrylic clear matte - this was recommended in the cases where one wished to apply acrylic clear coats over Alclad lacquer.

Reading up on the topic of painting scale model real rubber was difficult but there were some references to the process. The choice was to dilute Vallejo AB acrylics and apply them as a wash with a regular brush - mostly because when I tried to AB the wash on it refused to go into the tread lines. Here Vallejo camoflague pale brown was used for the first wash and brushed in to the tread lines specifically. The top tire is after the excess was cleaned off using Tamiya acrylic thinner and a soft cloth.
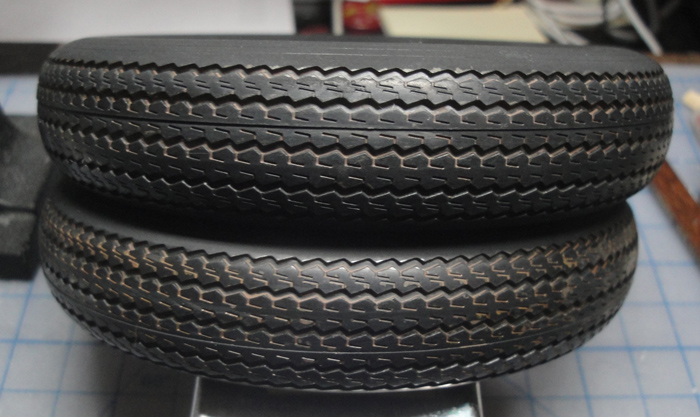
The second wash was also tread specific, with the same colour, but now the little details were also pinpointed. Again the top has had the excess wiped clean. The one issue I'm studiously ignoring is the seam line from the moulding - the plan is to keep it black so that it isn't as noticeable amongst the tread tops which will also remain black. Because these are larger scale tyres made from real rubber (thank you, Tamiya) the filling-in thing is just not possible.

The detailing of the wheels isn't set yet but the plan it to keep it in theme with what has already come before. There had been some consideration to use a colour instead of a metallic but in the end the whole metallic look was just too appealing to not do.
The tyres will be getting lighter wash coats now and these will be more overall to lighten the sidewalls and give it the used tyre look. Not sure if there will be more than that, we'll have to see how the next steps turn out.
I can't believe it's December already ...
Nothing exceeds like excess.
KatsZenJammer- Resident member
- Posts : 2600
Join date : 2016-05-20
Age : 57
Location : Vancouver, BC
Re: Steampunk Harley - Tamiya 1/6 HD FLH Classic 'extreme' kit bash (Very Photo Heavy)
![]() by GaryDainton Mon 03 Dec 2018, 12:14 pm
by GaryDainton Mon 03 Dec 2018, 12:14 pm
December indeed, another year nearly gone!!
GaryDainton- Advanced Member
- Posts : 4433
Join date : 2014-03-06
Age : 56
Location : Bolton UK
Re: Steampunk Harley - Tamiya 1/6 HD FLH Classic 'extreme' kit bash (Very Photo Heavy)
![]() by Mr Hirakawa Sat 08 Dec 2018, 7:14 am
by Mr Hirakawa Sat 08 Dec 2018, 7:14 am

Mr Hirakawa- Resident member
- Posts : 1532
Join date : 2015-11-11
Age : 52
Re: Steampunk Harley - Tamiya 1/6 HD FLH Classic 'extreme' kit bash (Very Photo Heavy)
![]() by KatsZenJammer Sun 09 Dec 2018, 6:45 pm
by KatsZenJammer Sun 09 Dec 2018, 6:45 pm
Gary - Thanks for the reminder on the painting of the tyres. They're currently getting another tread wash with a lighter toned dilution and after that I was planning to add more and more ... now I'm thinking hold back and wait until the initial enthusiastic need to over do it fades a tad.
And with that - the wheels get more work. The Vallejo clear matte went on very nicely and I set them aside to solidly cure for another couple of days. During that interval I was hit with inspiration for the rear wheel panels - so some masking was done.

The colour theme for the fenders and tanks get's a preview here. This was a 1:1 blend of Createx transparent deep red and Golden transparent alazarin crimson diluted to near-wash. It took 3 light coats to get to this point without too much saturation.
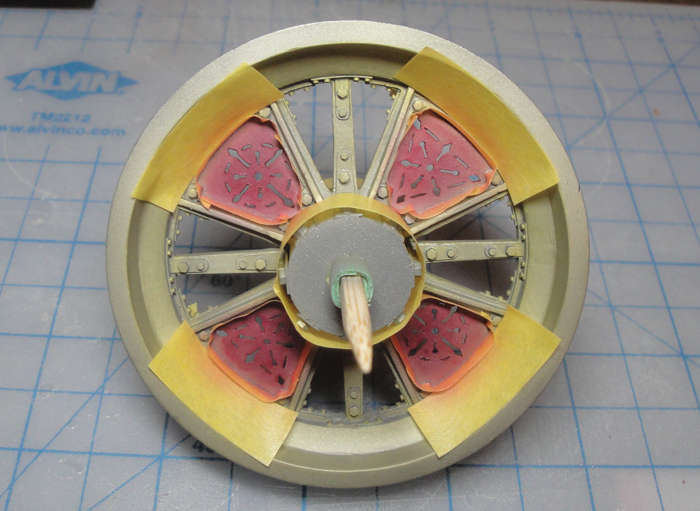
A top coat of just alazarin crimson also diluted to near wash.

Removal of the masking - there was some overspray but not enough to freak me out.

Regular brush work begins with the off gold enamel. This is the part where I curse myself for getting carried away with ornamentation detailing, lol.

One of the things that was powerfully reiterated during this was that when the wheels were being modified I wasn't thinking about functionality but rather ornamentation - so a lot, if not all, of the detailing on the wheels is just for show, so to speak. But the colour combo and the subsequent dirty-ing should be enough to unify these with the rest of the steamcycle in such a way that it doesn't look like I swapped out the wheels from another kit or something.
The seasonal slow down is a factor now as the approach of winter and the accompanying feeding frenzy of mass consumerism causes me (and milady) to hunker down and start making jigsaw puzzles in the dining room in order to distract ourselves from the barrage of shopping propaganda. Plus it's getting chilly enough that my airbrush time is being curtailed - I don't like blowing warm air out the window if I can help it, lol.
And the Dio sits in hiatus waiting for me to get back to it.
Nothing exceeds like excess.
KatsZenJammer- Resident member
- Posts : 2600
Join date : 2016-05-20
Age : 57
Location : Vancouver, BC
Re: Steampunk Harley - Tamiya 1/6 HD FLH Classic 'extreme' kit bash (Very Photo Heavy)
![]() by GaryDainton Mon 10 Dec 2018, 10:02 am
by GaryDainton Mon 10 Dec 2018, 10:02 am
GaryDainton- Advanced Member
- Posts : 4433
Join date : 2014-03-06
Age : 56
Location : Bolton UK
Re: Steampunk Harley - Tamiya 1/6 HD FLH Classic 'extreme' kit bash (Very Photo Heavy)
![]() by KatsZenJammer Thu 27 Dec 2018, 9:27 pm
by KatsZenJammer Thu 27 Dec 2018, 9:27 pm
So painting in the detail bits was time consuming and stuff - which is why I haven't posted for a couple of weeks (and let's not forget the whole Holiday Season thing). Here's a shot of the wheels with the first detail colour, the off-gold, complete.
The finishing of the nuts/bolts was done with Humbrol Gold straight from the can, no mixes for this. There is a slight difference but generally it looks almost the same as the off-gold. However, there is enough of a difference that the eye can notice it if one is looking for it.

After another bit of wash coat into the treads of the tyres. The colour is lighter, Vallejo Desert Tan, and diluted to skim milk consistency.

Washing the sides of the tyres. This is the first of two coats and after I went in and wiped the majority of it off with a cloth and acrylic thinner.
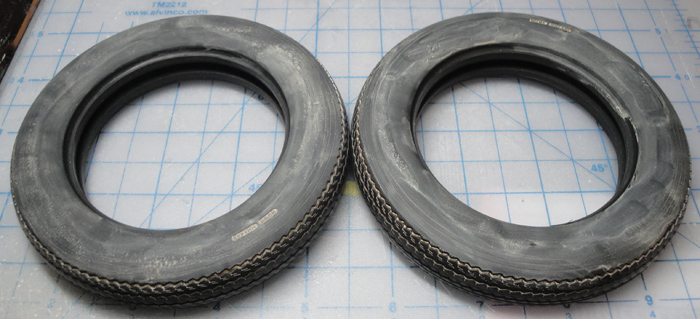
The wheels with the initial dirtying wash applied with pinpoint brush. The tyres after the side-wash was mostly wiped off. In both cases I kind of just fiddled until satisfied with the appearance..

After 2 to 3 coats of the shading grey followed by clear matte and the wheels are 'done' to the point where I put the tyres on.

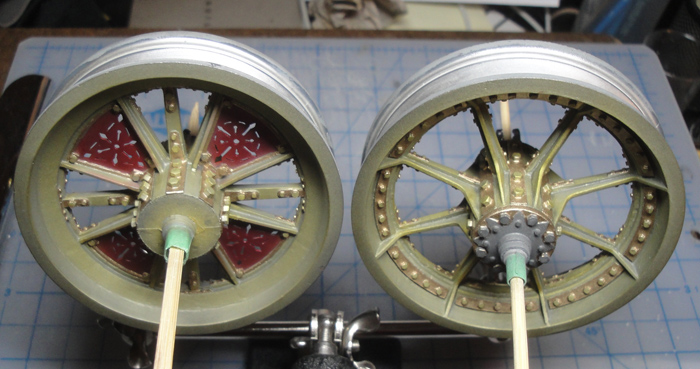
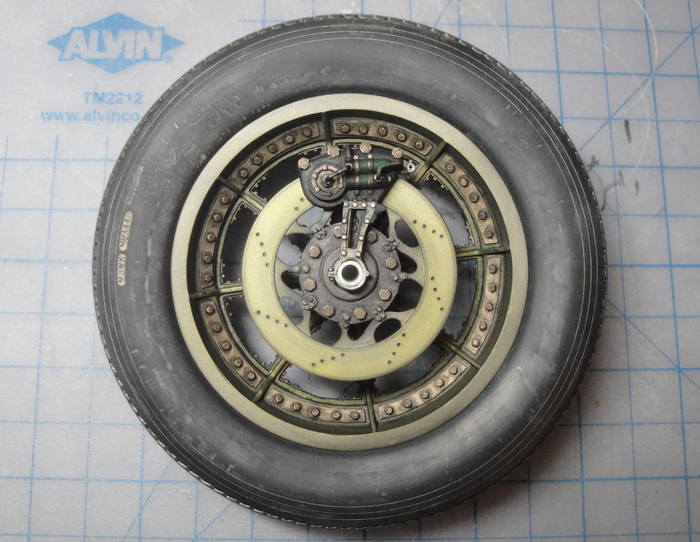
The front wheel with brake disc and calliper in place.
Rear wheel with brake disc and calliper.
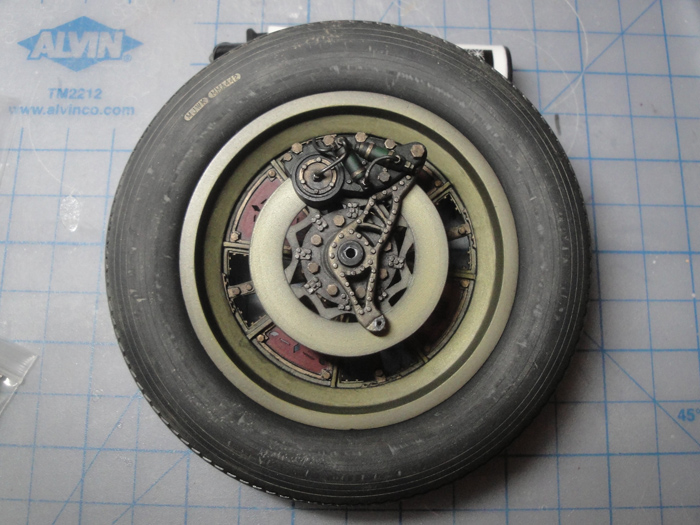
The other side of the rear wheel with the drive sprocket in place.

Overall I am pleased with how things have been turning out, especially since I realized my AB was showing signs of wear at some point. I guess it's great practice to learn how to paint smoothly and accurately with a wonky AB
To that end I went out for a Boxing Day Sale run, which I usually never do, and acquired a new Iwata Neo CN to replace the old one. For anyone who is thinking about starting down the road of Airbrushing or for those who need a handy utility AB the Neo series is fabulous - mostly because they are inexpensive as far as AB's go. The new Neo cost me less than $100 CDN after tax (Boxing Day discount in effect, normally about $130 CDN after tax). I chose the Neo when I bought my first AB for that reason and I chose to get the same for replacement because, simply, I don't do enough AB painting to merit a 'pro' rated AB.
Next on the painting agenda is the handlebars and their accessories. Then comes the thoughtful process of planning the next major phase of colour, which is to say deciding whether to start with the fenders/tanks to develop the burgundy 'body' colour or leave those for a bit and start in on the machinery. One thing for certain is the head and tail lamps will be left for later as I have no idea how I want them to look yet. It seems that, like with building, having no plan creates delays when it comes time to figure out what comes next, lol.
Nothing exceeds like excess.
KatsZenJammer- Resident member
- Posts : 2600
Join date : 2016-05-20
Age : 57
Location : Vancouver, BC
Re: Steampunk Harley - Tamiya 1/6 HD FLH Classic 'extreme' kit bash (Very Photo Heavy)
![]() by Mr Hirakawa Fri 28 Dec 2018, 10:14 am
by Mr Hirakawa Fri 28 Dec 2018, 10:14 am
Mr Hirakawa- Resident member
- Posts : 1532
Join date : 2015-11-11
Age : 52
Re: Steampunk Harley - Tamiya 1/6 HD FLH Classic 'extreme' kit bash (Very Photo Heavy)
![]() by GaryDainton Fri 28 Dec 2018, 12:00 pm
by GaryDainton Fri 28 Dec 2018, 12:00 pm
GaryDainton- Advanced Member
- Posts : 4433
Join date : 2014-03-06
Age : 56
Location : Bolton UK
Re: Steampunk Harley - Tamiya 1/6 HD FLH Classic 'extreme' kit bash (Very Photo Heavy)
![]() by beowulf Sun 06 Jan 2019, 12:52 pm
by beowulf Sun 06 Jan 2019, 12:52 pm

beowulf- Resident member
- Posts : 2469
Join date : 2013-05-02
Age : 62
Location : Monkey Hanger Town, UK
Re: Steampunk Harley - Tamiya 1/6 HD FLH Classic 'extreme' kit bash (Very Photo Heavy)
![]() by KatsZenJammer Mon 07 Jan 2019, 4:23 am
by KatsZenJammer Mon 07 Jan 2019, 4:23 am
Anytime, Mr. H. The vast majority of the techniques I use have come from others, it's all part of the community thing.
Time for the handlebars. At this point I've primered with Tamiya dark grey, then done the multi-colour multi-coat off-black similarly to the frame parts. Details have been painted or, int he case of the PE, re-exposed.

The off-gold and off-silver as well as matte gunmetal and Testors steel used for detailing the bits.

The rear view mirror gets to act as a test bed for the main body colour, Vallejo fire red base, followed by Createx crimson then Golden transparent purple. The brake lever is Alclad magnesium followed by Alclad brass. Brush dirtying of the details was followed by Golden shading grey shot from the AB.

Basic assembly. The handlebars are not yet fixed into the mounts because I'm not sure what the proper angle will be - thathas to await further assembly.

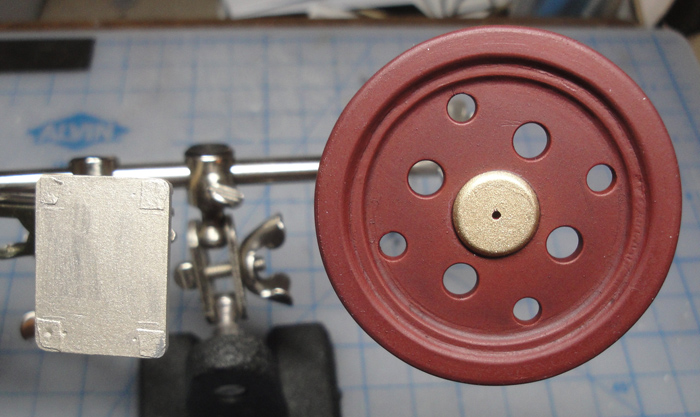
The flywheel also acts as a test bed for the main colour. I stopped here before the final coat of transparent purple.

The combination that I've settled on is Tamiya rust red matte for primer, Vallejo fire red as base coat, Createx crimson transparent and Golden purple transparent sealed with Vallejo clear matte. Oddly, this photo looks lighter than the previous but to the eye it's the opposite.

Next comes the crankcase and engine cylinder plus attached bits. What with the holiday season things got disrupted hobby time wise but there's also the fact that I have no plan, lol. Hopefully it won't take too long to figure out the next part of the adventure entails.
Nothing exceeds like excess.
KatsZenJammer- Resident member
- Posts : 2600
Join date : 2016-05-20
Age : 57
Location : Vancouver, BC
Re: Steampunk Harley - Tamiya 1/6 HD FLH Classic 'extreme' kit bash (Very Photo Heavy)
![]() by GaryDainton Mon 07 Jan 2019, 11:07 am
by GaryDainton Mon 07 Jan 2019, 11:07 am
GaryDainton- Advanced Member
- Posts : 4433
Join date : 2014-03-06
Age : 56
Location : Bolton UK
Re: Steampunk Harley - Tamiya 1/6 HD FLH Classic 'extreme' kit bash (Very Photo Heavy)
![]() by KatsZenJammer Mon 28 Jan 2019, 5:31 pm
by KatsZenJammer Mon 28 Jan 2019, 5:31 pm
Bit of a gap resulting from a strangely timely confluence of work based fatigue, social interactions, previous commitments and the obstacles resulting from a lack of a coherent plan. Also, though I had hoped to have more photos to show I wound up forgetting to document a bunch of the stuff as it was worked on, lol. Oh absent minded me...
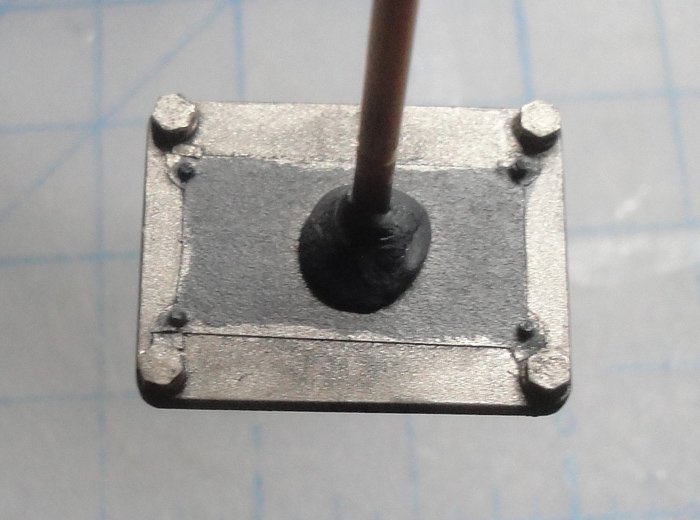
The flywheel with metallic detail and the base plate for the engine in progress. For reference, the red part of the flywheel is the same as the last photo in the previous post.
After a few thin coats of the ever reliable shading grey. That and the variable lighting give the flywheel more of it's 'real' appearance in this photo.

The topside of the engine plate. You can sort of make out the 'oil staining' but it's quite subtle, on purpose.
And then I forgot to take any pictures for about ten days, lol. You can see that the flywheel and engine plate have been dirtied quite a bit more, lots of 'grime shadowing' applied. The rest of the drive 'sprockets' start getting developed with a base of Vallejo fire red. I took the opportunity to do a comparison between the raw base coat and the end result of all that shading, tinting and griming. And the engine plate griming is more visible in this photo.

Engine plate affixed to the frame - the colour match was pretty good considering my seat of the pants approach to all this. There will be some more griming later to unify the bits.

And so it goes at the beginning of the new year. The flywheel has also been put away as 'done for now.' Next the 3 sprockets will be getting the same tinting regimen before the griming/shading begins, I will try to remember to take some photos for reference. The engine parts are next up and that is one of the causes of this stall out on my part - I can't settle on a colour for the engine. My thoughts are mostly leaning to black or a sort of 'black-ish' colour. And though the standard has been keeping everything matte at this stage I have a feeling that the engine will wind up glossed to some extent. Stay tuned for further developments on that score.
Nothing exceeds like excess.
KatsZenJammer- Resident member
- Posts : 2600
Join date : 2016-05-20
Age : 57
Location : Vancouver, BC
Re: Steampunk Harley - Tamiya 1/6 HD FLH Classic 'extreme' kit bash (Very Photo Heavy)
![]() by GaryDainton Mon 28 Jan 2019, 9:17 pm
by GaryDainton Mon 28 Jan 2019, 9:17 pm
GaryDainton- Advanced Member
- Posts : 4433
Join date : 2014-03-06
Age : 56
Location : Bolton UK
Re: Steampunk Harley - Tamiya 1/6 HD FLH Classic 'extreme' kit bash (Very Photo Heavy)
![]() by KatsZenJammer Thu 31 Jan 2019, 5:47 pm
by KatsZenJammer Thu 31 Jan 2019, 5:47 pm
The drive sprockets after a coat of Createx deep red transparent then some Golden alizarin crimson transparent - following the established formula.

Engine parts after selective priming - Tamiya dark grey and black matte acrylics.
Sprockets after some Golden dioxazine purple transparent.

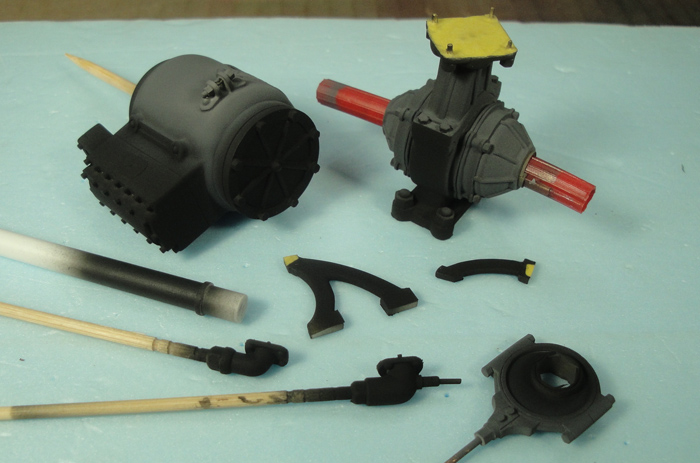
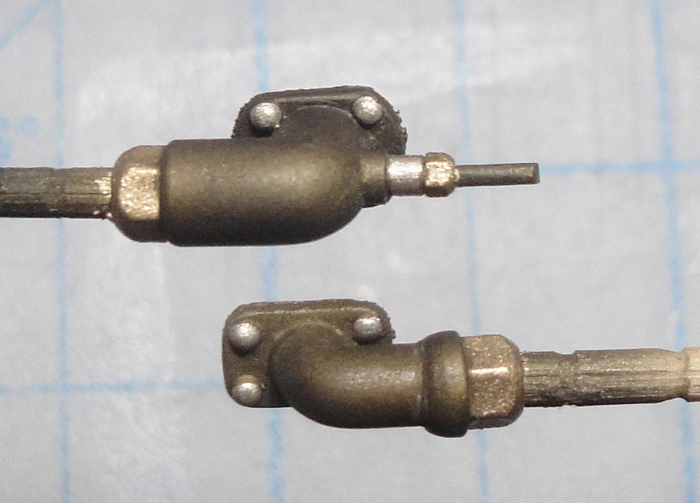
Swerving into the enamel/lacquer zone, the cylinder gets some Alclad magnesium and the crankcase gets Testor's flat gunmetal. This is the first time I tried using Testor's with Tamiya lacquer thinner through the AB and it worked excellently.

The offset crank gets some Alclad magnesium on the outer rim and basic acrylic matte black. The in/out steam feeds are coated in Alclad bright brass. Please note that I'm shooting Alclad onto a matte base so it's coming out kind of grainy. One of these days I'm going to shoot some Alclad onto a glossy base coat.
Colour variations have been plaguing me these past few weeks and finally I made the leap to try something different. This is Golden transparent brown iron oxide shot onto the Alclad magnesium to give the cylinder an oddish bronze tint. I did the same with the middle segment of the crankcase housing. The darker tint is Golden shading grey used on the steambox and the outer caps of the crankcase,

Tinted the in/out feeds with some transparent brown iron oxide.

Once the base colours looked good I hit the cylinder and crankcase with Createx transparent grey then some more shading grey.

The in/outs get some shading grey as well.
The progress with the engine has me stoked, especially after stalling out like I did. Next comes the time consuming addition of small details followed by clear coats and dirtying. The plan is to start using semi and gloss clear coats sparingly - the experimental part.
Right now the debate for what comes after is divided into two sides - the part that wants to work on the footrests and levers versus the part that wants to tackle the boiler/burner. And there's the fenders and tanks to think about.
Nothing exceeds like excess.
KatsZenJammer- Resident member
- Posts : 2600
Join date : 2016-05-20
Age : 57
Location : Vancouver, BC
Re: Steampunk Harley - Tamiya 1/6 HD FLH Classic 'extreme' kit bash (Very Photo Heavy)
![]() by GaryDainton Thu 31 Jan 2019, 6:20 pm
by GaryDainton Thu 31 Jan 2019, 6:20 pm
GaryDainton- Advanced Member
- Posts : 4433
Join date : 2014-03-06
Age : 56
Location : Bolton UK
Re: Steampunk Harley - Tamiya 1/6 HD FLH Classic 'extreme' kit bash (Very Photo Heavy)
![]() by KatsZenJammer Sat 02 Feb 2019, 5:10 am
by KatsZenJammer Sat 02 Feb 2019, 5:10 am
Taking advantage of my time off means progress improves. The drive sprockets with detailing added using the same repertoire of enamels as before.

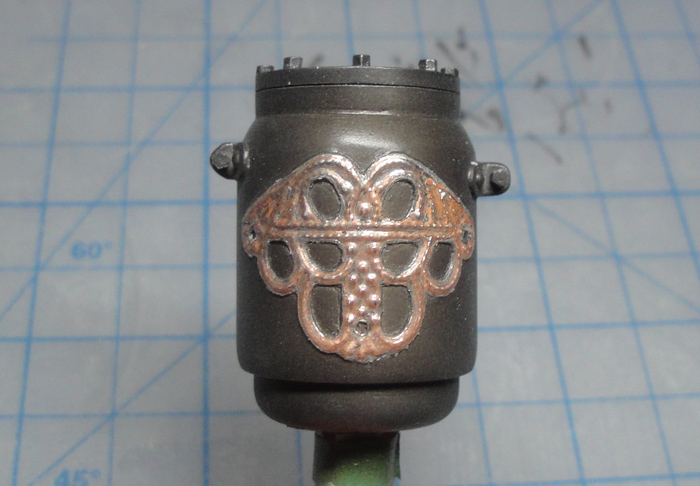
The cylinder added detail exposed. This will get a similar treatment to the previous metal detail bits.
The offset cam with detailing added.

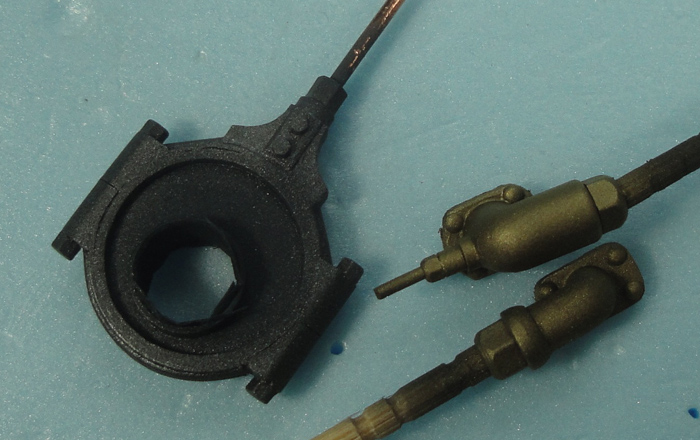
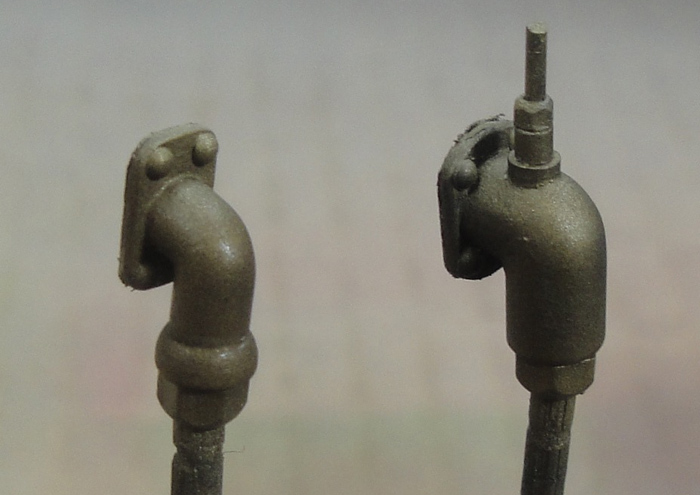
The In/Outs with detailing added.
Cylinder and crankcase with detailing added. Note that the crankcase housing bolts are painted as well but so dark that they appear to be the same as the housing itself.
After clear matte came dirtying with brushwork followed by AB. Then instead of uniformly coating with one type of clear there is matte over the centre hub and the outer ring while the middle ring is semi gloss. The hub bits are actually that dark, by the way, its not a camera thing.

The cylinder (but not the steambox) and crankcase domes got clear gloss. The central housing of the crankcase got semi-gloss, as well as select portions of the offset cam and the cylinder to frame brackets. The steambox and everything else got clear matte.

Couldn't resist a test fit and was very pleased. I was extremely unsure about the engine and that anxiety slowed me down a lot but it feels good to have managed to deal with it satisfactorily.

After some deliberation the next bits to go into the booth will be from the boiler/burner. And after some more deliberation the direction to proceed is guts, guts guts. The painting of the body parts would benefit from my getting practice and experience on the other stuff beforehand. Having said that, don't be surprised if I completely ignore my own planning, I can be like that sometimes, lol.
Nothing exceeds like excess.
KatsZenJammer- Resident member
- Posts : 2600
Join date : 2016-05-20
Age : 57
Location : Vancouver, BC
Re: Steampunk Harley - Tamiya 1/6 HD FLH Classic 'extreme' kit bash (Very Photo Heavy)
![]() by GaryDainton Sat 02 Feb 2019, 8:27 am
by GaryDainton Sat 02 Feb 2019, 8:27 am
GaryDainton- Advanced Member
- Posts : 4433
Join date : 2014-03-06
Age : 56
Location : Bolton UK
Re: Steampunk Harley - Tamiya 1/6 HD FLH Classic 'extreme' kit bash (Very Photo Heavy)
![]() by RetiredMike Sun 03 Feb 2019, 2:43 pm
by RetiredMike Sun 03 Feb 2019, 2:43 pm


RetiredMike- Advanced Member
- Posts : 3525
Join date : 2013-04-27
Age : 73
Location : Valparaiso, Indiana
Re: Steampunk Harley - Tamiya 1/6 HD FLH Classic 'extreme' kit bash (Very Photo Heavy)
![]() by Nipponrookie Mon 04 Feb 2019, 12:43 am
by Nipponrookie Mon 04 Feb 2019, 12:43 am

Nipponrookie- Intermediate Member

- Posts : 568
Join date : 2015-08-29
Age : 63
Location : Kyushu, Japan
Re: Steampunk Harley - Tamiya 1/6 HD FLH Classic 'extreme' kit bash (Very Photo Heavy)
![]() by KatsZenJammer Sat 09 Feb 2019, 12:44 am
by KatsZenJammer Sat 09 Feb 2019, 12:44 am
Unfortunately some 'cold' weather has rolled through the region which hampers my ability to effectively AB. Not that it's actually cold by the standards of the rest of North America, or Europe for that matter, but the den is badly insulated. And of course there was nothing ready for regular brush painting. But I was able to sneak in a bit of work here and there.
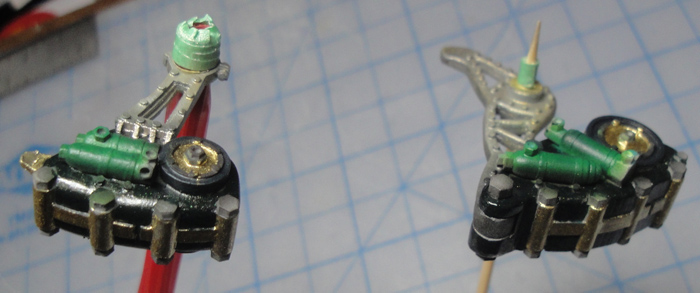
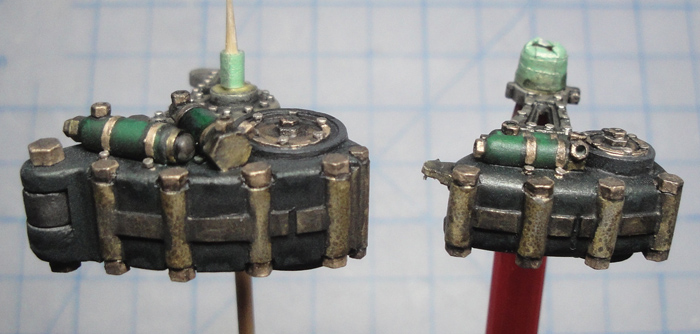
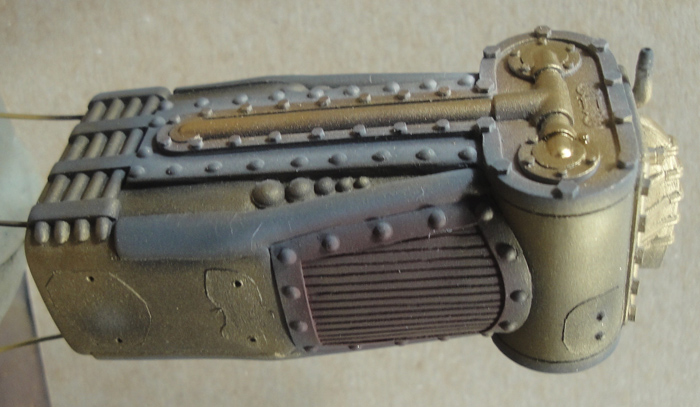
The body of the boiler/burner after selective colour priming. Black and dark grey for most of it and rust red with an overlay of tan sand for the side panels.

Next comes the Alclad - mostly polished brass with some areas of pale gold.

On this side I also shot some Alclad bright copper though it doesn't show all that distinctly.
All the boiler/burner additional detail bits with primers of black, grey and rust red as before.

Base coats applied - Alclad polished brass for most, some pale gold here and there and the handles were done with some very old but still useable Badger red.

Still waiting for the paint to cure properly as I write this, another thing that the cold interferes with. Next will be clear matte for the bits and further base coat work on the boiler/burner before that gets clear matte as well. Then the progression of work with the detailing and dirtying.
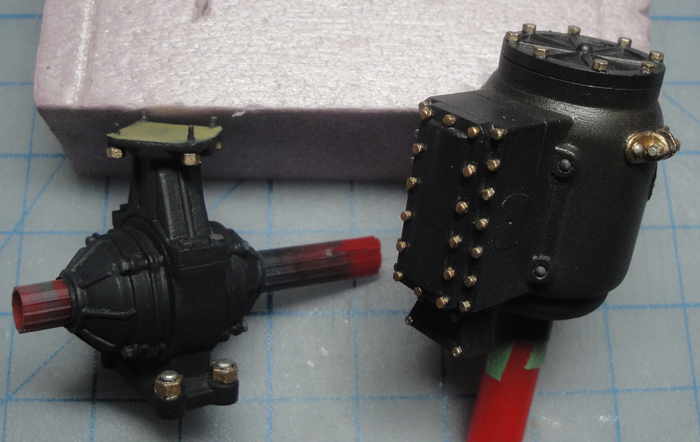
Recent results using Alclad have increased my confidence and so parts like the transmission and condenser no longer seem unfocused. And as I get to know the various paints and clears I'm using the 'body' colour situation is also resolving. Not looking for any miracles but it would be nice to advance more quickly - especially since the dio base and the accessories still beckon.
Nothing exceeds like excess.
KatsZenJammer- Resident member
- Posts : 2600
Join date : 2016-05-20
Age : 57
Location : Vancouver, BC
Re: Steampunk Harley - Tamiya 1/6 HD FLH Classic 'extreme' kit bash (Very Photo Heavy)
![]() by GaryDainton Sat 09 Feb 2019, 9:07 am
by GaryDainton Sat 09 Feb 2019, 9:07 am
GaryDainton- Advanced Member
- Posts : 4433
Join date : 2014-03-06
Age : 56
Location : Bolton UK
Re: Steampunk Harley - Tamiya 1/6 HD FLH Classic 'extreme' kit bash (Very Photo Heavy)
![]() by Sponsored content
by Sponsored content
Sponsored content
Page 22 of 25 • 1 ... 12 ... 21, 22, 23, 24, 25 ![]()
» Tamiya 1/6 Harley Davidson Fat Boy Lo
» Tamiya 1/6 Harley Davidson FLH1200
» Steampunk Ducati
» '57 Salvage bash-up
|
|
|