
Steampunk Harley - Tamiya 1/6 HD FLH Classic 'extreme' kit bash (Very Photo Heavy)
Page 19 of 25 •  1 ... 11 ... 18, 19, 20 ... 25
 ![]()
Re: Steampunk Harley - Tamiya 1/6 HD FLH Classic 'extreme' kit bash (Very Photo Heavy)
![]() by Geezerman Thu 17 May 2018, 11:36 pm
by Geezerman Thu 17 May 2018, 11:36 pm
Been mega cool to watch all of the intricate details that had to be fashioned !
Just remarkable!
Thanks once again for sharing !!!


Geezerman- Advanced Member

- Posts : 3651
Join date : 2013-02-24
Age : 88
Location : Gulf coast of central Florids
Re: Steampunk Harley - Tamiya 1/6 HD FLH Classic 'extreme' kit bash (Very Photo Heavy)
![]() by disabled modeler Fri 18 May 2018, 11:32 am
by disabled modeler Fri 18 May 2018, 11:32 am

disabled modeler- Intermediate Member

- Posts : 979
Join date : 2016-05-22
Age : 60
Location : Quincy,IL. USA
Re: Steampunk Harley - Tamiya 1/6 HD FLH Classic 'extreme' kit bash (Very Photo Heavy)
![]() by kpnuts Sun 20 May 2018, 8:29 pm
by kpnuts Sun 20 May 2018, 8:29 pm
Not to mention the vision, artistic talent and engineering inventiveness.
kpnuts- Resident member
- Posts : 1676
Join date : 2015-01-29
Re: Steampunk Harley - Tamiya 1/6 HD FLH Classic 'extreme' kit bash (Very Photo Heavy)
![]() by KatsZenJammer Sun 27 May 2018, 5:45 pm
by KatsZenJammer Sun 27 May 2018, 5:45 pm

So this is a sort of mini-post before the Anniversary pics. I had thought I wasn't going to be able to do much but that turned out not to be the case and what resulted was thanks to Gary for a long ago suggestion which has finally come to fruition.
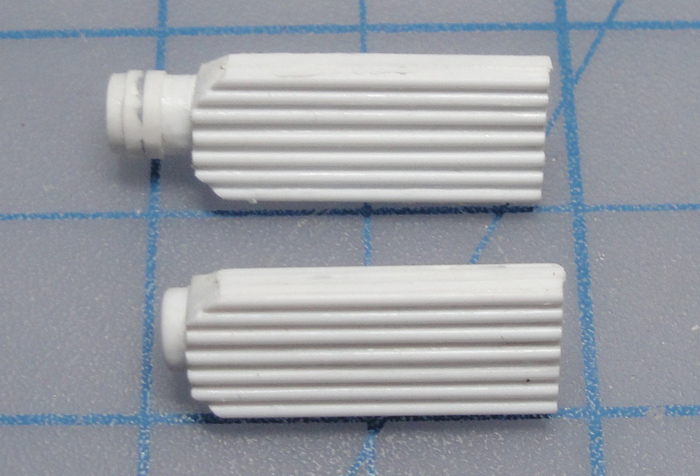
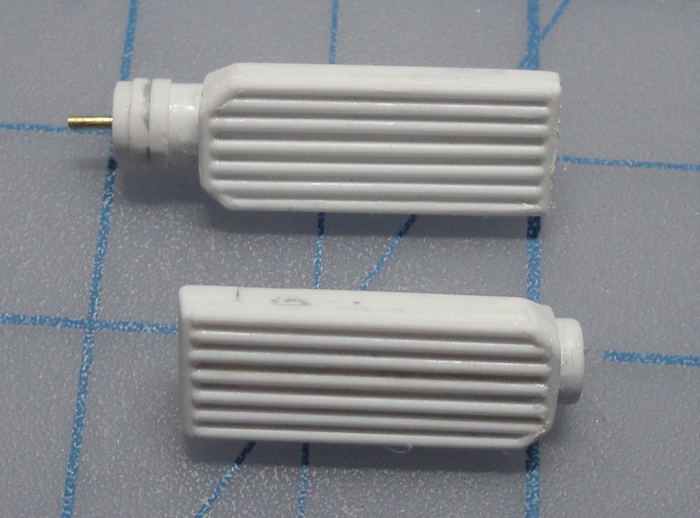
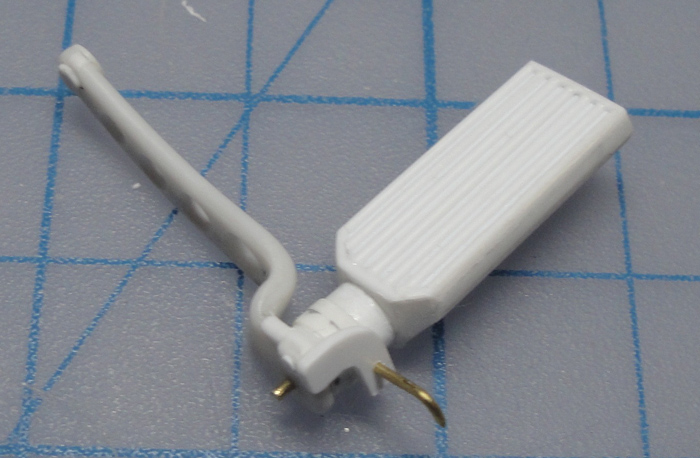
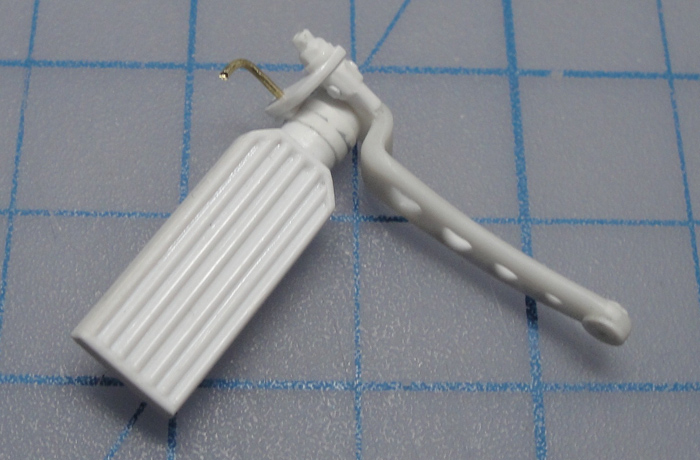
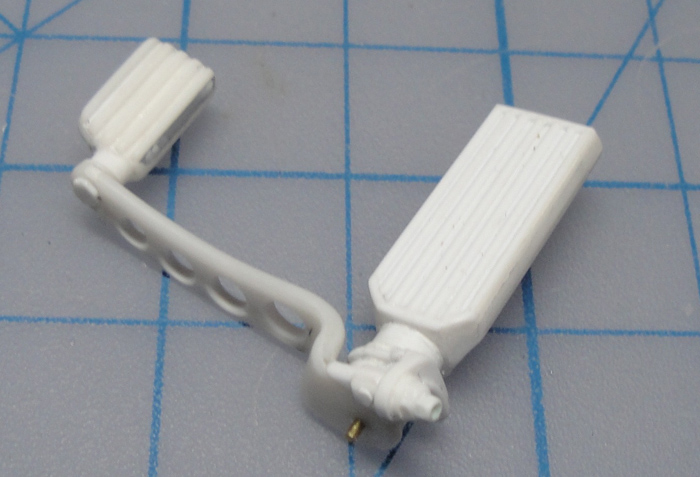
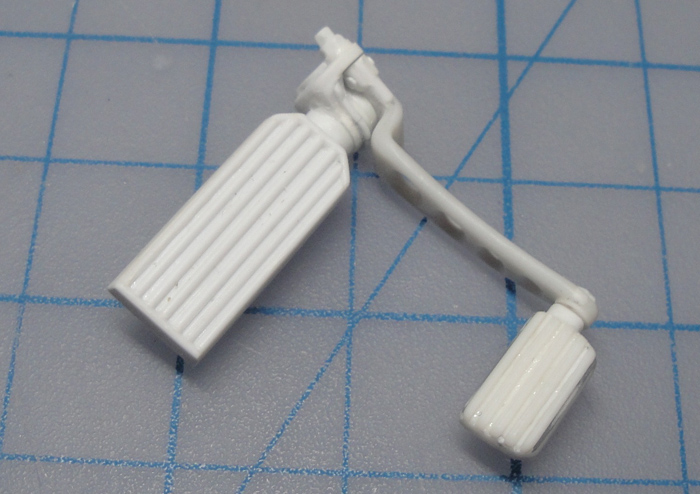
First are the foot rests after grip detail has been added. Work on these kind of stopped due to the need for further consideration as to where I was going with them.
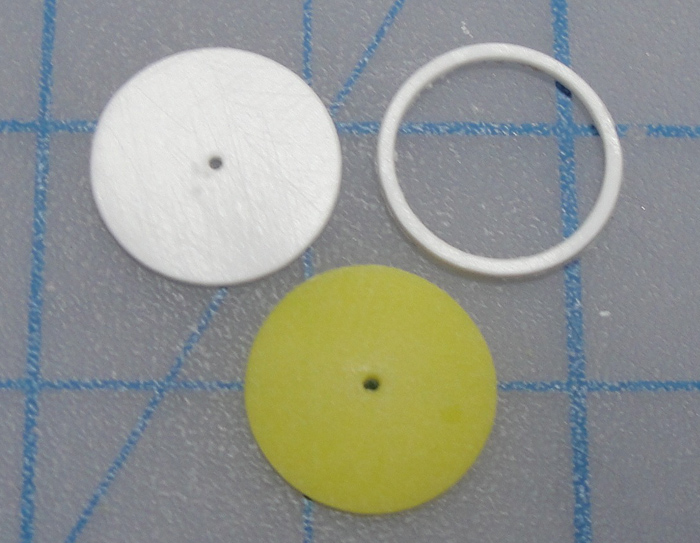
Then something in my brain decided it was high time to finally, finally get around to making the oft-spoken of and thought of Rear View Mirror. The yellow part is cut from a Ping Pong ball to get that spherical curve for the back, the flat disc is the backing for the reflector and the ring is the ... ring, I guess, lol.
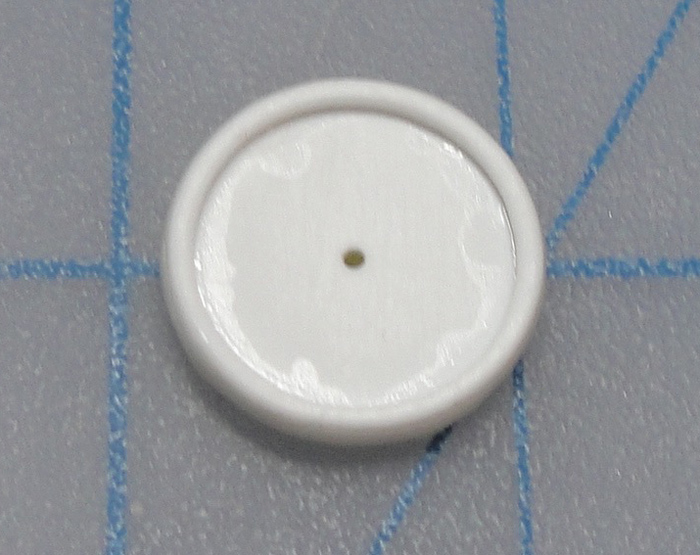
The bits shaped a bit then assembled. I had to use CA to secure the Ping Pong ball bit as the plastic didn't respond to MEK.
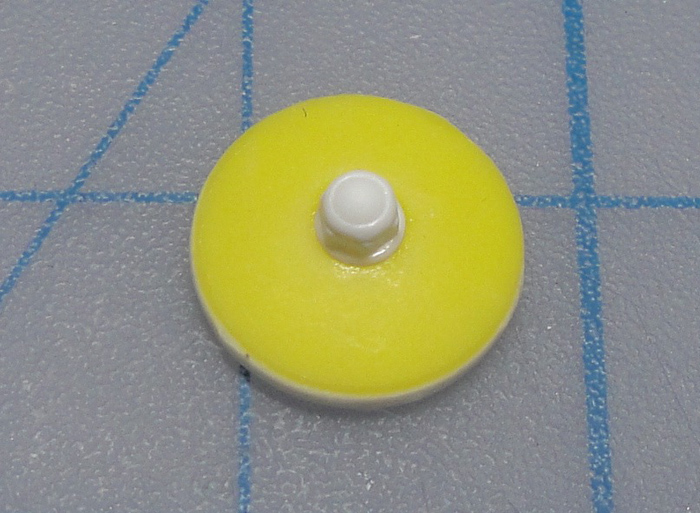
Missed a couple of steps of the stem being fabricated but here is the result. I'm quite pleased with this, not too modern and with just enough flair that it looks sort of Victorian.
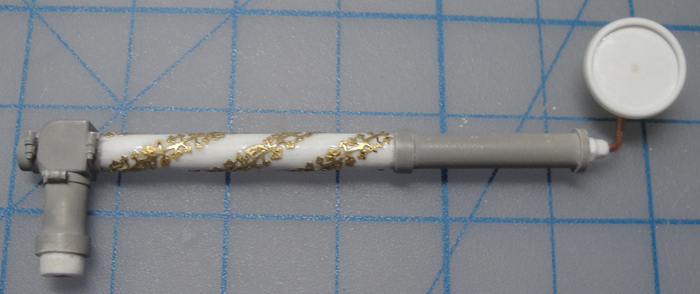
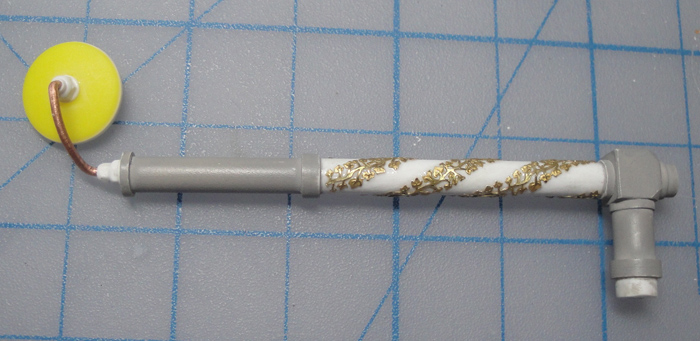
And instead of my usual post-script I will simply move onto the next post ...

KatsZenJammer- Resident member
- Posts : 2600
Join date : 2016-05-20
Age : 57
Location : Vancouver, BC
Re: Steampunk Harley - Tamiya 1/6 HD FLH Classic 'extreme' kit bash (Very Photo Heavy)
![]() by GaryDainton Sun 27 May 2018, 5:55 pm
by GaryDainton Sun 27 May 2018, 5:55 pm

GaryDainton- Advanced Member
- Posts : 4433
Join date : 2014-03-06
Age : 56
Location : Bolton UK
The Steamcycle Build 4th Anniversary
![]() by KatsZenJammer Sun 27 May 2018, 5:58 pm
by KatsZenJammer Sun 27 May 2018, 5:58 pm
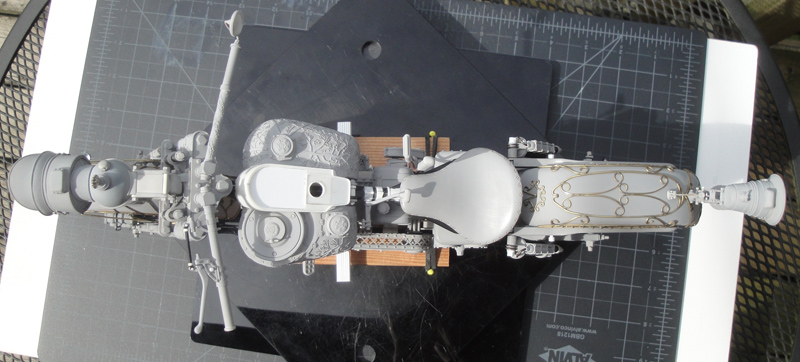
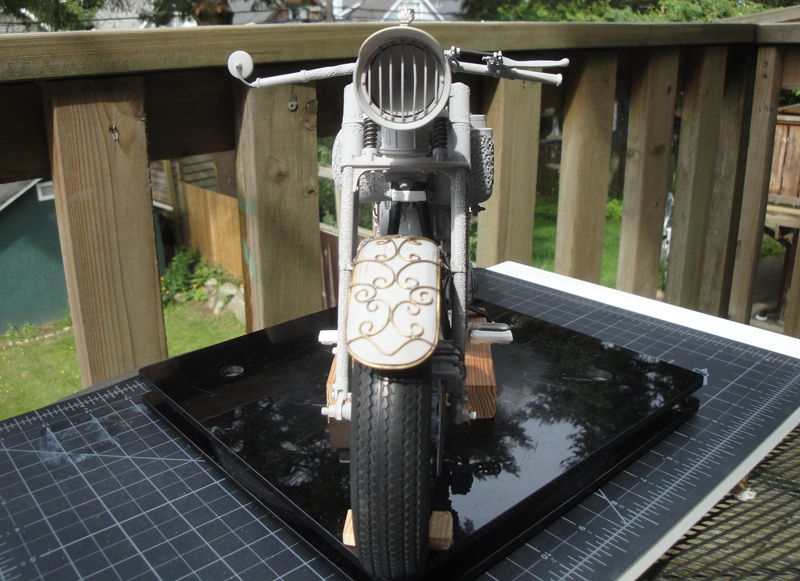
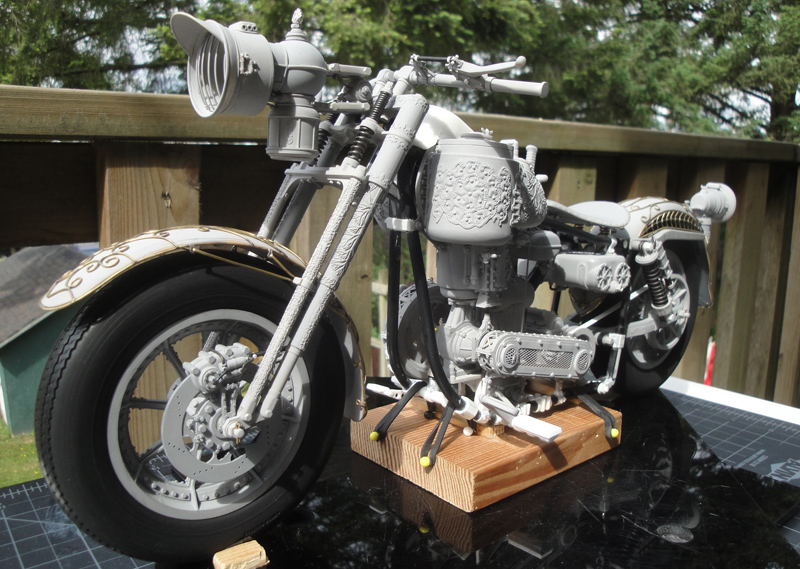

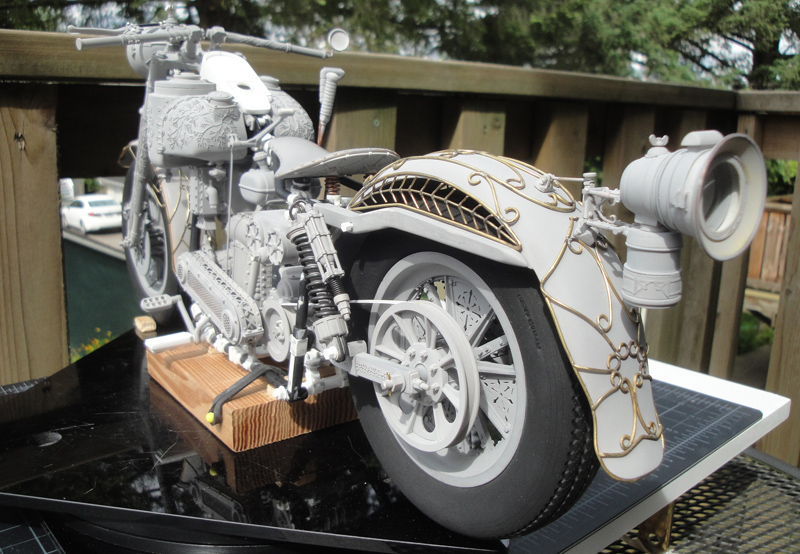

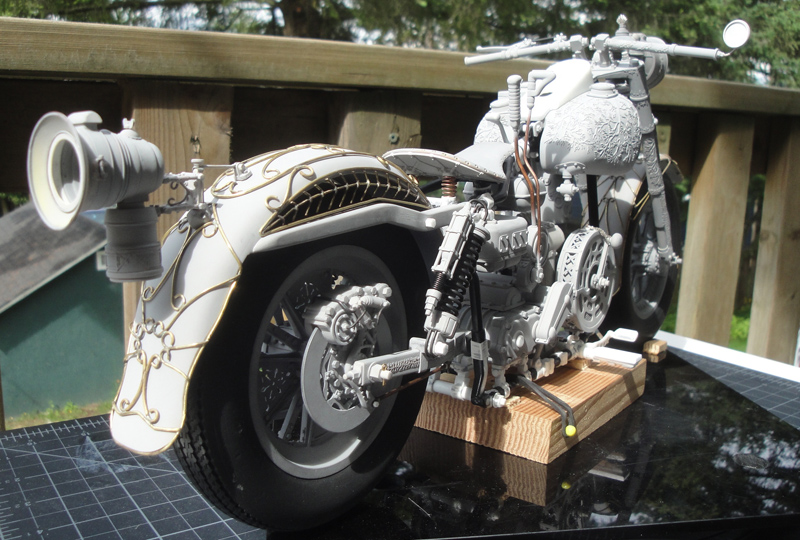
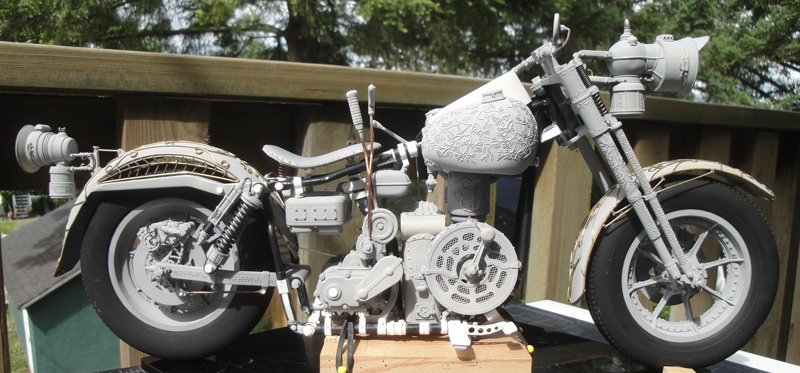
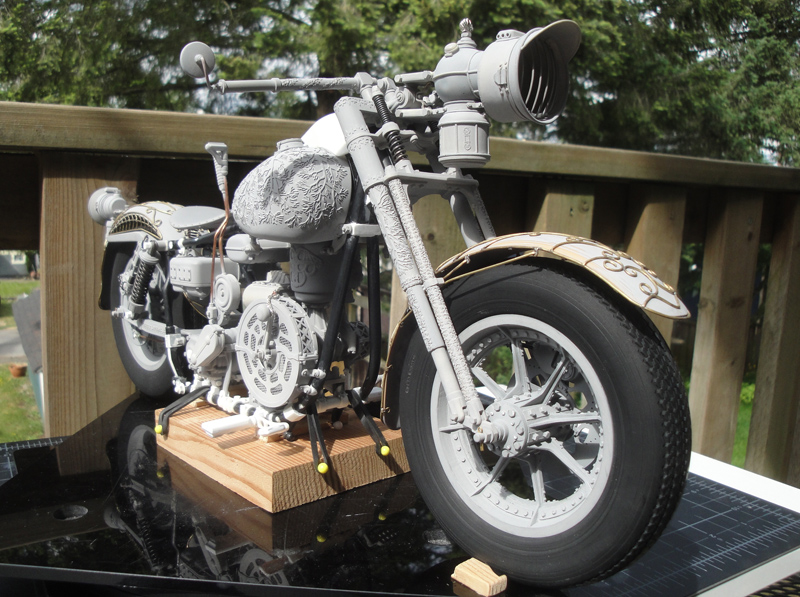
As can be seen I got the opportunity to shoot some primer on some of the bare parts. The assembly took some hours as I had to re-remember how stuff fit together and so forth. And once again I headed outdoors for the sunlight.
I was comparing shots from previous Birthdays and had to laugh a bit at myself (yet again) for the fact that I chose to take this on to begin with. But now it feels like it was worth it, though there are still bits that need to be created and such. In a previous post I optimistically under estimated how much was left to do - since the Birthday Assembly I have a better idea of what needs to be done and this includes the front and rear brake cable placement, the rear brake linkage, the drive belts, the console and four dials, the ports for the feeds to the four dials, all of the plumbing and maybe even some handles for the head and tail lights. That last may not happen, but nothing is set in stone at this point.
Many, many thanks to everyone who has been following this journey so far, a long strange trip that isn't quite over yet. I'm sure the adventure of painting this thing will take a bit of time as well, lol.
Nothing exceeds like excess ...
KatsZenJammer- Resident member
- Posts : 2600
Join date : 2016-05-20
Age : 57
Location : Vancouver, BC
Re: Steampunk Harley - Tamiya 1/6 HD FLH Classic 'extreme' kit bash (Very Photo Heavy)
![]() by GaryDainton Sun 27 May 2018, 6:01 pm
by GaryDainton Sun 27 May 2018, 6:01 pm
GaryDainton- Advanced Member
- Posts : 4433
Join date : 2014-03-06
Age : 56
Location : Bolton UK
Re: Steampunk Harley - Tamiya 1/6 HD FLH Classic 'extreme' kit bash (Very Photo Heavy)
![]() by Geezerman Tue 29 May 2018, 12:41 pm
by Geezerman Tue 29 May 2018, 12:41 pm
I have SO enjoyed watching this build.
Thank you, Kats, for sharing this !
Geezerman- Advanced Member
- Posts : 3651
Join date : 2013-02-24
Age : 88
Location : Gulf coast of central Florids
Re: Steampunk Harley - Tamiya 1/6 HD FLH Classic 'extreme' kit bash (Very Photo Heavy)
![]() by KatsZenJammer Sun 03 Jun 2018, 5:40 pm
by KatsZenJammer Sun 03 Jun 2018, 5:40 pm
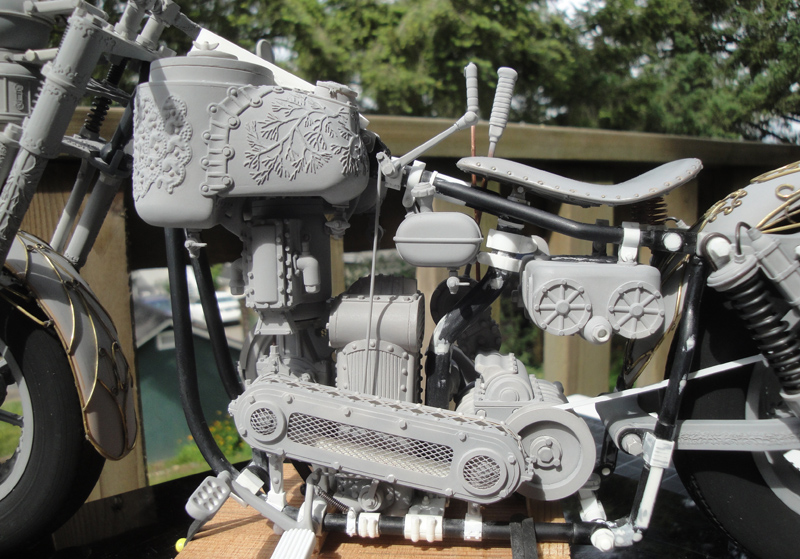
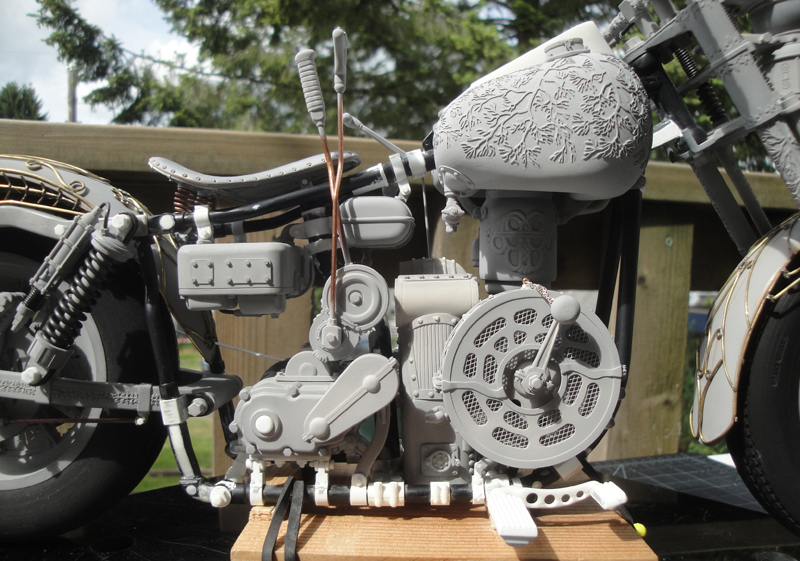
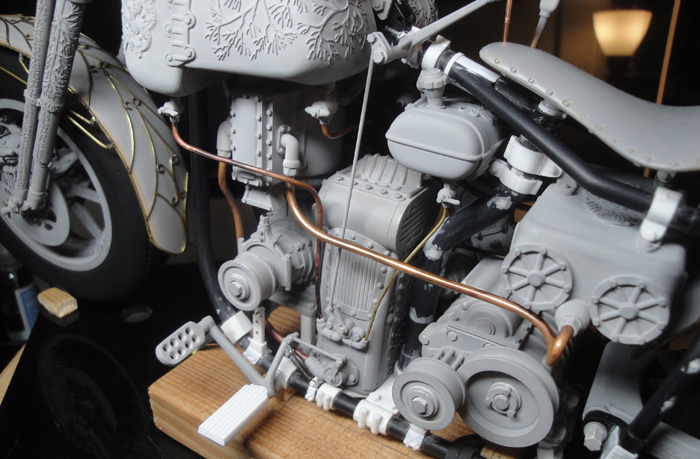
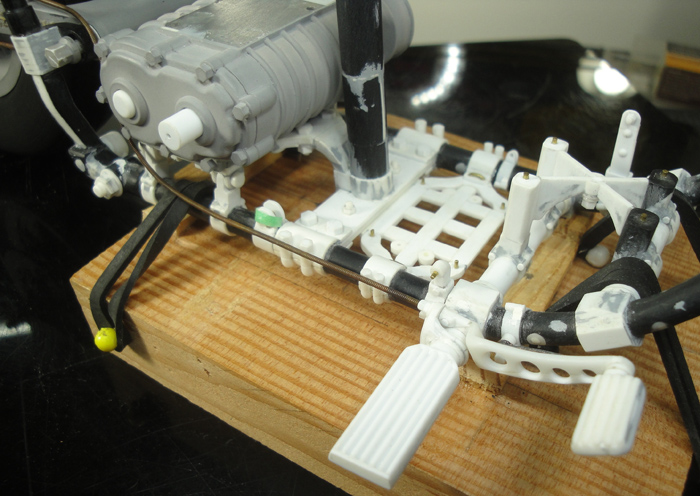
After the anniversary assembly I didn't have the heart to pull it all apart immediately, plus it was a great opportunity to do some checking and thinking and ... Plumbing!! This was the start of some experimenting, a feed from the Condenser to the Pump and from the Pump to the Boiler/Burner.
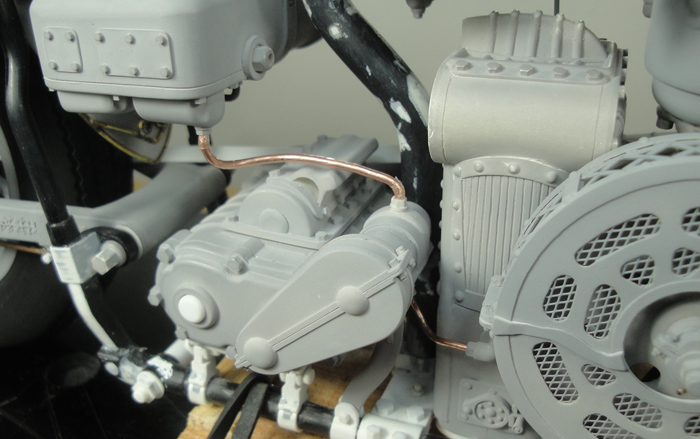
Things worked out well enough that I worked up the water feed to the Condenser.
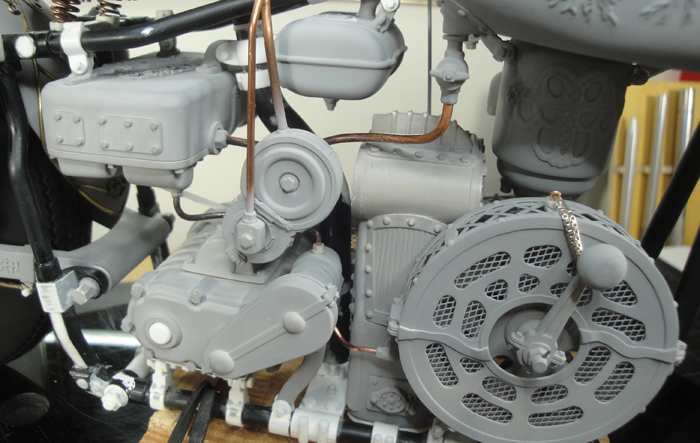
Forgot to take in-between photos but here is some more plumbing. The two fuel feeds to the Boiler/Burner are thin wire and the steam feed and exhaust are thicker (call it approx. 12 gauge wire). Also, kind of hard to see, is the feed from the secondary Water Tank to the main water feed valve. One of the changes here from the anniversary photos is that I have flipped the steam intake and the exhaust outflow ports because the logistics of the set up made it easier that way. I can't say that I knew this might be a possibility but the two ports were made to be easily flippable, thankfully.
After thinking about it for years now I finally got around to making the plastic lens for the head lamp. Options like vacuum forming and casting resin seemed a bit more complex than I wanted to get so I went for the rough and ready paint stripping heat gun. I didn't get any photos of the process but it was simply cutting a clear plastic bonbon box into panels, heating a panel to 'floppy' and setting it atop the original glass lens, heating it more to form the shape and hoping for the best.
On the left is the glass lens and the right is the almost finished plastic lens. The cracking and spalling on the glass lens was caused by the heat from the plastic itself, which was a surprise. I also haven't shown the nine or ten other attempts that didn't work out, lol.
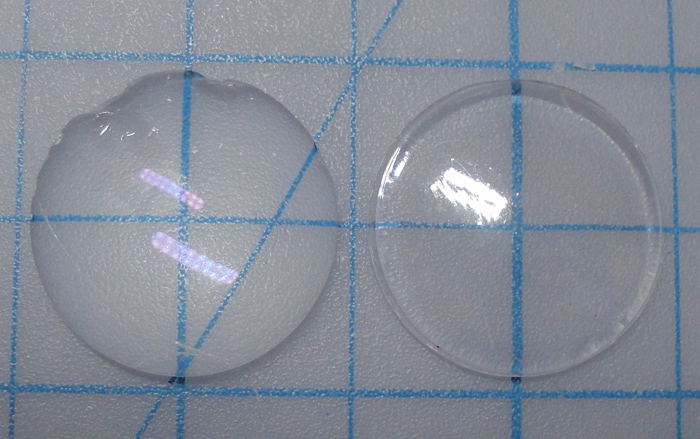
Test fit. The plastic worked well, it came out imperfect and slightly 'wobbly' which I first called a Fail but milady pointed out that old glass was often imperfect and wobbly and this would fit into the whole motif. I might 'age' the lens a bit with some transparent sepia and soot when the painting gets underway.

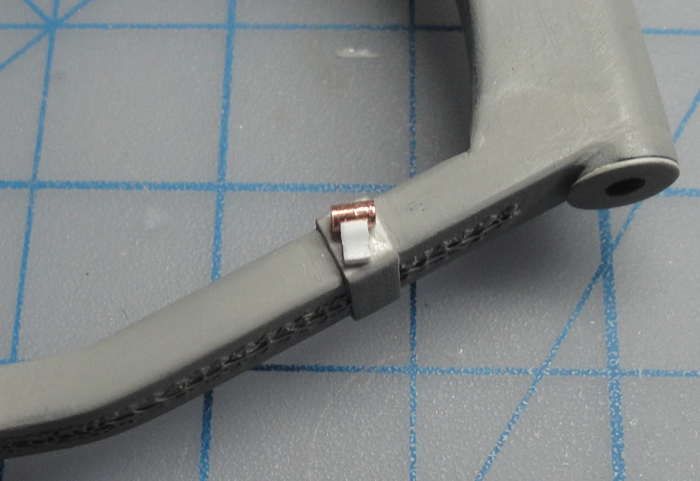
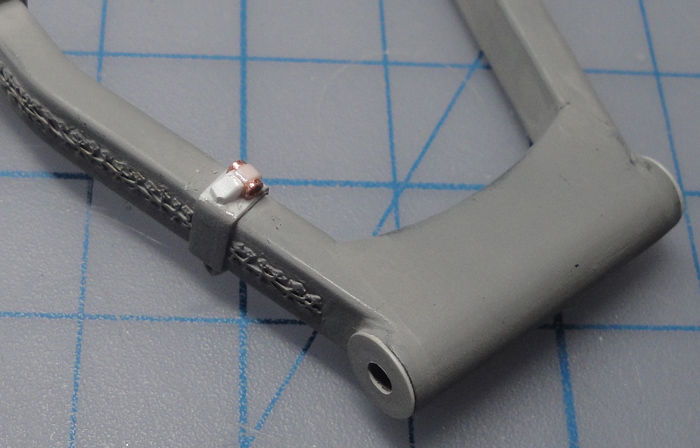
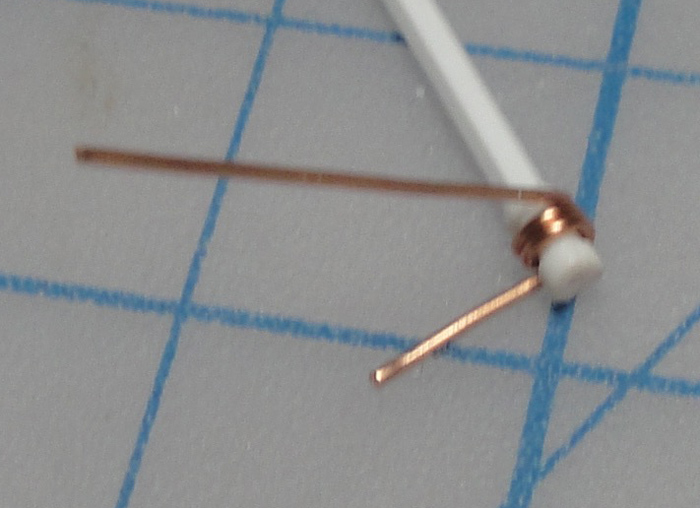
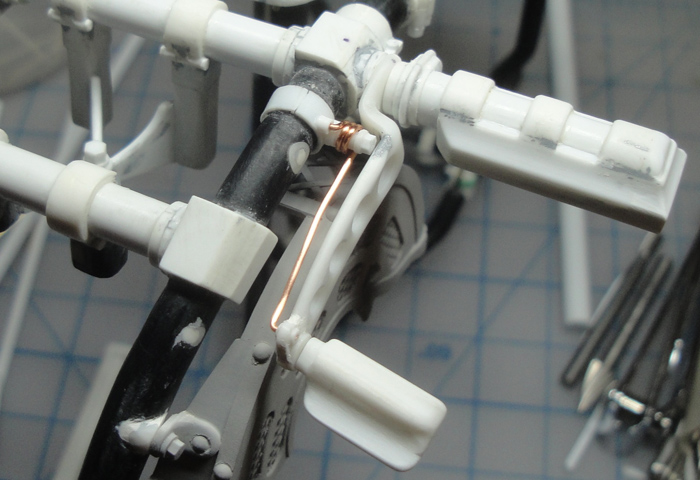
I was breaking my brain trying to envision the rear brake linkage and set up so I diverted to the front brake cable. Using guitar string as originally planned provided some challenges but I really like the look of it. The solution here was to first anneal the string to make it less springy and more apt to keeping curves and putting in a cable guide bit on the back of the fork crossmember big enough that I could install the brake cable in two pieces. The cable guide is a bit of copper tubing drilled out to allow for the guitar string, affixed with CA and decorated with a strip of styrene and more CA for reinforcement.
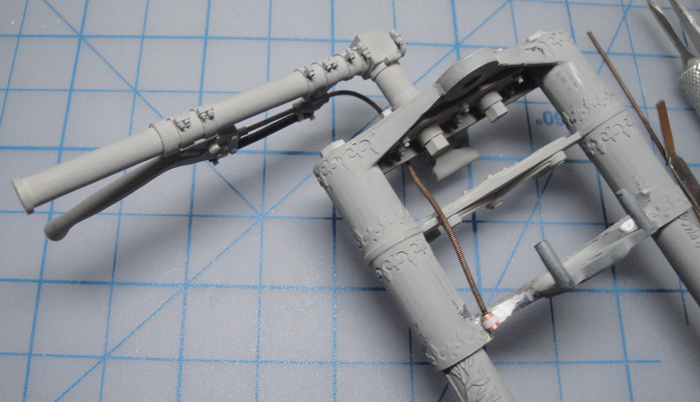
The cable from the brake to the cable guide, or the bottom portion. I had originally planned to put in more cable guides but with the annealed guitar string this proved to be unnecessary and I was able to have the cable sit 'free.' This isn't the final, there will be more tweaking to the length and the curve.
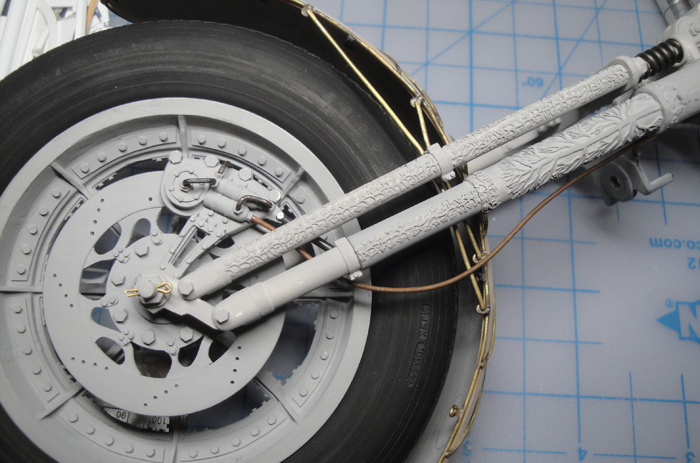
How it looks going 'through' the cable guide.
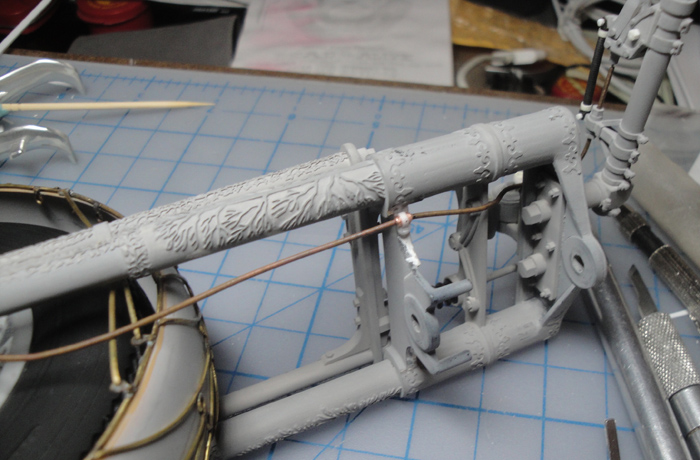
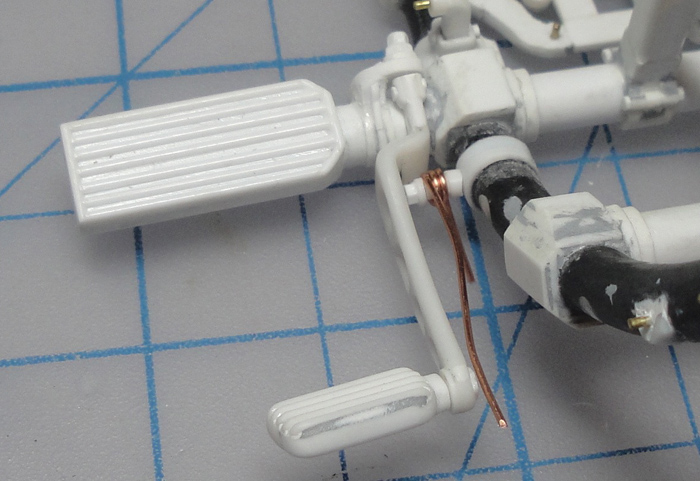
As I had hoped the work on the front brake cable helped clarify some things and so here is the rear brake lever with added bits to facilitate my current plan.
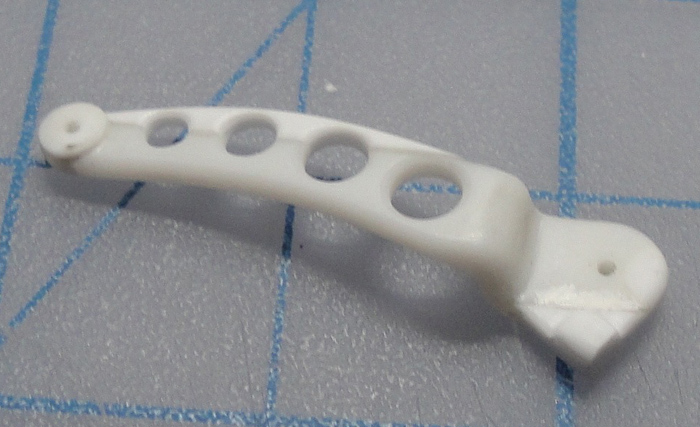
The foot pads with a bit more work done. These are almost complete at this point, unless I get a sudden inspiration.
So, the list of things that need to be done shrinks a bit more. I still have to make;
- the rear brake return spring and linkage plus the guides for the cable
- feed ports for the console gauges for the boiler/burner and the condenser and add in the feeds to under the console
- the console and dials itself
- belts for the drives
- the centre stand for the frame
- the lens for the rear tail lamp
- wrapping for the hand grips of the handlebars
- maybe some asbestos wrap for the steam and exhaust pipes
- sanding of the front tire to remove the 'modern' casting stuff
... and something I had totally forgotten until this moment which is the exhaust for the burner (and at this point I have no idea how I'm going to do this so I might just omit it altogether and call the lack of a burned gasses exhaust part of the Steampunk Magical Machinery thing).
At least I got the rear view mirror done, lol.
Nothing exceeds like excess ...
KatsZenJammer- Resident member
- Posts : 2600
Join date : 2016-05-20
Age : 57
Location : Vancouver, BC
Re: Steampunk Harley - Tamiya 1/6 HD FLH Classic 'extreme' kit bash (Very Photo Heavy)
![]() by GaryDainton Sun 03 Jun 2018, 5:57 pm
by GaryDainton Sun 03 Jun 2018, 5:57 pm
GaryDainton- Advanced Member
- Posts : 4433
Join date : 2014-03-06
Age : 56
Location : Bolton UK
Re: Steampunk Harley - Tamiya 1/6 HD FLH Classic 'extreme' kit bash (Very Photo Heavy)
![]() by KatsZenJammer Sun 10 Jun 2018, 6:57 pm
by KatsZenJammer Sun 10 Jun 2018, 6:57 pm
So now I've reached the stage where no matter how much I try to think of things I find I've forgotten something along the way. Thankfully the remaining stuff is not hideously involved and complex ... I hope, lol.
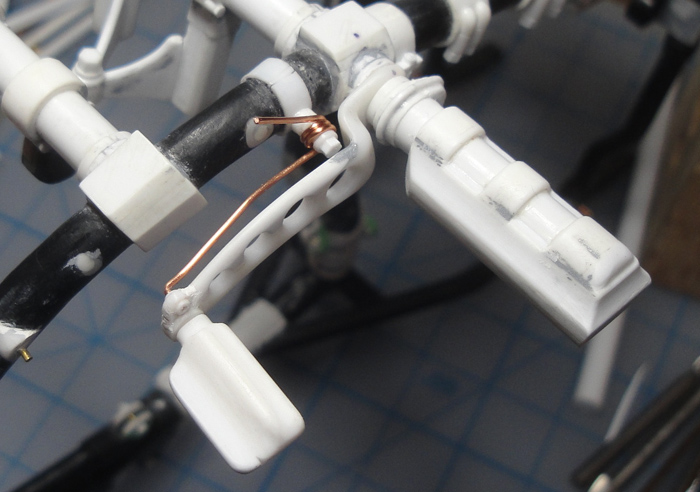
The rear brake cable mount starts to take shape. After beating my head against a wall of preconceived notions I finally made the breakthrough of realizing I could attach the cable mount to the footpad post instead of to the frame. I realize this might not be 'standard' but at this point I've ventured fully into the 'Steampunk Magic' world of making things look as cool as possible without dwelling too much on the physical reality of logistical sensibility.
Detailing added, hex nuts and little bits and all that associated stuff.
Pretty much complete at this point, two views of the mostly done details.
The rear break cable guide takes shape. There might be one of these mounted to the frame as well but it seems like I can get away with just this one mounted to the rear wheel yoke.
And here's one of the forgotten bits (in the embellishment zone) which I finally remembered and dealt with (as I figured I'd probably forget it again if I put it aside).
The return spring for the rear brake foot lever is developing, but will have to wait temporarily as I have also remembered yet another forgotten bit in the form of the secondary drive belt tensioning roller. This will be a bit involved as I plan to mount it to the rear wheel yoke and because I had forgotten it I will need to cut away some of the PE embellishment to add the mount point clamp and stuff. I considered not putting the tension roller in but for an old fashioned belt drive it is kind of an essential part, plus it ought to add yet more 'excessive detail' pop to the build because there isn't enough of that already *insert ironic groan here*.
As well, last post I suggested that I might not worry about the exhaust venting for the boiler/burner and that inspired my subconscious to dive deep and reveal to me that nowhere in the set up have I included a Pressure Release Valve ... oops. I spent some time mulling this lack and came to the conclusion that no amount of Steampunk Magic could allow for this so the exhaust is now slowly gestating in the imagination lab. The current idea is to combine the burnt gasses and steam pressure release into one exhaust pipe with some Magical Mechanics to allow the one pipe to function for both purposes.
At least I can check the rear brake cable mount to the foot lever off the list, lol.
Nothing exceeds like excess ...
KatsZenJammer- Resident member
- Posts : 2600
Join date : 2016-05-20
Age : 57
Location : Vancouver, BC
Re: Steampunk Harley - Tamiya 1/6 HD FLH Classic 'extreme' kit bash (Very Photo Heavy)
![]() by Geezerman Mon 11 Jun 2018, 11:51 am
by Geezerman Mon 11 Jun 2018, 11:51 am
Geezerman- Advanced Member
- Posts : 3651
Join date : 2013-02-24
Age : 88
Location : Gulf coast of central Florids
Re: Steampunk Harley - Tamiya 1/6 HD FLH Classic 'extreme' kit bash (Very Photo Heavy)
![]() by GaryDainton Mon 11 Jun 2018, 4:38 pm
by GaryDainton Mon 11 Jun 2018, 4:38 pm
GaryDainton- Advanced Member
- Posts : 4433
Join date : 2014-03-06
Age : 56
Location : Bolton UK
Re: Steampunk Harley - Tamiya 1/6 HD FLH Classic 'extreme' kit bash (Very Photo Heavy)
![]() by Speed Racer 65 Thu 14 Jun 2018, 2:48 am
by Speed Racer 65 Thu 14 Jun 2018, 2:48 am

Speed Racer 65- Intermediate Member
- Posts : 865
Join date : 2015-08-06
Location : Louisville KY
Re: Steampunk Harley - Tamiya 1/6 HD FLH Classic 'extreme' kit bash (Very Photo Heavy)
![]() by disabled modeler Thu 14 Jun 2018, 10:59 am
by disabled modeler Thu 14 Jun 2018, 10:59 am

disabled modeler- Intermediate Member
- Posts : 979
Join date : 2016-05-22
Age : 60
Location : Quincy,IL. USA
Re: Steampunk Harley - Tamiya 1/6 HD FLH Classic 'extreme' kit bash (Very Photo Heavy)
![]() by Mr Hirakawa Fri 15 Jun 2018, 8:36 am
by Mr Hirakawa Fri 15 Jun 2018, 8:36 am

Mr Hirakawa- Resident member
- Posts : 1530
Join date : 2015-11-11
Age : 52
Re: Steampunk Harley - Tamiya 1/6 HD FLH Classic 'extreme' kit bash (Very Photo Heavy)
![]() by KatsZenJammer Sat 16 Jun 2018, 11:12 pm
by KatsZenJammer Sat 16 Jun 2018, 11:12 pm
Sudden inspiration allowed me to go gangbusters on the final drive belt tensioner, always a nice thing. Here's the tensioner wheel with the big belt wheel for perspective.

Hex nut detail and post added.
The lever starts to develop.
The hinge which will mount to the frame test fit and the set screw worked up. And a change to the original plan, in which I am mounting the tensioner to the frame instead of the rear wheel yoke - for purely logistical reasons. I'm going with a 'full open' setting on the set screw to imply that the cycle has a new final drive belt or that there is maintenance in progress. In the second photo you can more clearly see the threading on the set screw bolt, this was done with a small metal nut of appropriate size and a lot of cautious, gentle back and forth. I haven't done a lot of tap and die work in my life so this was challenging.
And now we move onto the return spring set up for the rear brake foot lever. I used 24 gauge copper wire and the post is 1 mm rod with 1.2 mm ends built up from round rod on the 'bottom' and a hex and round rod combo to cap it, giving it that nut on top of a washer look.
And then I discovered that I had pre-placed the clamp band too close in to the foot pad post so I had to remove and re-add before this pic.
After adding a little ring for the spring just behind the footpad for the rear brake. I went with the underside view because you can't see this stuff from above.
And while all of the above was going on I also started the centre stand. The portion here is cut from the original kit part. I'm going to develop this in the 'down' position as the steamcycle is not going to have a side mounted kickstand.
So, I can check off making the tensioner, the rear brake lever return spring is almost done, the centre stand is started and I'm sure I'm forgetting more yet. Another re-surfaced lost detail is a few 'hinges' for some of the clamps on the frame. I had put these off as they would be on the bottom of the frame and I feared breaking them off during the process, but now it's pretty much time to put those in.
Sadly this feels like one of those Twilight Zone situations where the more of the last bits I complete the more I still need to do. I blame this on my faulty memory and false optimism, lol. So, mostly for my own benefit, the updated list of things yet to come;
- ports for the feeds to the gauges in the Console
- the Console and gauges
- the burner exhaust/steam vent set up and pipe
- drive belts
- wrapping for the handles
- 'asbestos' looking wrap for the main steam and return feed pipes
- tail lamp lens
- sanding the mould detail off the front tire
And, of course, anything else I've forgotten, lol.
Nothing exceeds like excess ...
KatsZenJammer- Resident member
- Posts : 2600
Join date : 2016-05-20
Age : 57
Location : Vancouver, BC
Re: Steampunk Harley - Tamiya 1/6 HD FLH Classic 'extreme' kit bash (Very Photo Heavy)
![]() by GaryDainton Sun 17 Jun 2018, 12:30 pm
by GaryDainton Sun 17 Jun 2018, 12:30 pm
GaryDainton- Advanced Member
- Posts : 4433
Join date : 2014-03-06
Age : 56
Location : Bolton UK
Re: Steampunk Harley - Tamiya 1/6 HD FLH Classic 'extreme' kit bash (Very Photo Heavy)
![]() by disabled modeler Sun 17 Jun 2018, 1:11 pm
by disabled modeler Sun 17 Jun 2018, 1:11 pm
disabled modeler- Intermediate Member
- Posts : 979
Join date : 2016-05-22
Age : 60
Location : Quincy,IL. USA
Re: Steampunk Harley - Tamiya 1/6 HD FLH Classic 'extreme' kit bash (Very Photo Heavy)
![]() by Geezerman Mon 18 Jun 2018, 11:01 am
by Geezerman Mon 18 Jun 2018, 11:01 am
Loving this build !
Geezerman- Advanced Member
- Posts : 3651
Join date : 2013-02-24
Age : 88
Location : Gulf coast of central Florids
Re: Steampunk Harley - Tamiya 1/6 HD FLH Classic 'extreme' kit bash (Very Photo Heavy)
![]() by kpnuts Mon 18 Jun 2018, 6:06 pm
by kpnuts Mon 18 Jun 2018, 6:06 pm
kpnuts- Resident member
- Posts : 1676
Join date : 2015-01-29
Re: Steampunk Harley - Tamiya 1/6 HD FLH Classic 'extreme' kit bash (Very Photo Heavy)
![]() by beowulf Mon 18 Jun 2018, 9:27 pm
by beowulf Mon 18 Jun 2018, 9:27 pm

beowulf- Resident member
- Posts : 2469
Join date : 2013-05-02
Age : 62
Location : Monkey Hanger Town, UK
Re: Steampunk Harley - Tamiya 1/6 HD FLH Classic 'extreme' kit bash (Very Photo Heavy)
![]() by KatsZenJammer Sat 23 Jun 2018, 7:48 pm
by KatsZenJammer Sat 23 Jun 2018, 7:48 pm
Bits and pieces, bits and pieces. Here's a pic of the rear brake lever return spring with both ends seated (test fit). I've since blackened the spring and called this portion ready to wait for painting.
The rear brake cable test fit. Like the front brake I used annealed guitar string and also like the front it's in two parts meeting at the cable guide on the rear wheel yoke.

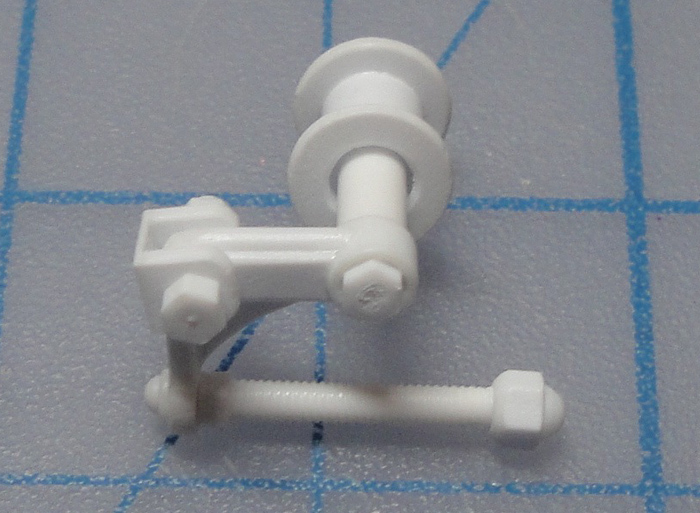
The final drive belt tensioner test fit. This turned out almost like I wanted, close enough to call it ready for painting.

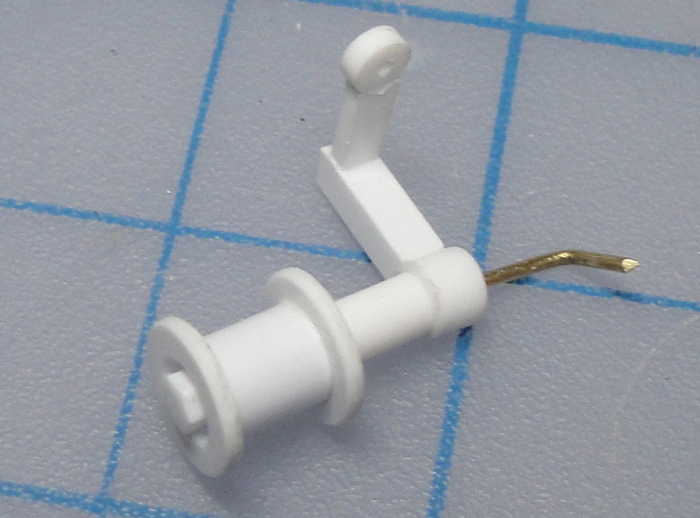
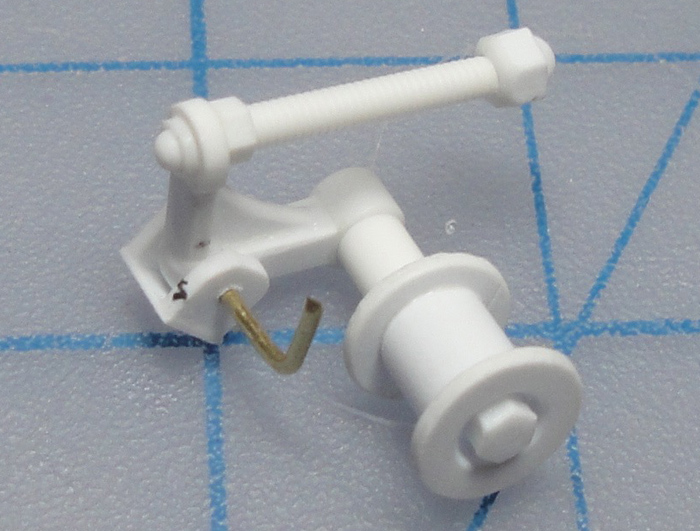
The pressure gauge port for the Condenser in place.
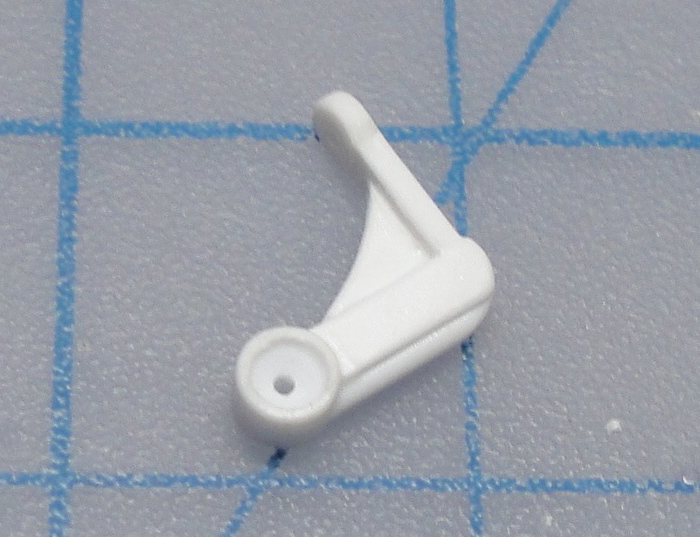
Ports for the boiler/burner in place. The vertical port is for the pressure gauge and the right angle port is for the temperature gauge. Two different sizes of leads as well with the temperature lead being thinner than the pressure lead, as is often the case in real life.
I've started work on the 'combined' exhaust set up as well, though nothing photo worthy as of yet. Currently the plan is to have is mounted on the top of the boiler/burner on the right side with the pipe leading down and to the back. Still mulling over how to combine both burned gasses and steam venting into a single pipe ...
I have some material I scrounged for the 'asbestos' pipe wrap but have yet to play around with it to see if it will work properly. The material for the belt drives has yet to be determined - my research has shown me that the belts need not Look like leather so that gives me some wiggle room.
Same goes for the handlebar wrapping, though I'd like that to look like leather if possible. Failing that I might just go for rough, dirty, heavy canvas or something to that effect.
The graphics for the gauges are almost done and once I know the sizes of the gauges I can start the process of printing them out to figure out the correct reduction and all that stuff. The Console awaits my attention but I'm holding off so that I can devote my full attention to it.
I found a clear plastic disc which might work well for the rear tail lamp, I hope, lol.
And all of this while I'm being distracted by the World Cup. Mind you I'm not a huge devotee of Footie, plus I only watch weekend matches, but that's enough to keep me from the work bench.
Nothing exceeds like excess ...
KatsZenJammer- Resident member
- Posts : 2600
Join date : 2016-05-20
Age : 57
Location : Vancouver, BC
Re: Steampunk Harley - Tamiya 1/6 HD FLH Classic 'extreme' kit bash (Very Photo Heavy)
![]() by kpnuts Sat 23 Jun 2018, 8:43 pm
by kpnuts Sat 23 Jun 2018, 8:43 pm
kpnuts- Resident member
- Posts : 1676
Join date : 2015-01-29
Re: Steampunk Harley - Tamiya 1/6 HD FLH Classic 'extreme' kit bash (Very Photo Heavy)
![]() by Geezerman Sat 23 Jun 2018, 8:53 pm
by Geezerman Sat 23 Jun 2018, 8:53 pm
Re: annealed guitar string. Is this heated so that the inner wire and the outer wrap wire together, are softened to be more flexible? I soften regular solid copper wire to wrap / hold branches on bonsai while styling where I want a bend. I was just wondering about the guitar string that consists of an inner wire with outer wire wrapping, being annealed as one solid wire. That's interesting !
Geezerman- Advanced Member
- Posts : 3651
Join date : 2013-02-24
Age : 88
Location : Gulf coast of central Florids
Re: Steampunk Harley - Tamiya 1/6 HD FLH Classic 'extreme' kit bash (Very Photo Heavy)
![]() by Sponsored content
by Sponsored content
Sponsored content
Page 19 of 25 • 1 ... 11 ... 18, 19, 20 ... 25 ![]()
» Tamiya 1/6 Harley Davidson Fat Boy Lo
» Tamiya 1/6 Harley Davidson FLH1200
» Steampunk Ducati
» '57 Salvage bash-up
|
|
|