
Steampunk Harley - Tamiya 1/6 HD FLH Classic 'extreme' kit bash (Very Photo Heavy)
Page 20 of 25 •  1 ... 11 ... 19, 20, 21 ... 25
 ![]()
Re: Steampunk Harley - Tamiya 1/6 HD FLH Classic 'extreme' kit bash (Very Photo Heavy)
![]() by KatsZenJammer Sat 30 Jun 2018, 5:09 pm
by KatsZenJammer Sat 30 Jun 2018, 5:09 pm

Clay - I tried annealing the guitar string because it was way too 'springy' to hold curves. I didn't get it super red hot but just heated it until the outer wire showed a dullish red and this seemed to soften the wire enough that it would hold curves without being too soft. Also, it took a lot of cleaning with a brass wire brush to get all the carbonization out from the outer wire coil. Of course this also meant that I had to be careful working the guitar string because it was easily crushable.
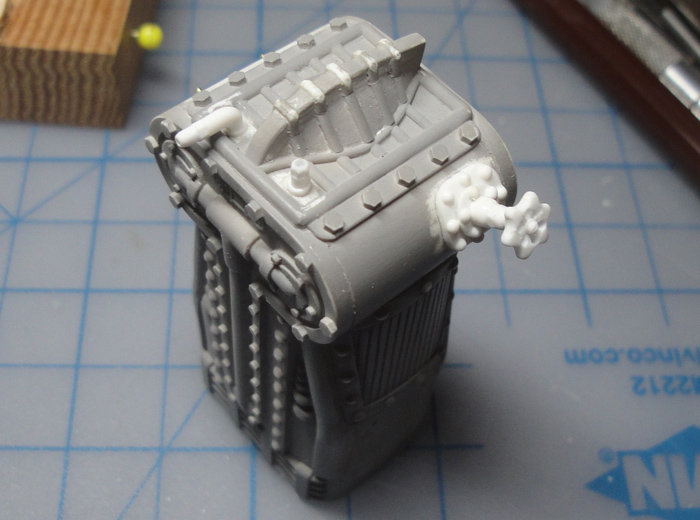
So this week's post is all about the recently remembered exhaust system. I cut the base plate from some styrene tube of the same diameter as the bits I used for the boiler/burner top so the curve matches. Add the mount point for the exhaust pipe and a little ring around the base for effect.

Set up the mount points on the boiler/burner housing.
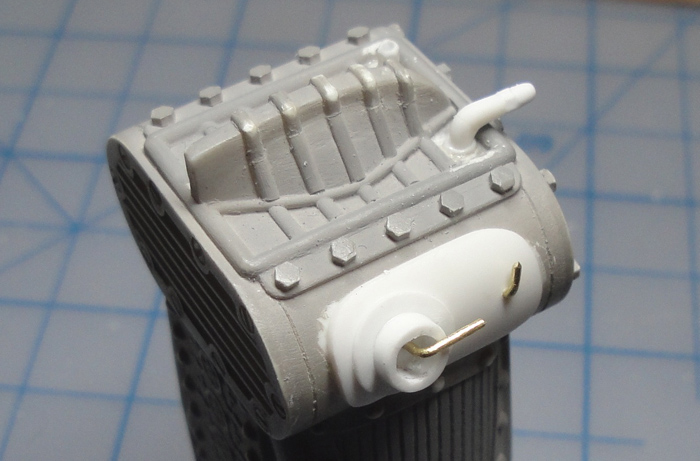
Going with the dual burned gasses/steam vent idea requires a pressure release valve. Here's the bits in development.

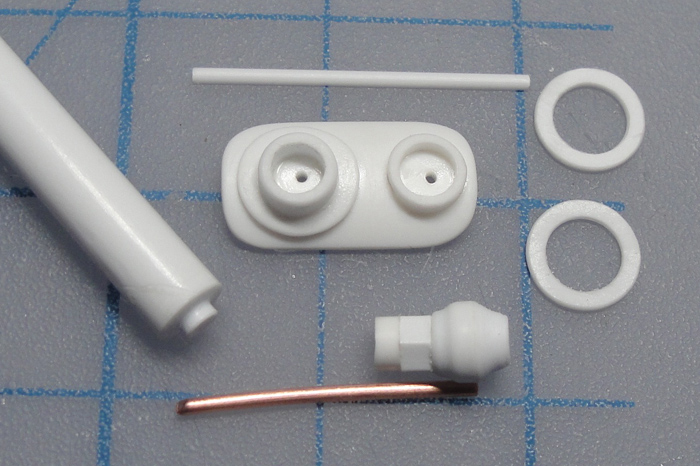
The pressure release valve takes shape and the 'bypass' tube is added to the base plate between the two ports. The 'knob' starts to develop as well, simply adding some bits of half circle rod on the edge disc cut from styrene rod.
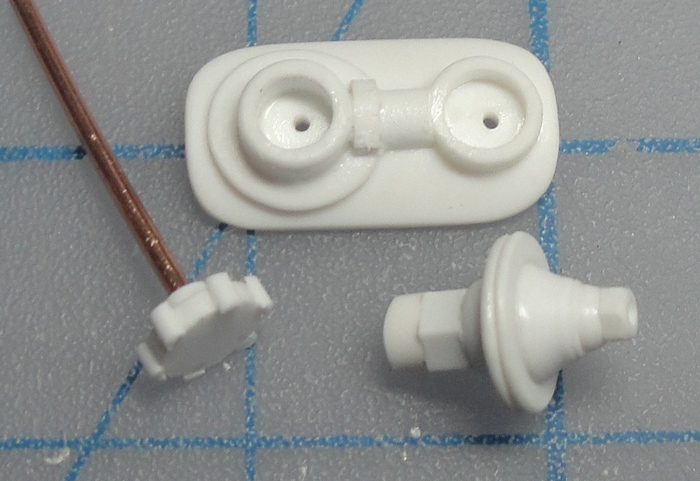
The knob after more work and the pressure release valve after I cut down some bits because it stuck out too much.
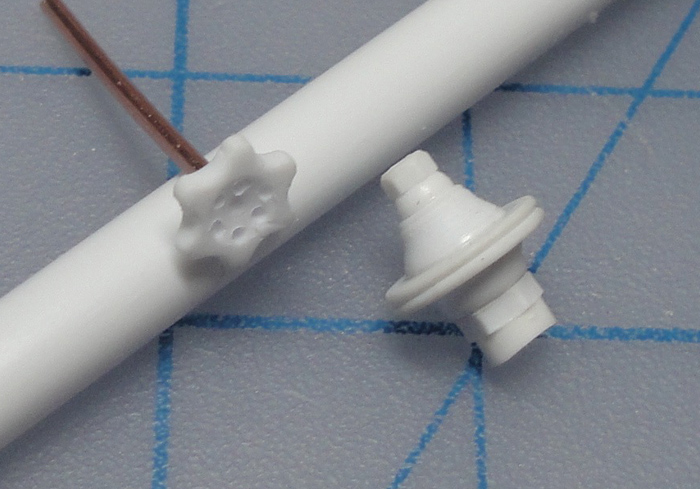
Bring on the hex nuts ...

A look at the pressure release valve with the knob in place.

The base plate gets some rivets.

Test fit of the contraption - it was at this point that I thought, "That knob needs to be bigger."

So I made a bigger knob in the same style as the first one. Not being one to waste unnecessarily I decided to add a plate on the other side of the boiler/burner and mount the smaller knob there - for what purpose I have no idea but it should look okay. More on this extra bit to come.

We end this post with a test fit of the exhaust pipe. This is made from 3 mm copper tube which was soft enough that it didn't need annealing which I prefer. I used the typical spiral spring tube bender and some nylon headed pliers to assist with the tight curve. This is just the rough first hack, the exhaust pipe will be tweaked and refined a bit more. Also, I used 'Blu-Tac' to secure the rear part to the frame for an idea of the mounting point, the 'frame mount clamp' is still to come.
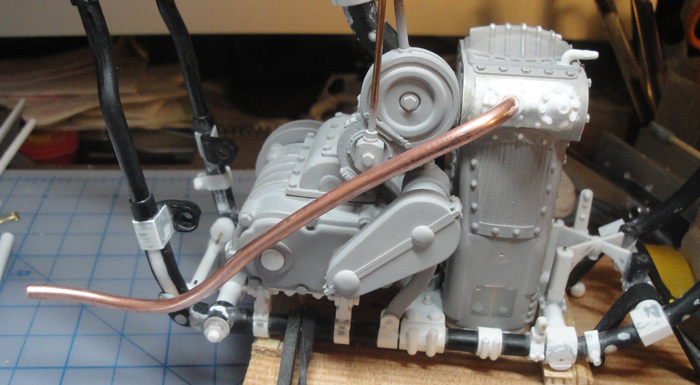
The progress on the exhaust is a morale boost - I had expected more heartache and anguish in my pessimistic moments. Since I took the last photo I've since cleaned up the exhaust pipe and added a slight flare to the open end and started on the frame mount clamp set up.
I must admit that the Console is kind of breaking my brain but only because I haven't started actively working on it. I hope that once I get started it will fall into place. At least the gauge leads will be easy enough, they just have to disappear between and under the tanks in roughly the correct positions.
The frame stand is the next bit awaiting my attention. I got a start on it and then left it to allow the sub-conscious to chew on the options.
The wrapping detail stuff has been collected into a catch all category I'm calling 'Dressage' for fun. Sort of like the addition of stuff like a properly folded hankie and a flower in the lapel button of a formal suit, lol.
Nothing exceeds like excess ...

KatsZenJammer- Resident member

- Posts : 2600
Join date : 2016-05-20
Age : 57
Location : Vancouver, BC
Re: Steampunk Harley - Tamiya 1/6 HD FLH Classic 'extreme' kit bash (Very Photo Heavy)
![]() by GaryDainton Sat 30 Jun 2018, 9:21 pm
by GaryDainton Sat 30 Jun 2018, 9:21 pm

GaryDainton- Advanced Member
- Posts : 4433
Join date : 2014-03-06
Age : 56
Location : Bolton UK
Re: Steampunk Harley - Tamiya 1/6 HD FLH Classic 'extreme' kit bash (Very Photo Heavy)
![]() by Geezerman Sun 01 Jul 2018, 10:48 am
by Geezerman Sun 01 Jul 2018, 10:48 am


Geezerman- Advanced Member
- Posts : 3651
Join date : 2013-02-24
Age : 88
Location : Gulf coast of central Florids
Re: Steampunk Harley - Tamiya 1/6 HD FLH Classic 'extreme' kit bash (Very Photo Heavy)
![]() by KatsZenJammer Sat 07 Jul 2018, 11:09 pm
by KatsZenJammer Sat 07 Jul 2018, 11:09 pm
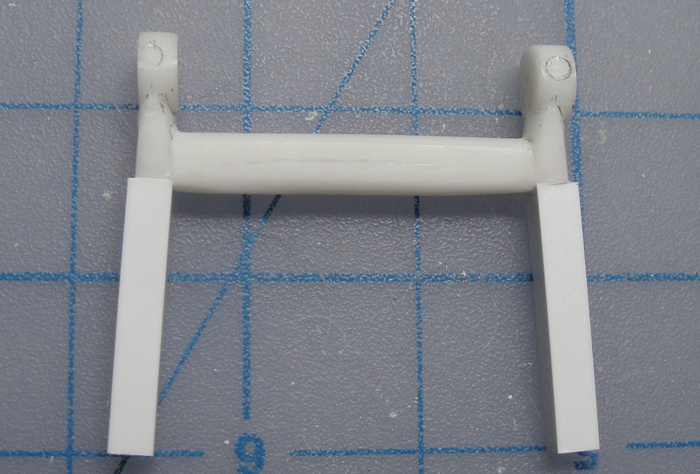
In the realm of bits and pieces one can get focused on the little bits and forget to take photos. Here's the exhaust pipe mount/clamp/thing after the majority of the work was done. One side will be affixed to the frame which will make painting it interesting.
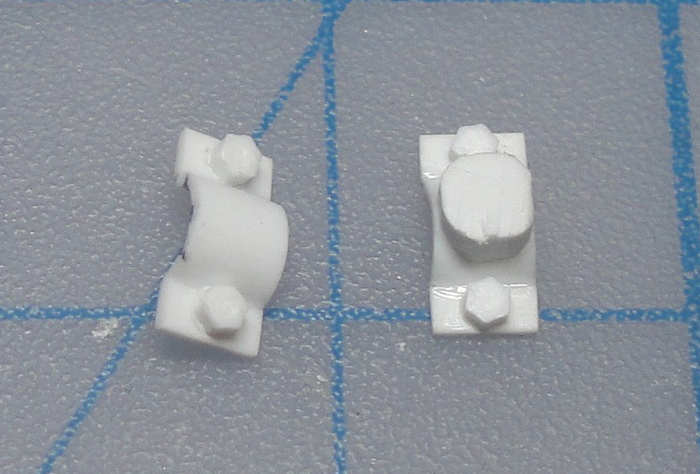
And pretty much done.
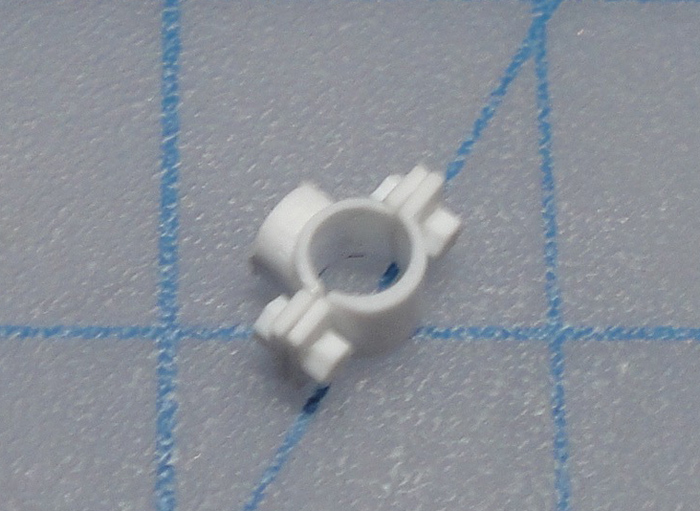
Attached to the frame - not yet sure of if I will be adding some additional 'clamp' detail to the frame member itself.

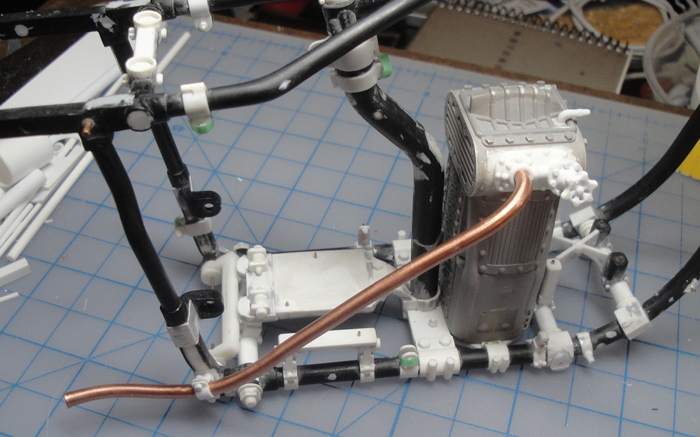
Test fit of the set up - and a sigh of relief when I didn't have to tweak everything for proper alignment. It's always nice when being obsessively fiddly in advance works out. The copper tube is going to be blackened (with Jax brand stuff) - more photos on this later.
The plate for the redundant knob for the other side of the boiler/burner gets worked on. Still haven't thought of a plausible reason for it but what the heck, it'll add to the detail density.

The first, smaller knob and the plate with rivet heads affixed.

Two views of the set up test fit. I'm going to have to do another assembly test to see if this is even viable - you might not be able to reach it behind whatever else is in the area, lol.

The centre stand gets legs. I got a little paranoid here and drilled holes for 20 gauge brass pins to reinforce, glued with a liberal amount of MEK to insure the styrene melted real good then reinforced that with thin CA after it had cured for a day.
Now the feet and some detail/reinforcement stuff.

Adjustments, shaping and details - still a ways to go but the basic idea is forming. And, yeah, I started this with no clear idea of what I wanted it to look like, lol.

And while all of the above was going on I was, well, basically pickling brass and copper bits. The plumbing bits aren't that photo worthy but the fender scrollwork has taken days and isn't yet done at this point. But I'm pleased at how it's gone so far, bearing in mind that these bits are shiny brass wire.

The stuff I use to blacken the brass and copper is Jax, previously mentioned in relation to the exhaust pipe. I was introduced to the stuff when I was working on the tall ship rescue and I find it easy to use but it requires patience, like days worth. I've also noticed that not only does this process darken the metal but it makes paint adhere to it better, I've painted blackened brass wire matte white and bent it and the paint held. Of course I'm only doing this because I bought a big bottle of the stuff years ago and still haven't used half of it yet, lol.
I plan to assemble a bunch of this stuff for the purpose of taking photos, perhaps next week's post will include those.
Starting to feel like I'm almost at the top of a mountain ... but it's only the First one, lol. With bits and pieces still needing to be done but semi-thought out the sub-conscious is now beginning to develop pre-formed anxieties for the painting process. I'm trying to keep this kind of thing in check, nothing stalls me faster than anticipation anxiety. Well, other than being distracted by life ...
Nothing exceeds like excess ...
KatsZenJammer- Resident member
- Posts : 2600
Join date : 2016-05-20
Age : 57
Location : Vancouver, BC
Re: Steampunk Harley - Tamiya 1/6 HD FLH Classic 'extreme' kit bash (Very Photo Heavy)
![]() by disabled modeler Sun 08 Jul 2018, 7:53 am
by disabled modeler Sun 08 Jul 2018, 7:53 am
disabled modeler- Intermediate Member

- Posts : 979
Join date : 2016-05-22
Age : 60
Location : Quincy,IL. USA
Re: Steampunk Harley - Tamiya 1/6 HD FLH Classic 'extreme' kit bash (Very Photo Heavy)
![]() by Skid Sun 08 Jul 2018, 8:50 am
by Skid Sun 08 Jul 2018, 8:50 am
Please tell me that you are going to enter this in many competitions........ the modelling world deserves to see this in the flesh.
My hat is off to you Kats, you deserve an award of the highest accolade for this.
_________________
Al.
Constructive criticism is always welcome.
“Success always demands a greater effort.” Winston Churchill
"Success is failure turned inside out" Unknown

Skid- Admin
- Posts : 7129
Join date : 2013-02-15
Age : 75
Location : Newcastle. Good Old Blighty. -

Re: Steampunk Harley - Tamiya 1/6 HD FLH Classic 'extreme' kit bash (Very Photo Heavy)
![]() by Geezerman Sun 08 Jul 2018, 9:43 am
by Geezerman Sun 08 Jul 2018, 9:43 am
Geezerman- Advanced Member
- Posts : 3651
Join date : 2013-02-24
Age : 88
Location : Gulf coast of central Florids
Re: Steampunk Harley - Tamiya 1/6 HD FLH Classic 'extreme' kit bash (Very Photo Heavy)
![]() by GaryDainton Sun 08 Jul 2018, 11:27 am
by GaryDainton Sun 08 Jul 2018, 11:27 am
GaryDainton- Advanced Member
- Posts : 4433
Join date : 2014-03-06
Age : 56
Location : Bolton UK
Re: Steampunk Harley - Tamiya 1/6 HD FLH Classic 'extreme' kit bash (Very Photo Heavy)
![]() by KatsZenJammer Sun 15 Jul 2018, 1:40 am
by KatsZenJammer Sun 15 Jul 2018, 1:40 am
Al - I'm not much of a traveller so venturing outwards for competitions isn't likely but our local IPMS chapter has an annual contest and I do plan to join and take part at some point, once it's been built that is. Plus the one LHS I frequent displays works from their staff and customers, that's another option for public display of the Steamcycle.
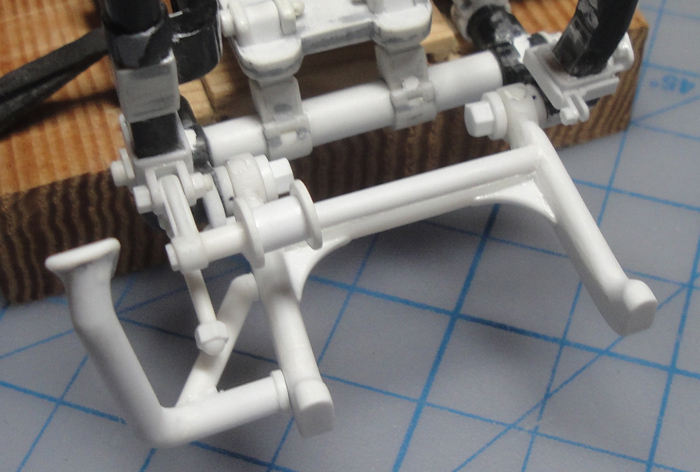
This week's post is all about the centre stand. Here's a test fit, after some more detailing, with the final drive belt tensioner while I was checking clearances and such. Even though I plan to have it in the down position for the finished build I wanted to insure that it was built viably, which is to say it wouldn't interfere with anything in the up position.
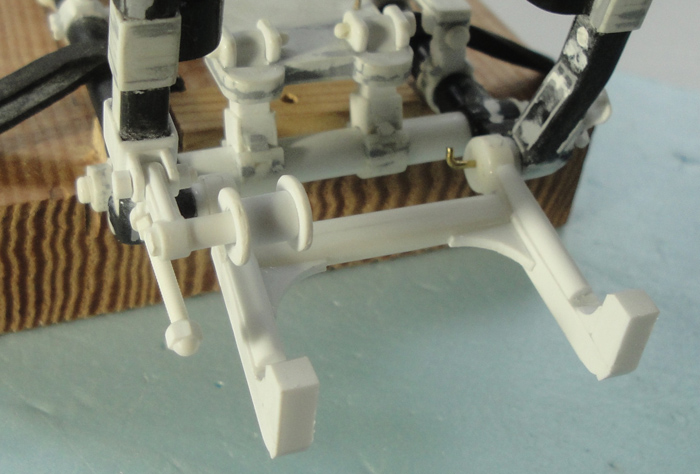
The foot lever starts taking shape. I had considered something simple, like a straight rod, but some of the centre stands I saw while researching had foot levers which were more involved and their appearance appealed to me.

And again with the final drive belt tensioner to check clearances.

The 'core' of the foot lever with pad affixed in place. Though it will be glued to the stand leg once done at this point it's kept in place with a peg of brass wire for ease of attachment and separation.

The 'stoppers' set up on the frame. I'd considered making these look more heavy and/or attached with clamps and all that but in the end I chose the route of making them look like part of the frame member moulding. It was just easier that way, lol.
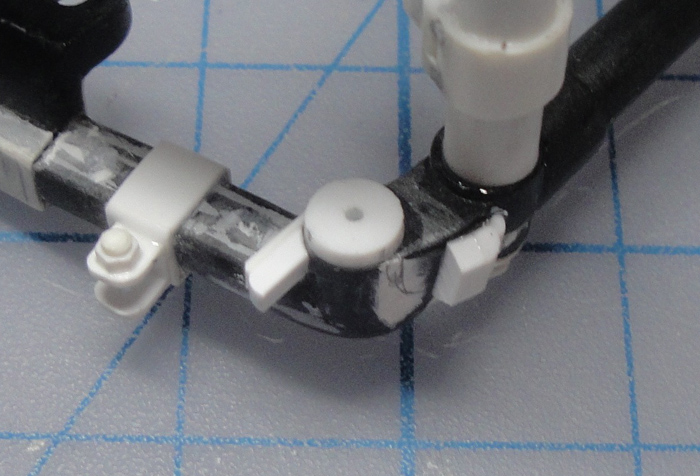
The additional bracing for the foot lever starts and the post sticking out from the stand left leg is obscured but it is the part which hits the stoppers emplaced on the frame. Also, on the right side you can see the mount point for the spring worked onto the 'bracket' which the exhaust pipe mount is attached.

Additional brace in place - test fit in the up position with the tensioner once again.
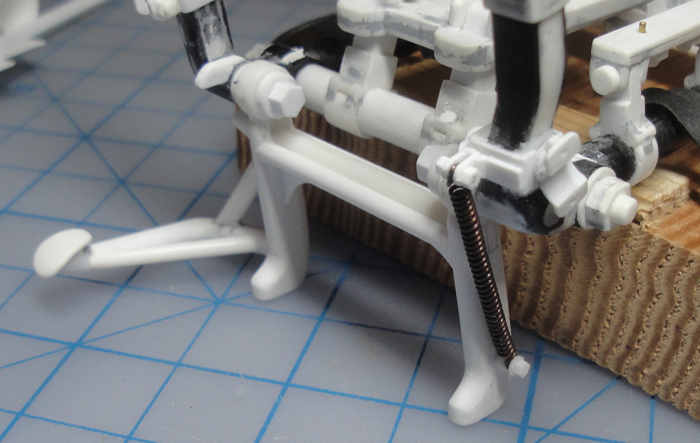
And the down position appearance.

The foot lever for the centre stand is more or less done. Still a bit of clean up and such but the basics are all there.

The stand spring test fit. Instead of using a real spring I coiled thin copper wire around a thin drill bit of the correct diameter then worked out the details in the up position. Once I had that set I worked out how much I needed to stretch it for the down position - by using plain wire I could simply stretch the coil and not have it spring back, lol. Doing it this way allows the 'stretched' spring to look like an actual spring would without having to fight the constant strain.
I'm very pleased with how uneventful this part of the build has been. Some setbacks and re-do's but generally smooth and non-trauma inducing.
Next comes the Console. I have a feeling I'm going to get a bit 'stupid' with it, beyond the dial detail that is. But what form that stupidity will take is still morphing from the aether ...
Then comes the various forms of wrapping, for pipes and handles, and the belts and some other bits and then the adventure of painting can begin.
Nothing exceeds like excess ...
KatsZenJammer- Resident member
- Posts : 2600
Join date : 2016-05-20
Age : 57
Location : Vancouver, BC
Re: Steampunk Harley - Tamiya 1/6 HD FLH Classic 'extreme' kit bash (Very Photo Heavy)
![]() by Skid Sun 15 Jul 2018, 8:54 am
by Skid Sun 15 Jul 2018, 8:54 am
_________________
Al.
Constructive criticism is always welcome.
“Success always demands a greater effort.” Winston Churchill
"Success is failure turned inside out" Unknown
Skid- Admin
- Posts : 7129
Join date : 2013-02-15
Age : 75
Location : Newcastle. Good Old Blighty. -
Re: Steampunk Harley - Tamiya 1/6 HD FLH Classic 'extreme' kit bash (Very Photo Heavy)
![]() by Geezerman Sun 15 Jul 2018, 12:02 pm
by Geezerman Sun 15 Jul 2018, 12:02 pm
This is fantastic !
Geezerman- Advanced Member
- Posts : 3651
Join date : 2013-02-24
Age : 88
Location : Gulf coast of central Florids
Re: Steampunk Harley - Tamiya 1/6 HD FLH Classic 'extreme' kit bash (Very Photo Heavy)
![]() by GaryDainton Sun 15 Jul 2018, 1:03 pm
by GaryDainton Sun 15 Jul 2018, 1:03 pm
GaryDainton- Advanced Member
- Posts : 4433
Join date : 2014-03-06
Age : 56
Location : Bolton UK
Re: Steampunk Harley - Tamiya 1/6 HD FLH Classic 'extreme' kit bash (Very Photo Heavy)
![]() by Guest Sun 15 Jul 2018, 3:14 pm
by Guest Sun 15 Jul 2018, 3:14 pm
Guest- Guest
Re: Steampunk Harley - Tamiya 1/6 HD FLH Classic 'extreme' kit bash (Very Photo Heavy)
![]() by KatsZenJammer Sun 22 Jul 2018, 6:30 pm
by KatsZenJammer Sun 22 Jul 2018, 6:30 pm
So I finally got around to working up the Console with its multiple pressure gauges and one temperature gauge. This part took me back a bit to the days when I was working up home made decals for my Cutty Sark rebuild so I tried to document it a bit more than usual in case anyone else can benefit from this stuff.
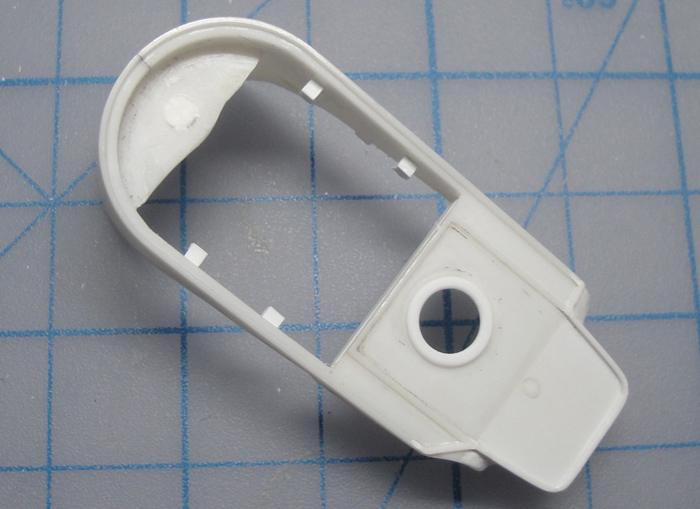
The Console insert blank which I cut and shaped a long time ago, perhaps even years. I chose to work on the basics on the back side of the piece since any surface marring will be unseen. The masking tape circles are rough ideas for the gauge sizes and placement. These three will all be pressure gauges.

Now for the Proof Of Concept parts build. The two styrene rings are cut from 0.5 mm sheet with a compass, the one on the left is the rounded ring and the right is the underside 'frame' bit to hold the gauge graphic part. The gauge graphic is one of the ones I've been 'Shopping and so I printed it out at the correct diameter (not happy with the clarity but this is only a test). The needle is hand drawn so it's kind of rough which was the plan as well. The gauge was backed onto 0.2 mm styrene sheet with double sided tape first as plain paper is not excessively sturdy. Then I took some clear plastic sheets for inkjet printing and cleaned off the stuff that holds the ink, affixed that to the front of the gauge with double sided tape and cut to size.
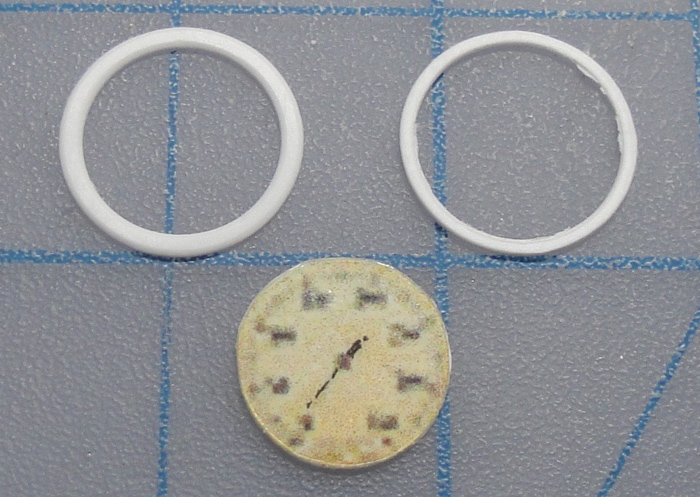
Test to see how it looks - I was satisfied with this first hack at the idea, which is a relief, lol.

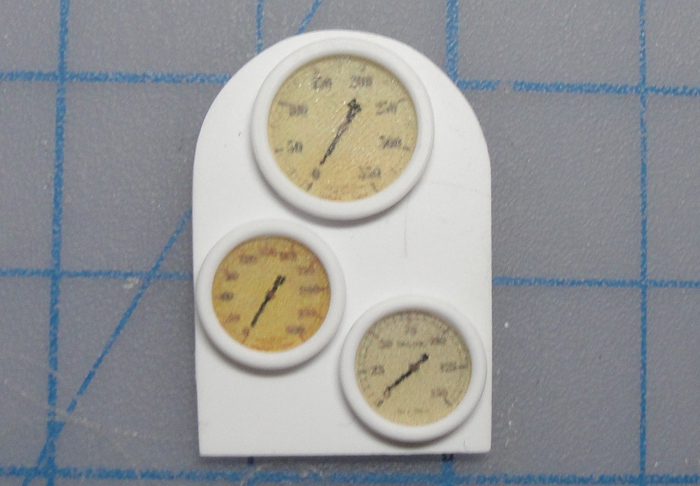
The rings and frames for the other two gauges set up. This is how the Console will roughly look as far as placement of the gauges goes.

A shot of the work zone for this aspect. I was going to delete this one but it does give a nice view of the various attempts and tests of the gauge graphics - three different pressure gauges after all.

One of the things about Photoshop is that it is so amazingly versatile that it is easy to forget all the things you can do with it. The left side of this image shows the original tests from the previous photo and as it goes to the right my re-discovery of the things I can do with PS get tested. In short, I figured out how to sharpen the graphics so the teeny little gauge faces weren't so blurry after reduction.

A close up of the Proof Of Concept graphics versus the more refined one, these are the same gauge. After this I got rid of the first attempt at the face of the gauge and did up the 'better' version.

And the Pressure Gauges become reality. In close up the needles look rough and wonky but from half a foot away they look ok so I'll leave it at that. For the 'glass' I wound up putting on three layers of the clear plastic sheet to build it up a bit. One unintended side effect was that the double sided adhesive has a slightly amber-ish tone to it so the layering 'tinted' the clear plastic just a bit to give it an old glass kind of feel.
Next comes cutting the holes in the Console insert. Also, the Temperature Gauge will be worked up to fit into the pre-existing hole at the bottom of the Console. After that will come the 'stupidity' I spoke of as far as detailing the Console goes, I'm still mulling over what I want to do with that.
Still doing some fiddly work on the centre stand, mostly filling and sanding and smoothing, nothing photo worthy there.
And once the Console is done the list shrinks that much more. For my own benefit I'll list what's left, this exercise helps me keep things in mind ...
- sanding the Front Tire
- drive belts
- lens for the tail lamp
- a 'mirror' for the rear view mirror
- handlebar handle wrap
- 'asbestos' for the hot pipes
Now that I'm at this point in the build my brain can't seem to accept the fact that the 'to be done' list has shrunk. I keep getting this feeling like I'm forgetting something big and important, but as far as I can figure that is not the case. There is always the possibility that I will suddenly remember some crucial missing element but that seems highly unlikely now ... or is it?

Perhaps my sub-conscious is confusing the Accessories with the Main Build. Speaking of which, I have tentative plans for a dio base, no walls or stuff but a basic cobblestone or dirt track look, maybe a sidewalk. With that will come things like gloves, goggles, tools and kits and the de rigueur personal weaponry of Steampunk (rifle, pistol, sword or sabre and a knife).

Nothing exceeds like excess ...
KatsZenJammer- Resident member
- Posts : 2600
Join date : 2016-05-20
Age : 57
Location : Vancouver, BC
Re: Steampunk Harley - Tamiya 1/6 HD FLH Classic 'extreme' kit bash (Very Photo Heavy)
![]() by Guest Sun 22 Jul 2018, 7:30 pm
by Guest Sun 22 Jul 2018, 7:30 pm
This stuff came to mind when I was reading about your lens for the gauges. I really dig this stuff, it dries crystal clear is water soluble, is pretty tough and remains flexible once cured. I get it a Michelle's.

Guest- Guest
Re: Steampunk Harley - Tamiya 1/6 HD FLH Classic 'extreme' kit bash (Very Photo Heavy)
![]() by GaryDainton Mon 23 Jul 2018, 9:19 am
by GaryDainton Mon 23 Jul 2018, 9:19 am
GaryDainton- Advanced Member
- Posts : 4433
Join date : 2014-03-06
Age : 56
Location : Bolton UK
Re: Steampunk Harley - Tamiya 1/6 HD FLH Classic 'extreme' kit bash (Very Photo Heavy)
![]() by KatsZenJammer Mon 30 Jul 2018, 12:25 am
by KatsZenJammer Mon 30 Jul 2018, 12:25 am
Curt - I actually tried something similar back in the day doing up graphics for the ship rescue project and discovered that it kind of dissolved the ink jet ink on both paper and plastic. I had considered using it for the head lamp lens but gave it up after I couldn't figure out how to make a mould. But I use the little bit I still have for other stuff, it is very versatile and works awesome.
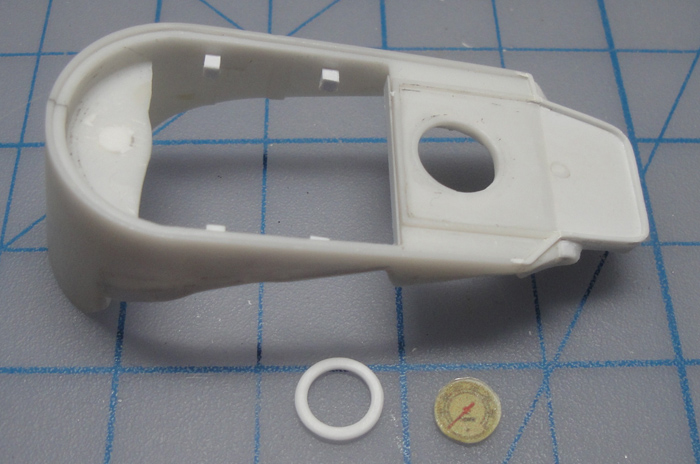
So it occurred to me after perusing my last post that I neglected to document any of the actual work making the gauge rings and such ... so here's the Temperature gauge rings being cut from sheet styrene.

A view from underneath - note that the upper ring is wider so it overlaps on both sides. Warning, cutting the lower, thinner ring is a real test of finesse and patience (it took four tries to get one that didn't split).

Test fit in the Console.
Printing the graphics and figuring out the proper size. Note: this wasn't a single PS file but I was using the 'Image Print Location' function of the PS print window and ran the same sheet of paper through the printer over and over again. Another note: the red needle for the gauge is from the original image - I had to PS out the needles from the other gauges because they were in odd positions or bent.

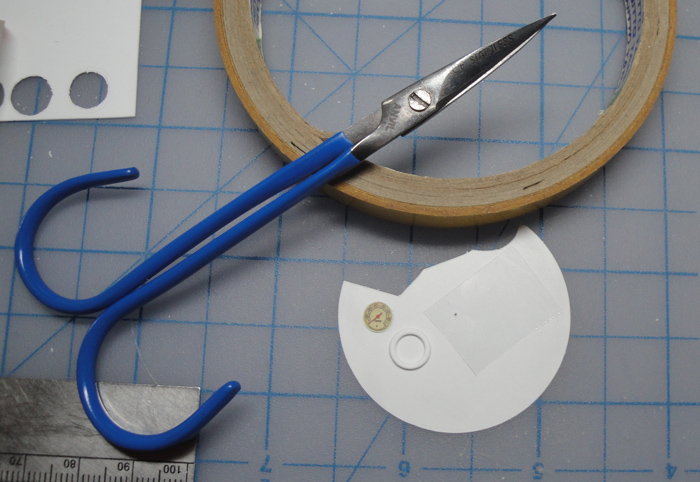
Making the dial face with glass. The scissors I bought from a fly tying supply shop for the ship rescue project, slightly curved and still molecularly sharp after these many years of use (for $50.00 CDN they'd better be good). The ATG tape (aka double sided) is a necessity for my version of this. The dial graphic and ring are sitting on the thin styrene which I use to back the paper dial and you can just kind of see the clear sheet as well.
Parts ready for testing.
The Console now has it's gauges. And now it's time for me to get my Stupid on, lol.

I finally found a way to use a bunch of the PE bits that were supposed to be a crane assembly for a WW2 era IJN warship.


And this is about as far as I could get with the PE crane bits. Still more saturation to come but I'm going to be turning to the other PE stuff I have to do that.

The only other thing I've managed to get done was the sanding of the front tire, so that get's checked off the list.
The next part of the Console detailing might take longer because it involves tetchy, finicky, eye hurting, nerve fraying work with really tiny bits of PE and thin CA - and believe me when I say that static electricity plays a huge factor doing stuff like this. That and unexpected sneezing.
Funny, I feel like I'm making better and worse progress at the same time. Must be impatience messing with my subconscious or something - or maybe I ought to watch what I eat for breakfast on my days off, lol
Nothing exceeds like excess ...
KatsZenJammer- Resident member
- Posts : 2600
Join date : 2016-05-20
Age : 57
Location : Vancouver, BC
Re: Steampunk Harley - Tamiya 1/6 HD FLH Classic 'extreme' kit bash (Very Photo Heavy)
![]() by GaryDainton Mon 30 Jul 2018, 10:52 am
by GaryDainton Mon 30 Jul 2018, 10:52 am
GaryDainton- Advanced Member
- Posts : 4433
Join date : 2014-03-06
Age : 56
Location : Bolton UK
Re: Steampunk Harley - Tamiya 1/6 HD FLH Classic 'extreme' kit bash (Very Photo Heavy)
![]() by Geezerman Mon 30 Jul 2018, 12:04 pm
by Geezerman Mon 30 Jul 2018, 12:04 pm
The gauges really look good !!!
Geezerman- Advanced Member
- Posts : 3651
Join date : 2013-02-24
Age : 88
Location : Gulf coast of central Florids
Re: Steampunk Harley - Tamiya 1/6 HD FLH Classic 'extreme' kit bash (Very Photo Heavy)
![]() by KatsZenJammer Sun 05 Aug 2018, 4:50 pm
by KatsZenJammer Sun 05 Aug 2018, 4:50 pm
Here's a photo of the modifications made to the PE vines, basically just cutting off half the foliage.

First bit of vine in place. You can also see that I filled the top row of open boxes with fleur-de-lys bits.

And two sides complete. After this I was thinking about the Console face and a voice told me to leave them blank, so the plan is to give them nice colour and stuff but no texture.


Another thing to check off the list was wrap for the 'hot' pipes. in this case the main steam feed to the cylinder and the steam exhaust coming off the cylinder. I had some stuff that would have been great for 'asbestos' looking wrap except that it was old and basically shredded into dust when I tried manipulating it in any way. So I turned to Book Binding Tape which is thin fabric stuff and happened to be black. I don't remember why or for what project I got the stuff for but it's still in good shape. Here's one layer of wrap with the other pipe bare for comparison.

As I mentioned the stuff is thin so I put a second layer on just to plump it up a bit. Here's both hot pipes with two layers. After this will be adding paint effects, bringing it up from black to make it look like dirty asbestos or something to that effect.

Then I spent a whole bunch of time prepping for the transition from workshop to paintshop - part of that was getting around to all the masking on all the bits. On the other parts the photo's would just be 'repeats' with Tamiya masking tape highlights but the Frame is also ready for primer. This is a momentous occasion for me, kind of like finally getting the boulder to the top of the hill - you can see the yellow masking tape scattered all over the bits.
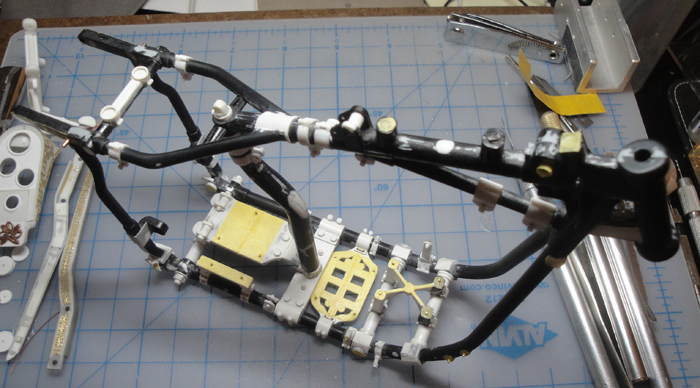
And after a couple of hours of painstaking airbrushing ... I forgot how involved and 'bitty' the frame is. A lot of time getting into the nooks and stuff.

THE PAINTING ADVENTURE - Prologue: with all the painting that was about to happen it was time to re-assess the spray box I jury rigged some 3 years ago out of a cardboard box, a laptop cooling pad and some plexiglass. My main concern was that the fan strength wasn't really up to a lot of painting. It had been okay for the little bits I'd been doing here and there so I thought I'd see if I could boost the fan speed somehow - only to discover it had passed into the realm of recycled electronics since the last time I used it.
But I had already rescued a Stanley mini-extractor recently and thought that I could cobble something with it that wouldn't require a kilometre of duct tape to modify for use. So off to Home Depot where I purchased 25 feet of 4" ducting, a PVC 4" 'Tee' used for plumbing, a rectangular floor duct thing (forget what's its called) and a big roll of Gorilla Tape. Modifying the cardboard box wasn't difficult and the rest was similarly easy - which is to say the number of mistakes did not exceed my age, lol.
The 'in-use' version now is set up to be dismantleable and semi-portable. I used maybe 10 feet of the ducting so I have lots more if I wish to alter the configuration. Right now the fan just sits on the windowsill when in use, this might change in the future. For filtering I'm using the pollen/mold/allergen rated vent filters I have been with the old set up, two layers. I might switch to pleated filters at some point.

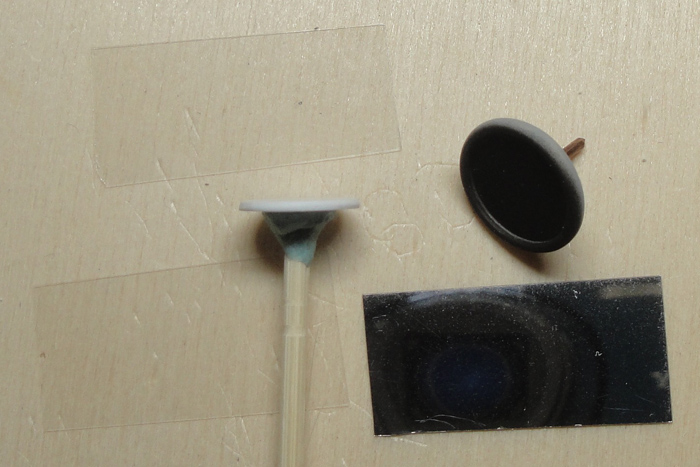
And finally a fitting way to transition I think - the Rear View Mirror gets its mirror. Where the mirror will be set has been painted matte black, you can see the piece of reflective material (the reflection is the camera lens) and the two bits of clear sheet that are potential outer layers.
And so we move from one zone to another. But wait, I hear, you haven't done the handlebar wrap or the drive belts yet. True, but the fact is that I wouldn't be able to finalize either of those bits until the painting has been done and, in the case of the drive belts, final assembly is underway. So I will give myself Lots of time to figure out materials and stuff for those last things.
For now I'm just puttering along with the disassembly/masking portion which also means lots of small containers and bags with labels and finicky cutting of masking tape and trying to recall how bits fit together and so on. And I'm going exclusively with Tamiya masking tape - the green stuff is well and good for rough or practice work but when it comes to the real thing I definitely prefer the yellow.
Aside from the prepping the only thing left for me to figure out is the colour scheme ... yup, I haven't got a clue yet. I've been bouncing around ideas and have pre-bought a bunch of Alclad and still haven't got more than a foggy notion of how I'm going to proceed. This is kind of appropriate since it's how this whole insane thing started in the first place
Nothing exceeds like excess ...
KatsZenJammer- Resident member
- Posts : 2600
Join date : 2016-05-20
Age : 57
Location : Vancouver, BC
Re: Steampunk Harley - Tamiya 1/6 HD FLH Classic 'extreme' kit bash (Very Photo Heavy)
![]() by GaryDainton Sun 05 Aug 2018, 8:56 pm
by GaryDainton Sun 05 Aug 2018, 8:56 pm
http://orig09.deviantart.net/a10f/f/2012/351/8/5/steampunk_fashion__use_of_color_theory_and_metals_by_windthin-d5ocscz.pdf
GaryDainton- Advanced Member
- Posts : 4433
Join date : 2014-03-06
Age : 56
Location : Bolton UK
Re: Steampunk Harley - Tamiya 1/6 HD FLH Classic 'extreme' kit bash (Very Photo Heavy)
![]() by KatsZenJammer Tue 07 Aug 2018, 3:35 am
by KatsZenJammer Tue 07 Aug 2018, 3:35 am
Gary - thanks so much for that link!! I already had some reference files I gleaned off the Net but it was mostly about cosplay and modifying Nerf guns. The historical info in the link you provided really helps me in developing a context for the whole decor ... is that the right word? You get what I mean. Anyway, thanks again.Its not usual for me to post two days in a row but an unexpected batch of free time allowed me to get things in order, loose ends wise.
So on the left is the first try at the mirror using my previous method of using ATG tape and clear sheet plastic. This worked for the gauges but on a reflective surface things went weird. I considered using just the reflective sheet but a bit of experimentation showed me that it was far too easily marked up. On a whim I tried out some packing tape and the result is on the right. Needless to say that's what I went with.

Quick test fit - dust and all. The image in the mirror is the tip of my finger (I'm wearing black latex gloves).

And some time late this afternoon I wrapped up the basic masking, making the last of the forgotten hex nuts and minor cleaning up. I cleared my computer desk of the imported mini-workshop for the first time since January of this year. And though I already took a photo of the frame prepped and primed, here's a shot of the rest of the Steamcycle parts.
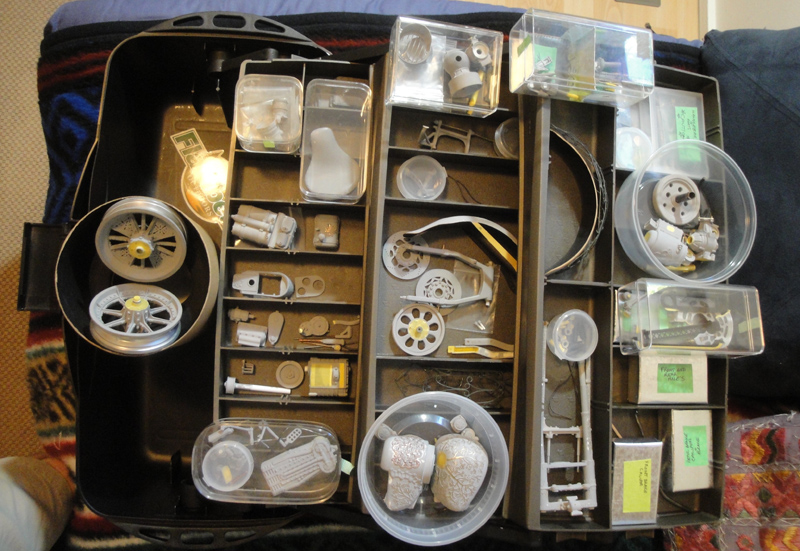
Woo hoo! Hopefully the next post will be the opening salvo of the Painting Adventure - wherein the protagonist takes on the task of navigating the complex and variable seas of colour, texture, shade, weathering and 'oops, is that supposed to happen?'
Nothing exceeds like excess ...
KatsZenJammer- Resident member
- Posts : 2600
Join date : 2016-05-20
Age : 57
Location : Vancouver, BC
Re: Steampunk Harley - Tamiya 1/6 HD FLH Classic 'extreme' kit bash (Very Photo Heavy)
![]() by GaryDainton Wed 08 Aug 2018, 2:06 pm
by GaryDainton Wed 08 Aug 2018, 2:06 pm
GaryDainton- Advanced Member
- Posts : 4433
Join date : 2014-03-06
Age : 56
Location : Bolton UK
Re: Steampunk Harley - Tamiya 1/6 HD FLH Classic 'extreme' kit bash (Very Photo Heavy)
![]() by KatsZenJammer Sun 12 Aug 2018, 4:01 am
by KatsZenJammer Sun 12 Aug 2018, 4:01 am
The Painting Adventure Beginneth finally
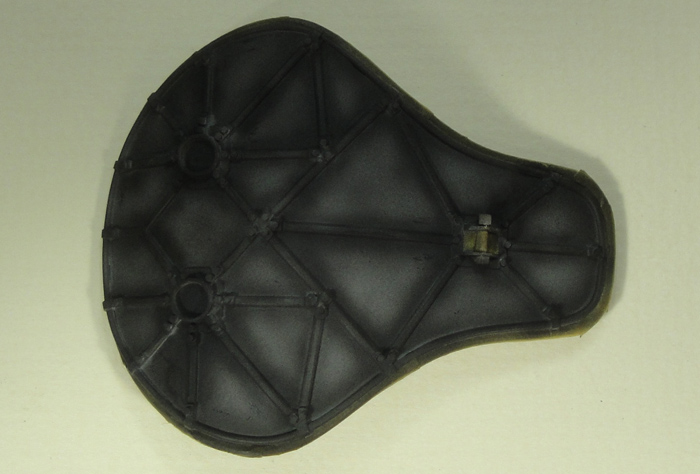
After all this time a few things sort of worked themselves out before hand. One of these things was that I wanted to start with something that was not going to be highly visible thus allowing me room for errors and correction without having to worry about it being right out there. I was also mindful of the fact that the seat was the singularly odd-ball part compared to the rest of the Steamcycle. After doing the math the underside of the seat seemed like the perfect place to begin, kind of visible but not too much, has both 'open' places to practice smooth coats and finish as well as lots of small details to practice (or recall) that kind of precise painting. And I could play around with some ideas about colour and tone.
I just got started darkening the seams when I recalled I wanted to start this with a photo of the underside in primer. This is pretty close.

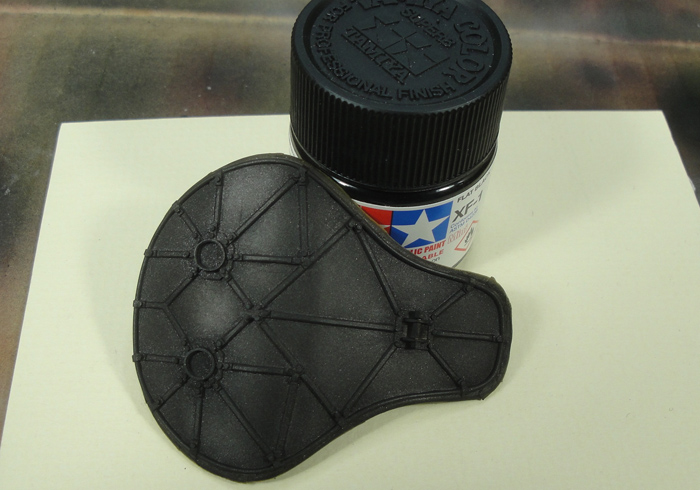
After a coat of matte black seaming and some 'haze' to darken the panel areas slightly. Let cure for an hour on a warm and breezy windowsill.
And then a light coat of Hull Red, also cured for two hours on said windowsill. The bottles are the colours that have been used to this point.

Next a thin layer of Tamiya Gunmetal acrylic. I will attest to the 'graininess' of the paint and you can see the 'sparkle' effect. I imagine that with more coats the colour would blend. Oh, and it required extra cleaning to get the little sparkle flakes out of the airbrush. I let this sit overnight to insure it was fully cured.

Another thin coat of matte black. The photo shows it looking black but with the eye you can see the red and gunmetal undertones. On the windowsill for two hours.
Then a thin coat of clear matte. I really like the Vallejo stuff and highly recommend it. Cured for two hours.

Back to some old school brushing - this is the smallest detail brush I have, acquired during the ship rescue project which was 1/96th scale. Here I gave the spines a layer of the gunmetal just to pop them out a tad. Tamiya metallic acrylics tend to clump and stuff which can be annoying. Cured for four hours (dinner and stuff).

Also from the ship rescue project was a can of 'gold mix' I'd made - can't remember exactly what it was but I wanted to change the standard Humbrol gold to something deeper. This I used on the bracket bits. Cured for two hours.

Then I hit the hex nuts with another mix, this one was Testor's silver and gold mixed to make a kind of platinum-ish colour.

Another coat of matte, followed by the dirty-ing for which I used a transparent pigment from Golden. This stuff is not specifically for model building but it is compatible with acrylics and doesn't react with the Vallejo clear matte. Cured for three hours. Lastly a couple of nice, moderate coats of clear matte and I call it done for now - there's going to be 'unifying' stuff happening much later.

This first foray seems to have worked out as I'd hoped. It's been fun learning or practicing the new-ish techniques involved in airbrushing but it was also very gratifying to start brush work once more. Now comes the learning and adaptation curve.
Next comes the seat itself which will be worn and well-used leather. There are several techniques I have seen for accomplishing this, some with brush work and oil paint and some with airbrush. I'm going to try the airbrush methods first but if those don't work out then I'll try the others though I would prefer to not work with oil paints if I can help it.
Not sure what I'll want to start with after that. Once I have a better idea of the colour palette I'm going to want to 'assembly line' parts - more efficient that way. One thing about airbrushing is that colour changes require a bit more work than regular brushes, I'd rather spend a lot of time painting versus cleaning.
Nothing exceeds like excess ...
KatsZenJammer- Resident member
- Posts : 2600
Join date : 2016-05-20
Age : 57
Location : Vancouver, BC
Re: Steampunk Harley - Tamiya 1/6 HD FLH Classic 'extreme' kit bash (Very Photo Heavy)
![]() by GaryDainton Sun 12 Aug 2018, 8:51 pm
by GaryDainton Sun 12 Aug 2018, 8:51 pm
GaryDainton- Advanced Member
- Posts : 4433
Join date : 2014-03-06
Age : 56
Location : Bolton UK
Re: Steampunk Harley - Tamiya 1/6 HD FLH Classic 'extreme' kit bash (Very Photo Heavy)
![]() by Sponsored content
by Sponsored content
Sponsored content
Page 20 of 25 • 1 ... 11 ... 19, 20, 21 ... 25 ![]()
» Tamiya 1/6 Harley Davidson Fat Boy Lo
» Tamiya 1/6 Harley Davidson FLH1200
» Steampunk Ducati
» '57 Salvage bash-up
|
|
|