
Steampunk Harley - Tamiya 1/6 HD FLH Classic 'extreme' kit bash (Very Photo Heavy)
Page 15 of 25 •  1 ... 9 ... 14, 15, 16 ... 20 ... 25
 ![]()
Re: Steampunk Harley - Tamiya 1/6 HD FLH Classic 'extreme' kit bash (Very Photo Heavy)
![]() by Geezerman Tue 05 Sep 2017, 11:37 am
by Geezerman Tue 05 Sep 2017, 11:37 am
The PE on the fill caps really reflect a steampunk theme !
Nice work !


Geezerman- Advanced Member

- Posts : 3651
Join date : 2013-02-24
Age : 88
Location : Gulf coast of central Florids
Re: Steampunk Harley - Tamiya 1/6 HD FLH Classic 'extreme' kit bash (Very Photo Heavy)
![]() by disabled modeler Tue 05 Sep 2017, 12:06 pm
by disabled modeler Tue 05 Sep 2017, 12:06 pm
disabled modeler- Intermediate Member

- Posts : 979
Join date : 2016-05-22
Age : 60
Location : Quincy,IL. USA
Re: Steampunk Harley - Tamiya 1/6 HD FLH Classic 'extreme' kit bash (Very Photo Heavy)
![]() by KatsZenJammer Mon 11 Sep 2017, 12:24 am
by KatsZenJammer Mon 11 Sep 2017, 12:24 am

And another thanks for the kind comments for the fill caps - I wasn't sure if the idea would work so it's nice to hear it looks ok (hard to be objective about one's own stuff and all that). Now the only problem is to resist the urge to spatter ivy leaves onto any spot where they'll fit, lol.
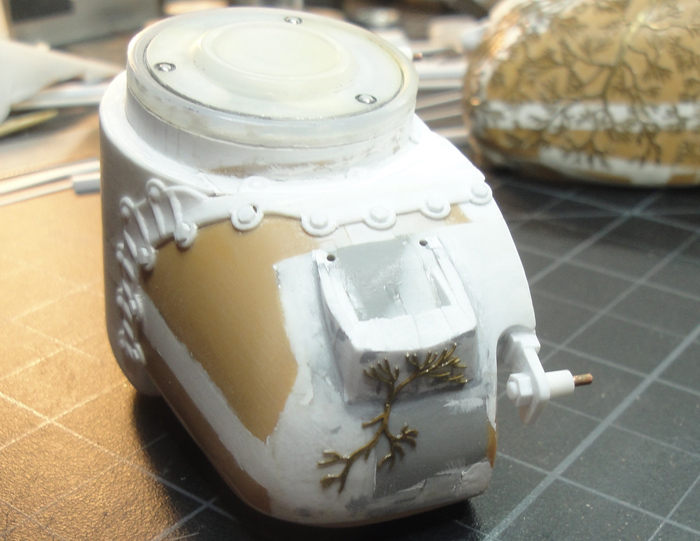
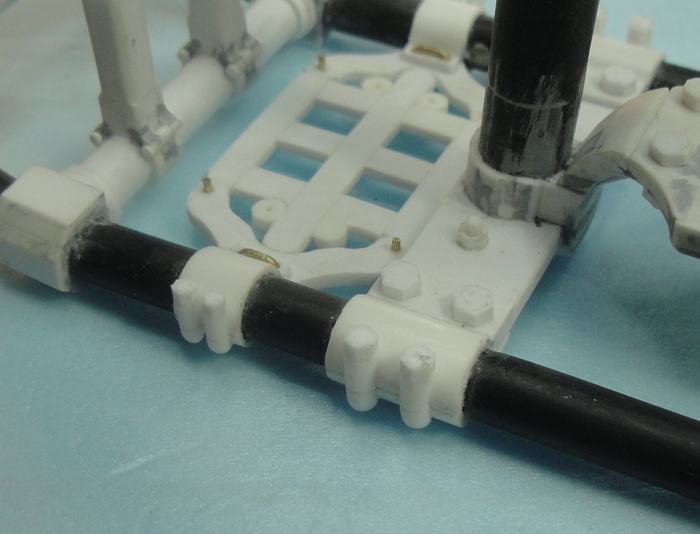
Puttering along - added 'nut and bolt' details to the rear and front tank mounts.
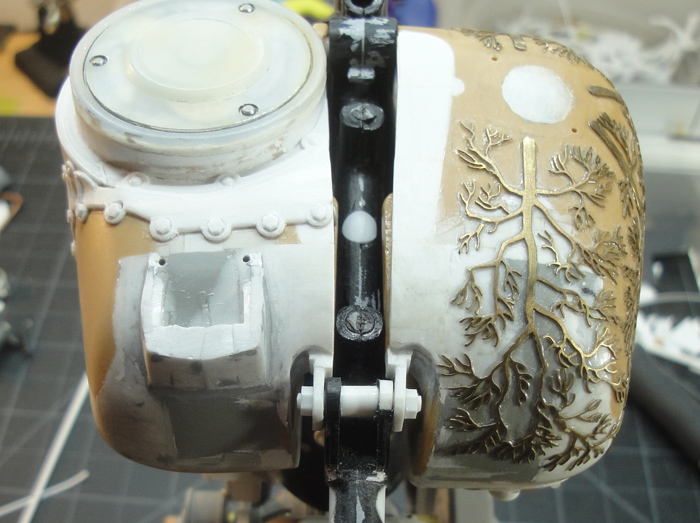

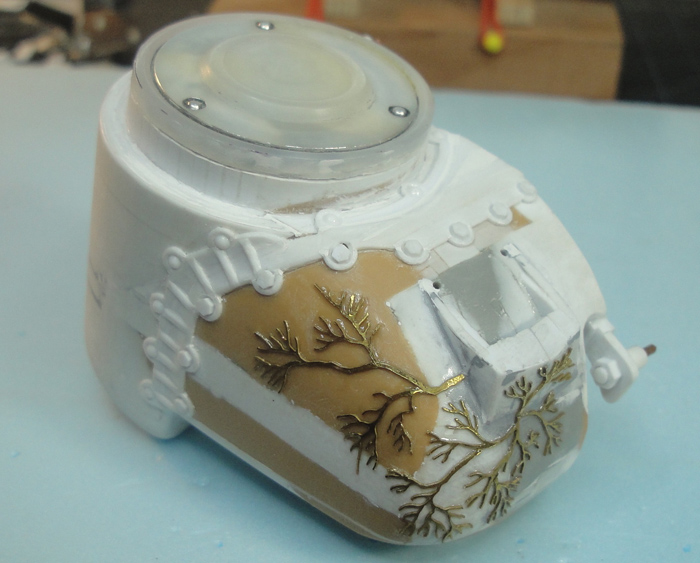
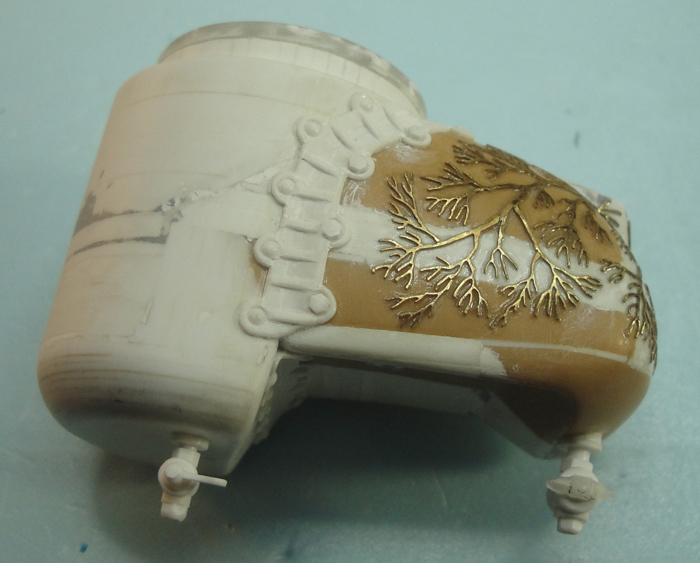
The beginning of the PE detailing for the secondary water tank. Similar in theme to the main water tank but a slightly different approach.
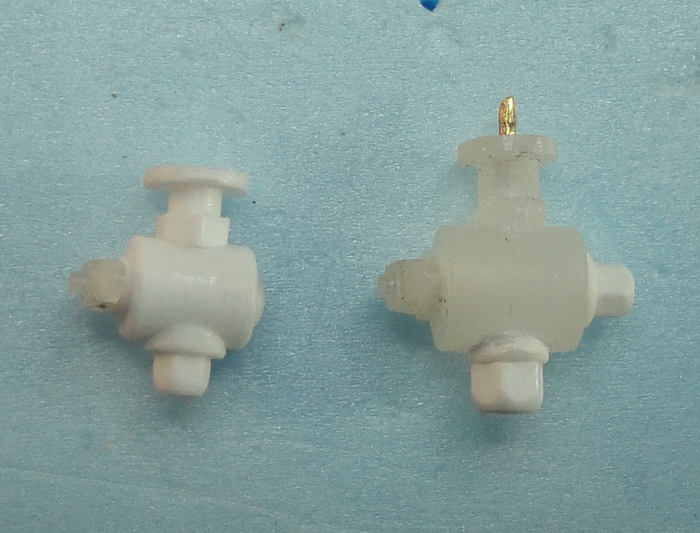
The smaller water valve for the secondary tank, mostly scratched, but I retained the second 'wing nut' from the kit valve for use here. A comparison shot with the main tank valve.
Test fit of the valves in place, the secondary is slightly higher then the main to allow for gravity feed. And a bit more of the PE added as well.
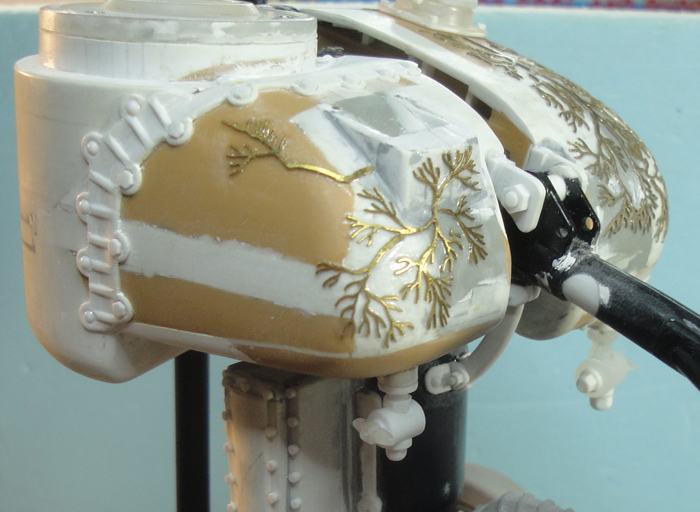
And a bit more PE.
I'm still undecided as to whether I'm going to add embellishment to the fuel tank in the form of decoration or 'practical' details. Then there's the fill cap and feed valve for the fuel tank to make as well.
The instrument panel is percolating - I'm still trying to nail down what I want to have featured there in terms of gauges but one thing I'm not putting in is a speedometer/odometer. Why no speedo? Well, getting into the Steampunk Ethos thing it occurred to me that Safety was not on top of the priority list in the early days of experimental vehicles and a lot of the stuff we take for granted today would have been considered unnecessary back-when. Plus this way I don't have to make the speedo cable and whatever sort of assembly would be needed to get the reading.
Just keep swimming ...

KatsZenJammer- Resident member
- Posts : 2600
Join date : 2016-05-20
Age : 57
Location : Vancouver, BC
Re: Steampunk Harley - Tamiya 1/6 HD FLH Classic 'extreme' kit bash (Very Photo Heavy)
![]() by disabled modeler Mon 11 Sep 2017, 12:02 pm
by disabled modeler Mon 11 Sep 2017, 12:02 pm
disabled modeler- Intermediate Member
- Posts : 979
Join date : 2016-05-22
Age : 60
Location : Quincy,IL. USA
Re: Steampunk Harley - Tamiya 1/6 HD FLH Classic 'extreme' kit bash (Very Photo Heavy)
![]() by GaryDainton Mon 11 Sep 2017, 2:11 pm
by GaryDainton Mon 11 Sep 2017, 2:11 pm

GaryDainton- Advanced Member
- Posts : 4433
Join date : 2014-03-06
Age : 56
Location : Bolton UK
Re: Steampunk Harley - Tamiya 1/6 HD FLH Classic 'extreme' kit bash (Very Photo Heavy)
![]() by Geezerman Thu 21 Sep 2017, 11:36 am
by Geezerman Thu 21 Sep 2017, 11:36 am
Geezerman- Advanced Member
- Posts : 3651
Join date : 2013-02-24
Age : 88
Location : Gulf coast of central Florids
Re: Steampunk Harley - Tamiya 1/6 HD FLH Classic 'extreme' kit bash (Very Photo Heavy)
![]() by KatsZenJammer Sun 24 Sep 2017, 8:00 pm
by KatsZenJammer Sun 24 Sep 2017, 8:00 pm
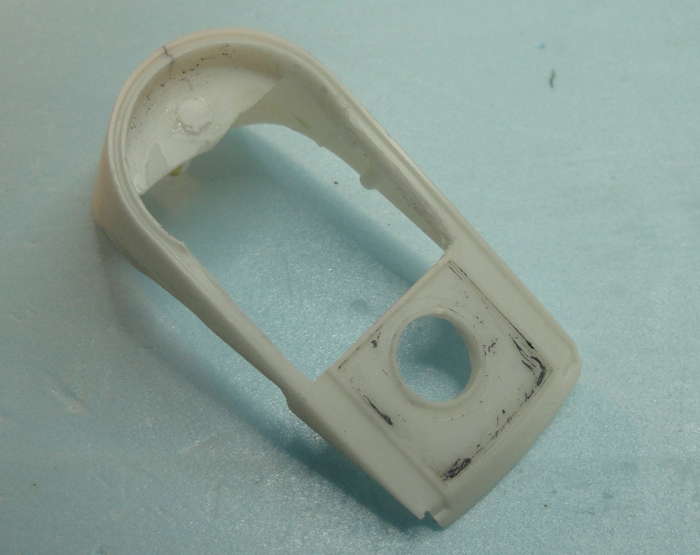
Bit of a gap due to busy times, motivational ebbing and a detour in the build. Still detailing the combo tank but I needed to step away for a bit and so I worked on some odds and ends. Here's a shot of the instrument panel shroud with further modding in preparation for the new array of dials and stuff.
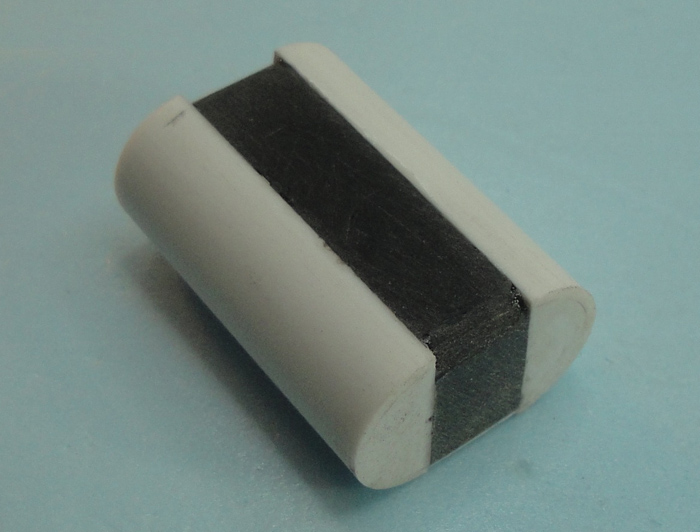
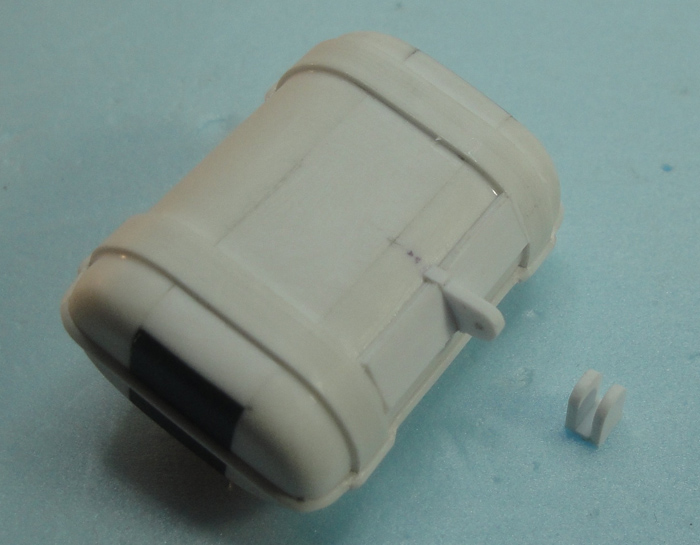
Starting the secondary fuel tank which I have determined will sit behind the main tanks up near the saddle. This will entail more mounting brackets to the frame and such but first the tank itself - the black piece is a leftover bit from previous bashing and the half cylinders are 1/2 inch styrene tube.

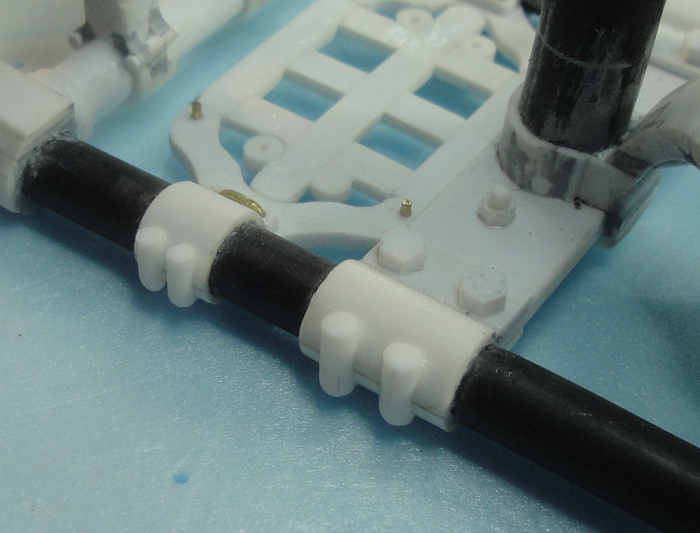
Another aspect of the detour was to take some time to 'finish' off some details on the details which already exist - back burner stuff which I left 'til later, which is now, lol. Here's some added detail to the seat post and boiler frame clamps.
And adding some hinges to the mounting clamps for the condenser.
I don't know if it's the change in weather (from muggy heat to autumn in the space of a day) but I've been feeling some semi-seasonal blah's. Tough to get motivated when the brain just wants to veg out on re-runs. Hopefully I'll get inspired this week ...
Just keep swimming ...
KatsZenJammer- Resident member
- Posts : 2600
Join date : 2016-05-20
Age : 57
Location : Vancouver, BC
Re: Steampunk Harley - Tamiya 1/6 HD FLH Classic 'extreme' kit bash (Very Photo Heavy)
![]() by GaryDainton Sun 24 Sep 2017, 8:21 pm
by GaryDainton Sun 24 Sep 2017, 8:21 pm
GaryDainton- Advanced Member
- Posts : 4433
Join date : 2014-03-06
Age : 56
Location : Bolton UK
Re: Steampunk Harley - Tamiya 1/6 HD FLH Classic 'extreme' kit bash (Very Photo Heavy)
![]() by Geezerman Wed 27 Sep 2017, 10:54 am
by Geezerman Wed 27 Sep 2017, 10:54 am
Cheers,
Clay (Geezerman)
Geezerman- Advanced Member
- Posts : 3651
Join date : 2013-02-24
Age : 88
Location : Gulf coast of central Florids
Re: Steampunk Harley - Tamiya 1/6 HD FLH Classic 'extreme' kit bash (Very Photo Heavy)
![]() by KatsZenJammer Sun 01 Oct 2017, 6:56 pm
by KatsZenJammer Sun 01 Oct 2017, 6:56 pm
Ah, the autumnal shift and the whole mojo thing ... I'm an 'autumn person' but as I age my body parts doth protest the seasonal variations, sigh.
However, some stuff got done despite the creaks and aches. The combo tank is further along but I neglected to take photos of the progress as it was kind of boring. Here's a shot with the mostly complete fuel fill cap and the other bits. Still some detail work to do on the top of the fuel tank and then comes the fuel valve on the bottom side and all that.

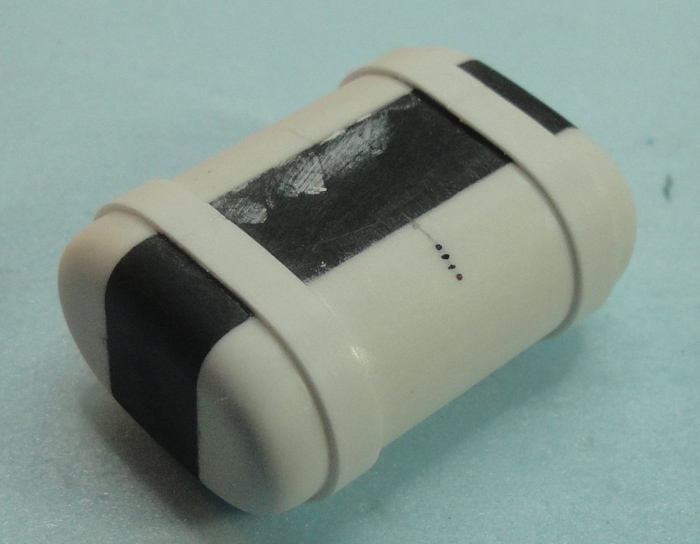
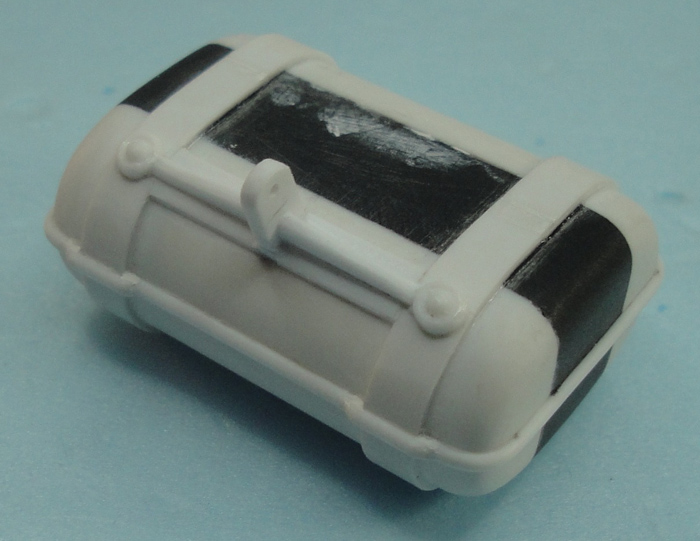
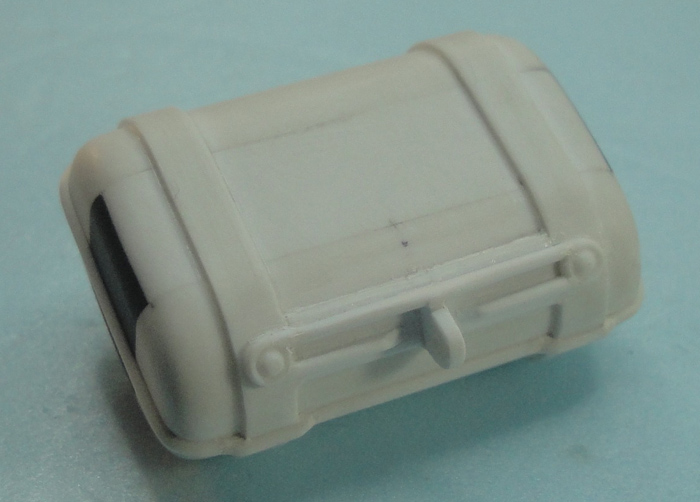
Adding detail to the secondary fuel tank. First some bands then an 'equatorial' bead.

I'm pretty sure part of my recent slow down is due to my own confusion over the upcoming stuff, which is to say, the plumbing. And I recently remembered that I intended to add 'shrouds' for the drive belts and flywheel so the old brain is trying to mull out the sequence of building of parts in order to prevent later conflict. I haven't even begun adding the feed line mounts to the main cylinder and so on. I know from past experience that I just need to chip away at this stuff a bit at a time but first comes the overwhelming feelings of complete and utter dismay and repeated self-questioning along the lines of, "What was I thinking? Why am I so stupid?" But I'm getting used to it, lol.
Just keep swimming ...
KatsZenJammer- Resident member
- Posts : 2600
Join date : 2016-05-20
Age : 57
Location : Vancouver, BC
Re: Steampunk Harley - Tamiya 1/6 HD FLH Classic 'extreme' kit bash (Very Photo Heavy)
![]() by GaryDainton Sun 01 Oct 2017, 7:30 pm
by GaryDainton Sun 01 Oct 2017, 7:30 pm
GaryDainton- Advanced Member
- Posts : 4433
Join date : 2014-03-06
Age : 56
Location : Bolton UK
Re: Steampunk Harley - Tamiya 1/6 HD FLH Classic 'extreme' kit bash (Very Photo Heavy)
![]() by Nipponrookie Mon 02 Oct 2017, 6:50 am
by Nipponrookie Mon 02 Oct 2017, 6:50 am

Nipponrookie- Intermediate Member
- Posts : 568
Join date : 2015-08-29
Age : 63
Location : Kyushu, Japan
Re: Steampunk Harley - Tamiya 1/6 HD FLH Classic 'extreme' kit bash (Very Photo Heavy)
![]() by Geezerman Mon 02 Oct 2017, 9:58 am
by Geezerman Mon 02 Oct 2017, 9:58 am
Geezerman- Advanced Member
- Posts : 3651
Join date : 2013-02-24
Age : 88
Location : Gulf coast of central Florids
Re: Steampunk Harley - Tamiya 1/6 HD FLH Classic 'extreme' kit bash (Very Photo Heavy)
![]() by Geezerman Wed 11 Oct 2017, 12:21 pm
by Geezerman Wed 11 Oct 2017, 12:21 pm
Geezerman- Advanced Member
- Posts : 3651
Join date : 2013-02-24
Age : 88
Location : Gulf coast of central Florids
Re: Steampunk Harley - Tamiya 1/6 HD FLH Classic 'extreme' kit bash (Very Photo Heavy)
![]() by KatsZenJammer Sun 15 Oct 2017, 4:06 am
by KatsZenJammer Sun 15 Oct 2017, 4:06 am
Gary - sketches ... haven't been doing those lately as I fell out of the habit. Perhaps I should re-start, it helped before, and thanks for the reminder.
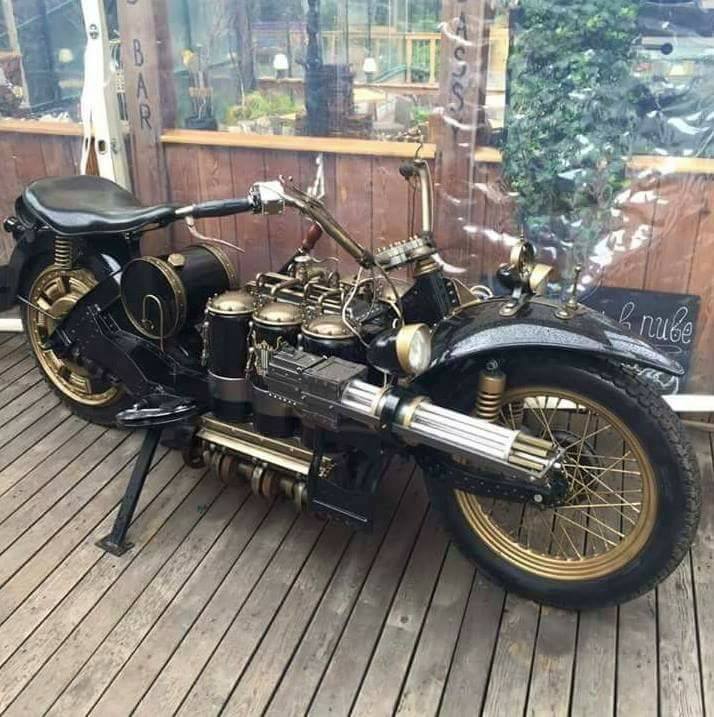
Clay - awesome photo, thanks for sharing it. I wasn't planning on arming the Steamcycle but I do plan to make a rifle and pistol of the steampunk variety, that is I plan to do so, lol.
Though I'm not back to what I would like to be at in terms of production I have been able to get in some good time. Taking my own advice and distracting onto something else helped, I think of them as 'fits' because I suddenly do a bunch of stuff without really over-thinking it.
In a fit I made a couple of fuel valves (bottom) based on the design of the water valves (top) but different enough to be distinguishable from one another. I neglected to take any photos of the process though, oops.

Another fit resulted in the application of PE Ivy detail to the right handlebar - this is going against a previous idea I had had which I left in limbo. In that time my thinking changed and a new idea, this, emerged. There are 2 strands of ivy involved, I thought of just one but I thought it looked better this way.

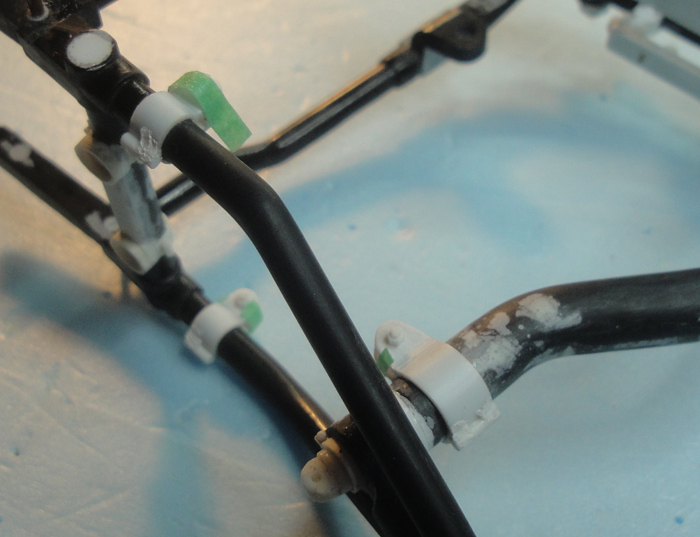
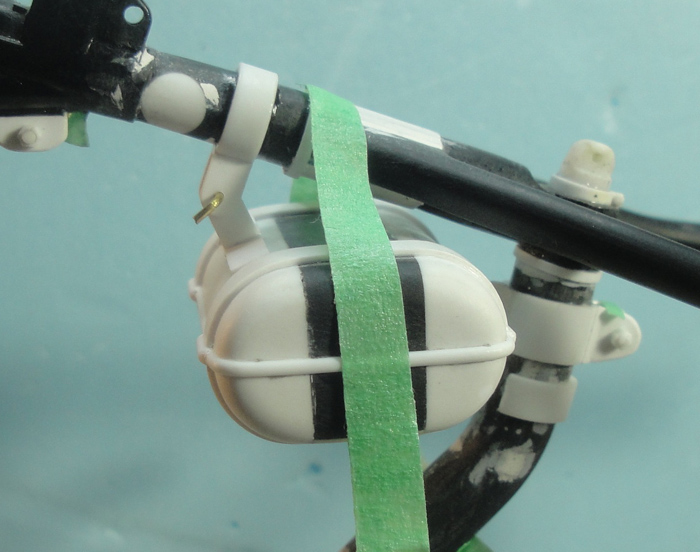
Some no-frills rigging of the secondary fuel tank in preparation for the mounting hardware. The blank circlets on the frame will become the mounting clamps and are not fixed in place yet.
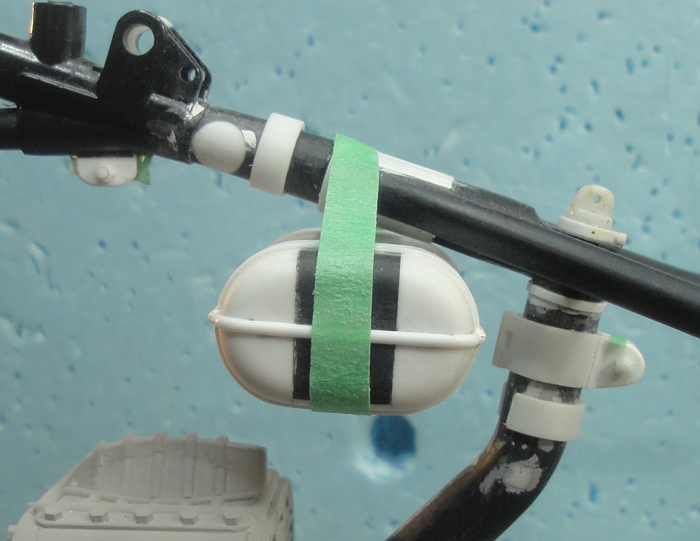
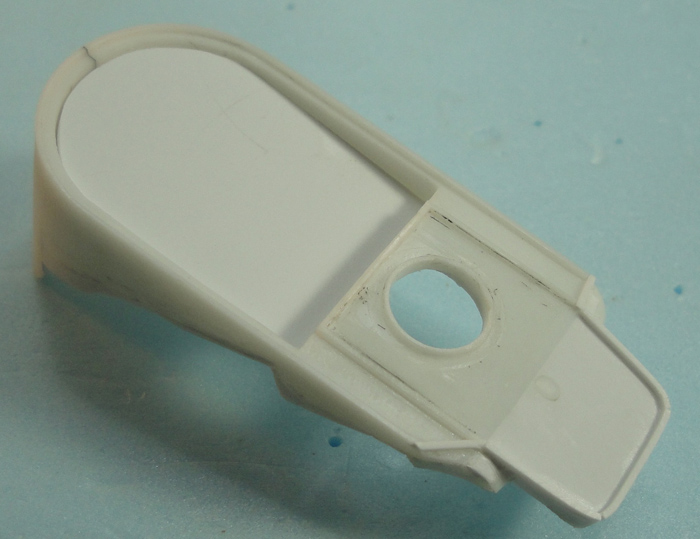
The instrument panel/tank shroud develops a bit with the addition of a tail and the cutting out of the main panel with a blank cut to fit.

The front mounting hardware takes initial form. At this point the frame clamp circlet is affixed. As usual for stuff like this I used MEK first then reinforced with thin CA.
Detail added to instrument panel. Also I added a rear post with corresponding frame mount point, you can see the sanded off stub of it at the top of the tail add on.
The front mount point gets more detail. I like to call this functional detail in the sense that it adds to the appearance as well as acting like its real life counterpart, the vertical side bits anyway.
Once I have the rear mount for the secondary fuel tank complete I'll do a 'sectional test fit' of the saddle, tanks, boiler/burner, condenser and transmission in order to check the crowding. I've been keeping track of stuff like that but pieces at a time, not often with all the stuff in place.
I figure it will be 'fashionably' crowded, I hate the thought that I might have to re-locate something already in place

Just keep swimming ...
KatsZenJammer- Resident member
- Posts : 2600
Join date : 2016-05-20
Age : 57
Location : Vancouver, BC
Re: Steampunk Harley - Tamiya 1/6 HD FLH Classic 'extreme' kit bash (Very Photo Heavy)
![]() by GaryDainton Sun 15 Oct 2017, 10:42 am
by GaryDainton Sun 15 Oct 2017, 10:42 am
GaryDainton- Advanced Member
- Posts : 4433
Join date : 2014-03-06
Age : 56
Location : Bolton UK
Re: Steampunk Harley - Tamiya 1/6 HD FLH Classic 'extreme' kit bash (Very Photo Heavy)
![]() by Geezerman Sun 15 Oct 2017, 11:17 am
by Geezerman Sun 15 Oct 2017, 11:17 am
Geezerman- Advanced Member
- Posts : 3651
Join date : 2013-02-24
Age : 88
Location : Gulf coast of central Florids
Re: Steampunk Harley - Tamiya 1/6 HD FLH Classic 'extreme' kit bash (Very Photo Heavy)
![]() by disabled modeler Sun 15 Oct 2017, 12:20 pm
by disabled modeler Sun 15 Oct 2017, 12:20 pm
disabled modeler- Intermediate Member
- Posts : 979
Join date : 2016-05-22
Age : 60
Location : Quincy,IL. USA
Re: Steampunk Harley - Tamiya 1/6 HD FLH Classic 'extreme' kit bash (Very Photo Heavy)
![]() by KatsZenJammer Sun 22 Oct 2017, 6:13 pm
by KatsZenJammer Sun 22 Oct 2017, 6:13 pm
Bit by bit ... here's the lower/rear mount point for the secondary fuel tank and the corresponding frame mount 'U'.
Detailing the tank mount area. The rest of the tank body will probably remain plain to echo the primary fuel tank look. Still to come are the fuel valve placement and the fill tube.
Locating the fuel valve on the combo tank. This might change slightly, I'm not set on the fuel valve placement.
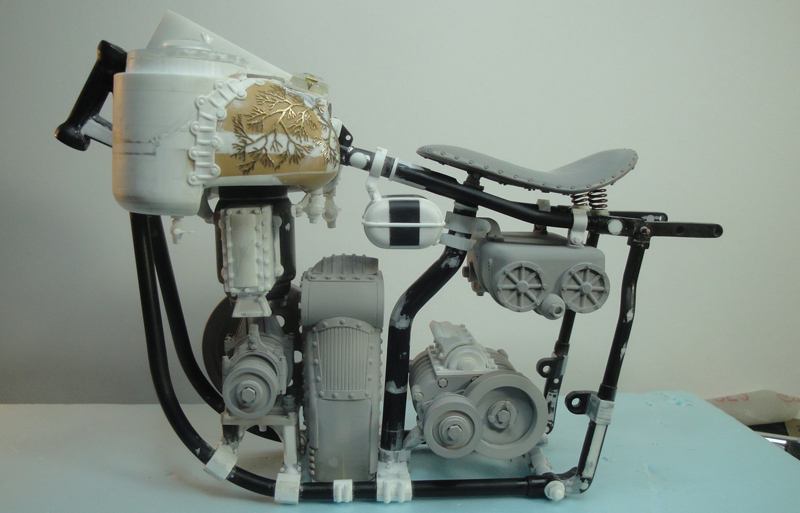
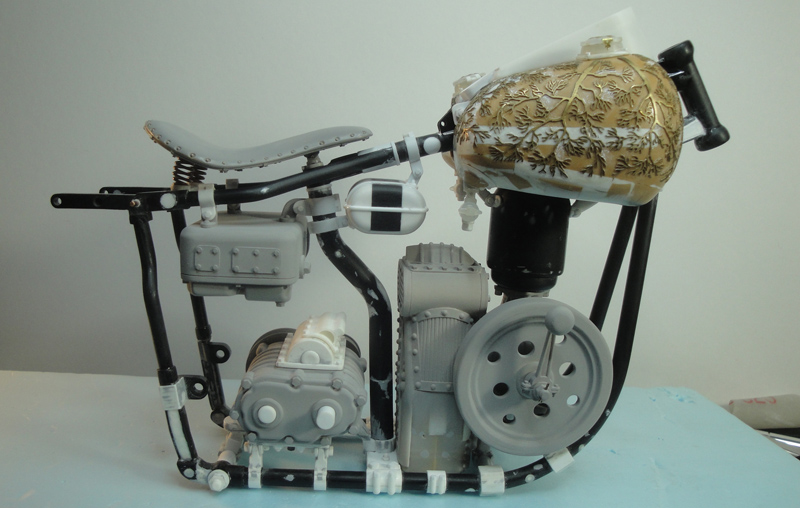
And its time for the test fit. A touch crowded but not stupidly so, thankfully. This side is going to get a lot of plumbing and I'm thinking I'll locate the 'burner control,' and possibly a 'throttle' for the boiler.
The other side. This side will have to accommodate a water pump, the transmission shifter mechanism and shifter levers as well as its own plumbing.
I've been doing a lot of thinking in an effort to create some sort of nebulous plan of sorts. Once I have the water pump and transmission stuff worked out I'm thinking I'll have to work up the shrouds for the flywheel and primary drive belt. Once those are roughed out I can start thinking about foot peg location to facilitate figuring out the rear brake pedal (right side) and maybe (just maybe) a foot throttle on the left side - though the foot throttle idea is very unformed and vague at this time. After that will come the boiler/burner exhaust which will probably run down and to one side like modern short pipes. And it's only now that I've started mulling over the whole kickstand/frame stand situation, lol.
Just keep swimming ...
KatsZenJammer- Resident member
- Posts : 2600
Join date : 2016-05-20
Age : 57
Location : Vancouver, BC
Re: Steampunk Harley - Tamiya 1/6 HD FLH Classic 'extreme' kit bash (Very Photo Heavy)
![]() by GaryDainton Sun 22 Oct 2017, 6:52 pm
by GaryDainton Sun 22 Oct 2017, 6:52 pm
GaryDainton- Advanced Member
- Posts : 4433
Join date : 2014-03-06
Age : 56
Location : Bolton UK
Re: Steampunk Harley - Tamiya 1/6 HD FLH Classic 'extreme' kit bash (Very Photo Heavy)
![]() by Geezerman Tue 24 Oct 2017, 11:03 pm
by Geezerman Tue 24 Oct 2017, 11:03 pm
Love the business.
Geezerman- Advanced Member
- Posts : 3651
Join date : 2013-02-24
Age : 88
Location : Gulf coast of central Florids
Re: Steampunk Harley - Tamiya 1/6 HD FLH Classic 'extreme' kit bash (Very Photo Heavy)
![]() by KatsZenJammer Sun 29 Oct 2017, 10:33 pm
by KatsZenJammer Sun 29 Oct 2017, 10:33 pm
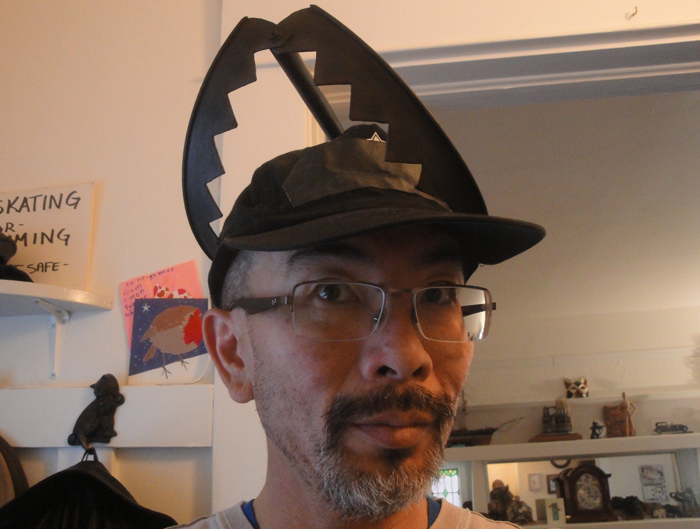
This week's worktable time was curtailed due to Halloween - some work mates requested that I resurrect an old (10+ yrs) costume hat I'd made from the rim of a 5 gallon plastic jug and a hunk of wood dowel. This involved stripping off all the old paint, not difficult as the paint was already falling off, and repainting. This kind of 'prop' costume is ideal for my work situation (manual labour).
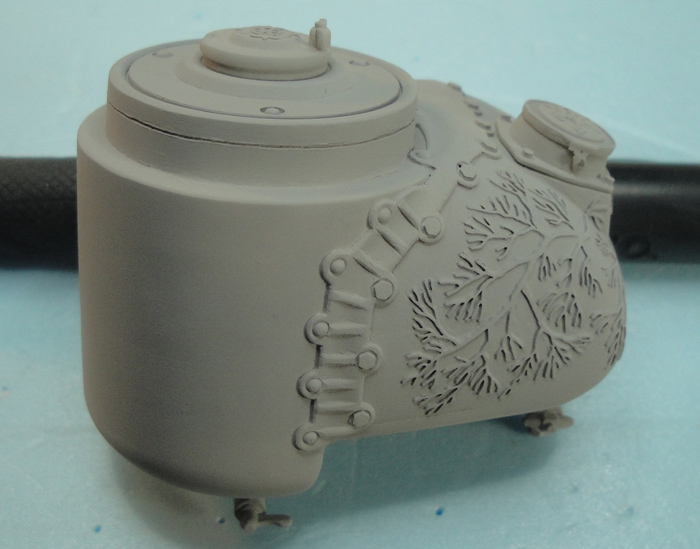
And since I had the spray box and AB set up I figured I'd give the tanks a shot of primer as a 'check' coat. First is the primary water tank.

And the primary fuel/secondary water combo tank. Now I get to discover all the little spots that could use some more clean up work and get a 'neutral' view of the detailing. I don't know if I've mentioned this before but contrasting materials often interferes with getting a complete view as the eye gets distracted (at least as far as I'm concerned, lol).
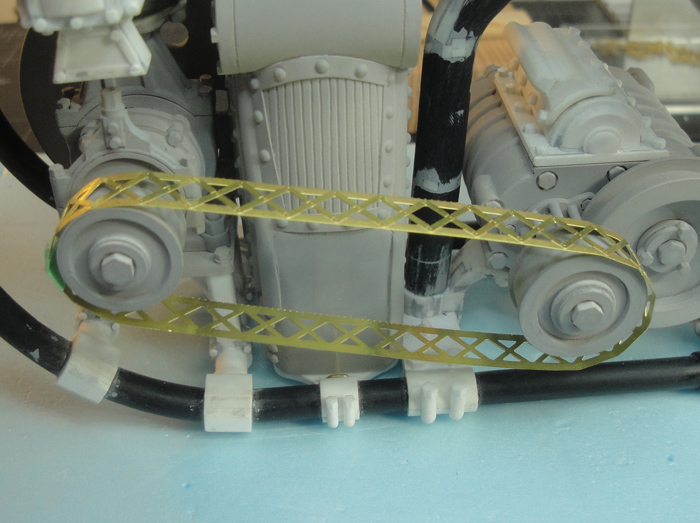
In the course of messing around in the work space I came across some PE girders I'd found in a clearance bin at the LHS - about 2 years ago. I can't recall why I bought them initially but a flash of inspiration got me fiddling. I'd been thinking about safety shrouds for the flywheel and primary drive belt ... the girder segment was about the same width as the primary drive belt ...

I do so enjoy having things develop without too much fuss. I've already started planning how best to cut the front and back covers from sheet styrene and considering the various mounting options - this will have to be easily removable for painting and assembly and all that stuff.
I'll end this week's post with best wishes for a Safe and Happy Halloween to everyone.

Just Keep Swimming ...
KatsZenJammer- Resident member
- Posts : 2600
Join date : 2016-05-20
Age : 57
Location : Vancouver, BC
Re: Steampunk Harley - Tamiya 1/6 HD FLH Classic 'extreme' kit bash (Very Photo Heavy)
![]() by Geezerman Mon 30 Oct 2017, 9:23 am
by Geezerman Mon 30 Oct 2017, 9:23 am
Love the belt and pully's shroud material !!
Perfect !!
Geezerman- Advanced Member
- Posts : 3651
Join date : 2013-02-24
Age : 88
Location : Gulf coast of central Florids
Re: Steampunk Harley - Tamiya 1/6 HD FLH Classic 'extreme' kit bash (Very Photo Heavy)
![]() by disabled modeler Mon 30 Oct 2017, 11:24 am
by disabled modeler Mon 30 Oct 2017, 11:24 am
disabled modeler- Intermediate Member
- Posts : 979
Join date : 2016-05-22
Age : 60
Location : Quincy,IL. USA
Re: Steampunk Harley - Tamiya 1/6 HD FLH Classic 'extreme' kit bash (Very Photo Heavy)
![]() by GaryDainton Mon 30 Oct 2017, 1:28 pm
by GaryDainton Mon 30 Oct 2017, 1:28 pm

The model is looking fantastic!!!
GaryDainton- Advanced Member
- Posts : 4433
Join date : 2014-03-06
Age : 56
Location : Bolton UK
Re: Steampunk Harley - Tamiya 1/6 HD FLH Classic 'extreme' kit bash (Very Photo Heavy)
![]() by Sponsored content
by Sponsored content
Sponsored content
Page 15 of 25 • 1 ... 9 ... 14, 15, 16 ... 20 ... 25 ![]()
» Tamiya 1/6 Harley Davidson Fat Boy Lo
» Tamiya 1/6 Harley Davidson FLH1200
» Steampunk Ducati
» '57 Salvage bash-up
|
|
|