Steampunk Harley - Tamiya 1/6 HD FLH Classic 'extreme' kit bash (Very Photo Heavy)
+17
Geezerman
GaryDainton
Mence
RetiredMike
Nipponrookie
Mr Hirakawa
Ace
kpnuts
hotrodmax
Skid
dublin boy
harron68
disabled modeler
Speed Racer 65
KatsZenJammer
Shelby
A5h
21 posters
Page 2 of 25
Page 2 of 25 •  1, 2, 3 ... 13 ... 25
 Re: Steampunk Harley - Tamiya 1/6 HD FLH Classic 'extreme' kit bash (Very Photo Heavy)
That looks amazing now Kats, can't wait to see what it looks like when painted!
GaryDainton- Advanced Member

- Posts : 4433
Join date : 2014-03-06
Age : 57
Location : Bolton UK
 Re: Steampunk Harley - Tamiya 1/6 HD FLH Classic 'extreme' kit bash (Very Photo Heavy)
Awesome as usual Kats....very very cool..!
disabled modeler- Intermediate Member

- Posts : 979
Join date : 2016-05-22
Age : 60
Location : Quincy,IL. USA
 Re: Steampunk Harley - Tamiya 1/6 HD FLH Classic 'extreme' kit bash (Very Photo Heavy)
I ride, but yet have to build a bike model. With that said, I really dig 'steampunk', and,so, will be watching intently.
This work so far is mega impressive !!!

This work so far is mega impressive !!!


Geezerman- Advanced Member

- Posts : 3651
Join date : 2013-02-24
Age : 89
Location : Gulf coast of central Florids
 Re: Steampunk Harley - Tamiya 1/6 HD FLH Classic 'extreme' kit bash (Very Photo Heavy)
Gary, Mark & Clay - Thank you for your very kind words and support 
Concerning the mounting of the front fender to the forks, in this case the secondary forks so that the fender will 'float' with it instead of being static on the main forks. We start with 'rings' placed on the forks in the correct spots followed by inner flat plates added.


Thinking about the rear fender and the rear shocks. To start I 'dry fit' the parts as is to see how things are sitting. (And, yes, those are more Q-Tips being used, lol)


Some paint and chrome removal.

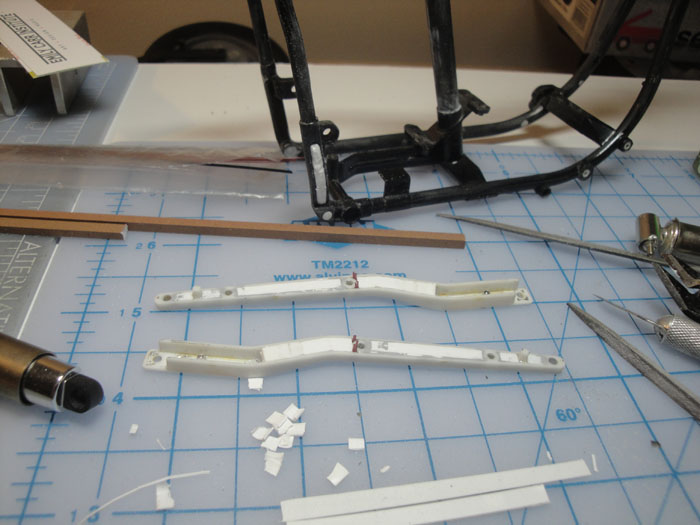
The fender braces get filled in. These were hollow cast kit pieces which I wanted to beef up in case they actually needed to be more structurally supportive.
Test fit.

Quick shot of the brake calliper and disc after initial brush primer-ing.

Shaping and modding to the rear fender. The original look and profile was never an option so here begins the process of cutting away the sides on the path to what I felt was the correct look.


Filling in the little divot which was once the mount point for the rear tail light.


Concerning the mounting of the front fender to the forks, in this case the secondary forks so that the fender will 'float' with it instead of being static on the main forks. We start with 'rings' placed on the forks in the correct spots followed by inner flat plates added.


Thinking about the rear fender and the rear shocks. To start I 'dry fit' the parts as is to see how things are sitting. (And, yes, those are more Q-Tips being used, lol)


Some paint and chrome removal.

The fender braces get filled in. These were hollow cast kit pieces which I wanted to beef up in case they actually needed to be more structurally supportive.

Test fit.

Quick shot of the brake calliper and disc after initial brush primer-ing.

Shaping and modding to the rear fender. The original look and profile was never an option so here begins the process of cutting away the sides on the path to what I felt was the correct look.


Filling in the little divot which was once the mount point for the rear tail light.


KatsZenJammer- Resident member

- Posts : 2600
Join date : 2016-05-20
Age : 57
Location : Vancouver, BC
 Re: Steampunk Harley - Tamiya 1/6 HD FLH Classic 'extreme' kit bash (Very Photo Heavy)
The rear fender after initial shaping. That white line along the curve is a fill in of a moulded ridge which I didn't want to lost entirely, just smooth over.
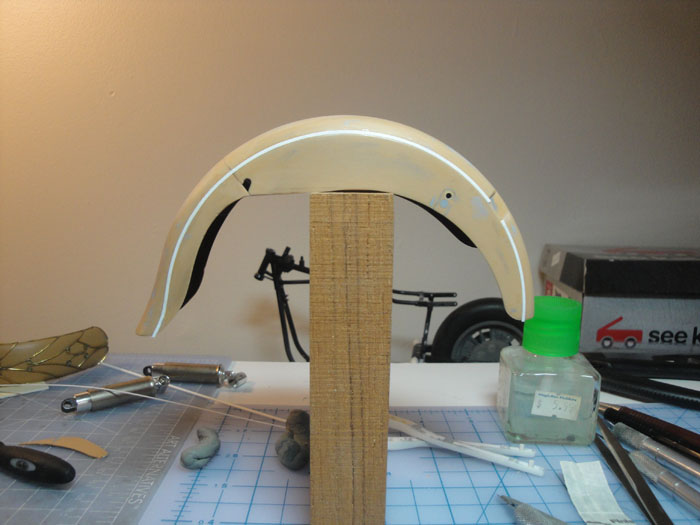
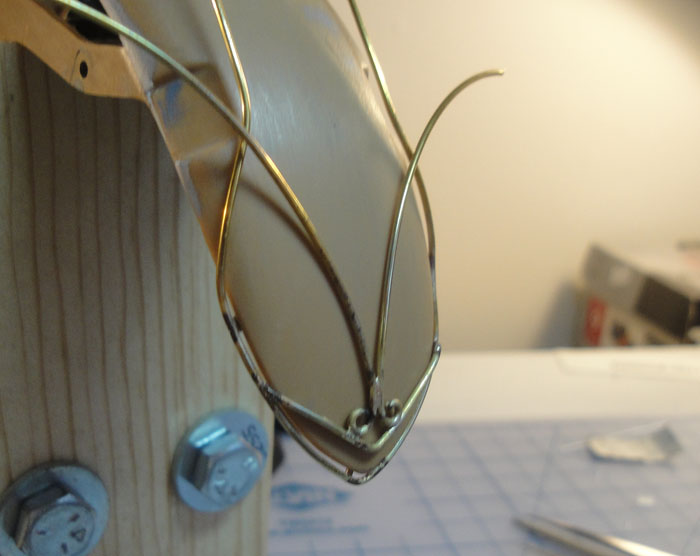
We return to the front fender, in this case the mounting posts/brackets or whatever you'd call these things. Making them out of brass wire which requires a bit of fiddly torch soldering.

And repeated test fits and alignment adjustments. This took some time and frustration, lol.


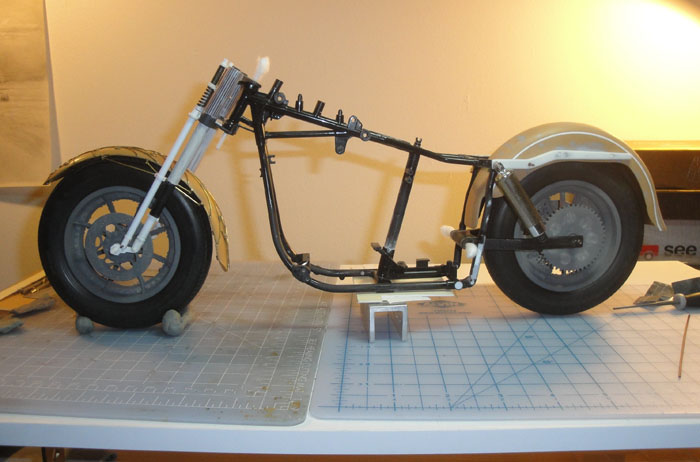
The end product. At first I thought the wire might have seemed a bit thin in scale but after a review of vehicles from the 1890 - 1910 era I realized that stuff like this was commonplace in terms of seemingly being undersized.


An overview shot of the simultaneous parts aspect of this build. You can see the beginnings of the mods to the rear shocks.

On and on and on and on …

We return to the front fender, in this case the mounting posts/brackets or whatever you'd call these things. Making them out of brass wire which requires a bit of fiddly torch soldering.

And repeated test fits and alignment adjustments. This took some time and frustration, lol.


The end product. At first I thought the wire might have seemed a bit thin in scale but after a review of vehicles from the 1890 - 1910 era I realized that stuff like this was commonplace in terms of seemingly being undersized.


An overview shot of the simultaneous parts aspect of this build. You can see the beginnings of the mods to the rear shocks.

On and on and on and on …

KatsZenJammer- Resident member

- Posts : 2600
Join date : 2016-05-20
Age : 57
Location : Vancouver, BC
 Re: Steampunk Harley - Tamiya 1/6 HD FLH Classic 'extreme' kit bash (Very Photo Heavy)
According to the dates on these photos we've now reached November 2014 or so. Work on the rear shocks starts in earnest here. Rather than the original Harley style with the shocks encased in housings I wanted them more exposed and so that meant basically rebuilding them. This is still a kit bash, though, as kit parts are incorporated into these.

Thickening the top cap mounts using the strip styrene method I detailed earlier for some other part.


The basics start coming together. The top and bottom caps are from the kit shocks.


At some point I figured out the static length of the shocks and made a measurement rig to ensure symmetry on both sides.


Detailing of the top and bottom caps continues.

An added detail for the rear shocks is hydraulic reservoirs - I have no idea if this makes sense but I saw these for modern air shocks and thought the concept looked cool. I cut the 'pills' from thick rod and shaped the ends. Then I started adding details.

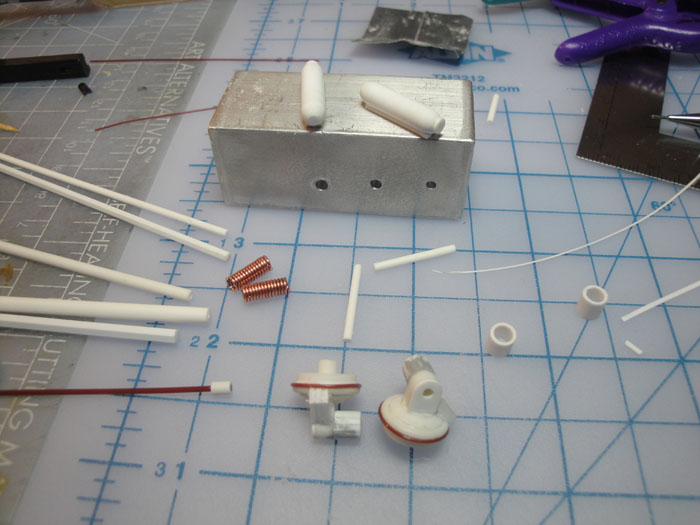

Top caps with more detail. The added chunks are for the reservoirs to mount onto.

Smaller expansion springs being developed for the 'return' tension on the reservoir. This might seem weird but it will make sense later, I promise.

Reinforcement bands being added to the bottom caps.

Test fit with different versions of the springs for a comparative view.


Thickening the top cap mounts using the strip styrene method I detailed earlier for some other part.


The basics start coming together. The top and bottom caps are from the kit shocks.


At some point I figured out the static length of the shocks and made a measurement rig to ensure symmetry on both sides.


Detailing of the top and bottom caps continues.

An added detail for the rear shocks is hydraulic reservoirs - I have no idea if this makes sense but I saw these for modern air shocks and thought the concept looked cool. I cut the 'pills' from thick rod and shaped the ends. Then I started adding details.


Top caps with more detail. The added chunks are for the reservoirs to mount onto.

Smaller expansion springs being developed for the 'return' tension on the reservoir. This might seem weird but it will make sense later, I promise.

Reinforcement bands being added to the bottom caps.

Test fit with different versions of the springs for a comparative view.


KatsZenJammer- Resident member

- Posts : 2600
Join date : 2016-05-20
Age : 57
Location : Vancouver, BC
 Re: Steampunk Harley - Tamiya 1/6 HD FLH Classic 'extreme' kit bash (Very Photo Heavy)
The little pills start taking shape.

The little expansion springs being fitted - hopefully this makes visual sense if not mechanically.


Adding the little touches to increase the level of detail.


Test fit to insure the whole looks ok.

The reservoirs are more-or-less done.

Adding hex nuts - in this case these are 'functional' as part of the hydraulic plumbing set up.

Developing the inner posts for the shocks. As these will be partly visible through the coils of the springs I wanted them to have the correct sort of profile.

Detailing the bottom caps, more styrene strips and shaping.
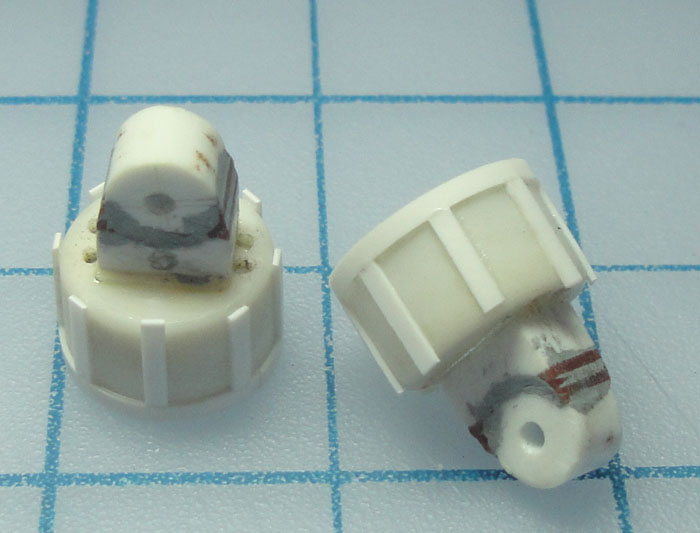


Test fit.
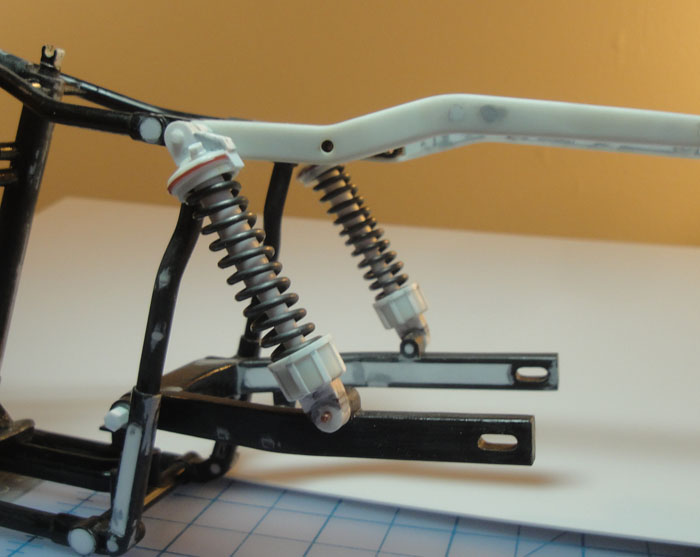

The mounting posts for the tops of the shocks. The kit originally had these secured with real screws into the frame. I chose to get away from this and redeveloped the mounts as seen.

And now we're into January 2015 ...

The little expansion springs being fitted - hopefully this makes visual sense if not mechanically.


Adding the little touches to increase the level of detail.


Test fit to insure the whole looks ok.

The reservoirs are more-or-less done.

Adding hex nuts - in this case these are 'functional' as part of the hydraulic plumbing set up.

Developing the inner posts for the shocks. As these will be partly visible through the coils of the springs I wanted them to have the correct sort of profile.

Detailing the bottom caps, more styrene strips and shaping.


Test fit.


The mounting posts for the tops of the shocks. The kit originally had these secured with real screws into the frame. I chose to get away from this and redeveloped the mounts as seen.

And now we're into January 2015 ...

KatsZenJammer- Resident member

- Posts : 2600
Join date : 2016-05-20
Age : 57
Location : Vancouver, BC
 Re: Steampunk Harley - Tamiya 1/6 HD FLH Classic 'extreme' kit bash (Very Photo Heavy)
Very nice work and a real joy to follow. 

Guest- Guest
 Re: Steampunk Harley - Tamiya 1/6 HD FLH Classic 'extreme' kit bash (Very Photo Heavy)
Zbuckster - Thanks for the kind words and support 
Here's the yoke with copper posts for the bottom mounts for the shocks and on the ends of the yoke is the beginning of added detail modding.

Hydraulic reservoirs affixed to the shocks and test fits.


Adding a bit of plumbing for the reservoir - copper wire shaped then blackened with Jax.
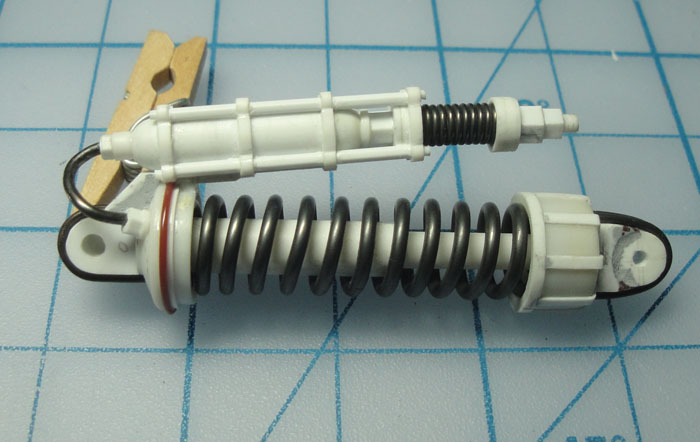
Working on the alignment adjustments for the rear axle. I based these in the kit originals, making them slightly chunkier to reflect the whole Steampunk/Victorian era theme. You can also see the start of the clamp bands for the bottom shock mount points.

The clamp band for the rear brake stabilizer in process and you can see the mount clamps further along in their development.

A couple of views of how I fill voids in existing pieces. Rather than pile in a lot of putty, which can soften the plastic and take forever to cure, I drop in pieces of styrene and use small amounts of MEK. Wait a for bait for the MEK to cure and then add more until the void is packed. Shape and then putty. In the second photo you can see the beginnings of the clamp band for the yoke hinge points on the frame.


Around this time I finally broke down and got myself an airbrush and compressor after only 30 years of putting it off, lol. This shot is of the parts which I had already primed with a regular brush getting a recoat using Tamiya acrylic, light grey.

The rear brake stabilizer. Kit original was just a plain old strip of plastic, so I made a more appropriate looking one with copper wire and brass sheet. The trick here is to form the 'U' bits roughly, then drill holes for the wire, then solder the sheet 'U' bits to the wire. After that I shaped the 'U' ends and drilled through them for the mounting pins. Doing it this way makes it far easier to work the little 'U' bits.

Stabilizer mount point on the yoke being affixed.

Kit parts undergoing modding. The bracket for the rear brake has been heavily worked on already, some basic shaping and cutting out of inner bits. Calliper halves ready to be hacked, cut, sanded, etc.

The frame under process, concentrating on the area around the yoke hinge points.

The yoke with the axle alignment nuts and bolts mostly worked up and the rear brake stabilizer mount mostly done.


Here's the yoke with copper posts for the bottom mounts for the shocks and on the ends of the yoke is the beginning of added detail modding.

Hydraulic reservoirs affixed to the shocks and test fits.


Adding a bit of plumbing for the reservoir - copper wire shaped then blackened with Jax.

Working on the alignment adjustments for the rear axle. I based these in the kit originals, making them slightly chunkier to reflect the whole Steampunk/Victorian era theme. You can also see the start of the clamp bands for the bottom shock mount points.

The clamp band for the rear brake stabilizer in process and you can see the mount clamps further along in their development.

A couple of views of how I fill voids in existing pieces. Rather than pile in a lot of putty, which can soften the plastic and take forever to cure, I drop in pieces of styrene and use small amounts of MEK. Wait a for bait for the MEK to cure and then add more until the void is packed. Shape and then putty. In the second photo you can see the beginnings of the clamp band for the yoke hinge points on the frame.


Around this time I finally broke down and got myself an airbrush and compressor after only 30 years of putting it off, lol. This shot is of the parts which I had already primed with a regular brush getting a recoat using Tamiya acrylic, light grey.

The rear brake stabilizer. Kit original was just a plain old strip of plastic, so I made a more appropriate looking one with copper wire and brass sheet. The trick here is to form the 'U' bits roughly, then drill holes for the wire, then solder the sheet 'U' bits to the wire. After that I shaped the 'U' ends and drilled through them for the mounting pins. Doing it this way makes it far easier to work the little 'U' bits.

Stabilizer mount point on the yoke being affixed.

Kit parts undergoing modding. The bracket for the rear brake has been heavily worked on already, some basic shaping and cutting out of inner bits. Calliper halves ready to be hacked, cut, sanded, etc.

The frame under process, concentrating on the area around the yoke hinge points.

The yoke with the axle alignment nuts and bolts mostly worked up and the rear brake stabilizer mount mostly done.


KatsZenJammer- Resident member

- Posts : 2600
Join date : 2016-05-20
Age : 57
Location : Vancouver, BC
 Re: Steampunk Harley - Tamiya 1/6 HD FLH Classic 'extreme' kit bash (Very Photo Heavy)
Great stuff Kats, I hated my airbrush to begin with, just couldn't get on with it but now I wouldnt be without it. I bought an ultrasonic cleaner which is brilliant.

GaryDainton- Advanced Member

- Posts : 4433
Join date : 2014-03-06
Age : 57
Location : Bolton UK
 Re: Steampunk Harley - Tamiya 1/6 HD FLH Classic 'extreme' kit bash (Very Photo Heavy)
*Edit* Gary - Thanks for looking in. I still haven't really used my airbrush as much as I should be for practice but I figure that will change given time. I've thought about an ultrasonic cleaner but have been holding off for now. My next new hobby tool is likely to be an air tank for the airbrush set up.
The rear brake bracket shaped and cleaned up a bit.

After drilling a mount hole for the stabilizer in the bracket it was time for a test fit to check on the whole alignment thing.


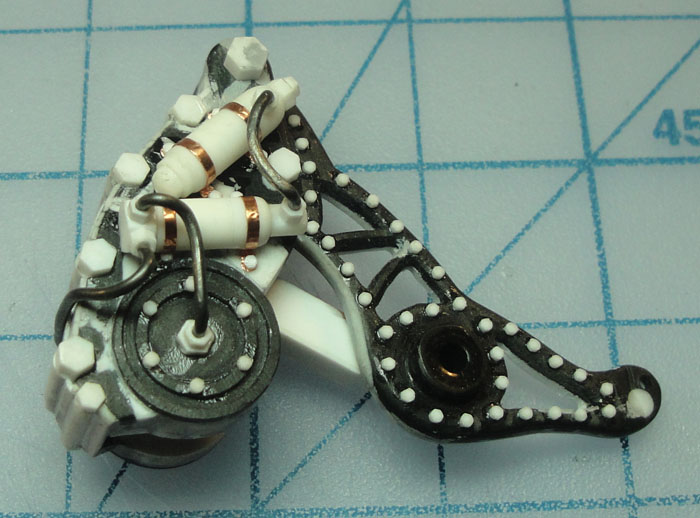
Now that I knew how it was going to sit I could get to work on the callipers themselves. I wanted these to look similar to the front brake but not exactly the same, the 'two different parts produced by the same machine shop' kind of thing. Those little white posts are for securing the halves together, if you look closely you can see the holes drilled through the tops of the calliper halves.

I kept the covers for the calliper pistons and used them for the rear brake. But I wanted to have cylindrical bodies visible so this meant cutting out discs of styrene to create them.

Cutting and shaping, fitting, adjusting, etc.
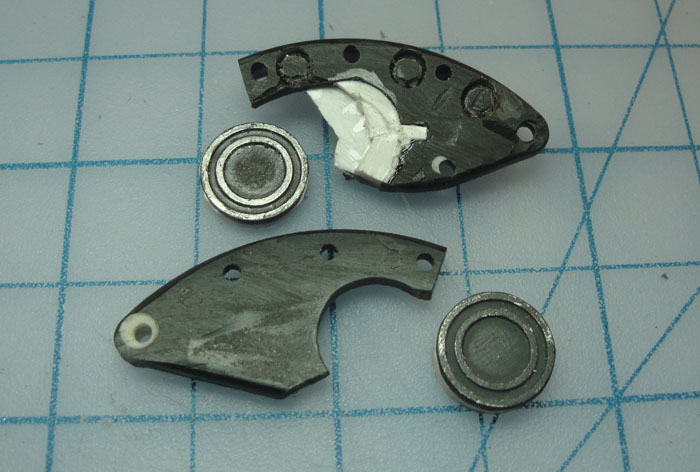

Getting there. The 'fins' on the outside half were an impulsive idea that worked so I kept them. Another example of things veering off the original idea but working out.

Developing the callipers on the topside. Though I had something like this planned what you see isn't exactly that but a simpler way of getting to where I wanted to go.


Further work on the calliper.


Did someone say, "Hex nuts?"

Test fit and a view of the progress.


The rear brake bracket shaped and cleaned up a bit.

After drilling a mount hole for the stabilizer in the bracket it was time for a test fit to check on the whole alignment thing.


Now that I knew how it was going to sit I could get to work on the callipers themselves. I wanted these to look similar to the front brake but not exactly the same, the 'two different parts produced by the same machine shop' kind of thing. Those little white posts are for securing the halves together, if you look closely you can see the holes drilled through the tops of the calliper halves.

I kept the covers for the calliper pistons and used them for the rear brake. But I wanted to have cylindrical bodies visible so this meant cutting out discs of styrene to create them.

Cutting and shaping, fitting, adjusting, etc.


Getting there. The 'fins' on the outside half were an impulsive idea that worked so I kept them. Another example of things veering off the original idea but working out.

Developing the callipers on the topside. Though I had something like this planned what you see isn't exactly that but a simpler way of getting to where I wanted to go.


Further work on the calliper.


Did someone say, "Hex nuts?"

Test fit and a view of the progress.


KatsZenJammer- Resident member

- Posts : 2600
Join date : 2016-05-20
Age : 57
Location : Vancouver, BC
 Re: Steampunk Harley - Tamiya 1/6 HD FLH Classic 'extreme' kit bash (Very Photo Heavy)
Amazing work Kats, just amazing.
_________________
Al.
Constructive criticism is always welcome.
“Success always demands a greater effort.” Winston Churchill
"Success is failure turned inside out" Unknown
 Re: Steampunk Harley - Tamiya 1/6 HD FLH Classic 'extreme' kit bash (Very Photo Heavy)
Super build, very enjoyable to follow.
Guest- Guest
 Re: Steampunk Harley - Tamiya 1/6 HD FLH Classic 'extreme' kit bash (Very Photo Heavy)
Curt, Al & Zbuckster - Thanks for the very kind words and support!
I'm starting to feel kind of bad because of all the scrolling I'm making people do when they review this thread, lol. But I figure with the kind of backlog I'm working through it's probably better to get it all out as soon as possible in order to return to regular programming. So we start this post with the forks, namely finally capping the posts for the hinges with, what else, hex nuts!


The rear brake calliper gets added 'hydraulics.'

The front brake calliper and mounting bracket, rough primed. The teeny little wire post for the stabilizer gets teeny little hex nuts as well.

Following the theme of the front brake for detailing the rear. And if there weren't already enough hex nuts ...
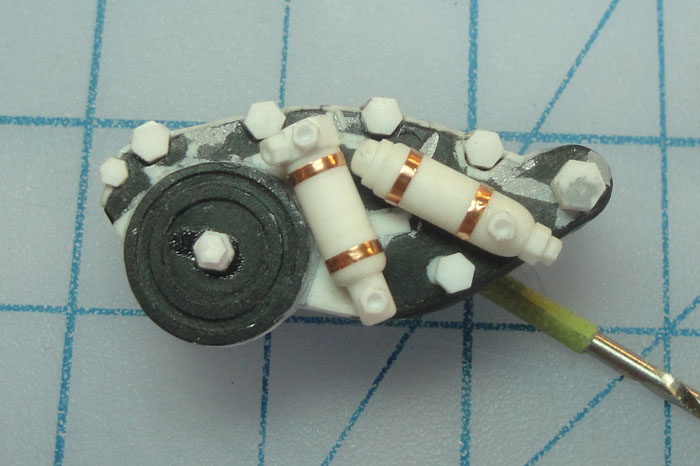
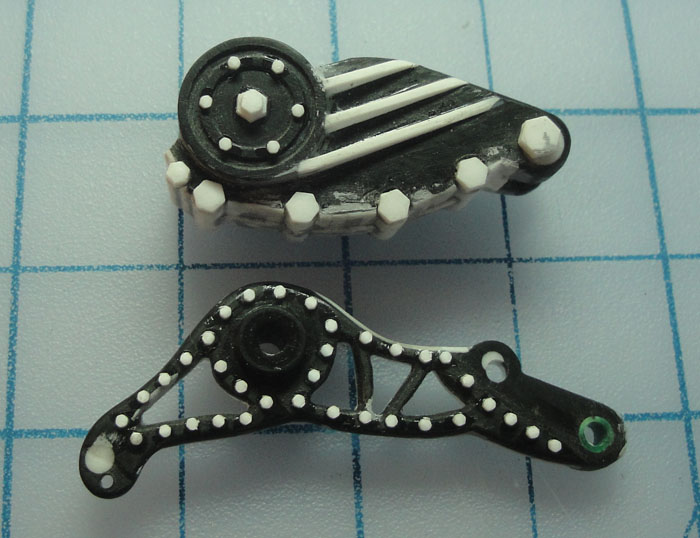

Shaping the rear fender.

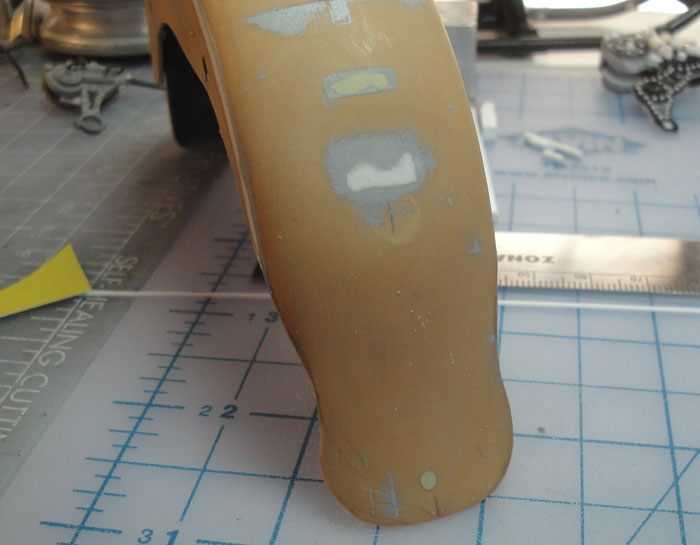
Test fit and appearance check.


Close up of the rear wheel. Here it's obvious how much the work I did on the wheel is obscured, yet it still peeks out enough to get noticed if one looks carefully.

I'm starting to feel kind of bad because of all the scrolling I'm making people do when they review this thread, lol. But I figure with the kind of backlog I'm working through it's probably better to get it all out as soon as possible in order to return to regular programming. So we start this post with the forks, namely finally capping the posts for the hinges with, what else, hex nuts!


The rear brake calliper gets added 'hydraulics.'

The front brake calliper and mounting bracket, rough primed. The teeny little wire post for the stabilizer gets teeny little hex nuts as well.

Following the theme of the front brake for detailing the rear. And if there weren't already enough hex nuts ...


Shaping the rear fender.


Test fit and appearance check.


Close up of the rear wheel. Here it's obvious how much the work I did on the wheel is obscured, yet it still peeks out enough to get noticed if one looks carefully.


KatsZenJammer- Resident member

- Posts : 2600
Join date : 2016-05-20
Age : 57
Location : Vancouver, BC
 Re: Steampunk Harley - Tamiya 1/6 HD FLH Classic 'extreme' kit bash (Very Photo Heavy)
So I wound up not being all that keen on the look and decided that further mods were required. The shaded area is the cut out.
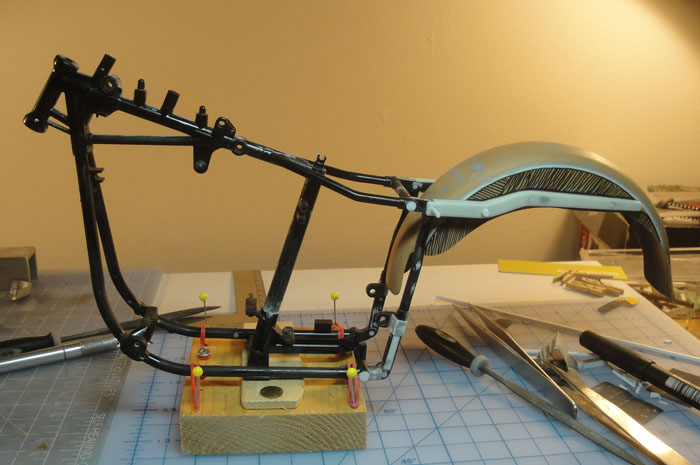
A view of the scavenged bits I cobbled together as a frame rig.

A close up of the planned removal.
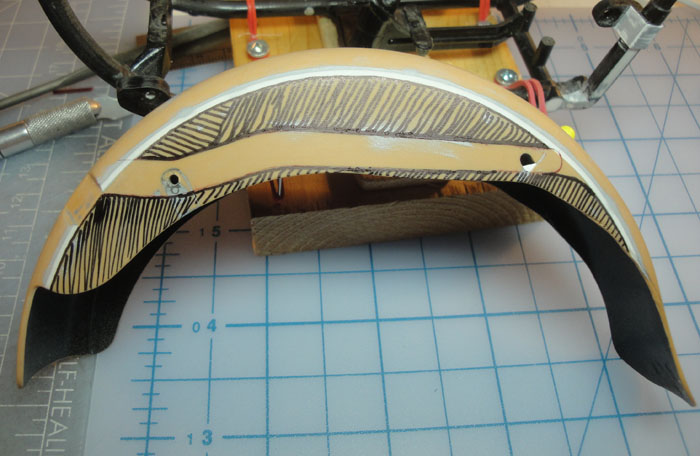
The first rough cut done.

I was much happier with this new look.


The rear brake calliper gets plumbing installed.

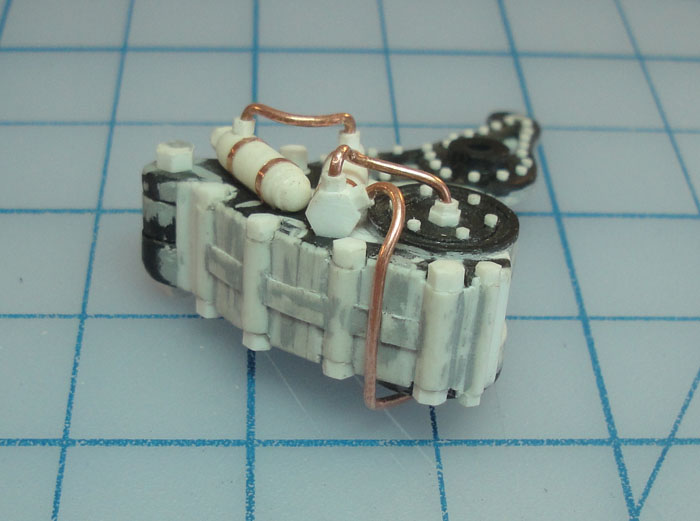
And after blackening.
Hopefully I will be able to sneak in a few posts throughout the week because I'd like to post photos from the Steamcycle's 2nd Birthday (May 29th) but they'd be out of sequence. Then again, 700 photos as way to start a WIP is kind of much, lol. And this is after culling out excess redundancy.

A view of the scavenged bits I cobbled together as a frame rig.

A close up of the planned removal.

The first rough cut done.

I was much happier with this new look.


The rear brake calliper gets plumbing installed.


And after blackening.

Hopefully I will be able to sneak in a few posts throughout the week because I'd like to post photos from the Steamcycle's 2nd Birthday (May 29th) but they'd be out of sequence. Then again, 700 photos as way to start a WIP is kind of much, lol. And this is after culling out excess redundancy.

KatsZenJammer- Resident member

- Posts : 2600
Join date : 2016-05-20
Age : 57
Location : Vancouver, BC
 Re: Steampunk Harley - Tamiya 1/6 HD FLH Classic 'extreme' kit bash (Very Photo Heavy)
Jamming in one more post tonight - in which the saddle evolves. We start with the previously modified kit saddle.

I let the natural lines of the kit part determine the single seat shape. I also cut corresponding segments from the underside.

Cleared out the old putty and re-filled with styrene strips.

Further along and you can see the underside bits have been further modded to conform to the curve of the saddle. The shine is from gel CA that I was using instead of putty.

Putting the pieces in form.

The front mount point gets worked on. The kit original was a simple 'C' clip, I wanted something more detailed because it would now be visible.

The underside development with the mount bracket.


A touch of detail.

I imagined the saddle to be leather so here I marked out the points for dimples within which I'm going to seat rivets. I included the Dremel bits I used in the photos.

Test fit.

Widening the dimples a bit with a slightly larger bit.

And that's it for tonight. Tune in again for … more hex nuts *insert maniacal laughter*

I let the natural lines of the kit part determine the single seat shape. I also cut corresponding segments from the underside.

Cleared out the old putty and re-filled with styrene strips.

Further along and you can see the underside bits have been further modded to conform to the curve of the saddle. The shine is from gel CA that I was using instead of putty.

Putting the pieces in form.

The front mount point gets worked on. The kit original was a simple 'C' clip, I wanted something more detailed because it would now be visible.

The underside development with the mount bracket.


A touch of detail.

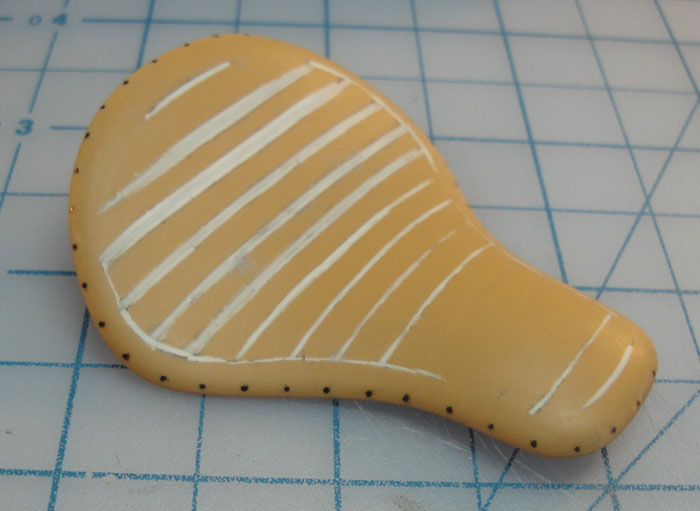
I imagined the saddle to be leather so here I marked out the points for dimples within which I'm going to seat rivets. I included the Dremel bits I used in the photos.


Test fit.


Widening the dimples a bit with a slightly larger bit.

And that's it for tonight. Tune in again for … more hex nuts *insert maniacal laughter*

KatsZenJammer- Resident member

- Posts : 2600
Join date : 2016-05-20
Age : 57
Location : Vancouver, BC
 Re: Steampunk Harley - Tamiya 1/6 HD FLH Classic 'extreme' kit bash (Very Photo Heavy)
 Great stuff. Really enjoying this build.
Guest- Guest
 Re: Steampunk Harley - Tamiya 1/6 HD FLH Classic 'extreme' kit bash (Very Photo Heavy)
I am really enjoying this Kats.
Guest- Guest
 Re: Steampunk Harley - Tamiya 1/6 HD FLH Classic 'extreme' kit bash (Very Photo Heavy)
Really coming along now Kats, superb! 


GaryDainton- Advanced Member

- Posts : 4433
Join date : 2014-03-06
Age : 57
Location : Bolton UK
 Re: Steampunk Harley - Tamiya 1/6 HD FLH Classic 'extreme' kit bash (Very Photo Heavy)
Saddle looks comfy. 
I used to have a trike with a ''sprung'' saddle and after an hour in the seat I got off and walked like John Wayne!

I used to have a trike with a ''sprung'' saddle and after an hour in the seat I got off and walked like John Wayne!

Guest- Guest
 Re: Steampunk Harley - Tamiya 1/6 HD FLH Classic 'extreme' kit bash (Very Photo Heavy)
Just a thought Kats, have you considered a real leather covering for the seat?
Some great stuff out there for that.
Some great stuff out there for that.

GaryDainton- Advanced Member

- Posts : 4433
Join date : 2014-03-06
Age : 57
Location : Bolton UK
 Re: Steampunk Harley - Tamiya 1/6 HD FLH Classic 'extreme' kit bash (Very Photo Heavy)
I just spent an hour studying every picture of this unbelievably detailed exorcise in scratch building. Every great once in awhile someone builds something that completely blows me away! This build has done just that! Amazing detail and wildly creative! I can't wait to see more!!

hotrodmax- Rookie Member

- Posts : 379
Join date : 2015-02-15
Age : 67
Location : Willow Spring North Carolina
 Re: Steampunk Harley - Tamiya 1/6 HD FLH Classic 'extreme' kit bash (Very Photo Heavy)
GaryDainton wrote:Just a thought Kats, have you considered a real leather covering for the seat?
Some great stuff out there for that.
Good question Gary.
Kats, I have recently seen a faux leather paint finish, it looks to be super simple. If I can find a link I will post it up here.
Guest- Guest
 Re: Steampunk Harley - Tamiya 1/6 HD FLH Classic 'extreme' kit bash (Very Photo Heavy)
Zbuckster, Curt, Gary, Nigel & Max - Thanks for looking in and for the very (nay, extremely) kind words and encouragement!
Nigel, I know what you mean - there have been more than a few times in the past where I, too, walked like The Duke, lol.
Gary - I had considered it from seeing examples of it when doing research but I think I'm going to go the paint faux method as that gives me a bit more control over shade and also wear and age effects. However, the saddlebags might wind up being made from some appropriate 'real' material … not sure about that.
Curt - if you could that would be great, I'm still in the data gathering mode for the paint and everything is welcome.
Max - another thanks for your extremely kind comments. I think I can say without too much ego that some cool stuff is coming up in a bit, which is to say, a hundred photos or so, lol.
So time to try and cram in a couple of posts to work through the backlog. Of course I wanted to decorate the rear fender with a similar type of 'iron work' but I wouldn't be able to make it a sleeve. After thinking about it a lot I decided to go with three separate pieces which would set onto the fender using little tabs and holes. This is the start of the forward piece, which is under the saddle.


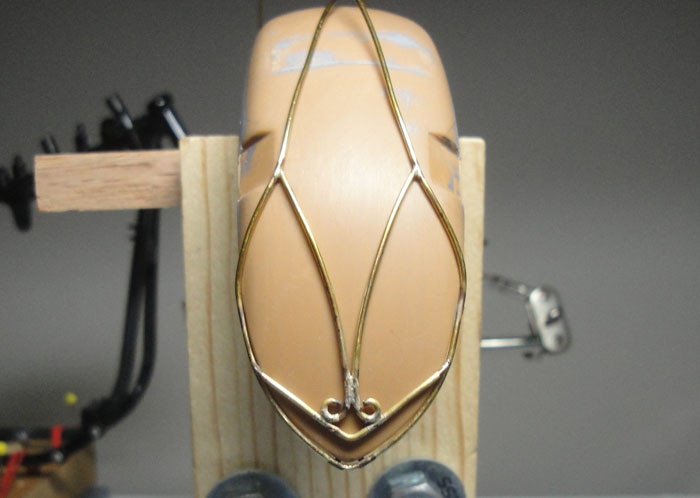
Sometimes things work out the way I planned. The rear part of the front fender had a distinct shape to the lines and in a fit of inspiration I tried to mirror that on the front part of the rear fender. Not that stuff like this will stand out but I like trying to bury details in everywhere I can.

Flourish added to again mimic the front portion.

Test fit and right away I wanted more going on at the top where it seats in the hole in the fender.

Basic design using curved line portions, radial symmetry and a lot of luck allowed me to pull this off on the first try.
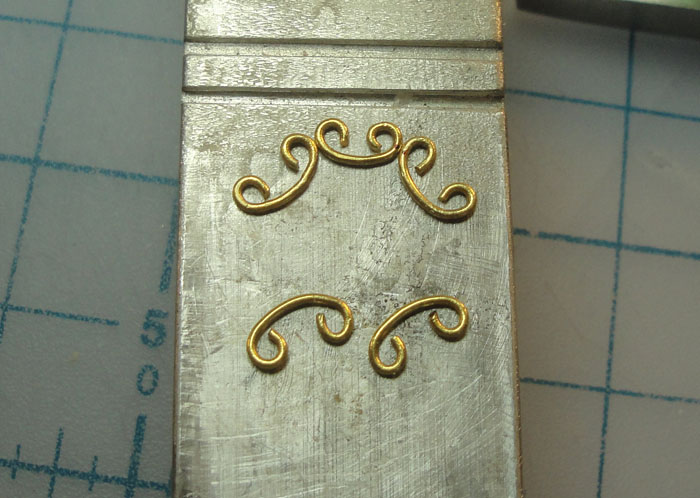

Test fit and I feel it looks much better.
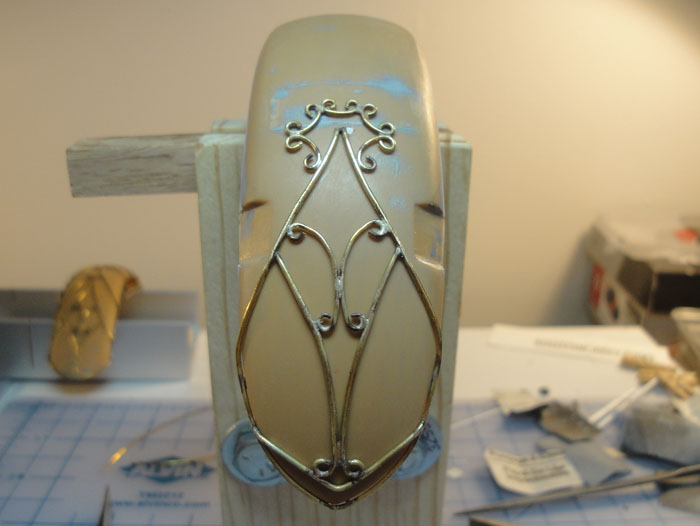
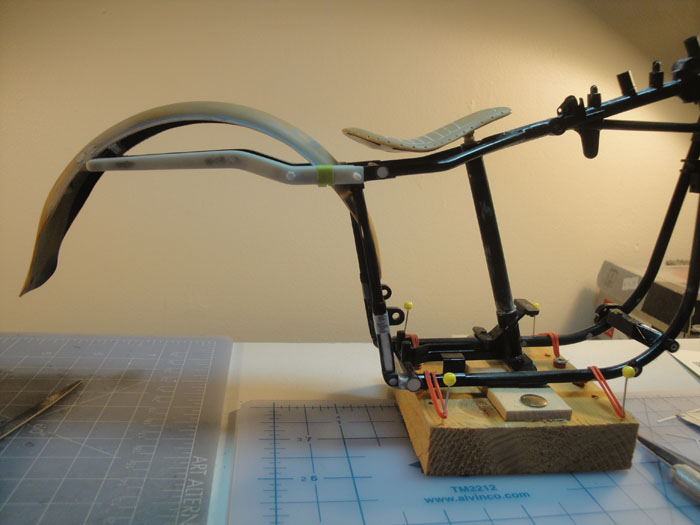
Test fit on frame and a segue to the saddle.

Drilled out the first dimple, front centre, and the little bit of brass wire which will become the rivet or tack or whatever they're called.

And done. The thickness of the plastic allowed me to clip short stubs brass wire which didn't quite reach the other side. I then filled the inside holes with CA, some thin at first followed by thicker gap fill stuff. This way I didn't have to worry about accidentally filling in a dimple.

Nigel, I know what you mean - there have been more than a few times in the past where I, too, walked like The Duke, lol.
Gary - I had considered it from seeing examples of it when doing research but I think I'm going to go the paint faux method as that gives me a bit more control over shade and also wear and age effects. However, the saddlebags might wind up being made from some appropriate 'real' material … not sure about that.
Curt - if you could that would be great, I'm still in the data gathering mode for the paint and everything is welcome.
Max - another thanks for your extremely kind comments. I think I can say without too much ego that some cool stuff is coming up in a bit, which is to say, a hundred photos or so, lol.
So time to try and cram in a couple of posts to work through the backlog. Of course I wanted to decorate the rear fender with a similar type of 'iron work' but I wouldn't be able to make it a sleeve. After thinking about it a lot I decided to go with three separate pieces which would set onto the fender using little tabs and holes. This is the start of the forward piece, which is under the saddle.


Sometimes things work out the way I planned. The rear part of the front fender had a distinct shape to the lines and in a fit of inspiration I tried to mirror that on the front part of the rear fender. Not that stuff like this will stand out but I like trying to bury details in everywhere I can.

Flourish added to again mimic the front portion.

Test fit and right away I wanted more going on at the top where it seats in the hole in the fender.

Basic design using curved line portions, radial symmetry and a lot of luck allowed me to pull this off on the first try.


Test fit and I feel it looks much better.

Test fit on frame and a segue to the saddle.

Drilled out the first dimple, front centre, and the little bit of brass wire which will become the rivet or tack or whatever they're called.

And done. The thickness of the plastic allowed me to clip short stubs brass wire which didn't quite reach the other side. I then filled the inside holes with CA, some thin at first followed by thicker gap fill stuff. This way I didn't have to worry about accidentally filling in a dimple.


KatsZenJammer- Resident member

- Posts : 2600
Join date : 2016-05-20
Age : 57
Location : Vancouver, BC
Page 2 of 25 •  1, 2, 3 ... 13 ... 25
 Similar topics
» A Steamcycle - an extreme kit bash/scratch build
» Tamiya 1/6 Harley Davidson Fat Boy Lo
» Tamiya 1/6 Harley Davidson FLH1200
» Steampunk Ducati
» '57 Salvage bash-up
» Tamiya 1/6 Harley Davidson Fat Boy Lo
» Tamiya 1/6 Harley Davidson FLH1200
» Steampunk Ducati
» '57 Salvage bash-up
Page 2 of 25
Permissions in this forum:
You cannot reply to topics in this forum