Airco DH-2 - Pegasus 1/72
+2
harron68
Geezerman
6 posters
Skid's :: Works In Progress :: Aircraft
Page 1 of 2
Page 1 of 2 • 1, 2 
 Airco DH-2 - Pegasus 1/72
I bought this one out of curiosity. It's from a British firm named Pegasus and they usually carry a pretty good price, so I had to see why. This one was only $16 w/shpg on ebay.
It's an interesting WWI design.

These are limited run injection moldings. Although there's quite a bit of flash, the surface detail is nice.

It comes with white metal castings for many small pieces and stainless wire for the booms. The strut material is in one long piece, cross-sectionally oval in shape. Decals are silk-screened for better color density. The exploded view you see is actually the instruction sheet. Exactly where pieces get mated to each other has to be confirmed by checking online photos.

This is the engine casting after painting the cylinders.

Here is the assembled cockpit floor with MG. There is no instrument panel included, so I'll see if I can print one on paper and insert that. The sides of the seat had to be filed down to allow the fuselage halves to join up without a gap. Belts are just bits of masking tape

The stainless booms get CA'd onto small slots in the wing inserts. The tail will be done the same. So I laid them out on chart paper to keep everything straight.

So far all has gone well. Hope it continues that way.
Mike
It's an interesting WWI design.

These are limited run injection moldings. Although there's quite a bit of flash, the surface detail is nice.

It comes with white metal castings for many small pieces and stainless wire for the booms. The strut material is in one long piece, cross-sectionally oval in shape. Decals are silk-screened for better color density. The exploded view you see is actually the instruction sheet. Exactly where pieces get mated to each other has to be confirmed by checking online photos.

This is the engine casting after painting the cylinders.

Here is the assembled cockpit floor with MG. There is no instrument panel included, so I'll see if I can print one on paper and insert that. The sides of the seat had to be filed down to allow the fuselage halves to join up without a gap. Belts are just bits of masking tape

The stainless booms get CA'd onto small slots in the wing inserts. The tail will be done the same. So I laid them out on chart paper to keep everything straight.

So far all has gone well. Hope it continues that way.
Mike

RetiredMike- Advanced Member

- Posts : 3525
Join date : 2013-04-27
Age : 73
Location : Valparaiso, Indiana
 Re: Airco DH-2 - Pegasus 1/72
I love the Airco DH2 'pusher' it's just such a cool looking aircraft. I had an Eduard 1:48 version but sold it years ago as the rigging put me off. I'd attempt it now so I may look for another.
It must be tiny in 1:72 and I think it will test your patience and skill when doing the rigging.
Plenty of flash to clean up too.

It must be tiny in 1:72 and I think it will test your patience and skill when doing the rigging.
Plenty of flash to clean up too.

_________________
Al.
Constructive criticism is always welcome.
“Success always demands a greater effort.” Winston Churchill
"Success is failure turned inside out" Unknown

Geezerman- Advanced Member

- Posts : 3651
Join date : 2013-02-24
Age : 89
Location : Gulf coast of central Florids
 Re: Airco DH-2 - Pegasus 1/72
"Pushers" were slow and ungainly. Praise should go to crews who survived! I wish u well on this small scale challenge. Glad it comes with a pretty good looking engine!
harron68- Advanced Member

- Posts : 3621
Join date : 2013-02-28
Age : 74
Location : MIDWEST
 Re: Airco DH-2 - Pegasus 1/72
Another gem in the making Mike, Im in. 


GaryDainton- Advanced Member

- Posts : 4433
Join date : 2014-03-06
Age : 57
Location : Bolton UK
 Re: Airco DH-2 - Pegasus 1/72
This should be very cool!! 


KatsZenJammer- Resident member

- Posts : 2600
Join date : 2016-05-20
Age : 57
Location : Vancouver, BC
 Re: Airco DH-2 - Pegasus 1/72
This may be a long and difficult build, so I'll probably start something else to maintain the mojo I got back.
Got a couple of verticals attached to the booms. CA'ing plastic to stainless is quite a delicate matter. They keep snapping off if you touch them a bit. Also, I didn't contour them like the real thing. So they may come off for another try.

Did some fuselage work.

The registration of that top piece wasn't quite right, so I lined up the leather straps and I'll redo the rest.

Filed down the little tank thingy and replaced it with a piece of styrene. Removed the cabane struts to make work easier.

Did quite a bit of looking online to find out exactly how the rear bulkhead fit in there.

I won't give it up, though.
Thanks for looking.
Got a couple of verticals attached to the booms. CA'ing plastic to stainless is quite a delicate matter. They keep snapping off if you touch them a bit. Also, I didn't contour them like the real thing. So they may come off for another try.

Did some fuselage work.

The registration of that top piece wasn't quite right, so I lined up the leather straps and I'll redo the rest.

Filed down the little tank thingy and replaced it with a piece of styrene. Removed the cabane struts to make work easier.

Did quite a bit of looking online to find out exactly how the rear bulkhead fit in there.

I won't give it up, though.
Thanks for looking.

RetiredMike- Advanced Member

- Posts : 3525
Join date : 2013-04-27
Age : 73
Location : Valparaiso, Indiana
 Re: Airco DH-2 - Pegasus 1/72
Some of the 1/72 scale plane kits leave a lot to be desired. Makes me wonder if anyone at the "companies" ever builds them before selling them!
Your corrections show patience and determination to make it worthy of a spot in the collection. Good show!
Your corrections show patience and determination to make it worthy of a spot in the collection. Good show!
harron68- Advanced Member

- Posts : 3621
Join date : 2013-02-28
Age : 74
Location : MIDWEST
 Re: Airco DH-2 - Pegasus 1/72
Slow, but progressing here.
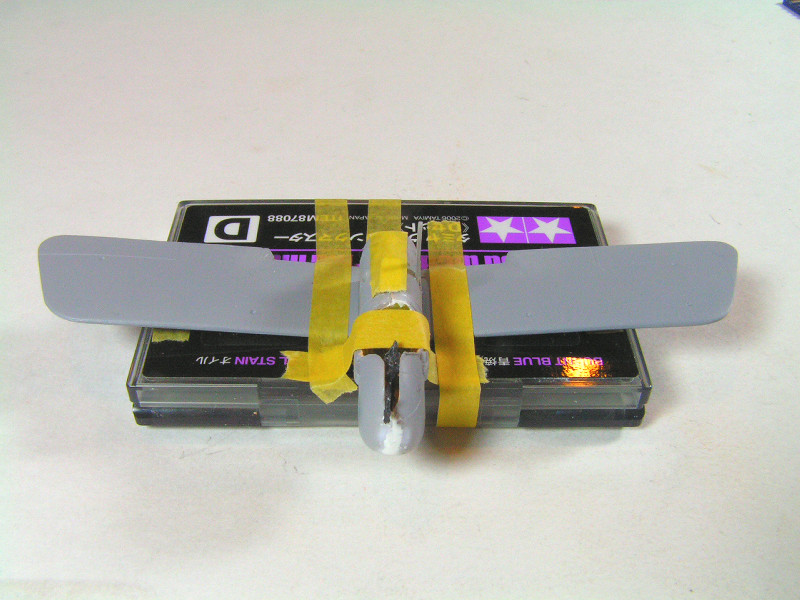
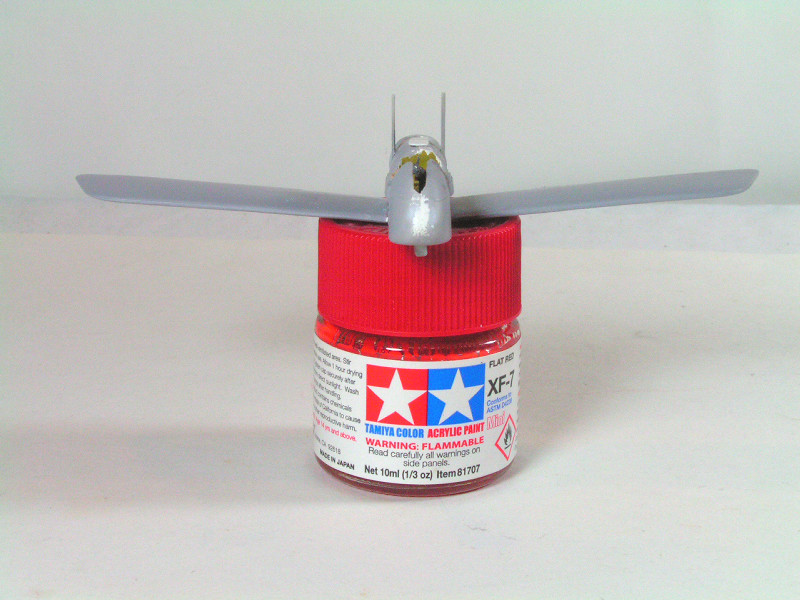
The attachment of the lower wing halves had to be studied on internet shots because the instructions are so vague. First, the wings must have a bit of angle to them - enough to match that of the top wing. Second, the wing halves don't attach fully to the fuselage. About 3/4 of its forward width attaches. I set up this makeshift jig to hold the wing halves in place - luckily I didn't CA them to the jig. LOL


Close enough - I hope.
Thanks for the comments and for looking.
The attachment of the lower wing halves had to be studied on internet shots because the instructions are so vague. First, the wings must have a bit of angle to them - enough to match that of the top wing. Second, the wing halves don't attach fully to the fuselage. About 3/4 of its forward width attaches. I set up this makeshift jig to hold the wing halves in place - luckily I didn't CA them to the jig. LOL


Close enough - I hope.
Thanks for the comments and for looking.

RetiredMike- Advanced Member

- Posts : 3525
Join date : 2013-04-27
Age : 73
Location : Valparaiso, Indiana
 Re: Airco DH-2 - Pegasus 1/72
OMG Mike that is TINY!!!! 


GaryDainton- Advanced Member

- Posts : 4433
Join date : 2014-03-06
Age : 57
Location : Bolton UK
 Re: Airco DH-2 - Pegasus 1/72
Nice fixture and assembly of the wings. Man talk about a pain, good work all round on such a tiny subject.
Guest- Guest
 Re: Airco DH-2 - Pegasus 1/72
Some stunningly finicky detail work going on! As for the Styrene to stainless - have you tried using 2 part epoxy instead of CA? When I am faced with that combo I usually try to lightly sand or file the metal surface to provide tooth and then use slow cure 2 part epoxy. I find this gives a better grab and is less brittle than CA. Not sure if you want to go this way, just an idea.
Looking forward to more excessively tiny detailing
Looking forward to more excessively tiny detailing


KatsZenJammer- Resident member

- Posts : 2600
Join date : 2016-05-20
Age : 57
Location : Vancouver, BC
 Re: Airco DH-2 - Pegasus 1/72
I knew this would be tiny.
Nice job setting up the dihedral Mike.
Nice job setting up the dihedral Mike.
_________________
Al.
Constructive criticism is always welcome.
“Success always demands a greater effort.” Winston Churchill
"Success is failure turned inside out" Unknown
 Re: Airco DH-2 - Pegasus 1/72
Well it's going to be full speed ahead on this one, now. I think I screwed up the angle of the lower booms, but it would require too much destruction to fix everything. This one's going to be a guinea pig for an untried method of rigging I saw on another weebsite. Early on, the booms kept coming off and I feel lucky to have gotten this far. I'm afraid rigging it with EZLine and putting tension on components will destroy it again, so I'm going to attempt rigging it by gluing on fine paint brush bristles.


I'll probably try this plane again with a version that isn't a skill level 10. LOL


I'll probably try this plane again with a version that isn't a skill level 10. LOL

RetiredMike- Advanced Member

- Posts : 3525
Join date : 2013-04-27
Age : 73
Location : Valparaiso, Indiana
 Re: Airco DH-2 - Pegasus 1/72
It's still looking good to me Mike.
Good luck with the new rigging method, I'm keen to see how it works out.
Good luck with the new rigging method, I'm keen to see how it works out.
_________________
Al.
Constructive criticism is always welcome.
“Success always demands a greater effort.” Winston Churchill
"Success is failure turned inside out" Unknown
 Re: Airco DH-2 - Pegasus 1/72
Brilliant work Mike. Im with Al regarding the rigging method, looking forward to it.

GaryDainton- Advanced Member

- Posts : 4433
Join date : 2014-03-06
Age : 57
Location : Bolton UK
 Re: Airco DH-2 - Pegasus 1/72
I've begun the rigging experiment and it looks good.
I'm using a quality polyester paint brush, a wax product called Rub 'n Buff that can be found in craft stores, and a tissue.

A few strands are cut from the brush and the 'distressed' ends are trimmed off. A bit of the metallic wax paste is put on the tissue and the strand is drawn through a few times. The finish can be made shinier by drawing it through a clean portion of the tissue - kind of burnishing the finish. The translucent strand now has a shiny look of cable.

One or two here have yet to be treated to show the difference.

Then cut to length and CA them onto the framework. This paint brush yielded about a 2.5 inch strand, so I'll have to resort to EZLine, given the same treatment, for the big ones. But those areas aren't as delicate as the strut and boom areas.


The brush strands are better than fine wire I've tried since they don't hold a slight bend when handling as wire does. Unless you kink it, it stays pretty straight. The strands average about . " thick, so a 2" paint brush will last a lifetime.
Being flexible, this might be a good application for antennae on planes or armor, too.
Thanks for your comments and for looking in.
Mike
I'm using a quality polyester paint brush, a wax product called Rub 'n Buff that can be found in craft stores, and a tissue.

A few strands are cut from the brush and the 'distressed' ends are trimmed off. A bit of the metallic wax paste is put on the tissue and the strand is drawn through a few times. The finish can be made shinier by drawing it through a clean portion of the tissue - kind of burnishing the finish. The translucent strand now has a shiny look of cable.

One or two here have yet to be treated to show the difference.

Then cut to length and CA them onto the framework. This paint brush yielded about a 2.5 inch strand, so I'll have to resort to EZLine, given the same treatment, for the big ones. But those areas aren't as delicate as the strut and boom areas.


The brush strands are better than fine wire I've tried since they don't hold a slight bend when handling as wire does. Unless you kink it, it stays pretty straight. The strands average about .
 " thick, so a 2" paint brush will last a lifetime.
Being flexible, this might be a good application for antennae on planes or armor, too.
Thanks for your comments and for looking in.
Mike

RetiredMike- Advanced Member

- Posts : 3525
Join date : 2013-04-27
Age : 73
Location : Valparaiso, Indiana
 Re: Airco DH-2 - Pegasus 1/72
Thanks Mike, very much appreciated and highly innovative. They look superb when in place.


GaryDainton- Advanced Member

- Posts : 4433
Join date : 2014-03-06
Age : 57
Location : Bolton UK
 Re: Airco DH-2 - Pegasus 1/72
Awesome work! The paint brush strand idea is excellent and it looks great! 


KatsZenJammer- Resident member

- Posts : 2600
Join date : 2016-05-20
Age : 57
Location : Vancouver, BC
 Re: Airco DH-2 - Pegasus 1/72
This might sound slightly nutz but what about human hair for rigging? it would be strong enough and take colour nicely..
Guest- Guest

GaryDainton- Advanced Member

- Posts : 4433
Join date : 2014-03-06
Age : 57
Location : Bolton UK
 Re: Airco DH-2 - Pegasus 1/72
I like that idea Mike.... nice job.
_________________
Al.
Constructive criticism is always welcome.
“Success always demands a greater effort.” Winston Churchill
"Success is failure turned inside out" Unknown
 Re: Airco DH-2 - Pegasus 1/72
arni wrote:This might sound slightly nutz but what about human hair for rigging? it would be strong enough and take colour nicely..
A human hair would work nicely, Nige. The advantage of the bristle I like is that, while flexible, it remains stiff and straight. After it's measured up, both ends can be given a tiny drop of CA and it can be set in place in one move. Hair, as well as EZLine or thread, is 'limp' and must be glued in one end at a time, usually measuring and cutting after the first end is set.
One of the things I don't like about working with the 'limp' mediums is when you glue the first end onto the surface, if you don't hold it up to maintain point contact, it will lay down on the surface and the glue will creep up the length gluing too much of it.
I guess its all a personal preference in the end. This method may not work with larger scales because its hard to find brushes with very long bristles.

RetiredMike- Advanced Member

- Posts : 3525
Join date : 2013-04-27
Age : 73
Location : Valparaiso, Indiana
Page 1 of 2 • 1, 2 
Skid's :: Works In Progress :: Aircraft
Page 1 of 2
Permissions in this forum:
You cannot reply to topics in this forum

