
3100 Chevy Custom
Skid's :: Works In Progress :: Trucks
Page 3 of 7 •  1, 2, 3, 4, 5, 6, 7
 ![]()
Re: 3100 Chevy Custom
![]() by Skid Sun 08 Feb 2015, 10:04 am
by Skid Sun 08 Feb 2015, 10:04 am
_________________
Al.
Constructive criticism is always welcome.
“Success always demands a greater effort.” Winston Churchill
"Success is failure turned inside out" Unknown

Skid- Admin
- Posts : 7129
Join date : 2013-02-15
Age : 75
Location : Newcastle. Good Old Blighty. -

Re: 3100 Chevy Custom
![]() by harron68 Sun 08 Feb 2015, 12:54 pm
by harron68 Sun 08 Feb 2015, 12:54 pm
In sum, do whatever pleases your taste. It will be on your display shelf! Thanx.
harron68- Advanced Member

- Posts : 3616
Join date : 2013-02-28
Age : 73
Location : MIDWEST
Re: 3100 Chevy Custom
![]() by Shelby Sun 08 Feb 2015, 6:23 pm
by Shelby Sun 08 Feb 2015, 6:23 pm
I worked on two other style mounts. Let me know what you guys think.
"Swoosh" style

Triangle

"Victorian" term coined by Dave.
By the way the door handles will be shaved. Thanks for your input and suggestions guys!

Shelby- Intermediate Member

- Posts : 947
Join date : 2013-03-02
Location : Alberta, Canada
Re: 3100 Chevy Custom
![]() by Skid Sun 08 Feb 2015, 7:06 pm
by Skid Sun 08 Feb 2015, 7:06 pm
_________________
Al.
Constructive criticism is always welcome.
“Success always demands a greater effort.” Winston Churchill
"Success is failure turned inside out" Unknown
Skid- Admin
- Posts : 7129
Join date : 2013-02-15
Age : 75
Location : Newcastle. Good Old Blighty. -
Guest- Guest

A5h- Resident member
- Posts : 1537
Join date : 2014-08-11
Age : 44
Location : Sheffield UK
Re: 3100 Chevy Custom
![]() by Shelby Sat 14 Feb 2015, 5:23 pm
by Shelby Sat 14 Feb 2015, 5:23 pm
I have been under the weather with a flu so very little got accomplished. I had all the chrome parts stripped and put a base coat on that a friend of mine uses and has fantastic result with Alclad. I was looking forward to the results with my iwata airbrush. Well the dang thing wouldn't spit out a speck of paint. I worked on it this morning and works well with water. I'm sure when I need it to paint something it will fold like a cheap tent.
This airbrush has frustrated me to no end since I bought it and I haven't accomplished a single paint job succesfully with it. So I had to rely on my old Paasch H to complete the job which started acting erraticly as well after painting half the grille. I'm less than happy with the results but I might just say to hell with it and leave it all as is and move on.

I came up with another mirror mount and I think that's the one I will go with. Different styling and nearly half the size of the others.
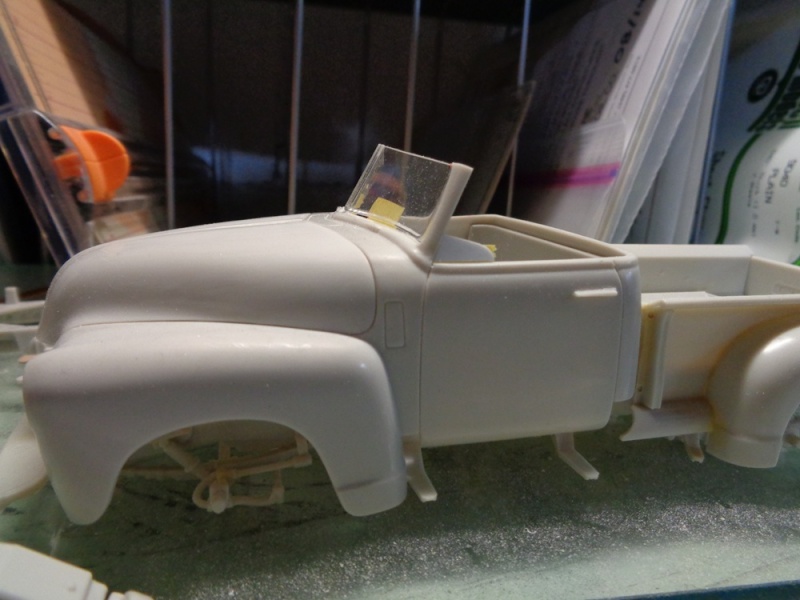
Next step is the engine and wrapping up the cab and interior details.
Shelby- Intermediate Member
- Posts : 947
Join date : 2013-03-02
Location : Alberta, Canada
Re: 3100 Chevy Custom
![]() by Dave from Pleasanton Sat 14 Feb 2015, 6:16 pm
by Dave from Pleasanton Sat 14 Feb 2015, 6:16 pm

Dave from Pleasanton- New Member

- Posts : 237
Join date : 2014-07-20
Re: 3100 Chevy Custom
![]() by Guest Sun 15 Feb 2015, 4:28 am
by Guest Sun 15 Feb 2015, 4:28 am
Guest- Guest
Re: 3100 Chevy Custom
![]() by Shelby Sat 28 Mar 2015, 6:02 pm
by Shelby Sat 28 Mar 2015, 6:02 pm
Two things have been slowing me down with this project:
1) Fiddling with the mirrors and mounts has taken so much time but I finally decided how to do it, attach it and armed with the materials to do it
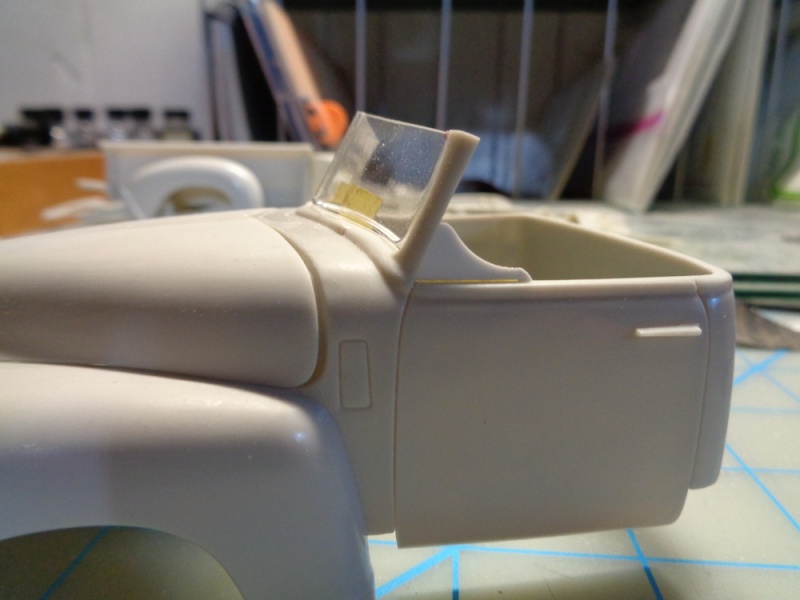
2) The interior has been stalled because I have had a problem filling out the door panel where the heater would be attached. I have been using MEK for this purpose but I kept getting pithing as you can see here.

So after many attempts of filling those holes with bob's brew I finally gave up and turned to 5 mins epoxy. As luck would have it something went wrong there too. After applying it on the door panel and also the cab (I had 4 tiny holes to fill there too) the hardener is simply not kicking in. Even if I was off on the ratio a bit it would just take a longer to harden but after 2 weeks it still is sticky and gummy.
Until I figure out what to do with this I am putting it away as I never encountered this before and don't know what to do to salvage this so any suggestion is welcome.
Shelby- Intermediate Member
- Posts : 947
Join date : 2013-03-02
Location : Alberta, Canada
Re: 3100 Chevy Custom
![]() by Guest Sat 28 Mar 2015, 6:44 pm
by Guest Sat 28 Mar 2015, 6:44 pm
Guest- Guest
Re: 3100 Chevy Custom
![]() by Geezerman Sun 29 Mar 2015, 1:57 pm
by Geezerman Sun 29 Mar 2015, 1:57 pm


Geezerman- Advanced Member
- Posts : 3651
Join date : 2013-02-24
Age : 88
Location : Gulf coast of central Florids
Re: 3100 Chevy Custom
![]() by Dave from Pleasanton Sun 29 Mar 2015, 4:06 pm
by Dave from Pleasanton Sun 29 Mar 2015, 4:06 pm
Really wanting to see this one to completion.
Dave from Pleasanton- New Member
- Posts : 237
Join date : 2014-07-20
Re: 3100 Chevy Custom
![]() by Shelby Sun 29 Mar 2015, 11:57 pm
by Shelby Sun 29 Mar 2015, 11:57 pm
Dave I'm afraid that's not a viable solution and even getting a good mix of epoxy on top once it's sanded I'm back in the same spot. I do have a second kit which has most sub assemblies completed that I bought at the car club. I used the cab for painting experiments and as a guinea pig for this one so it's taking a batch in the break fluid for now.
I will be getting back to it using those parts but I will take a break from it and I already started in something different which I will post down the road.
Shelby- Intermediate Member
- Posts : 947
Join date : 2013-03-02
Location : Alberta, Canada
Re: 3100 Chevy Custom
![]() by Skid Mon 06 Apr 2015, 11:14 am
by Skid Mon 06 Apr 2015, 11:14 am
Why not cut off the offending portion and use it as a template to make a replacement?
_________________
Al.
Constructive criticism is always welcome.
“Success always demands a greater effort.” Winston Churchill
"Success is failure turned inside out" Unknown
Skid- Admin
- Posts : 7129
Join date : 2013-02-15
Age : 75
Location : Newcastle. Good Old Blighty. -
Re: 3100 Chevy Custom
![]() by Shelby Sun 25 Oct 2015, 8:00 pm
by Shelby Sun 25 Oct 2015, 8:00 pm
I haven't completely sat idle with this build and here's a bit of an update. I spent a lot of time trying to make my mind up about the mirrors and and mounts wasting a lot of time and slowing down the build because of it. I made a final decision and I'm sticking with it!
Basically I took the mirrors from a Shelby Series I and chopped the mounting arms from them and will use 2 styrene rods to connect them to the mounts I made.
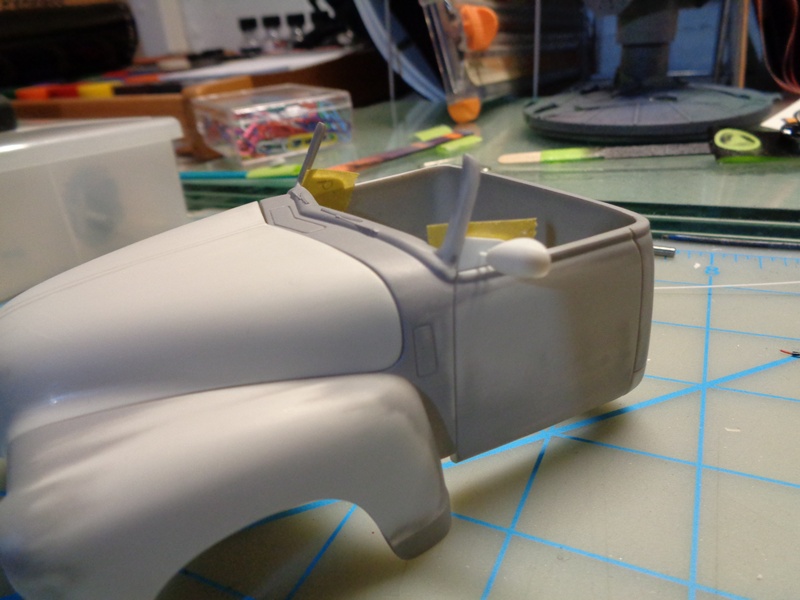


I decided to go a different way with the interior paint scheme so I attached the trim to the bench seat.

I tackled the engine and started with the distributor and sanded the top smooth and drilled holes for the wiring.

Dizzy painted and wired.

Added the boot plugs to the engine.

Engine wired
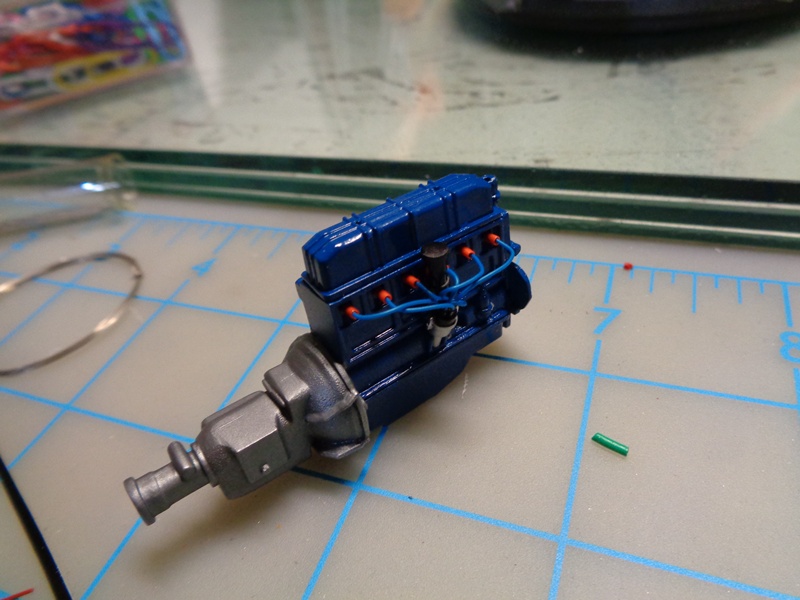
A little plumbing done.


Engine completed.


The next step is priming all the body parts and move on with painting but I have been under the weather this last week so once I feel better I will keep pressing with the build.
Thanks for checking it out guys!
Shelby- Intermediate Member
- Posts : 947
Join date : 2013-03-02
Location : Alberta, Canada
Re: 3100 Chevy Custom
![]() by john2308 Sun 25 Oct 2015, 8:39 pm
by john2308 Sun 25 Oct 2015, 8:39 pm
 Keep at it cause it will be sweet when finished

john2308- Full Member
- Posts : 1142
Join date : 2013-04-10
Age : 79
Location : Phoenix, AZ
Re: 3100 Chevy Custom
![]() by john2308 Sun 25 Oct 2015, 8:51 pm
by john2308 Sun 25 Oct 2015, 8:51 pm
john2308- Full Member
- Posts : 1142
Join date : 2013-04-10
Age : 79
Location : Phoenix, AZ
Re: 3100 Chevy Custom
![]() by harron68 Mon 26 Oct 2015, 1:58 pm
by harron68 Mon 26 Oct 2015, 1:58 pm
harron68- Advanced Member
- Posts : 3616
Join date : 2013-02-28
Age : 73
Location : MIDWEST
Re: 3100 Chevy Custom
![]() by Guest Mon 26 Oct 2015, 3:19 pm
by Guest Mon 26 Oct 2015, 3:19 pm
All your other little worries ... you're more than capable of overcoming those in my opinion
Guest- Guest
dogfish7- Intermediate Member
- Posts : 668
Join date : 2013-02-27
Age : 77
Location : Hoodsport, WA
Re: 3100 Chevy Custom
![]() by Guest Mon 26 Oct 2015, 4:48 pm
by Guest Mon 26 Oct 2015, 4:48 pm
Guest- Guest
Re: 3100 Chevy Custom
![]() by Shelby Wed 28 Oct 2015, 5:22 am
by Shelby Wed 28 Oct 2015, 5:22 am
John and John J: I have that problem solved but I will definitely put your ideas to the test the next time I run into the same problem.
Shelby- Intermediate Member
- Posts : 947
Join date : 2013-03-02
Location : Alberta, Canada
Re: 3100 Chevy Custom
![]() by Shelby Sun 01 Nov 2015, 2:27 am
by Shelby Sun 01 Nov 2015, 2:27 am
All the body, bits and pieces are primed. I usually use a light gray primer but after doing a few parts and having to do a few fixes I ran out and not having build for a long time I got the wrong can. I've used it in the past and the darker primer will not make a noticable difference in the paint.
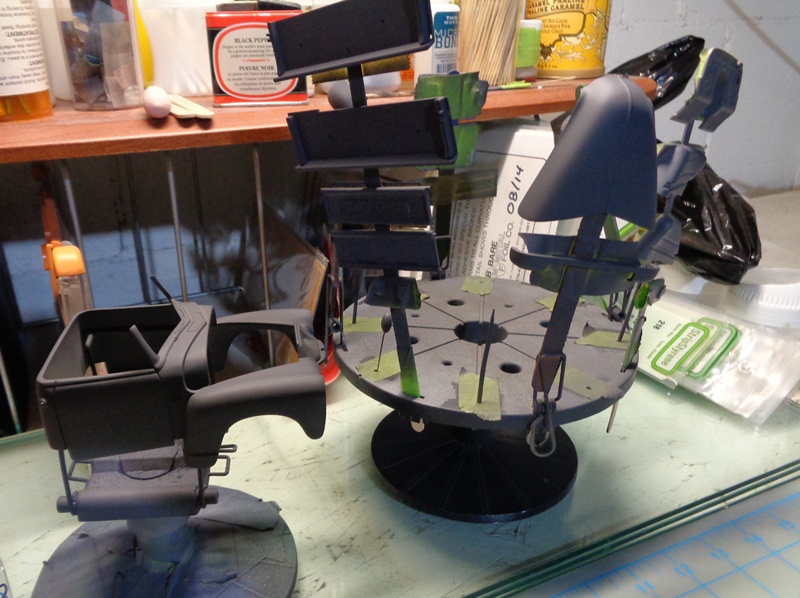
Everything seems to be in good shape so I can move on to painting and that exciting!

Thanks for stopping by and hopefully I will have an update soon!
Shelby- Intermediate Member
- Posts : 947
Join date : 2013-03-02
Location : Alberta, Canada
Sam- Resident member
- Posts : 1963
Join date : 2013-02-23
Age : 57
Location : Back in Toledo, Oregon
Page 3 of 7 • 1, 2, 3, 4, 5, 6, 7 ![]()
» 1950 Chevy 3100 pickup
» 66 Chevy El Camino Custom
» '46 Chevy Custom Saltster
» '61 Chevy Impalla Mild Custom
Skid's :: Works In Progress :: Trucks
|
|
|