
3100 Chevy Custom
Skid's :: Works In Progress :: Trucks
Page 5 of 7 •  1, 2, 3, 4, 5, 6, 7
 ![]()
Re: 3100 Chevy Custom
![]() by Shelby Sat 20 Feb 2016, 5:08 pm
by Shelby Sat 20 Feb 2016, 5:08 pm
JohnJ: I hope I can keep going in that vein.
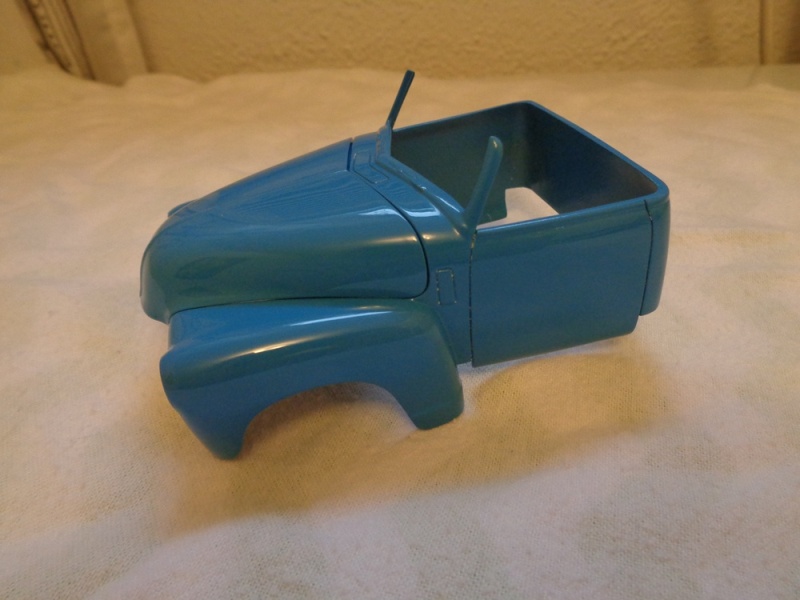
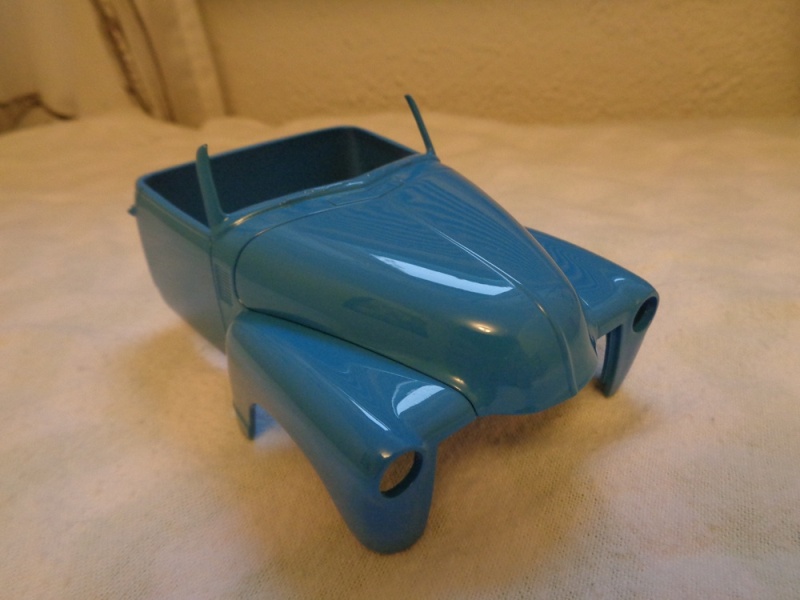
This is a one step forward two steps back update. I wanted a two tone interior...
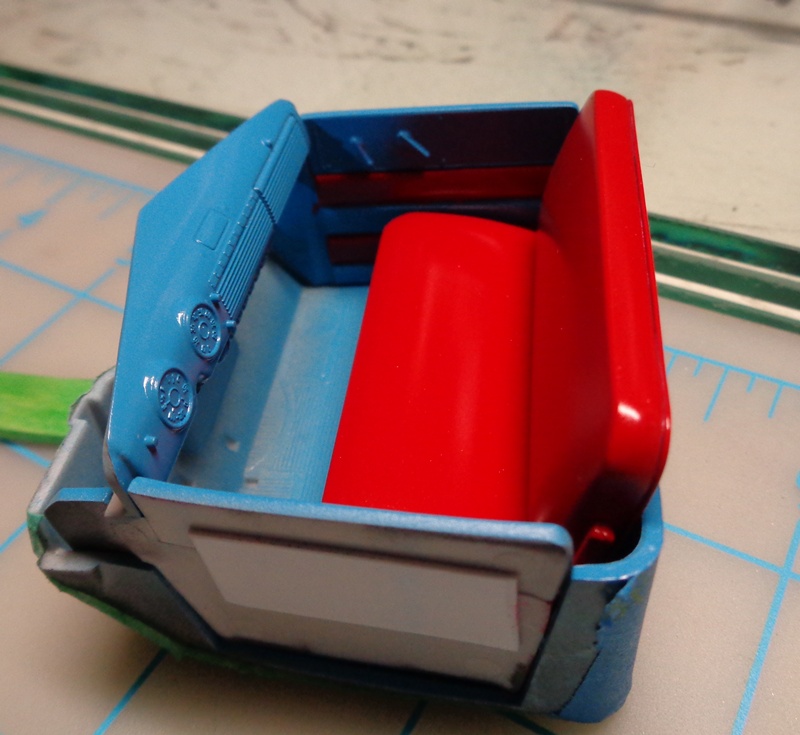

The mock looks reasonably good but the door panels tell a different story. I don't usually have a problem getting a clean line with Tamiya tape but this time I got some heavy bleeding. Maybe I'm just rusty so I will try to sand and correct it otherwise they will need to be stripped and start all over.

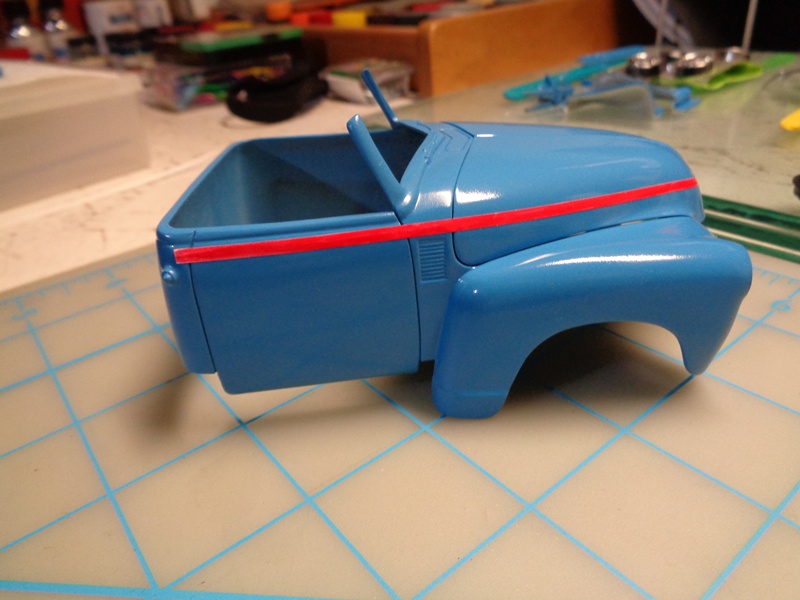
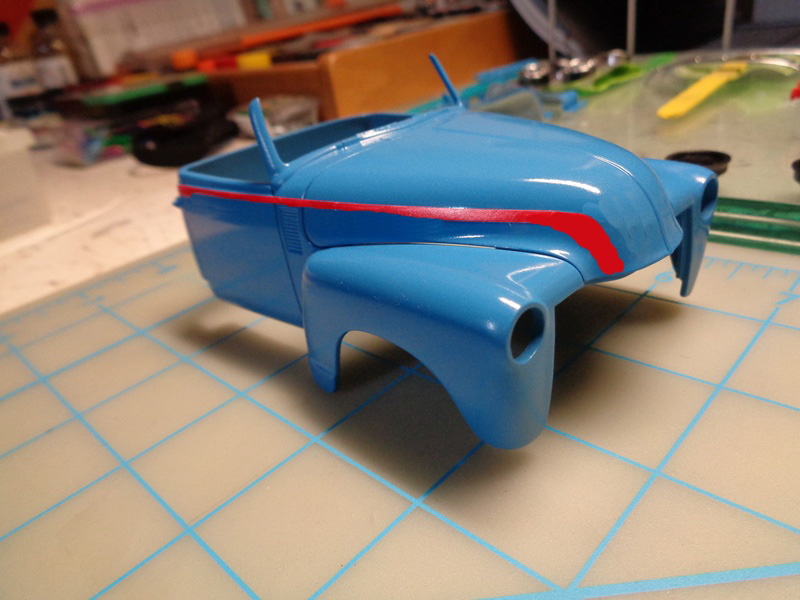
For the body I was thinking of a red stripe high on the doors to the hood. This example looks to be a bit thicker than what I would like. What do you guys think?

Thanks for checking it out and I hope to be going in the right direction and get a better update next time.

Shelby- Intermediate Member

- Posts : 947
Join date : 2013-03-02
Location : Alberta, Canada
Re: 3100 Chevy Custom
![]() by Guest Sat 20 Feb 2016, 6:31 pm
by Guest Sat 20 Feb 2016, 6:31 pm
Guest- Guest
Re: 3100 Chevy Custom
![]() by Skid Sat 20 Feb 2016, 7:18 pm
by Skid Sat 20 Feb 2016, 7:18 pm
_________________
Al.
Constructive criticism is always welcome.
“Success always demands a greater effort.” Winston Churchill
"Success is failure turned inside out" Unknown

Skid- Admin
- Posts : 7129
Join date : 2013-02-15
Age : 75
Location : Newcastle. Good Old Blighty. -

Re: 3100 Chevy Custom
![]() by Shelby Sun 21 Feb 2016, 1:50 am
by Shelby Sun 21 Feb 2016, 1:50 am
Shelby- Intermediate Member
- Posts : 947
Join date : 2013-03-02
Location : Alberta, Canada
Re: 3100 Chevy Custom
![]() by Skid Sun 21 Feb 2016, 10:08 am
by Skid Sun 21 Feb 2016, 10:08 am
_________________
Al.
Constructive criticism is always welcome.
“Success always demands a greater effort.” Winston Churchill
"Success is failure turned inside out" Unknown
Skid- Admin
- Posts : 7129
Join date : 2013-02-15
Age : 75
Location : Newcastle. Good Old Blighty. -
Re: 3100 Chevy Custom
![]() by RetiredMike Sun 21 Feb 2016, 3:35 pm
by RetiredMike Sun 21 Feb 2016, 3:35 pm
But then that's just my opinion.
Nice work.

RetiredMike- Advanced Member

- Posts : 3525
Join date : 2013-04-27
Age : 73
Location : Valparaiso, Indiana
Re: 3100 Chevy Custom
![]() by Guest Sun 21 Feb 2016, 4:13 pm
by Guest Sun 21 Feb 2016, 4:13 pm
Guest- Guest
Re: 3100 Chevy Custom
![]() by Shelby Mon 22 Feb 2016, 2:10 am
by Shelby Mon 22 Feb 2016, 2:10 am
Mike - Doing a curve like that would prove very tricky as I paint the the film before applying it to the model. The design you have looks better with the width that stripe is than just by tself.
Shelby- Intermediate Member
- Posts : 947
Join date : 2013-03-02
Location : Alberta, Canada
Re: 3100 Chevy Custom
![]() by Shelby Sat 12 Mar 2016, 6:36 pm
by Shelby Sat 12 Mar 2016, 6:36 pm
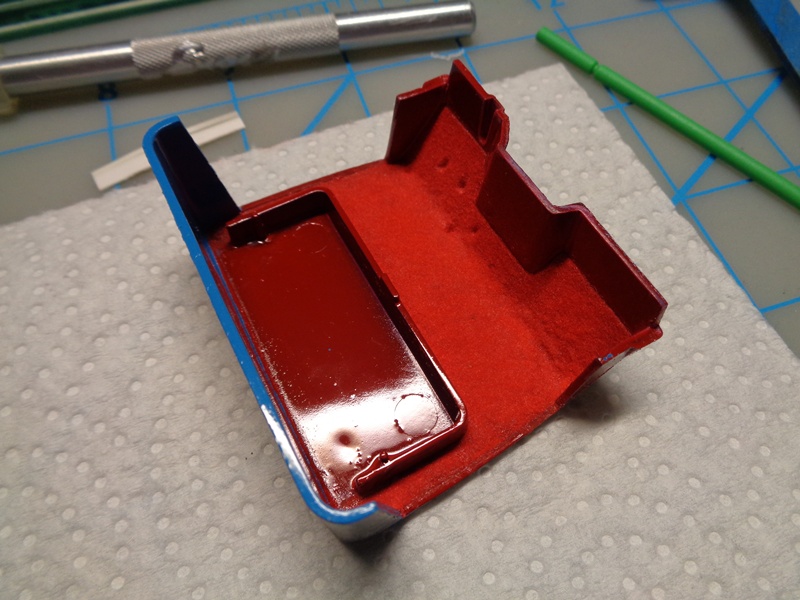
I clear coated the interior box panels and the body some more but you've seen pics already so I will post some once I polish everything.
I moved on to the interior floor and had a go at it with the embossing powder and the results are fine for a dark interior of a hardtop but didn't meet my standards for an open truck like this. A friend of mine had some flocking that would work nicely for the interior so I had another go at it which much better results in my opinion.
The door panels had to be stripped and are in the process of being painted again so more on that later.
I assembled the wheels after the original chrome was stripped and done with Alclad chrome.

Just to give you guys a sample of all the small stupid things that have been going wrong with this build. I needed to get a can of Tamiya from the hobby shop and as unbelievable as it may seem it was sealed with the regular sticker they have and look at that brand new nozzle!

The can seemed as full as a new one and couldn't be bothered to go back to the hobby shop and it works fine, it's just weird.
I will be pressing on focusing on the interior and hopefully the positive results keep coming. Thanks for following along guys!

Shelby- Intermediate Member
- Posts : 947
Join date : 2013-03-02
Location : Alberta, Canada
Re: 3100 Chevy Custom
![]() by Guest Sat 12 Mar 2016, 7:24 pm
by Guest Sat 12 Mar 2016, 7:24 pm
The chrome wheels are spot on.
I must admit that "hockey" nose stripe would look good, as John said though it'd have to follow the lines nicely or it could look a little off.... worth a try in my opinion.
That is weird about the rattle can, never had that before.
Guest- Guest
Re: 3100 Chevy Custom
![]() by hotrodmax Sun 13 Mar 2016, 2:06 am
by hotrodmax Sun 13 Mar 2016, 2:06 am

hotrodmax- Rookie Member

- Posts : 379
Join date : 2015-02-15
Age : 66
Location : Willow Spring North Carolina
Re: 3100 Chevy Custom
![]() by Guest Sun 13 Mar 2016, 2:09 pm
by Guest Sun 13 Mar 2016, 2:09 pm
You are the king of building these old trucks, they always look so slick. Thic is going to look cool, but I am not a fan of those wheels.
I've had that happen. I am guessing they get pulled from the line given a quick spray for QC then put back on the line.
Last edited by Plastic Freak on Mon 11 Apr 2016, 2:13 pm; edited 1 time in total
Guest- Guest
Re: 3100 Chevy Custom
![]() by Shelby Sat 19 Mar 2016, 6:20 pm
by Shelby Sat 19 Mar 2016, 6:20 pm
Curtis - I never thought of a random QC but that's probably the best explanation.
A friend of mine gave me a couple floor mat sets, one which I can't find anywhere and these ones which work well for an early 90s resto of a truck. I found the black to be washed quite a bit on the sides of it and were too long for the very slanted floor. So I did some trimming to get them looking more like rear mats but prefer them this way.

I got things moving along with the interior, got the doors painted again cleanly this time. Shot the bench seat with a semi-gloss coat. I made some seat belts and added the P/E GM buckles, then BMF'd the relevant parts.

I ran out of blades for foiling so I will get on the dash once I buy new ones today. Thanks for checking it out!
Shelby- Intermediate Member
- Posts : 947
Join date : 2013-03-02
Location : Alberta, Canada
Re: 3100 Chevy Custom
![]() by harron68 Sun 20 Mar 2016, 1:21 pm
by harron68 Sun 20 Mar 2016, 1:21 pm
harron68- Advanced Member
- Posts : 3616
Join date : 2013-02-28
Age : 73
Location : MIDWEST
Re: 3100 Chevy Custom
![]() by hotrodmax Sun 20 Mar 2016, 3:37 pm
by hotrodmax Sun 20 Mar 2016, 3:37 pm
hotrodmax- Rookie Member
- Posts : 379
Join date : 2015-02-15
Age : 66
Location : Willow Spring North Carolina
Guest- Guest
Re: 3100 Chevy Custom
![]() by Shelby Mon 11 Apr 2016, 12:48 am
by Shelby Mon 11 Apr 2016, 12:48 am
Needless to say I'm stalled here, mind you other things have kept me off the bench as well but I have had nothing but time the last few days.
One of the rear fenders ended up having a strange chemical reaction. It's all Tamiya lacquer so why I really don't know. That got stripped and starting anew there.
The windshield was scratched up and the restoration still shows sanding marks on the edges. My doing.
I can't get the graphic adhesive to stay put on the backing when I cut it 1mm wide before being able to paint it.
Those are the three main frustrations that are turning me off this build and I have to either pull my sleeves up or put it back in the box for awhile because nothing is getting done at the bench.
Shelby- Intermediate Member
- Posts : 947
Join date : 2013-03-02
Location : Alberta, Canada
Re: 3100 Chevy Custom
![]() by Skid Mon 11 Apr 2016, 9:32 am
by Skid Mon 11 Apr 2016, 9:32 am
It's looking great though.
I agree with Curt, lose those wheels IMO and unlike Mike, I'd prefer the stripe straight and terminating in a point.
_________________
Al.
Constructive criticism is always welcome.
“Success always demands a greater effort.” Winston Churchill
"Success is failure turned inside out" Unknown
Skid- Admin
- Posts : 7129
Join date : 2013-02-15
Age : 75
Location : Newcastle. Good Old Blighty. -
Re: 3100 Chevy Custom
![]() by Shelby Tue 12 Apr 2016, 11:51 pm
by Shelby Tue 12 Apr 2016, 11:51 pm
Shelby- Intermediate Member
- Posts : 947
Join date : 2013-03-02
Location : Alberta, Canada
Re: 3100 Chevy Custom
![]() by hotrodmax Fri 22 Apr 2016, 8:58 pm
by hotrodmax Fri 22 Apr 2016, 8:58 pm
hotrodmax- Rookie Member
- Posts : 379
Join date : 2015-02-15
Age : 66
Location : Willow Spring North Carolina
Re: 3100 Chevy Custom
![]() by Guest Fri 22 Apr 2016, 11:17 pm
by Guest Fri 22 Apr 2016, 11:17 pm
Guest- Guest
Re: 3100 Chevy Custom
![]() by Shelby Sat 23 Apr 2016, 1:50 am
by Shelby Sat 23 Apr 2016, 1:50 am
Shelby- Intermediate Member
- Posts : 947
Join date : 2013-03-02
Location : Alberta, Canada
Re: 3100 Chevy Custom
![]() by Shelby Sun 22 May 2016, 3:51 am
by Shelby Sun 22 May 2016, 3:51 am
I will spend my time between this one and the Corvette. Thanks for looking guys!
Shelby- Intermediate Member
- Posts : 947
Join date : 2013-03-02
Location : Alberta, Canada
Re: 3100 Chevy Custom
![]() by KatsZenJammer Sun 22 May 2016, 4:54 am
by KatsZenJammer Sun 22 May 2016, 4:54 am

KatsZenJammer- Resident member
- Posts : 2600
Join date : 2016-05-20
Age : 57
Location : Vancouver, BC
Page 5 of 7 • 1, 2, 3, 4, 5, 6, 7 ![]()
» 1950 Chevy 3100 pickup
» 66 Chevy El Camino Custom
» '46 Chevy Custom Saltster
» '61 Chevy Impalla Mild Custom
Skid's :: Works In Progress :: Trucks
|
|
|