3100 Chevy Custom
+16
KatsZenJammer
hotrodmax
dogfish7
john2308
Dave from Pleasanton
Geezerman
VirusX
Grouchy
harron68
Johnag
Shelby
webby
Skid
A5h
Sam
beowulf
20 posters
Skid's :: Works In Progress :: Trucks
Page 1 of 7
Page 1 of 7 • 1, 2, 3, 4, 5, 6, 7 
 3100 Chevy Custom
IT'S TRUCK TIME!!

Why all the excitement? It's been awhile since I built the last one and I get excited to work on trucks...so get on board like these guys!
I bought this AMT kit sealed at our IPMS swap meet for $10. I also ended up buying another which was started and sub assemblies done such as the chassis, engine, interior tub and box. No I'm not using that to get ahead and be lazy. It will however come in handy for test fitting and that sort of thing.
I'm looking at doing this one as a custom restoration, wired engine and fairly detailed all around. I will be starting with the box I got some balsa because I want to have a real wood bed, something I haven't tried yet and will have a go at it. Any insight, feedback, suggestions are always welcome.
The box cover

The sprue shots
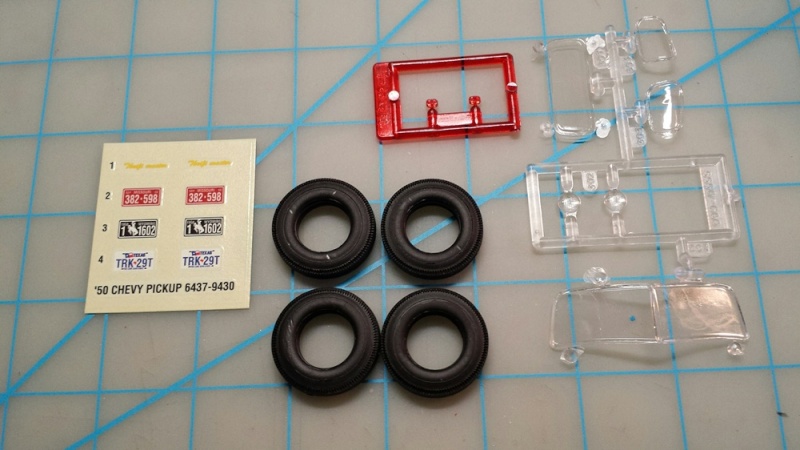

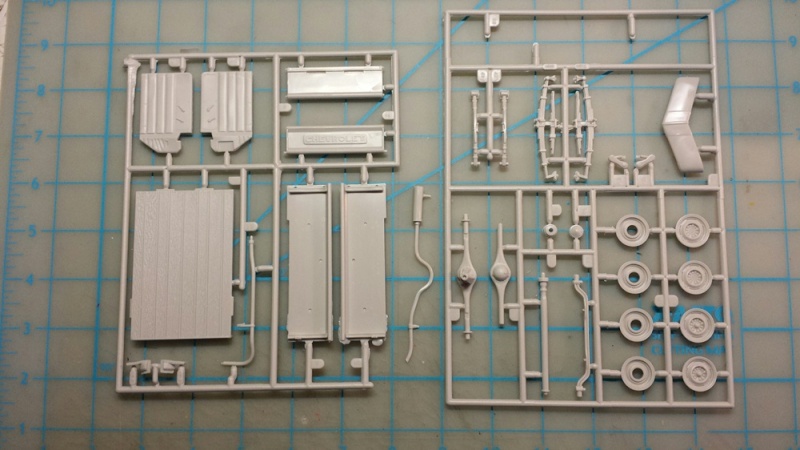


The cab

This kit has some very hard mould lines and it took me hours to get all the parts cleaned up and I even switched a few from the other kit, otherwise it is looking like a very nice kit.
I will probably start by sanding the floor smooth as plateform for the balsa but I am considering stir sticks as they have more wood grain than the balsa I have and wouldn't need cutting. I also need to get me some fine pin needles.
I will post progress as I get there. Thanks for checking it out!

Why all the excitement? It's been awhile since I built the last one and I get excited to work on trucks...so get on board like these guys!
I bought this AMT kit sealed at our IPMS swap meet for $10. I also ended up buying another which was started and sub assemblies done such as the chassis, engine, interior tub and box. No I'm not using that to get ahead and be lazy. It will however come in handy for test fitting and that sort of thing.
I'm looking at doing this one as a custom restoration, wired engine and fairly detailed all around. I will be starting with the box I got some balsa because I want to have a real wood bed, something I haven't tried yet and will have a go at it. Any insight, feedback, suggestions are always welcome.
The box cover

The sprue shots


The cab

This kit has some very hard mould lines and it took me hours to get all the parts cleaned up and I even switched a few from the other kit, otherwise it is looking like a very nice kit.
I will probably start by sanding the floor smooth as plateform for the balsa but I am considering stir sticks as they have more wood grain than the balsa I have and wouldn't need cutting. I also need to get me some fine pin needles.
I will post progress as I get there. Thanks for checking it out!

Shelby- Intermediate Member

- Posts : 947
Join date : 2013-03-02
Location : Alberta, Canada
 Re: 3100 Chevy Custom
Denis: I built this kit several years ago and as I recall there was a fitment issue with interior. The kit is one I later disassembled and is now in the box. Sorry to be so vague, but I thought it would be helpful for you to have a heads up regarding the problem. For what it is worth. John
Guest- Guest
 Re: 3100 Chevy Custom
ive always fancied doing an old pickup.......id like to add a real wooden bed to it

beowulf- Resident member

- Posts : 2469
Join date : 2013-05-02
Age : 63
Location : Monkey Hanger Town, UK
 Re: 3100 Chevy Custom
Good luck with it Denis.
This was my first completed kit on returning to modeling after a thirty year hiatus fourteen years ago. For me, the front end had a fitment issue and stuck up to high. I just piled some lumber and scafolding in the bed and called it good. LOL
This was my first completed kit on returning to modeling after a thirty year hiatus fourteen years ago. For me, the front end had a fitment issue and stuck up to high. I just piled some lumber and scafolding in the bed and called it good. LOL
_________________
Al.
Constructive criticism is always welcome.
“Success always demands a greater effort.” Winston Churchill
"Success is failure turned inside out" Unknown
 Re: 3100 Chevy Custom
Great subject Denis. One of my all time favorite body styles.
Sam- Resident member

- Posts : 2016
Join date : 2013-02-23
Age : 57
Location : Back in Toledo, Oregon
 Re: 3100 Chevy Custom
John - Are you talking about this version or the kit or the Texaco one?
I will be taking advantage of the other started kit to check it. It may not matter...modifications are on the horizon.
Al - I recall the one you built. I will keep an eye on the stance as I go and address the situation early.
Thanks for the heads up and encouragement guys!
I will be taking advantage of the other started kit to check it. It may not matter...modifications are on the horizon.
Al - I recall the one you built. I will keep an eye on the stance as I go and address the situation early.
Thanks for the heads up and encouragement guys!

Shelby- Intermediate Member

- Posts : 947
Join date : 2013-03-02
Location : Alberta, Canada
 Re: 3100 Chevy Custom
That's one of Dr. Cranky's faves. He has both a web site and is on you tube and has built a number of them. I don't recall him having any big probs with the kit. His thing is mostly rustified models with the occasional old custom. You can check the model club websites to see if there are any step-by-step examples of this one also. It has become builders' fave as to stock and modified styles.
harron68- Advanced Member

- Posts : 3621
Join date : 2013-02-28
Age : 74
Location : MIDWEST
 Re: 3100 Chevy Custom
Thanks for all the interest you've shown already guys.
A busy work week and a sprained wrist slowed down my efforts on the truck here but hopefully the week end will prove to be productive.
I was gonna do the bed with balsa but decied to go with stir sticks since they have better wood grain.
I felt those were very much on the light so I dug more in my pile.

I managed to find a few darker sticks with more accentuated grain too as you can see here.

I sanded smooth and straingtened the edges so everything is on the level. Played around to see what would look better for placement and this is what I came up with.

I have to figure out what to use and how to make the dividers between the planks. I'm hoping to find some styrene that will be manageable that way or even a fine "C" channel. So that will be next along with giving the sticks a coat of varnish.
Suggestions and feedback is always welcome. Thanks for checking it out!
A busy work week and a sprained wrist slowed down my efforts on the truck here but hopefully the week end will prove to be productive.
I was gonna do the bed with balsa but decied to go with stir sticks since they have better wood grain.
I felt those were very much on the light so I dug more in my pile.

I managed to find a few darker sticks with more accentuated grain too as you can see here.

I sanded smooth and straingtened the edges so everything is on the level. Played around to see what would look better for placement and this is what I came up with.

I have to figure out what to use and how to make the dividers between the planks. I'm hoping to find some styrene that will be manageable that way or even a fine "C" channel. So that will be next along with giving the sticks a coat of varnish.
Suggestions and feedback is always welcome. Thanks for checking it out!

Shelby- Intermediate Member

- Posts : 947
Join date : 2013-03-02
Location : Alberta, Canada
 Re: 3100 Chevy Custom
Finally an update
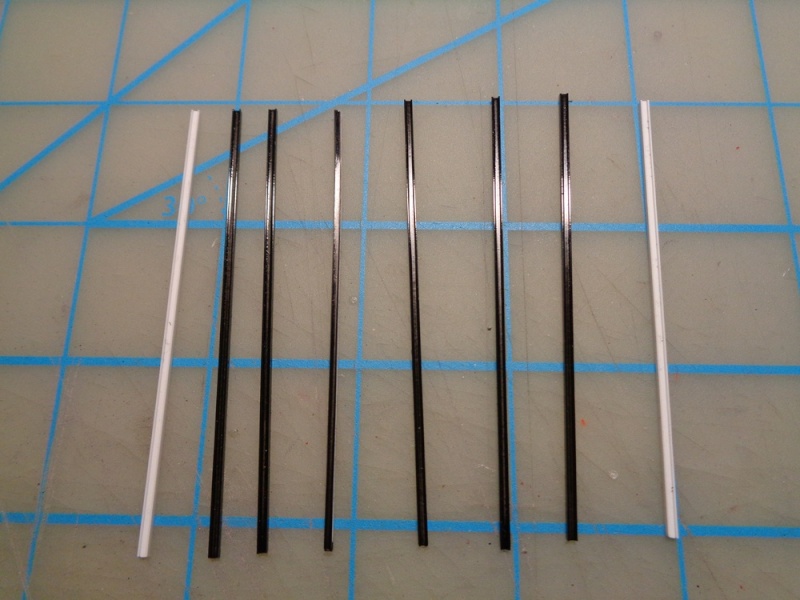
Firstly, regarding the bed, I am going with the .060 "H" beam wich will give me the height required to be just a smidge higher that the planks. I don't really have anything further on this since a fellow builder achieved a remakable finish on his Alclad chrome I wanted to get the same base paint to try it out for myself and only got it yesterday. I coated the beams along with all the chrome parts to be used on this truck and it will take a few days to dry. At that point I will returm my attention to the bed.
I looked at the top slot used to hold the bed in place on the sides of the box and with the planks it would end up giving me a gap so I decided to delete that along with the studs holding the rear wheel wells. I may add them back later on but it was much easier to sand everything off than trying to get around them.

The next thing to remedy was the support panel at the end of the bed. I removed this to make it easier to level off the planks and batans and will put it back in place after that's completed.


I moved on to the cab...as it is stock from the box.

..and off goes the top! The rough draft before getting cleaned up.

All cleaned up as it will be. I would have liked to shorten the windshield frame but because of its shape and a poor fit with the windshield itself I have to go with it as is. I tried sourcing out windshield frames but only found one that would yield the same result.
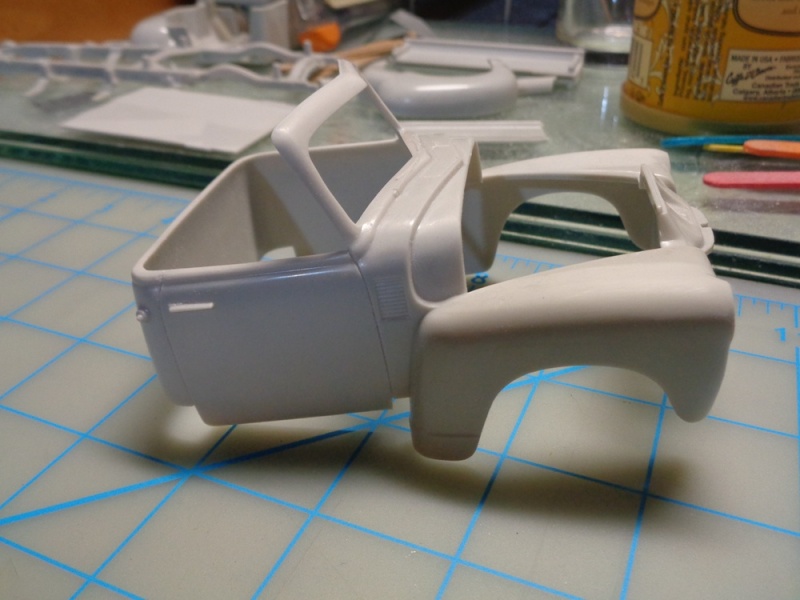
Of course in the modifcations game, one leads to another, in this case the inside door panels will need to be shortened and I might have to relocate a crank as well.
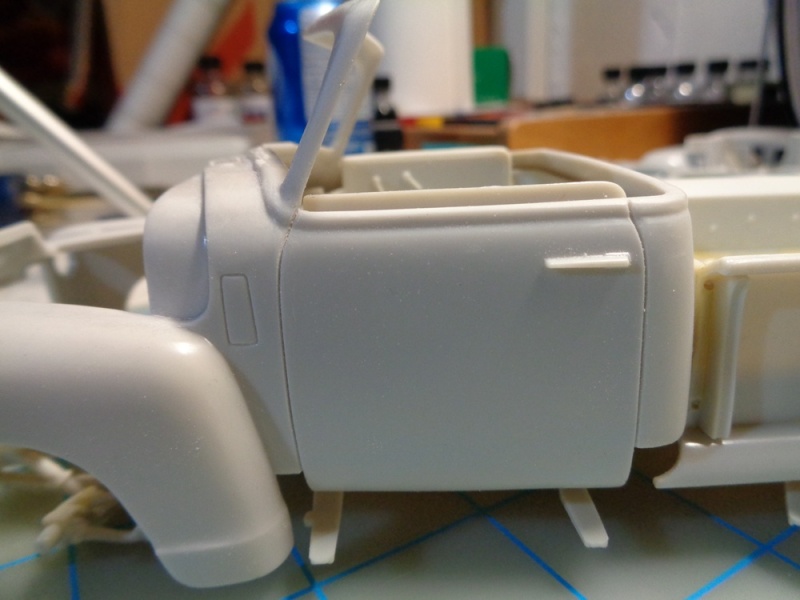
The seat's backrest is also higher than the cab itself but I don't know whether or not I will lower it. It is a sunny weather truck only so...does it really matter?

A mock up of what it's looking like at this stage...sans wheels as they are in the paint shop.

Comments, suggestions and constructive critisism always welcome and appreciated. Thanks for checking it out guys!
Firstly, regarding the bed, I am going with the .060 "H" beam wich will give me the height required to be just a smidge higher that the planks. I don't really have anything further on this since a fellow builder achieved a remakable finish on his Alclad chrome I wanted to get the same base paint to try it out for myself and only got it yesterday. I coated the beams along with all the chrome parts to be used on this truck and it will take a few days to dry. At that point I will returm my attention to the bed.
I looked at the top slot used to hold the bed in place on the sides of the box and with the planks it would end up giving me a gap so I decided to delete that along with the studs holding the rear wheel wells. I may add them back later on but it was much easier to sand everything off than trying to get around them.

The next thing to remedy was the support panel at the end of the bed. I removed this to make it easier to level off the planks and batans and will put it back in place after that's completed.


I moved on to the cab...as it is stock from the box.

..and off goes the top! The rough draft before getting cleaned up.

All cleaned up as it will be. I would have liked to shorten the windshield frame but because of its shape and a poor fit with the windshield itself I have to go with it as is. I tried sourcing out windshield frames but only found one that would yield the same result.

Of course in the modifcations game, one leads to another, in this case the inside door panels will need to be shortened and I might have to relocate a crank as well.

The seat's backrest is also higher than the cab itself but I don't know whether or not I will lower it. It is a sunny weather truck only so...does it really matter?

A mock up of what it's looking like at this stage...sans wheels as they are in the paint shop.

Comments, suggestions and constructive critisism always welcome and appreciated. Thanks for checking it out guys!

Shelby- Intermediate Member

- Posts : 947
Join date : 2013-03-02
Location : Alberta, Canada
 Re: 3100 Chevy Custom
Open top means more of the inside will be clearly visible. Fit issues look to be a challenge. Seat height not a problem to me, unless there's no filled back side to the bench seat. I wish more of these new "old" models had a second engine and a few options. The stock only parts seem cheesy for the prices they ask now. Compared to the ancient AMT '53 Ford pickup or the old Revell '56(?) one with opening doors, the kits offer only one way, or the highway. Good luck.
harron68- Advanced Member

- Posts : 3621
Join date : 2013-02-28
Age : 74
Location : MIDWEST
 Re: 3100 Chevy Custom
This is getting interesting Denis. I'm usually not a fan of open top pickups, but this one looks good so far. I'm anxious to see where you go from here.
Guest- Guest
 Re: 3100 Chevy Custom
Quality build written all over it!

webby- Moderator

- Posts : 2220
Join date : 2013-02-27
Age : 65
Location : Strathpine Australia. Built over WW2 airstrip
 Re: 3100 Chevy Custom
I like what you have done with it so far, its different good luck!!

A5h- Resident member

- Posts : 1585
Join date : 2014-08-11
Age : 45
Location : Sheffield UK
 Re: 3100 Chevy Custom
Nice work Denis. Love the open top and IMO, just leave the seat as is. It looks fine.
_________________
Al.
Constructive criticism is always welcome.
“Success always demands a greater effort.” Winston Churchill
"Success is failure turned inside out" Unknown
 Re: 3100 Chevy Custom
I'm glad you guys are liking it so far.
After scratching my head a few times I came up with a way to shorten the inside door panels without having to relocate any cranks.
I had to get the panel down to the red line and managed to do so with the driver side.

I cut the panel below the top section and sanded it down right to the trims. This was enough to bring it down to the level I was looking for without having a ripple effect for other modifications.

Only thing is I missed my cut on the passenger panel so I have to either fix it up or use the panel from the other kit and have another go at it. I tried prying the panel off but it's glued on good so it's in the freezer now so hopefully I can get it fixed up soon.
Thanks for checking it out guys!
After scratching my head a few times I came up with a way to shorten the inside door panels without having to relocate any cranks.
I had to get the panel down to the red line and managed to do so with the driver side.

I cut the panel below the top section and sanded it down right to the trims. This was enough to bring it down to the level I was looking for without having a ripple effect for other modifications.

Only thing is I missed my cut on the passenger panel so I have to either fix it up or use the panel from the other kit and have another go at it. I tried prying the panel off but it's glued on good so it's in the freezer now so hopefully I can get it fixed up soon.
Thanks for checking it out guys!

Shelby- Intermediate Member

- Posts : 947
Join date : 2013-03-02
Location : Alberta, Canada
 Re: 3100 Chevy Custom
Good work Denis. Nice fix. 

_________________
Al.
Constructive criticism is always welcome.
“Success always demands a greater effort.” Winston Churchill
"Success is failure turned inside out" Unknown
 Re: 3100 Chevy Custom
Now that's a cunning plan on the door cards. I wouldn't have thought of it.
C.
C.

webby- Moderator

- Posts : 2220
Join date : 2013-02-27
Age : 65
Location : Strathpine Australia. Built over WW2 airstrip
 Re: 3100 Chevy Custom
Thanks guys!
Still working on prying the spare door panel from the cab without breaking eggs. That's the only thing stopping me from painting the interior.
Still working on prying the spare door panel from the cab without breaking eggs. That's the only thing stopping me from painting the interior.

Shelby- Intermediate Member

- Posts : 947
Join date : 2013-03-02
Location : Alberta, Canada
 Re: 3100 Chevy Custom

_________________
Andy...
Life isn't about how to survive the storm, but how to dance in the rain...
 Re: 3100 Chevy Custom
Cool solution! Whatever you do, it will be great! That Chevy pickup is, in most ways, a good kit.
harron68- Advanced Member

- Posts : 3621
Join date : 2013-02-28
Age : 74
Location : MIDWEST
 Re: 3100 Chevy Custom
Thanks guys!
Well I haven't had any luck in removing the door panels from the other kit and it turns out I ran out of Pro Weld to make some MEK so I reverted my attention back to the bed.
I was going to paint the dividers with Alclad so I had the base on it then realized I would have needed to measure where the holes for the bolts be and drill them before painting. So I will drill the holes once everything is installed on the bed platform and use BMF.
I have the stir sticks varnished and finished to my satisfaction.
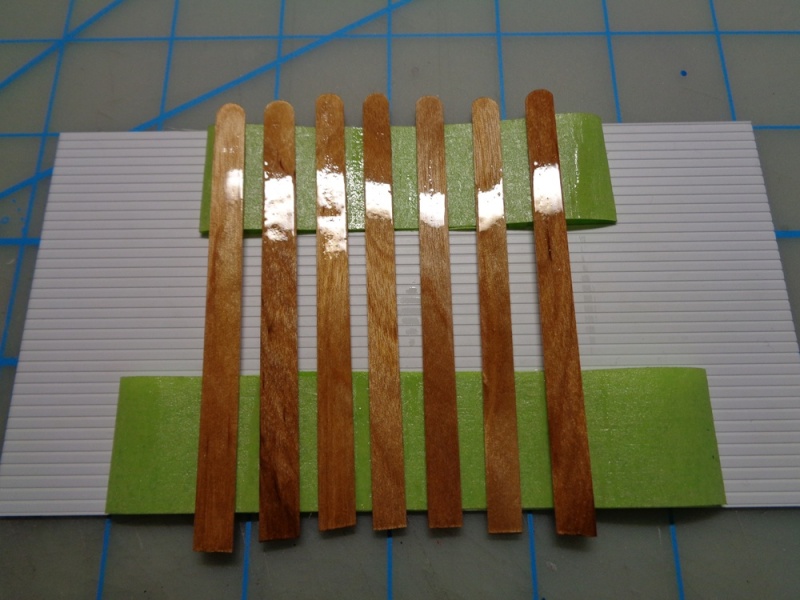
I have the bottom of the platform pained and once it's dry I can install the components of the bed and complete it.
Thanks for checking it out guys.
Well I haven't had any luck in removing the door panels from the other kit and it turns out I ran out of Pro Weld to make some MEK so I reverted my attention back to the bed.
I was going to paint the dividers with Alclad so I had the base on it then realized I would have needed to measure where the holes for the bolts be and drill them before painting. So I will drill the holes once everything is installed on the bed platform and use BMF.

I have the stir sticks varnished and finished to my satisfaction.

I have the bottom of the platform pained and once it's dry I can install the components of the bed and complete it.
Thanks for checking it out guys.

Shelby- Intermediate Member

- Posts : 947
Join date : 2013-03-02
Location : Alberta, Canada
Page 1 of 7 • 1, 2, 3, 4, 5, 6, 7 
 Similar topics
» 1950 Chevy 3100 pickup
» 1950 Chevy 3100 pickup
» 66 Chevy El Camino Custom
» '46 Chevy Custom Saltster
» '61 Chevy Impalla Mild Custom
» 1950 Chevy 3100 pickup
» 66 Chevy El Camino Custom
» '46 Chevy Custom Saltster
» '61 Chevy Impalla Mild Custom
Skid's :: Works In Progress :: Trucks
Page 1 of 7
Permissions in this forum:
You cannot reply to topics in this forum