
3100 Chevy Custom
Skid's :: Works In Progress :: Trucks
Page 2 of 7 •  1, 2, 3, 4, 5, 6, 7
 ![]()
Re: 3100 Chevy Custom
![]() by Shelby Sun 18 Jan 2015, 10:02 am
by Shelby Sun 18 Jan 2015, 10:02 am
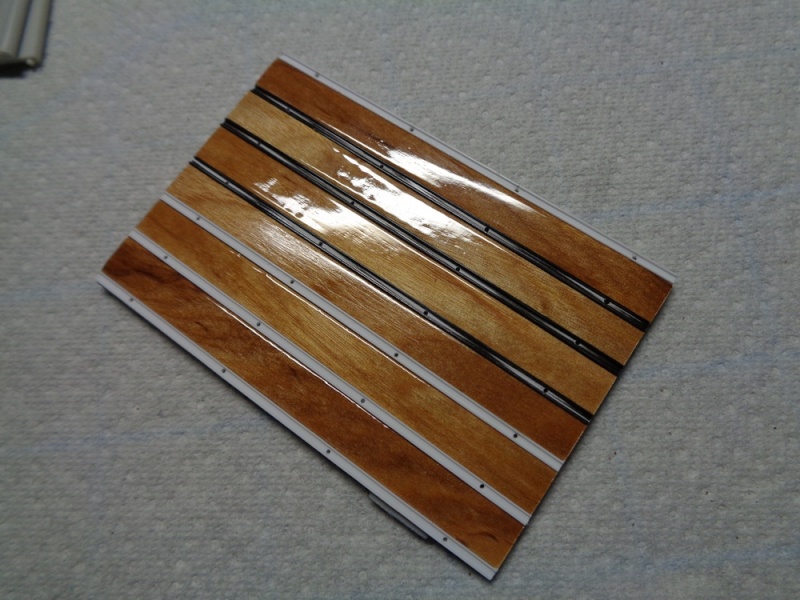
I got the planks and batans installed on the platform but still had to do straighten everything out and level things off.

The next step was to drill the holes for the rivets then sand smooth and I have everyhing flush.
I started on the BMF but still have some to go so hopefully I will have that done shortly and complete the bed.
Thanks for checking it out!

Shelby- Intermediate Member

- Posts : 947
Join date : 2013-03-02
Location : Alberta, Canada
Re: 3100 Chevy Custom
![]() by Skid Sun 18 Jan 2015, 10:18 am
by Skid Sun 18 Jan 2015, 10:18 am

_________________
Al.
Constructive criticism is always welcome.
“Success always demands a greater effort.” Winston Churchill
"Success is failure turned inside out" Unknown

Skid- Admin
- Posts : 7128
Join date : 2013-02-15
Age : 75
Location : Newcastle. Good Old Blighty. -

Re: 3100 Chevy Custom
![]() by RetiredMike Sun 18 Jan 2015, 3:21 pm
by RetiredMike Sun 18 Jan 2015, 3:21 pm

RetiredMike- Advanced Member

- Posts : 3525
Join date : 2013-04-27
Age : 73
Location : Valparaiso, Indiana
Re: 3100 Chevy Custom
![]() by harron68 Sun 18 Jan 2015, 3:50 pm
by harron68 Sun 18 Jan 2015, 3:50 pm
harron68- Advanced Member
- Posts : 3616
Join date : 2013-02-28
Age : 73
Location : MIDWEST
Re: 3100 Chevy Custom
![]() by Grouchy Sun 18 Jan 2015, 4:43 pm
by Grouchy Sun 18 Jan 2015, 4:43 pm
You have peaked my interest with your build. I like the TOPLESS look.
As for your door panels, would you be able to remove the extra height from the bottom of the panel, therefore leaving the original contour on top in tact? Or possibly section the center of the panel horizontally to eliminate the height?
Just a few thoughts for you.
Keep posting your progress on this cool build....
Rick
I missed the 2nd page of this build
 ...where you had sectioned the door panels...
Sorry for the late post on ideas...DOH!!!!

Grouchy- New Member

- Posts : 77
Join date : 2015-01-13
Age : 68
Location : Montana
Re: 3100 Chevy Custom
![]() by Shelby Mon 19 Jan 2015, 5:52 am
by Shelby Mon 19 Jan 2015, 5:52 am
Harron - A build usually is as good as its worse completed component. I just might stop here! LOL
Rick - No problem. Keep throwing those ideas. I'm always open to sugestions.
Shelby- Intermediate Member
- Posts : 947
Join date : 2013-03-02
Location : Alberta, Canada
Re: 3100 Chevy Custom
![]() by webby Mon 19 Jan 2015, 6:58 am
by webby Mon 19 Jan 2015, 6:58 am

webby- Moderator

- Posts : 2194
Join date : 2013-02-27
Age : 64
Location : Strathpine Australia. Built over WW2 airstrip
Re: 3100 Chevy Custom
![]() by VirusX Fri 23 Jan 2015, 2:52 am
by VirusX Fri 23 Jan 2015, 2:52 am

VirusX- New Member
- Posts : 73
Join date : 2013-03-01
Age : 37
Location : Cold Lake, Alberta, Canada
Re: 3100 Chevy Custom
![]() by Shelby Sat 24 Jan 2015, 5:19 pm
by Shelby Sat 24 Jan 2015, 5:19 pm
I have finally got the foiling done. It should have been pretty easy being all straight lines and nice grooves but I think my BMF sheet is on its last leg and need to be taken out back.
I came across cotton swabs from Tamiya at the hobby shop and thought I would try them. Because of their shape they are very versatile depending on the surface you need to foil and the angle you work with them. I like them although they're not cheap.

The bed foiled...

I was going to use white glue for the rivets but opted out and went with Micro metal metal adhesive. Only thing is the bottle I have which isn't all that old had cracked lid. This happened before with their micro sol. Is this something you guys have encountered?

The bed completed with rivets and all...

Now I can move on to the interior and other components of the build.
Thanks for checking it out guys
Shelby- Intermediate Member
- Posts : 947
Join date : 2013-03-02
Location : Alberta, Canada
Re: 3100 Chevy Custom
![]() by Dave from Pleasanton Sat 24 Jan 2015, 6:28 pm
by Dave from Pleasanton Sat 24 Jan 2015, 6:28 pm

Dave from Pleasanton- New Member
- Posts : 237
Join date : 2014-07-20
Re: 3100 Chevy Custom
![]() by Shelby Sat 24 Jan 2015, 6:36 pm
by Shelby Sat 24 Jan 2015, 6:36 pm
Yes this is glue and I guess it can be used to apply foil but with BMF I don't see why go through that trouble. It's mostly used on photo etch parts is my understaning.
I didn't make the rivets. They came in a bag on 5 sprues of 35 and I painted them brass for some contrast.
Shelby- Intermediate Member
- Posts : 947
Join date : 2013-03-02
Location : Alberta, Canada
Re: 3100 Chevy Custom
![]() by Sam Sat 24 Jan 2015, 7:25 pm
by Sam Sat 24 Jan 2015, 7:25 pm
Sam- Resident member
- Posts : 1962
Join date : 2013-02-23
Age : 57
Location : Back in Toledo, Oregon
Re: 3100 Chevy Custom
![]() by Guest Sat 24 Jan 2015, 8:09 pm
by Guest Sat 24 Jan 2015, 8:09 pm
Guest- Guest
Re: 3100 Chevy Custom
![]() by Sam Sun 25 Jan 2015, 12:51 am
by Sam Sun 25 Jan 2015, 12:51 am
Shelby wrote:
A mock up of what it's looking like at this stage...sans wheels as they are in the paint shop.
Comments, suggestions and constructive critisism always welcome and appreciated. Thanks for checking it out guys!

Denis, have you considered thinning the top of the windshield frame to match the thickness of the pillars, so as to lose the bulkiness of it. Maybe even remove the top of the frame altogether and just leave the pillars ?
Sam- Resident member
- Posts : 1962
Join date : 2013-02-23
Age : 57
Location : Back in Toledo, Oregon
Re: 3100 Chevy Custom
![]() by Shelby Tue 03 Feb 2015, 6:29 am
by Shelby Tue 03 Feb 2015, 6:29 am
I'm glad in a way I'm not the only one having problems with those lids.
Sam - Dave also suggested I trim down the top of the frame which is a good idea but removing the top might allow me to shorten the pillars and the winshield from the top. I will definitely look into what I can work out there because I do want to shorten it some if possible. Thanks!
I put the door back together using some styrene to reinforce it from the back.
The final result from the front. I think I got it pretty flush.

I worked on the bench seat which is open at the back and since it will stick out I cut out some styrene to cover it.

I still need to round off the corners but I'm getting there. I will be using .020 styrene rod to make a trim to join the seat and back. I didn't put it yet because I will be painting it a different colour than the rest of the seat.

Did some other stuff but not picture worthy yet. Hopefully I post more progress this week.
Thanks for looking guys!
Shelby- Intermediate Member
- Posts : 947
Join date : 2013-03-02
Location : Alberta, Canada

dogfish7- Intermediate Member
- Posts : 668
Join date : 2013-02-27
Age : 77
Location : Hoodsport, WA
Re: 3100 Chevy Custom
![]() by Skid Wed 04 Feb 2015, 7:26 pm
by Skid Wed 04 Feb 2015, 7:26 pm
_________________
Al.
Constructive criticism is always welcome.
“Success always demands a greater effort.” Winston Churchill
"Success is failure turned inside out" Unknown
Skid- Admin
- Posts : 7128
Join date : 2013-02-15
Age : 75
Location : Newcastle. Good Old Blighty. -
Re: 3100 Chevy Custom
![]() by Shelby Sat 07 Feb 2015, 6:29 pm
by Shelby Sat 07 Feb 2015, 6:29 pm
Time for an update!
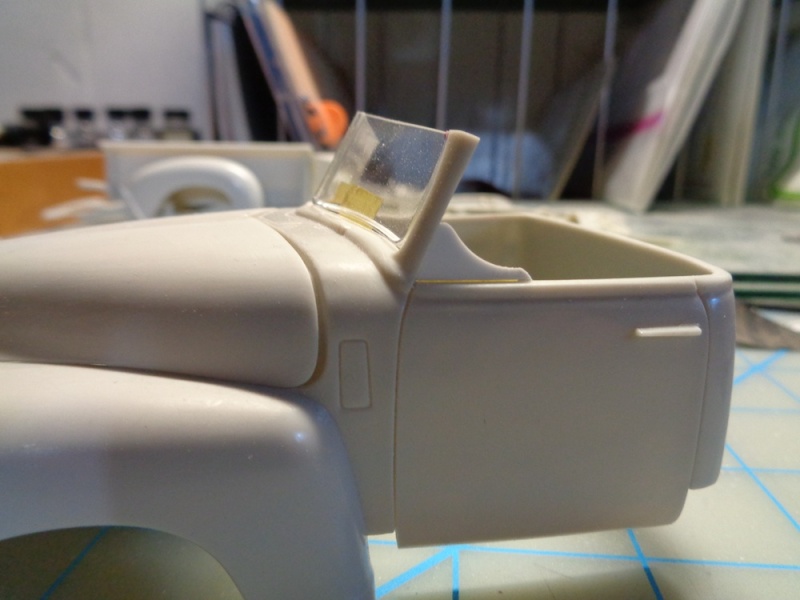
Sam had suggested to get rid of the top of the windshield frame and it was the easiest to shorten it and have everything fit so I got started on it.
The tape indicates where I cut the frame and how much was taken off. I didn't do the calculation as to how much was taken off scale wise, just made sure everything was even.

The original size windshield and the chopped off one after the fact.

A different angle to show the difference.

Mock of the windshield in its topless frame. From that angle it sure looks a little silly to me the nose looks so long.

From this angle it looks better but I'm not entirely sold on the look but I have an idea that hopefully will correct that.

Next up is a little more work on the interior and fixing that look and sideview mirrors as I'm not going to be using the stock one rather go with a more modern look for this custom.
Thanks for checking it out guys!
Shelby- Intermediate Member
- Posts : 947
Join date : 2013-03-02
Location : Alberta, Canada
Re: 3100 Chevy Custom
![]() by Guest Sat 07 Feb 2015, 6:38 pm
by Guest Sat 07 Feb 2015, 6:38 pm
It'd look fine when BMF'd / Painted
Nicely coming along by the way.
Guest- Guest
Re: 3100 Chevy Custom
![]() by Skid Sat 07 Feb 2015, 6:43 pm
by Skid Sat 07 Feb 2015, 6:43 pm
I think the slightly 'odd' look is caused by the a pillars now looking too thick at the tops, thicker there than the bottom which gives a top heavy look IMO. Maybe you could shave them down some from the outer edges at the top.
_________________
Al.
Constructive criticism is always welcome.
“Success always demands a greater effort.” Winston Churchill
"Success is failure turned inside out" Unknown
Skid- Admin
- Posts : 7128
Join date : 2013-02-15
Age : 75
Location : Newcastle. Good Old Blighty. -
Re: 3100 Chevy Custom
![]() by Guest Sat 07 Feb 2015, 7:24 pm
by Guest Sat 07 Feb 2015, 7:24 pm
Guest- Guest
Re: 3100 Chevy Custom
![]() by Shelby Sat 07 Feb 2015, 7:59 pm
by Shelby Sat 07 Feb 2015, 7:59 pm
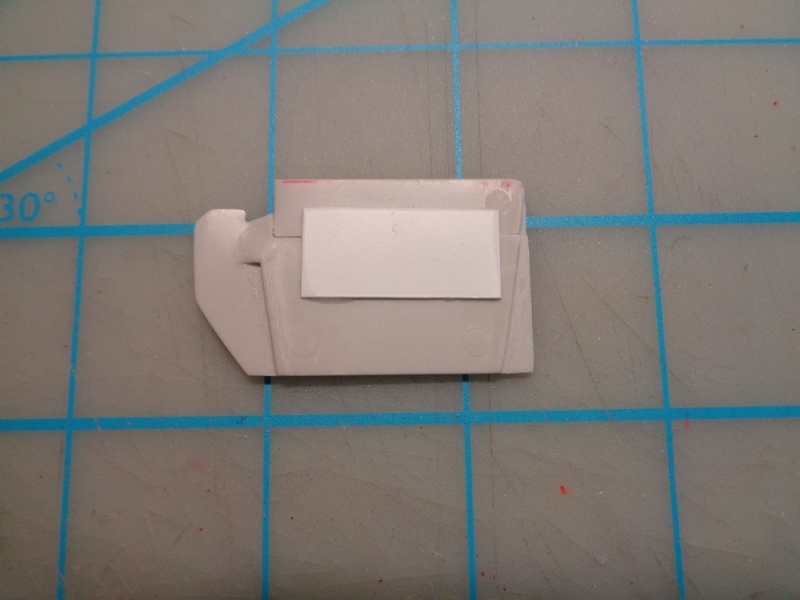
I picked out mirrors from a Shelby Series I kit to serve my purposes and they are larger than the slim side mirror from the Chevy. I chopped off the arms completely.

To accept these mirrors and also to address the look of the truck and pillars I have fabricated...call it a mirror mount if you will that wedges on the door and pillar.
I'm not putting the mmirrors on until I'm pretty certain this is the way to go but so far I'm liking it. Let me know what you guys think.

Shelby- Intermediate Member
- Posts : 947
Join date : 2013-03-02
Location : Alberta, Canada
Re: 3100 Chevy Custom
![]() by Guest Sat 07 Feb 2015, 9:28 pm
by Guest Sat 07 Feb 2015, 9:28 pm
Guest- Guest
Re: 3100 Chevy Custom
![]() by Shelby Sun 08 Feb 2015, 4:25 am
by Shelby Sun 08 Feb 2015, 4:25 am

I'm going to work on a different style winglet/mount thingy.
Shelby- Intermediate Member
- Posts : 947
Join date : 2013-03-02
Location : Alberta, Canada
Page 2 of 7 • 1, 2, 3, 4, 5, 6, 7 ![]()
» 1950 Chevy 3100 pickup
» 66 Chevy El Camino Custom
» '46 Chevy Custom Saltster
» '61 Chevy Impalla Mild Custom
Skid's :: Works In Progress :: Trucks
|
|
|