James Hunt's 1976 McLaren M23
+6
Old Coyote
pete s
Sam
Skid
harron68
RetiredMike
10 posters
Skid's :: Works In Progress :: Race cars
Page 2 of 2
Page 2 of 2 •  1, 2
1, 2
 Re: James Hunt's 1976 McLaren M23
Lookin GOOD ! 


Geezerman- Advanced Member

- Posts : 3651
Join date : 2013-02-24
Age : 89
Location : Gulf coast of central Florids
 Re: James Hunt's 1976 McLaren M23
No, Al. The PE was something I found recently on ebay. It is a Tamiya product, though. I also got their separate seat belt PE kit for the 1/20th Tamiya Alfa.

RetiredMike- Advanced Member

- Posts : 3525
Join date : 2013-04-27
Age : 73
Location : Valparaiso, Indiana
 Re: James Hunt's 1976 McLaren M23
Just a little update right now.
Getting back to this build, I looked over what I've done and where I'm at (because of home interruptions). I thought there was an error in my painting. I did the major red-orange portions of the body. I cut the decals for the main body piece and used that as a template for masking. The decals, when placed correctly, do not come to a point at the very front of the cowling as I thought was corrrect. The intersection point is tucked under the cowl at the glue point. Thanks to Skid and a few different race pics, its evident there were slight differences in paint details from race to race.

Aside from that, when testing the top and bottom body pieces fit, it was perfect. However, when I CA'd it and did it, pressing the center section around the cockpit raised the rear section up slightly at the rear radiators - frustrating. I was hoping to get away with very minimal seams that I wouldn't have to putty up, but that didn't happen. You know what usually happens instead. LOL
So, I puttied and I'll have to lightly touch up the white along the edges before decaling begins.
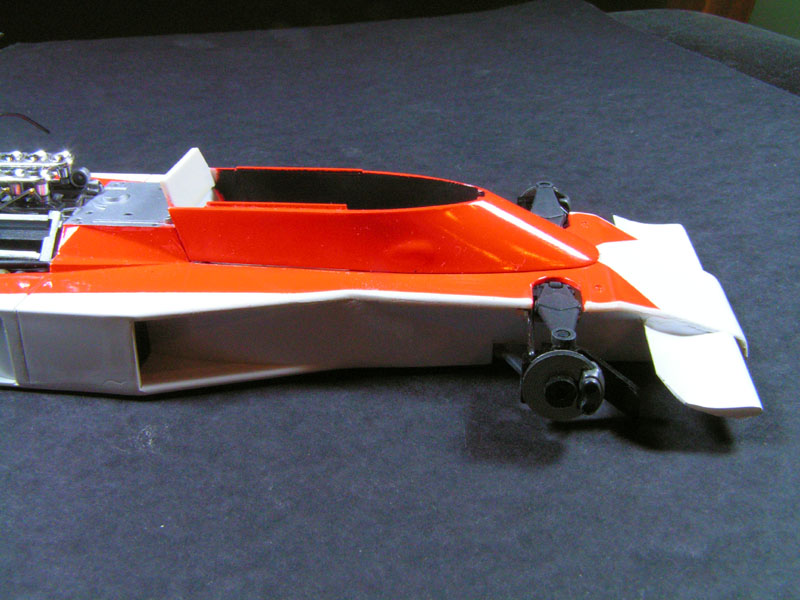
It's not going as planned, but as I remember with F1 cars I've done in the past - none have.
Thanks for looking.
Mike
Getting back to this build, I looked over what I've done and where I'm at (because of home interruptions). I thought there was an error in my painting. I did the major red-orange portions of the body. I cut the decals for the main body piece and used that as a template for masking. The decals, when placed correctly, do not come to a point at the very front of the cowling as I thought was corrrect. The intersection point is tucked under the cowl at the glue point. Thanks to Skid and a few different race pics, its evident there were slight differences in paint details from race to race.

Aside from that, when testing the top and bottom body pieces fit, it was perfect. However, when I CA'd it and did it, pressing the center section around the cockpit raised the rear section up slightly at the rear radiators - frustrating. I was hoping to get away with very minimal seams that I wouldn't have to putty up, but that didn't happen. You know what usually happens instead. LOL
So, I puttied and I'll have to lightly touch up the white along the edges before decaling begins.

It's not going as planned, but as I remember with F1 cars I've done in the past - none have.
Thanks for looking.
Mike

RetiredMike- Advanced Member

- Posts : 3525
Join date : 2013-04-27
Age : 73
Location : Valparaiso, Indiana
 Re: James Hunt's 1976 McLaren M23
it's looking really good Mike.
In the day there were even differences between teammates cars regarding paintwork so i would't worry too much.
looking forward to more ....
In the day there were even differences between teammates cars regarding paintwork so i would't worry too much.
looking forward to more ....
Guest- Guest
 Re: James Hunt's 1976 McLaren M23
Well, I'm slowly getting back into it now. So, update time. I've done little bits late at night without taking pics. Sorry.
The gap between top and bottom body halves is sealed up and touched up. Steering and instrument panel is painted and in. Tires have been painted and attached - not too happy there. The painting could be better, but the front Goodyears are so tiny. And Tamiya uses little wheel inserts to mount the rears and they end up mounting with an annoying wobble.
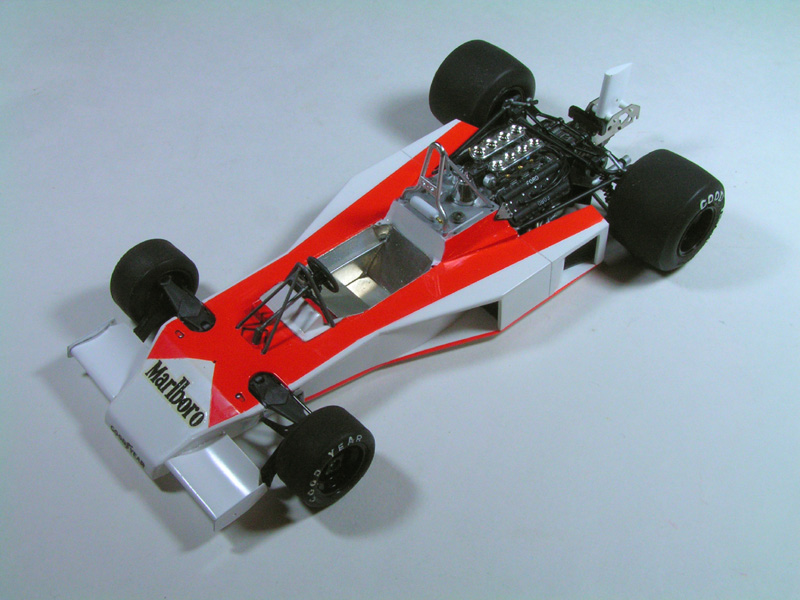
Plug wires are in; rollbar is on; small pieces under the rollbar are in. I've decided to not add plumbing to those pieces since the airbox covers almost everything up. You may notice the rear two injector lines now are on the inside. I found out why they changed them for 1976 - the curvature of the new airbox doesn't clear them if they're on the outside! DUH!


I also began decaling yesterday. The old decals are holding up pretty well after spraying them with Testors Decal Bonder. The whites, as in the words "James Hunt" are kind of thin and show the under color a bit. I was surprised the Marlboro decal by the shifter lump layed so well without manipulation.


That's it for now. Thanks for looking and commenting.
Mike
The gap between top and bottom body halves is sealed up and touched up. Steering and instrument panel is painted and in. Tires have been painted and attached - not too happy there. The painting could be better, but the front Goodyears are so tiny. And Tamiya uses little wheel inserts to mount the rears and they end up mounting with an annoying wobble.

Plug wires are in; rollbar is on; small pieces under the rollbar are in. I've decided to not add plumbing to those pieces since the airbox covers almost everything up. You may notice the rear two injector lines now are on the inside. I found out why they changed them for 1976 - the curvature of the new airbox doesn't clear them if they're on the outside! DUH!


I also began decaling yesterday. The old decals are holding up pretty well after spraying them with Testors Decal Bonder. The whites, as in the words "James Hunt" are kind of thin and show the under color a bit. I was surprised the Marlboro decal by the shifter lump layed so well without manipulation.


That's it for now. Thanks for looking and commenting.
Mike

RetiredMike- Advanced Member

- Posts : 3525
Join date : 2013-04-27
Age : 73
Location : Valparaiso, Indiana
 Re: James Hunt's 1976 McLaren M23
Looking awesome !
Sam- Resident member

- Posts : 2016
Join date : 2013-02-23
Age : 57
Location : Back in Toledo, Oregon
 Re: James Hunt's 1976 McLaren M23
And Tamiya uses little wheel inserts to mount the rears and they end up mounting with an annoying wobble. wrote:
I had the same issue on mine Mike.
It's looking good but I spy only three injector lines on the left bank. Did you miss it or leave it out? I lost two injectors on mine and didn't bother at all!! LOL
I'm glad the deacals are working out for you Mike, I was worried for you some as they must be about thirty years old by now.
_________________
Al.
Constructive criticism is always welcome.
“Success always demands a greater effort.” Winston Churchill
"Success is failure turned inside out" Unknown
 Re: James Hunt's 1976 McLaren M23
Looks like it's coming on a treat,
I was going to ask why only 6 injectors total as well....... Al got there first. :-)
Appologies if you've not finished them off yet.
I was going to ask why only 6 injectors total as well....... Al got there first. :-)
Appologies if you've not finished them off yet.
Guest- Guest
 Re: James Hunt's 1976 McLaren M23

That's a great looking engine !!
Just to show that I notice the explanation, the rear injectors on each bank were relocated to the inside.

Geezerman- Advanced Member

- Posts : 3651
Join date : 2013-02-24
Age : 89
Location : Gulf coast of central Florids
 Re: James Hunt's 1976 McLaren M23
Skid wrote:
It's looking good but I spy only three injector lines on the left bank. Did you miss it or leave it out? I lost two injectors on mine and didn't bother at all!! LOL
I'm glad the deacals are working out for you Mike, I was worried for you some as they must be about thirty years old by now.
I had to go back and take a second look to make sure, but they're still there. In this pic, you can see two small brass colored specks which are the connectors for the hoses. I nipped the left one a little longer than the right when I took it off(didn't want to disassemble the horns). The hose for the right one is visible above the specks while the left one snakes downward quickly and can't be seen here. They're close together because it was tuff just CAing them in there, much less getting the upward angle correct.

Thanks guys.
As for the decals, I've had good luck lately with old decals after overspraying them with Testors Decal Bonder. It's the decal fixing solution that comes with their DIY decal kit, but you can also buy it separately. I just sprayed the Sox&Martin Cuda decals. I haven't had bad reactions with any decals yet.

RetiredMike- Advanced Member

- Posts : 3525
Join date : 2013-04-27
Age : 73
Location : Valparaiso, Indiana
 Re: James Hunt's 1976 McLaren M23
Man, she is looking awesome! 

dogfish7- Intermediate Member

- Posts : 668
Join date : 2013-02-27
Age : 78
Location : Hoodsport, WA
 Re: James Hunt's 1976 McLaren M23
DOH!!!
Just checked, that's where they are on mine too!!! Could've sworn I'd lost 'em!!!
Just checked, that's where they are on mine too!!! Could've sworn I'd lost 'em!!!
_________________
Al.
Constructive criticism is always welcome.
“Success always demands a greater effort.” Winston Churchill
"Success is failure turned inside out" Unknown
 Re: James Hunt's 1976 McLaren M23
Interesting how the body design "style" changes with rules changes and over the years. Beautiful work, thanx for another fine F-1 of the past!
harron68- Advanced Member

- Posts : 3621
Join date : 2013-02-28
Age : 74
Location : MIDWEST
 Re: James Hunt's 1976 McLaren M23
Colin, back then, it was common for teams to use the same basic design for several years with only small changes from year to year.
The M23, saw 'service' for five years. 1973-1977.
This is the cowl of the 75 car (M23c)...........

........ and this is the cowl of the 76 car (M23d)

What Mike is saying is, this change required two of the injectors to be moved inboard, in order to clear the cowl.
The M23, saw 'service' for five years. 1973-1977.
This is the cowl of the 75 car (M23c)...........

........ and this is the cowl of the 76 car (M23d)

What Mike is saying is, this change required two of the injectors to be moved inboard, in order to clear the cowl.
_________________
Al.
Constructive criticism is always welcome.
“Success always demands a greater effort.” Winston Churchill
"Success is failure turned inside out" Unknown
 Re: James Hunt's 1976 McLaren M23
The McLaren is finally done.
Seatbelts are finished. A nice separate add-on from Tamiya.

Engine area is finished.

This is with the airbox attached. I tried to leave it detachable, but it keeps popping up due to the attaching pins being slightly out of register with their insertion points. So I decided to CA it on for final shelf display. I also painted the wingfoot on the tire which I forgot. To tone down the bright white lettering of the tire, I used the Tamiya rub on soot weathering.

The fluorescent red (Tamiya orange) is painted on with the exceptions of the pointed stripe on the top of the airbox and the insides of the numerals. That's the Tamiya decal color. Since I applied the airbox decal early on with the black pinstripes, I cut the remaining pinstripes off the existing decals and applied them to the body. I left a small bit of orange decal to provide a nice crisp edgeline and a uniform space between. You have to look close to see the difference. It worked out pretty good.

Thanks for looking and all your supporting comments.
Mike
Seatbelts are finished. A nice separate add-on from Tamiya.

Engine area is finished.

This is with the airbox attached. I tried to leave it detachable, but it keeps popping up due to the attaching pins being slightly out of register with their insertion points. So I decided to CA it on for final shelf display. I also painted the wingfoot on the tire which I forgot. To tone down the bright white lettering of the tire, I used the Tamiya rub on soot weathering.

The fluorescent red (Tamiya orange) is painted on with the exceptions of the pointed stripe on the top of the airbox and the insides of the numerals. That's the Tamiya decal color. Since I applied the airbox decal early on with the black pinstripes, I cut the remaining pinstripes off the existing decals and applied them to the body. I left a small bit of orange decal to provide a nice crisp edgeline and a uniform space between. You have to look close to see the difference. It worked out pretty good.

Thanks for looking and all your supporting comments.
Mike

RetiredMike- Advanced Member

- Posts : 3525
Join date : 2013-04-27
Age : 73
Location : Valparaiso, Indiana

Geezerman- Advanced Member

- Posts : 3651
Join date : 2013-02-24
Age : 89
Location : Gulf coast of central Florids
 Re: James Hunt's 1976 McLaren M23
Looks great Mike, very nice work!!

pete s- Intermediate Member

- Posts : 797
Join date : 2013-02-26
Age : 74
Location : Beaverton, OR
Page 2 of 2 •  1, 2
1, 2
 Similar topics
» James Hunt's 1976 McLaren M23
» 1975 McLaren M23 F1 "Rush Part Two" James Hunt
» MPC Mclaren M8d 1:20
» 1976 Dart Sport
» McLaren Mercedes MP4/12
» 1975 McLaren M23 F1 "Rush Part Two" James Hunt
» MPC Mclaren M8d 1:20
» 1976 Dart Sport
» McLaren Mercedes MP4/12
Skid's :: Works In Progress :: Race cars
Page 2 of 2
Permissions in this forum:
You cannot reply to topics in this forum