James Hunt's 1976 McLaren M23
+6
Old Coyote
pete s
Sam
Skid
harron68
RetiredMike
10 posters
Skid's :: Works In Progress :: Race cars
Page 1 of 2
Page 1 of 2 • 1, 2 
 James Hunt's 1976 McLaren M23
Here's one I'm doing for another group build on another site - the 1/20th Tamiya McLaren M23. It is the 1976 season version driven by James Hunt. Since it was bought new many years ago when it was first released, I am trying to match the Orange/Red as closely as I can in case of decal failure. Also, I'm not very successful with large format decal application. I plan to build it with the addition of the Tamiya PE and seatbelt upgrade kit. I'll add a few details around the engine area from photos I've come up with online.
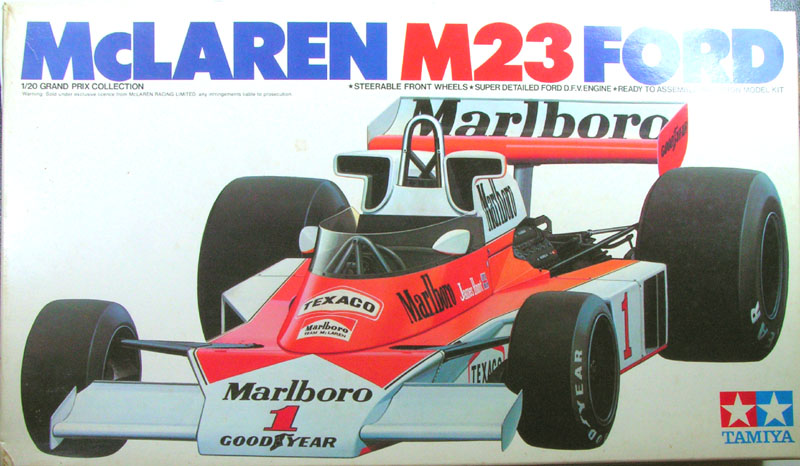


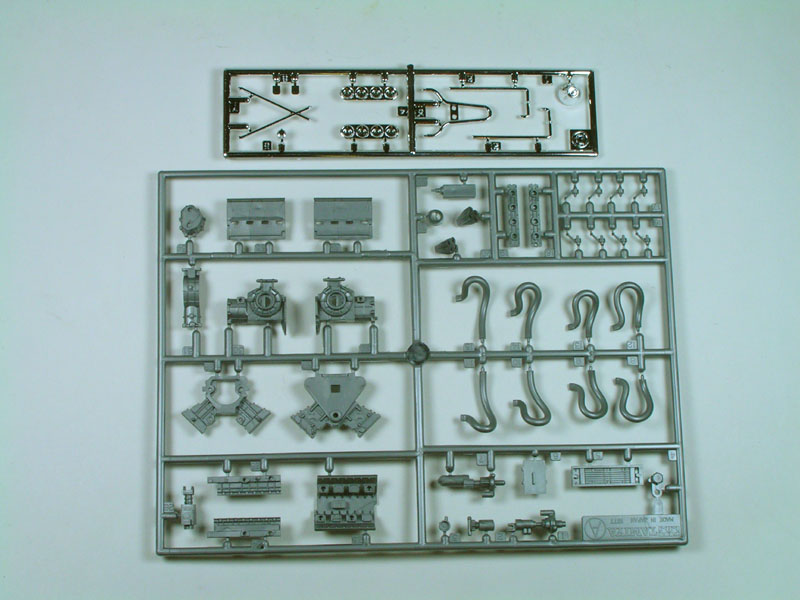


Thanks, everyone
Mike


Thanks, everyone
Mike

RetiredMike- Advanced Member

- Posts : 3525
Join date : 2013-04-27
Age : 73
Location : Valparaiso, Indiana
 Re: James Hunt's 1976 McLaren M23
My interest is sparked..... Will be keeping my beady eye on this.
Guest- Guest
 Re: James Hunt's 1976 McLaren M23
How cool! Kit now has P.E. parts too and should look great when done. Large red decals may be buggers to get on right, good luck!
harron68- Advanced Member

- Posts : 3621
Join date : 2013-02-28
Age : 74
Location : MIDWEST
 Re: James Hunt's 1976 McLaren M23
With a bit of work, it builds up nicely Mike and at least you got the Marlboro decals with yours, I had to buy AM versions for mine.
Last edited by Skid on Fri 02 May 2014, 8:33 am; edited 1 time in total
_________________
Al.
Constructive criticism is always welcome.
“Success always demands a greater effort.” Winston Churchill
"Success is failure turned inside out" Unknown
 Re: James Hunt's 1976 McLaren M23
Oh yea ! I will be following.


Sam- Resident member

- Posts : 2016
Join date : 2013-02-23
Age : 57
Location : Back in Toledo, Oregon
 Re: James Hunt's 1976 McLaren M23
Looks like a cool kit. Glad to see that the decals have the Marlboro logos too. I have a F1 McLaren kit of Aryton Senna's that does not have the Marlboro decals, so I will have to buy them separately. I also will be following this one.
One F1 kit that I have in the stash is the Tyrell six wheeler. An interesting concept for a F1 car! Saw it run many years ago at the Long Beach Grand Prix. Boy am I dating myself!
One F1 kit that I have in the stash is the Tyrell six wheeler. An interesting concept for a F1 car! Saw it run many years ago at the Long Beach Grand Prix. Boy am I dating myself!

pete s- Intermediate Member

- Posts : 797
Join date : 2013-02-26
Age : 74
Location : Beaverton, OR
 Re: James Hunt's 1976 McLaren M23
Boy am I dating myself! wrote:
That makes two of us Pete!! LOL.
Ah! gone are the days of true innovation. Six wheels, twin chassis, fan cars!!!! Now it's all down to who can spend the most money in gaining a few miserable pounds of extra downforce.
Money is stiffling true innovation.
_________________
Al.
Constructive criticism is always welcome.
“Success always demands a greater effort.” Winston Churchill
"Success is failure turned inside out" Unknown
 Re: James Hunt's 1976 McLaren M23
Skid wrote:
Money is stiffling true innovation.
Money has ruined automobile racing all over the world


Old Coyote- Intermediate Member

- Posts : 565
Join date : 2013-10-14
Age : 77
Location : High Point, North Carolina
 Re: James Hunt's 1976 McLaren M23
harron68 wrote:How cool! Kit now has P.E. parts too and should look great when done. Large red decals may be buggers to get on right, good luck!
The PE kit was a recent purchase as the kit itself is ages old. Large red (orange) decals hopefully won't be used. The entire sheet will be oversprayed for safety sake.
Al, when this kit was released, the Marlboro man was still alive and NASCAR was Winston Cup - the tobacco company probably received even a royalty from Tamiya for using their name. LOL

RetiredMike- Advanced Member

- Posts : 3525
Join date : 2013-04-27
Age : 73
Location : Valparaiso, Indiana
 Re: James Hunt's 1976 McLaren M23
Ah! it's an original issue then!. Cool. Hope the decals are OK.
_________________
Al.
Constructive criticism is always welcome.
“Success always demands a greater effort.” Winston Churchill
"Success is failure turned inside out" Unknown
 Re: James Hunt's 1976 McLaren M23
Skid wrote:With a bit of work, it builds up nicely Mike and at least you got the Marlboro decals with yours, I had to buy AM versions for mine.
It annoys me that the PC police are rewriting history by censoring tabaco sponsorship. It happened, was part of history, so it should stay.
Channel 7 pixelate out 'Marlboro' & "Camel' on footage of race cars from the 70s & 80s. Ditto for ground signage on the wretched code of football called Australian Rules.
Conversely, Ch 9 don't on cricket match footage from back in the day.
Watching old footage of Marlboro sponsored Holden Torana winning races hasn't suddenly given me the urge to take up smoking again.
End of rant, and good luck with the decals. I hate large decals on compound curves too.

webby- Moderator

- Posts : 2220
Join date : 2013-02-27
Age : 65
Location : Strathpine Australia. Built over WW2 airstrip
 Re: James Hunt's 1976 McLaren M23
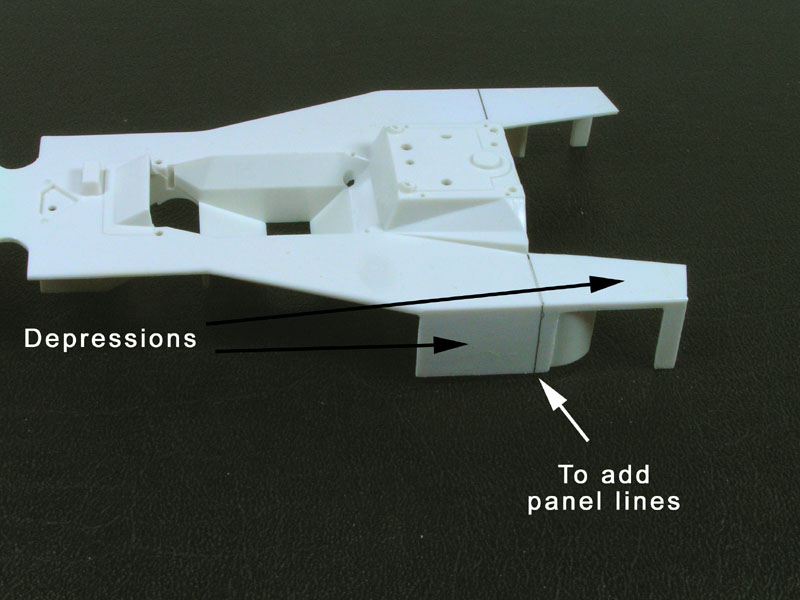
Checked out the McLaren body panels for injection marks and surface depressions. There are quite a few depressions, but they kept injection marks to a minimum and in less visible areas.
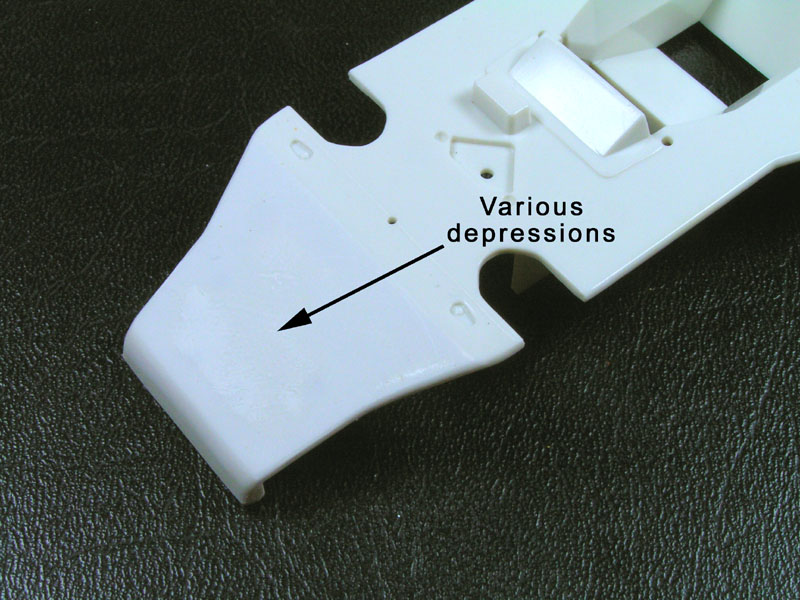

In this shot, I assume the openings are meant for a motorized version (See ? in photo). But no cover was provided for the on/off switch. For those of you more familiar with F1 cars, is the underside painted white or left bare aluminum as with most of the Ferrari race cars? It's probably easier to paint it all white.


Panel lines will be added where they didn't exist. These are visible because there are rivets on the seam.
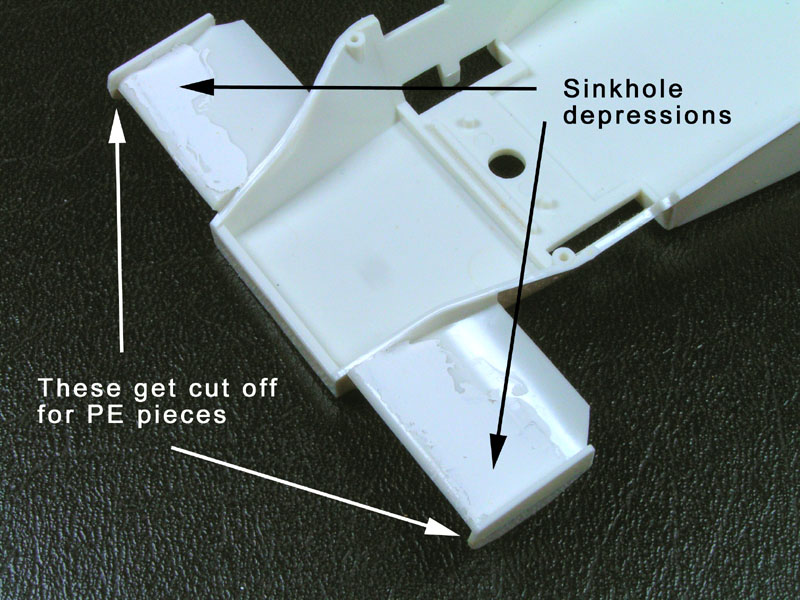
The side pieces to the front wing will be cut off to be replaced by PE substitutes.
Now I have to sit down and study how I'll go about inserting the upper front suspension and mask it off for joining the top and bottom halves of the body before painting, etc.
Until next time, thanks for looking and your comments.
Mike


In this shot, I assume the openings are meant for a motorized version (See ? in photo). But no cover was provided for the on/off switch. For those of you more familiar with F1 cars, is the underside painted white or left bare aluminum as with most of the Ferrari race cars? It's probably easier to paint it all white.


Panel lines will be added where they didn't exist. These are visible because there are rivets on the seam.

The side pieces to the front wing will be cut off to be replaced by PE substitutes.

Now I have to sit down and study how I'll go about inserting the upper front suspension and mask it off for joining the top and bottom halves of the body before painting, etc.
Until next time, thanks for looking and your comments.
Mike

RetiredMike- Advanced Member

- Posts : 3525
Join date : 2013-04-27
Age : 73
Location : Valparaiso, Indiana
 Re: James Hunt's 1976 McLaren M23
Seems like a lot of body work but I know the end result will be worth it.
Guest- Guest
 Re: James Hunt's 1976 McLaren M23
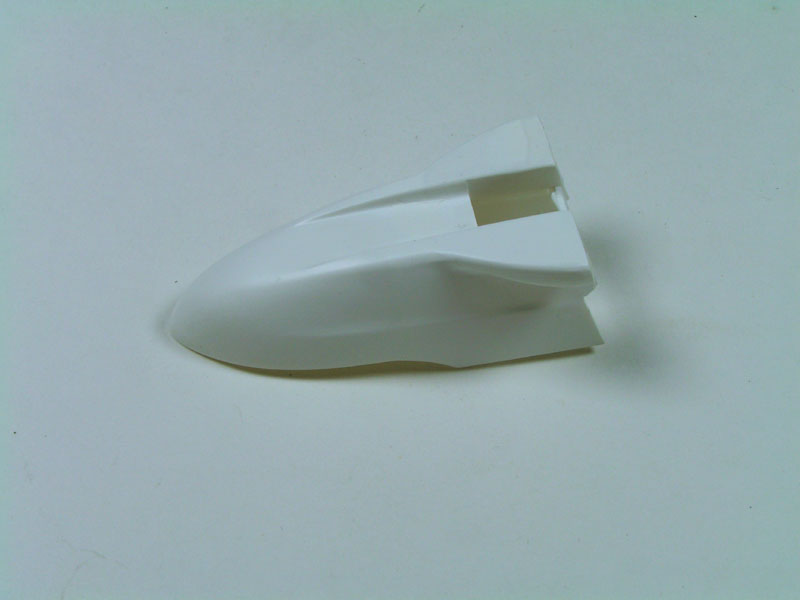
A little more work done here. Fixed all the depressions and injection marks and primed body panels in white. Got to work on some of the minor assemblies still contemplating what goes together when considering puttying and painting.
Painted the aluminum interior parts.

Got the air intakes puttied up and primed.
Got trans and rear suspension pieces together with the added PE.
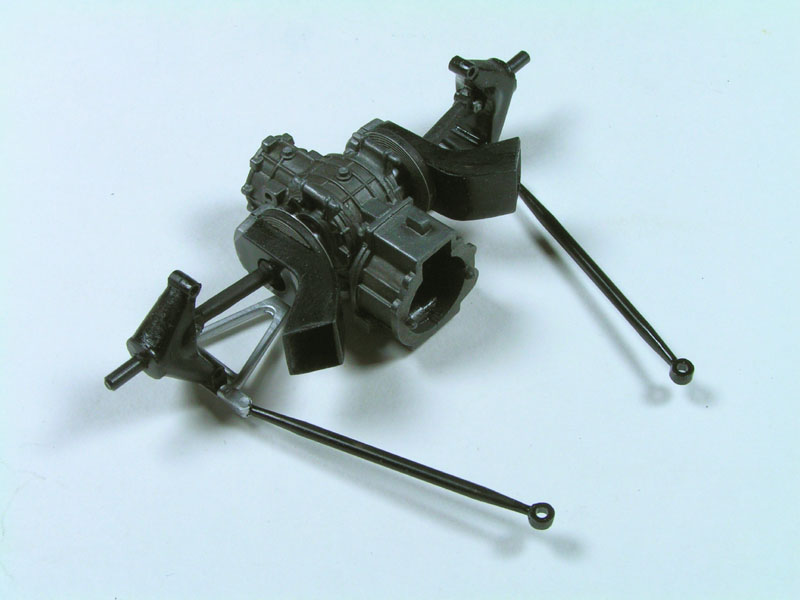
PE rotors are nice, but they're barely visible when assembled. Still the detail is nice.

Coming along with a slow start since most of the time is devoted to a kitchen remodel, but I've got to "Get Er Done" as its said.
Thanks for the comments and for viewing.
Mike
Painted the aluminum interior parts.

Got the air intakes puttied up and primed.

Got trans and rear suspension pieces together with the added PE.

PE rotors are nice, but they're barely visible when assembled. Still the detail is nice.

Coming along with a slow start since most of the time is devoted to a kitchen remodel, but I've got to "Get Er Done" as its said.
Thanks for the comments and for viewing.
Mike

RetiredMike- Advanced Member

- Posts : 3525
Join date : 2013-04-27
Age : 73
Location : Valparaiso, Indiana
 Re: James Hunt's 1976 McLaren M23
Nice progress Mike.
Yup! originally a motorised kit. The large opening was for the battery and you should at least have a cover for it.
Back in the day, the underside would have a most certainly been left as bare alluminium but I just left mine white. Matt white at that!! LOL
Yup! originally a motorised kit. The large opening was for the battery and you should at least have a cover for it.
Back in the day, the underside would have a most certainly been left as bare alluminium but I just left mine white. Matt white at that!! LOL
_________________
Al.
Constructive criticism is always welcome.
“Success always demands a greater effort.” Winston Churchill
"Success is failure turned inside out" Unknown
 Re: James Hunt's 1976 McLaren M23
A little more work on the McLaren. When the oil/water pumps were placed, the tubes from the water pump didn't reach the engine inlets! I took it apart, cut the stump off completely and inserted styrene rod finished in a silver rub-n-buff and polished. Unfortunately I didn't take a picture of the finished piece at the time - then the completed headers obliterated the view to the inside.

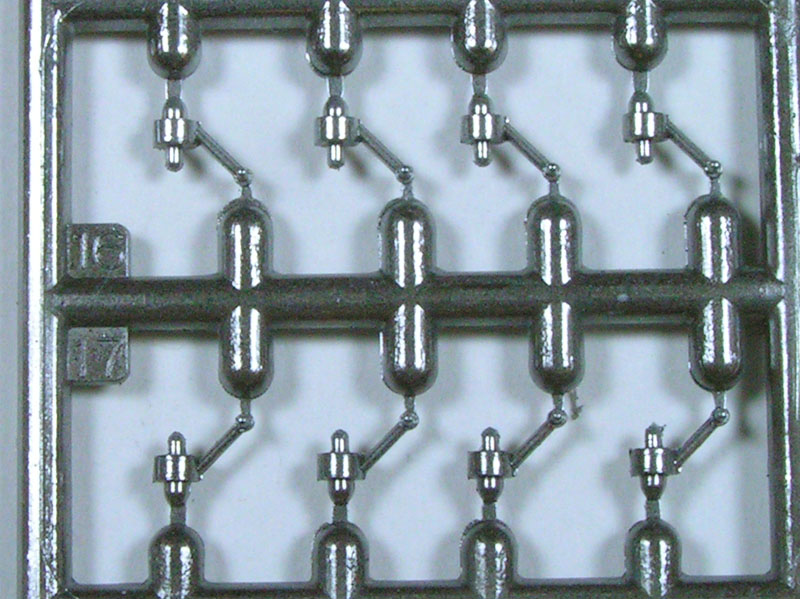
I didn't fancy the flat black Tamiya correctly said to paint the headers, so I elected to paint them as they were on an earlier M23. I used Alclad steel with a light overspray of Spasstix chrome. They were sprayed on he sprue to cover the entire pipe, even though they would be puttied onto the collectors and touched up. I wanted to assure good color coverage.

Injector bases were painted with Spasstix chrome.
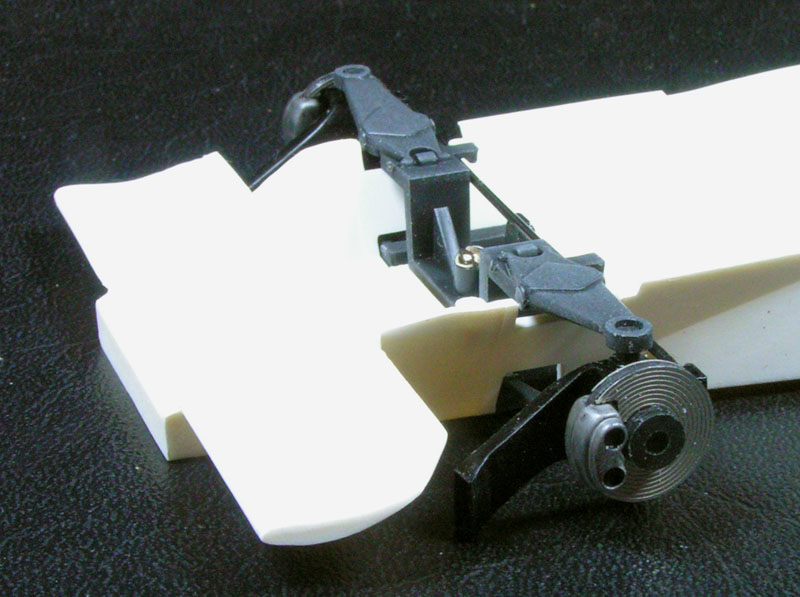
Got the front suspension installed which will allow me to join the top and bottom halves and putty it up. PE rotor covers on the front too.
Also got the holes for the motorized version sealed up and puttied.

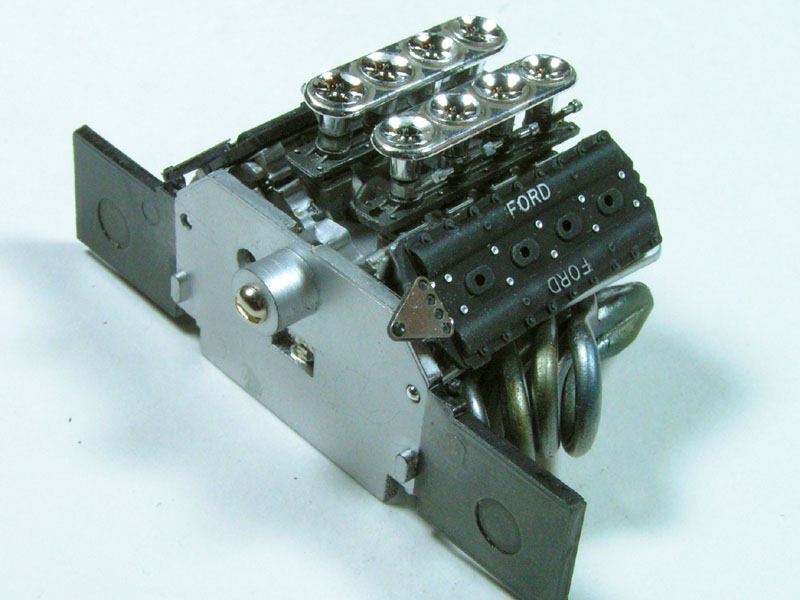
This is the engine mocked up. The headers are in permanently, though. I hope they clear everything else in the chassis because they were a PITA to assemble. I glued the pipes to the collectors first and when dry, removed them from the block to mold in the collector and touch up paint. When they were reinstalled, they barely allow the cooling pipes to pass through to the radiators. Tamiya's weathering kit D has blue and red heat staining rub ons and they were lightly used on the headers. You may notice the injector orientation is in a 2 and 2 criss cross pattern for the fuel lines. Tamiya instructions did correctly indicate to install the rear two injectors toward the inside, over the distributor, but I thought the older method looked better. I guess McLaren moved them inward when they relocated the coil box over the transaxle. Fuel line tubing will be added later on final assembly with the plug wires.


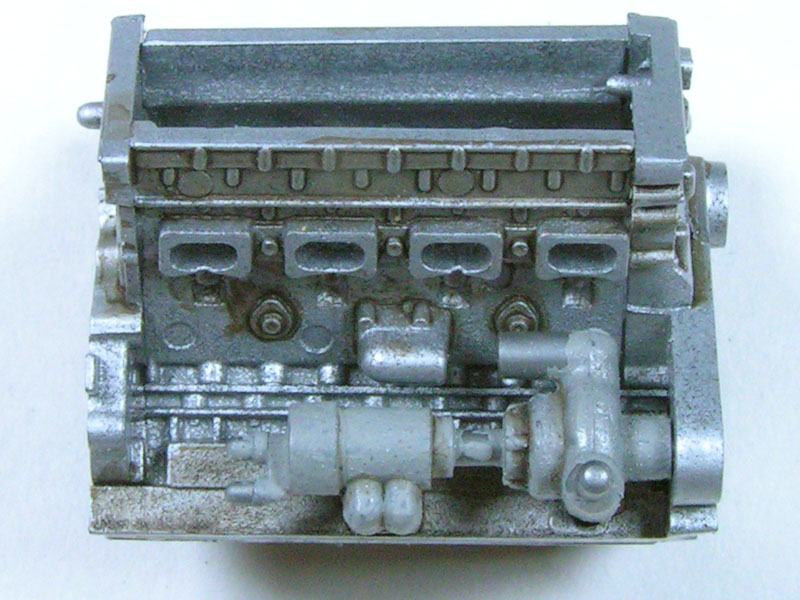
The oil pan was given a black wash to bring out detail. The water pump on the left doesn't line up with holes in the block, so I just cut off the pin to attach it. I could have hogged out the hole in the belt cover to relocate it, but didn't. A lot off detaling possibilities were getting covered up by
subsequent assemblies, so compromises had to be made. I even BMF'd the exposed side of the bulkhead and found out you'll never see it.

Thanks for looking and listening again.
Now it's back to the kitchen backsplash.
Mike


I didn't fancy the flat black Tamiya correctly said to paint the headers, so I elected to paint them as they were on an earlier M23. I used Alclad steel with a light overspray of Spasstix chrome. They were sprayed on he sprue to cover the entire pipe, even though they would be puttied onto the collectors and touched up. I wanted to assure good color coverage.

Injector bases were painted with Spasstix chrome.

Got the front suspension installed which will allow me to join the top and bottom halves and putty it up. PE rotor covers on the front too.

Also got the holes for the motorized version sealed up and puttied.

This is the engine mocked up. The headers are in permanently, though. I hope they clear everything else in the chassis because they were a PITA to assemble. I glued the pipes to the collectors first and when dry, removed them from the block to mold in the collector and touch up paint. When they were reinstalled, they barely allow the cooling pipes to pass through to the radiators. Tamiya's weathering kit D has blue and red heat staining rub ons and they were lightly used on the headers. You may notice the injector orientation is in a 2 and 2 criss cross pattern for the fuel lines. Tamiya instructions did correctly indicate to install the rear two injectors toward the inside, over the distributor, but I thought the older method looked better. I guess McLaren moved them inward when they relocated the coil box over the transaxle. Fuel line tubing will be added later on final assembly with the plug wires.


The oil pan was given a black wash to bring out detail. The water pump on the left doesn't line up with holes in the block, so I just cut off the pin to attach it. I could have hogged out the hole in the belt cover to relocate it, but didn't. A lot off detaling possibilities were getting covered up by
subsequent assemblies, so compromises had to be made. I even BMF'd the exposed side of the bulkhead and found out you'll never see it.

Thanks for looking and listening again.
Now it's back to the kitchen backsplash.
Mike

RetiredMike- Advanced Member

- Posts : 3525
Join date : 2013-04-27
Age : 73
Location : Valparaiso, Indiana
 Re: James Hunt's 1976 McLaren M23
Excellent update, You got a lot done. Fine looking work all the way around. I hate it when I detail a part only to find it is hidden on assembly. Happens all the time to me.
Guest- Guest
 Re: James Hunt's 1976 McLaren M23
It's looking good Mike, nice work.
I remember the water pumps being short but left them as is as I'd identified that they were hidden by the exhaust manifolds. Sorry, could have warned you!!
Yup! they are a real bitch. Same on all of the Tamiya DFV engines Mike. The Ebrro lLtus 72 is a much better arrangement though.
I remember the water pumps being short but left them as is as I'd identified that they were hidden by the exhaust manifolds. Sorry, could have warned you!!

Yup! they are a real bitch. Same on all of the Tamiya DFV engines Mike. The Ebrro lLtus 72 is a much better arrangement though.
_________________
Al.
Constructive criticism is always welcome.
“Success always demands a greater effort.” Winston Churchill
"Success is failure turned inside out" Unknown
 Re: James Hunt's 1976 McLaren M23
It's a fine looking engine !!!


Geezerman- Advanced Member

- Posts : 3651
Join date : 2013-02-24
Age : 89
Location : Gulf coast of central Florids
 Re: James Hunt's 1976 McLaren M23
The kit has excellent detail and you're putting it to good use!
dogfish7- Intermediate Member

- Posts : 668
Join date : 2013-02-27
Age : 78
Location : Hoodsport, WA
 Re: James Hunt's 1976 McLaren M23
Just a little update for now. Still working on the kitchen.
Got some MM Classic White laid down. Also tested the decals. Coated them with testors decal bonder first. This one on the air box stayed together quite well. The Tamiya decal was very reactive to Solvaset, however, turning 'mushy' soft instantly. Luckily nothing was damaged.

I added the criss-cross fuel lines to the injectors using fishing monofilament.

Placing the engine onto the lower chassis half was affected by the long lower rods not seating all the way onto their pins. This is where placement of the headers came into play. You can see in the photo where the rod contacts the headers. To press the rod down onto the pin further just puts a nasty unnatural bend in the rod. So I elected to cut a little of the chassis away exposing the mounting points (they should be covered).

This is one of the PE pieces that remains visible and looks quite nice.

That's it for now.
Thanks for looking.
Mike
Got some MM Classic White laid down. Also tested the decals. Coated them with testors decal bonder first. This one on the air box stayed together quite well. The Tamiya decal was very reactive to Solvaset, however, turning 'mushy' soft instantly. Luckily nothing was damaged.

I added the criss-cross fuel lines to the injectors using fishing monofilament.

Placing the engine onto the lower chassis half was affected by the long lower rods not seating all the way onto their pins. This is where placement of the headers came into play. You can see in the photo where the rod contacts the headers. To press the rod down onto the pin further just puts a nasty unnatural bend in the rod. So I elected to cut a little of the chassis away exposing the mounting points (they should be covered).

This is one of the PE pieces that remains visible and looks quite nice.

That's it for now.
Thanks for looking.
Mike

RetiredMike- Advanced Member

- Posts : 3525
Join date : 2013-04-27
Age : 73
Location : Valparaiso, Indiana
 Re: James Hunt's 1976 McLaren M23
Big scale Tamiyas and great building, a combo made for perfection. Thanx, the clear fuel lines are super. I luv the metal-colored paints!
harron68- Advanced Member

- Posts : 3621
Join date : 2013-02-28
Age : 74
Location : MIDWEST
 Re: James Hunt's 1976 McLaren M23
IIRC Mike, my decals were no problem at all and laid down well. There again, mine was a re-issue with fresh decals.
I had the same issue with the rear suspension tie rods too Mike!!
You got PE in your kit?..... not in the re-issue.
It's looking good Mike.
I had the same issue with the rear suspension tie rods too Mike!!
You got PE in your kit?..... not in the re-issue.

It's looking good Mike.
_________________
Al.
Constructive criticism is always welcome.
“Success always demands a greater effort.” Winston Churchill
"Success is failure turned inside out" Unknown
Page 1 of 2 • 1, 2 
 Similar topics
» James Hunt's 1976 McLaren M23
» 1975 McLaren M23 F1 "Rush Part Two" James Hunt
» MPC Mclaren M8d 1:20
» 1976 Dart Sport
» McLaren Mercedes MP4/12
» 1975 McLaren M23 F1 "Rush Part Two" James Hunt
» MPC Mclaren M8d 1:20
» 1976 Dart Sport
» McLaren Mercedes MP4/12
Skid's :: Works In Progress :: Race cars
Page 1 of 2
Permissions in this forum:
You cannot reply to topics in this forum