
200mm WWI British infantry.
Page 2 of 7 •  1, 2, 3, 4, 5, 6, 7
 ![]()
Re: 200mm WWI British infantry.
![]() by GaryDainton Wed 17 Jun 2015, 3:05 pm
by GaryDainton Wed 17 Jun 2015, 3:05 pm
Using MA light sea blue I filled in the iris leaving some of the french blue showing. A thin wash of MC light flesh has been put around the eyes and the black line has been softened with couple of thin coats of
MC burnt red.

Further very thin coats of burnt red are applied over the black line around the eye until it looks more 'natural', the corners are touched in with burnt red also. the light flesh has been softened with a transparent coat of our basic flesh mix of 50/50 brown sand and basic skintone. The iris has been further touched in with MA dark sea blue leaving some of the french blue showing.
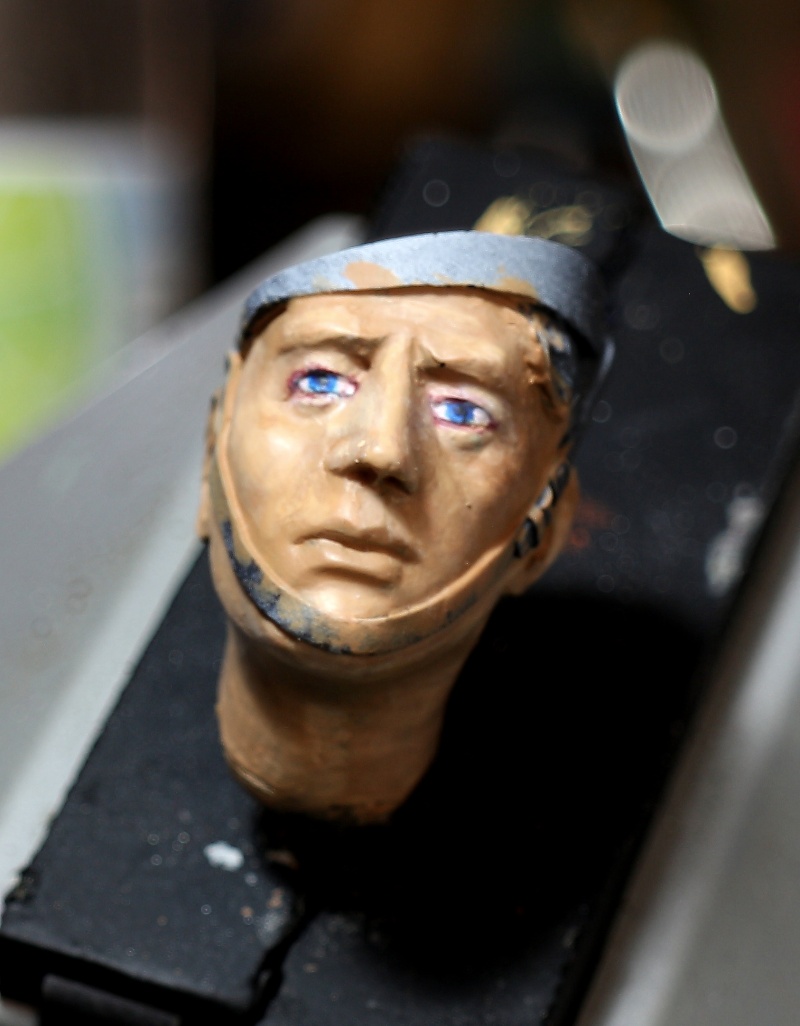
The black of the pupil has now been touched in with MA black and a small white 'highlight placed with MA white.
A little more work in the corners and some tidying up of the eyelids and under the eyes and we won't be miles away. Any body got any suggestions or questions please come in.

GaryDainton- Advanced Member

- Posts : 4433
Join date : 2014-03-06
Age : 56
Location : Bolton UK
Re: 200mm WWI British infantry.
![]() by GaryDainton Thu 18 Jun 2015, 6:07 pm
by GaryDainton Thu 18 Jun 2015, 6:07 pm
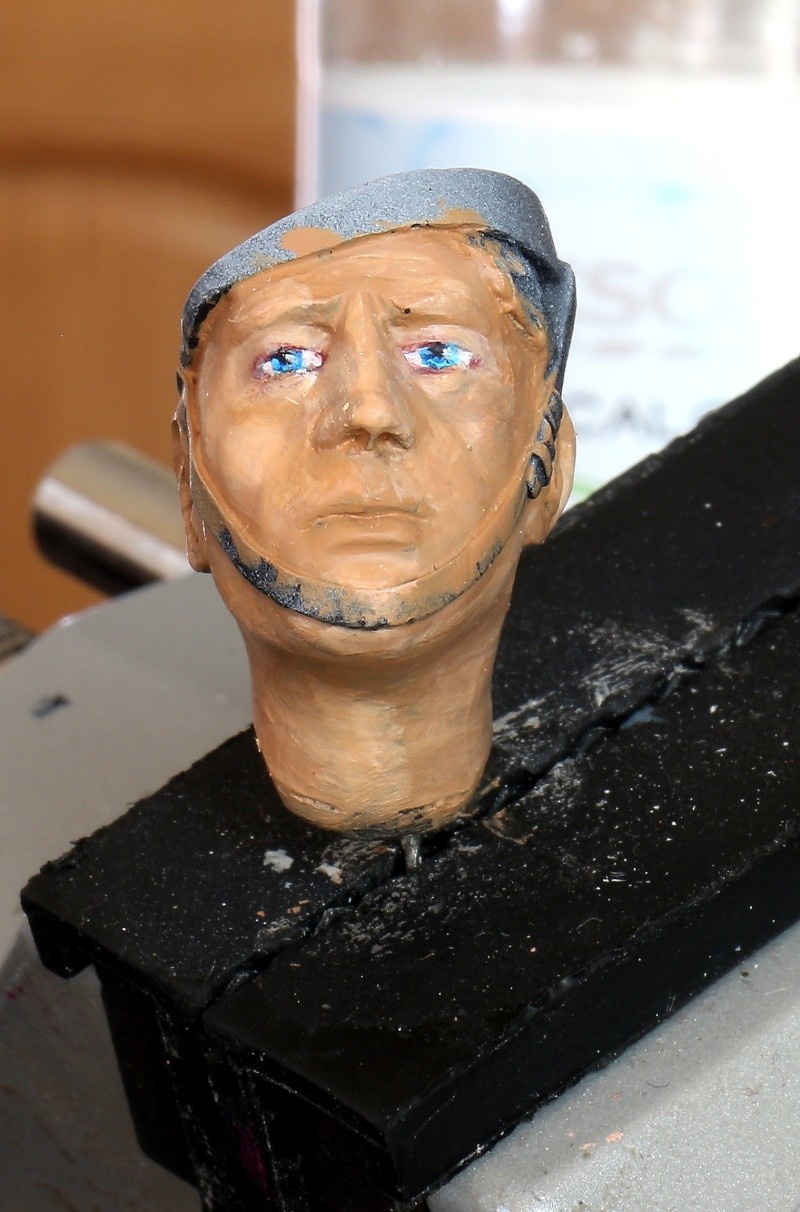
Then the second highlights with 50/50 mix of MC basic skintone and MC light flesh placed in the centre of the first highlight layer.

GaryDainton- Advanced Member
- Posts : 4433
Join date : 2014-03-06
Age : 56
Location : Bolton UK
Re: 200mm WWI British infantry.
![]() by GaryDainton Thu 18 Jun 2015, 7:05 pm
by GaryDainton Thu 18 Jun 2015, 7:05 pm
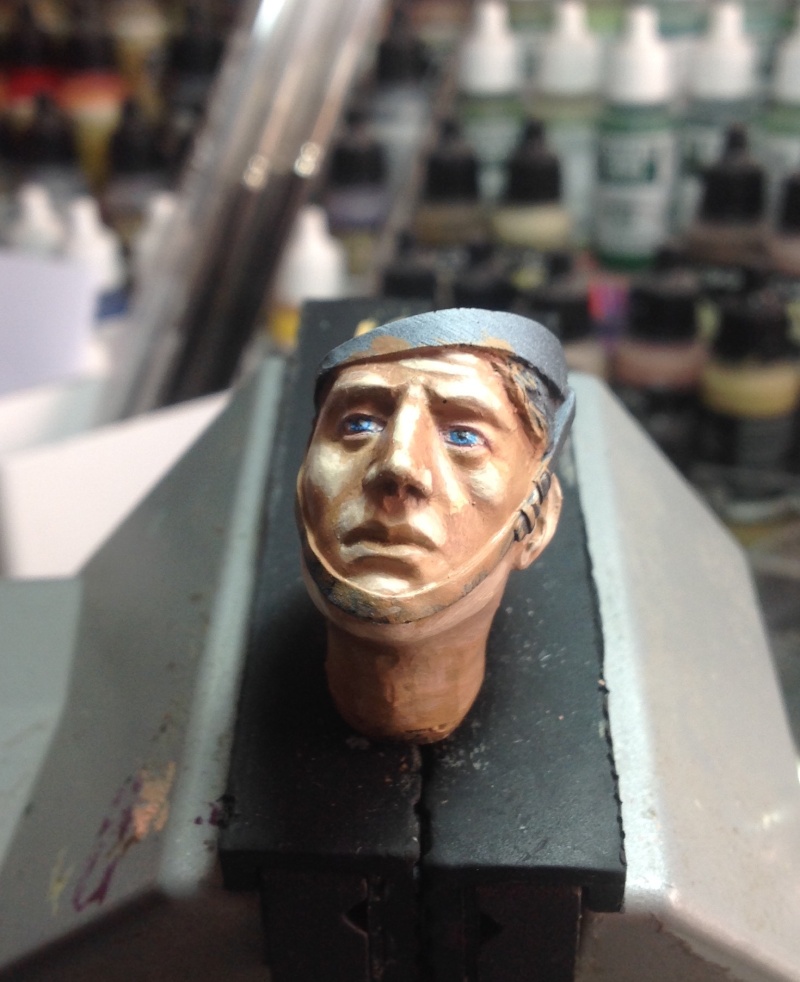
Second shadows over the first leaving an outline of the first shadow. MC burnt red with a touch of MC brown sand. Don't worry about the lack of blending and sketchy effect, well take care of that later with the final glazes and transparencies.

GaryDainton- Advanced Member
- Posts : 4433
Join date : 2014-03-06
Age : 56
Location : Bolton UK
Re: 200mm WWI British infantry.
![]() by Skid Thu 18 Jun 2015, 7:17 pm
by Skid Thu 18 Jun 2015, 7:17 pm

Last edited by Skid on Thu 18 Jun 2015, 7:45 pm; edited 1 time in total
_________________
Al.
Constructive criticism is always welcome.
“Success always demands a greater effort.” Winston Churchill
"Success is failure turned inside out" Unknown

Skid- Admin
- Posts : 7128
Join date : 2013-02-15
Age : 75
Location : Newcastle. Good Old Blighty. -

GaryDainton- Advanced Member
- Posts : 4433
Join date : 2014-03-06
Age : 56
Location : Bolton UK
Re: 200mm WWI British infantry.
![]() by GaryDainton Thu 18 Jun 2015, 7:25 pm
by GaryDainton Thu 18 Jun 2015, 7:25 pm
GaryDainton- Advanced Member
- Posts : 4433
Join date : 2014-03-06
Age : 56
Location : Bolton UK
Re: 200mm WWI British infantry.
![]() by Johnag Fri 19 Jun 2015, 12:05 am
by Johnag Fri 19 Jun 2015, 12:05 am
Andy...

_________________
Andy...
Life isn't about how to survive the storm, but how to dance in the rain...

Johnag- Moderator

- Posts : 1576
Join date : 2013-10-12
Age : 58
Location : North Wales, U.K... -
Re: 200mm WWI British infantry.
![]() by GaryDainton Fri 19 Jun 2015, 2:09 pm
by GaryDainton Fri 19 Jun 2015, 2:09 pm
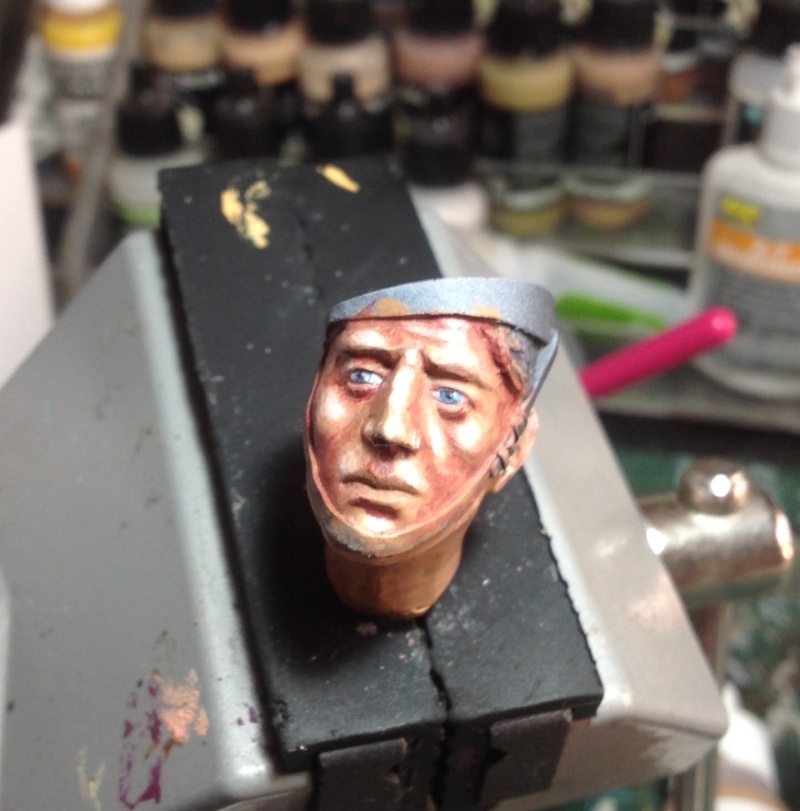
Note to self: Allow shade layers to dry before applying further coats!!!!!!, woke up to this today.

Im begining taking shade back by applying thin layers of intermediate shades and highlights which will hopefully take me back to a basic flesh appearance. I will use all our colours and mix them to give me many shades between each main colour and this is my palette.


This is where I've got him back to, Ill now have to re apply the highlights and shades as we did before.

Last edited by GaryDainton on Sat 20 Jun 2015, 10:16 am; edited 1 time in total
GaryDainton- Advanced Member
- Posts : 4433
Join date : 2014-03-06
Age : 56
Location : Bolton UK
Re: 200mm WWI British infantry.
![]() by Skid Fri 19 Jun 2015, 3:42 pm
by Skid Fri 19 Jun 2015, 3:42 pm
 Gary!!!
_________________
Al.
Constructive criticism is always welcome.
“Success always demands a greater effort.” Winston Churchill
"Success is failure turned inside out" Unknown
Skid- Admin
- Posts : 7128
Join date : 2013-02-15
Age : 75
Location : Newcastle. Good Old Blighty. -
Re: 200mm WWI British infantry.
![]() by GaryDainton Fri 19 Jun 2015, 3:51 pm
by GaryDainton Fri 19 Jun 2015, 3:51 pm
 LOL
LOL
GaryDainton- Advanced Member
- Posts : 4433
Join date : 2014-03-06
Age : 56
Location : Bolton UK
Re: 200mm WWI British infantry.
![]() by Guest Fri 19 Jun 2015, 5:23 pm
by Guest Fri 19 Jun 2015, 5:23 pm
Guest- Guest
Re: 200mm WWI British infantry.
![]() by GaryDainton Fri 19 Jun 2015, 6:22 pm
by GaryDainton Fri 19 Jun 2015, 6:22 pm
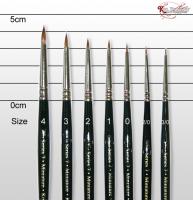
So far Ive only used the 00 and 0, which is usual on the head. I won't use the larger brushes until we've started the body etc.
Ive got him back to more or less where he was before my red shadow catastrophy so next Ill be building up highlights and shadows again.

Last edited by GaryDainton on Sat 20 Jun 2015, 10:17 am; edited 1 time in total
GaryDainton- Advanced Member
- Posts : 4433
Join date : 2014-03-06
Age : 56
Location : Bolton UK
Re: 200mm WWI British infantry.
![]() by Dave from Pleasanton Fri 19 Jun 2015, 11:37 pm
by Dave from Pleasanton Fri 19 Jun 2015, 11:37 pm

Dave from Pleasanton- New Member

- Posts : 237
Join date : 2014-07-20
Re: 200mm WWI British infantry.
![]() by GaryDainton Sat 20 Jun 2015, 9:55 am
by GaryDainton Sat 20 Jun 2015, 9:55 am
http://www.how-to-paint-miniatures.com/miniature_advanced_painting_blending.html
I produce a transparent or glaze (or try to LOL) using mediums which whilst not over thinning the paint consistency cause it to be less opaque and allow the layers and colours beneath to show through which helps to blend the layers. Matt medium has a similar effect whilst not surprisingly drying very matt, and I also have retarding medium which prevents the paint from drying quickly and allows blending to be done 'wet on wet', like an oil paint technique where rather than using many slightly lighter colours of paint next to each other to produce a blending effect, the paint layers are 'smudged' into each other.


I found this short video to be quite helpful. Hope you keep dropping in Dave, and thanks for the interest.

https://www.youtube.com/watch?v=VH6K297EWnI
GaryDainton- Advanced Member
- Posts : 4433
Join date : 2014-03-06
Age : 56
Location : Bolton UK
Re: 200mm WWI British infantry.
![]() by A5h Sun 21 Jun 2015, 12:02 am
by A5h Sun 21 Jun 2015, 12:02 am
Sorry that Im not around to comment as much as I used to, I only get on once a week now, keep it up chap, will be back next week!!!
Last edited by A5h on Sun 21 Jun 2015, 1:36 pm; edited 1 time in total

A5h- Resident member
- Posts : 1529
Join date : 2014-08-11
Age : 44
Location : Sheffield UK
Re: 200mm WWI British infantry.
![]() by GaryDainton Sun 21 Jun 2015, 9:12 am
by GaryDainton Sun 21 Jun 2015, 9:12 am
GaryDainton- Advanced Member
- Posts : 4433
Join date : 2014-03-06
Age : 56
Location : Bolton UK
Re: 200mm WWI British infantry.
![]() by GaryDainton Sun 21 Jun 2015, 1:13 pm
by GaryDainton Sun 21 Jun 2015, 1:13 pm
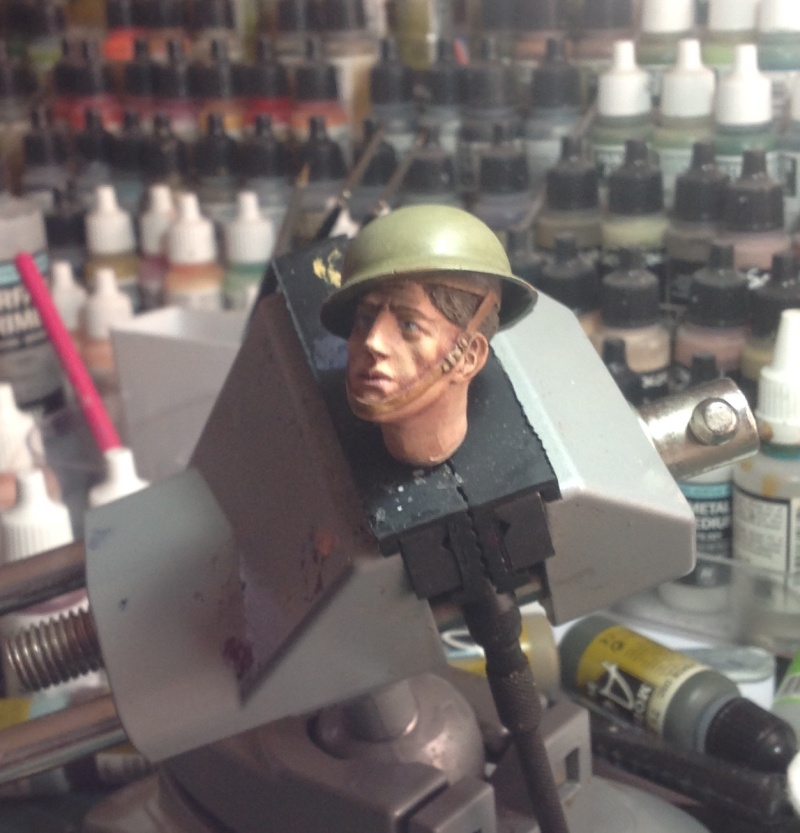
All colours are mixed with glaze medium at one drop of medium to three drops of paint (roughly) to create transparent layers, and by painting between the tones with varying depths of colour we can start to 'smooth' him out a little. (hopefully LOL). Also it is worth bearing in mind that our 'eye' doesn't see the figure like the camera does and from a more 'normal' viewing distance the paint looks considerably smoother than it does in the photographs. I liken this to looking at a painting, if you put your face right up to it you see splodges of colour and as you move away the painting comes to life. I always find my figures are best viewed from a distance of a couple of miles LOL.

Some stages of blending below.


I'm going to put the chin strap in now and shade unto that as I find this can affect the flesh, which may need a little more work when the leather strap and helmet go on.
GaryDainton- Advanced Member
- Posts : 4433
Join date : 2014-03-06
Age : 56
Location : Bolton UK
Re: 200mm WWI British infantry.
![]() by Guest Sun 21 Jun 2015, 1:26 pm
by Guest Sun 21 Jun 2015, 1:26 pm
I was always told / taught ( found it easier) to paint the raised areas first as its easier to "cut" into the edge of a raised surface than paint down onto an already painted surface (i.e the edges next to the flesh)
just a question, no criticism ... just wondering why :)
p.s. top job so far, might have to get a larger figure to try and get a decent look ... then again i'd probably just end up with a 200mm coco the clown instead of a 1/35th lol.
Guest- Guest
Re: 200mm WWI British infantry.
![]() by GaryDainton Sun 21 Jun 2015, 1:43 pm
by GaryDainton Sun 21 Jun 2015, 1:43 pm
Thanks for looking in and your interest.
G
GaryDainton- Advanced Member
- Posts : 4433
Join date : 2014-03-06
Age : 56
Location : Bolton UK
Re: 200mm WWI British infantry.
![]() by GaryDainton Mon 22 Jun 2015, 2:44 pm
by GaryDainton Mon 22 Jun 2015, 2:44 pm


GaryDainton- Advanced Member
- Posts : 4433
Join date : 2014-03-06
Age : 56
Location : Bolton UK
Re: 200mm WWI British infantry.
![]() by Johnag Mon 22 Jun 2015, 8:38 pm
by Johnag Mon 22 Jun 2015, 8:38 pm
Andy...
_________________
Andy...
Life isn't about how to survive the storm, but how to dance in the rain...
Johnag- Moderator
- Posts : 1576
Join date : 2013-10-12
Age : 58
Location : North Wales, U.K... -
GaryDainton- Advanced Member
- Posts : 4433
Join date : 2014-03-06
Age : 56
Location : Bolton UK
Re: 200mm WWI British infantry.
![]() by GaryDainton Thu 25 Jun 2015, 4:53 pm
by GaryDainton Thu 25 Jun 2015, 4:53 pm


Last edited by GaryDainton on Thu 25 Jun 2015, 5:48 pm; edited 1 time in total
GaryDainton- Advanced Member
- Posts : 4433
Join date : 2014-03-06
Age : 56
Location : Bolton UK
Page 2 of 7 • 1, 2, 3, 4, 5, 6, 7 ![]()
» Airfix "Infantry Tank MkII Matilda" 1/72
» Airfix "Infantry Tank MkII Matilda" 1/72
» SE5 British WWI Fighter
» Proud to be British..............
|
|
|