
Brush painting worn leather effect.
4 posters

Brush painting worn leather effect.
![]() by KatsZenJammer Fri 13 Sep 2019, 1:44 am
by KatsZenJammer Fri 13 Sep 2019, 1:44 am
So, a year or so ago I achieved a successful leather effect on the saddle of the Steamcycle using AB techniques I cribbed from various sources on the Net. But when it came to stuff like gloves/gauntlets, tool rolls and, well, billfolds, the issue of texture became a focus for me. One thing I decided early on was to tackle this with hand brushes instead of AB. I featured the development of the practice billfold in the Steamcycle Dio thread but decided that if my painting experiment worked I'd do a how to thread and here it is.
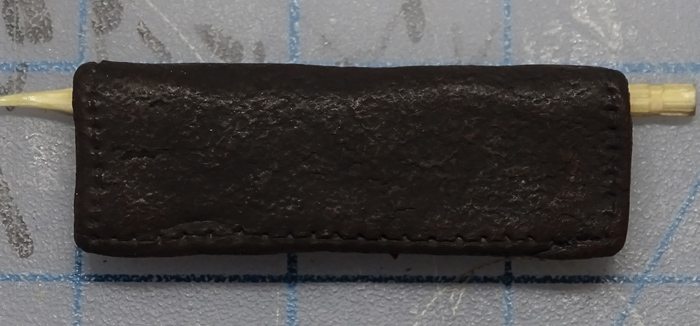
So we start with a photo already featured in the Dio thread - it's very hard to see the texture with the contrast. This is the primer coat shot with an AB using Tamiya acrylic matte black. The armoured blobject is also being experimentally painted, but I digress.
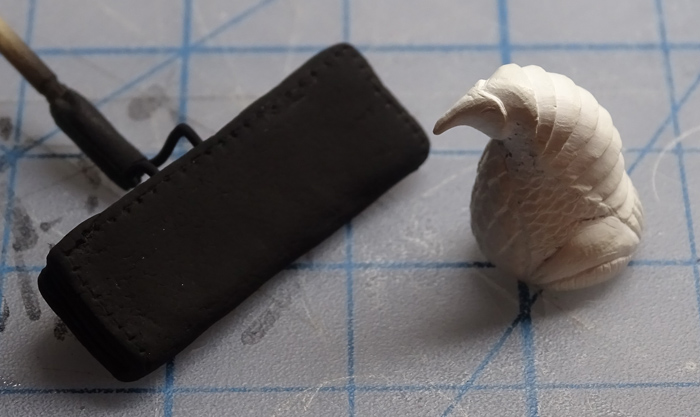
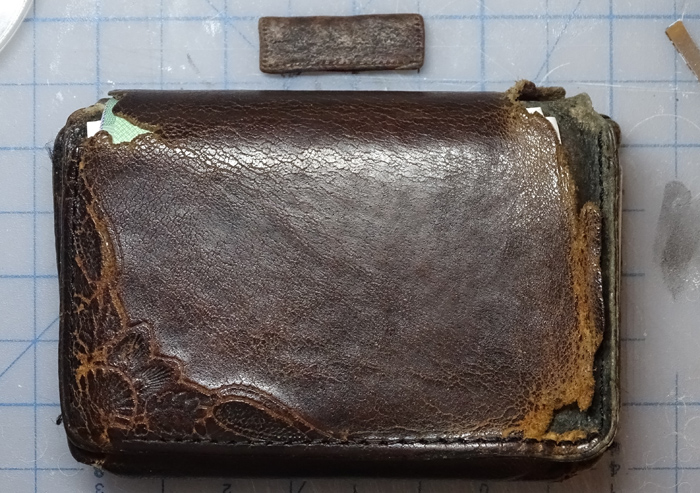
One thing when approaching any sort of paint effect project is to have a target for the appearance - this not only helps with achieving the goal but also can provide some necessary restraint from becoming too creative with colours or saturation. I just so happen to have an over 20 year old deer leather wallet which provided an easy and handy target, this saved me from having to do a lot of Net surfing for images.

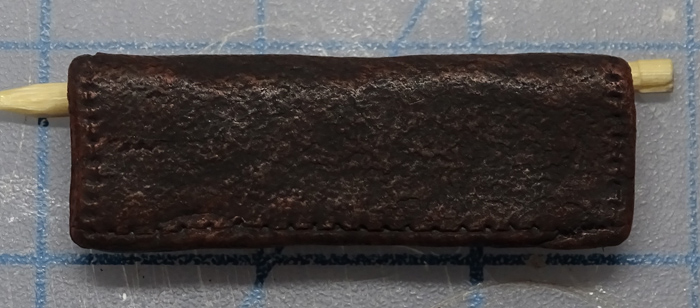
When choosing which paint medium to use I decided to work with enamels instead of acrylics. Experience has shown that laying acrylic on top of acrylic, especially with thinners involved, can cause the base layer to lift. And as I was painting onto Milliput epoxy I figured why take chances. This is after the first colour layer was dry brushed on - Testor's flat rubber which is relatively new to me though it might have been around for a while. This is a very dark colour which looks almost black against a lighter colour but as you can see it takes on a brownish tinge when laid onto black.
The next colour layer used Testors flat rust diluted to an almost wash-ish solution and then dry brushed on repeatedly until I was satisfied with the saturation. The multiple application technique allows for an uneven colour gradient to set up areas of greater wear and tear.
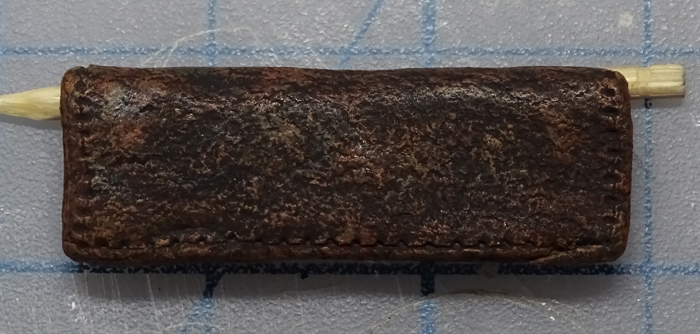
The next colour layer used a Humbrol flat light brown (almost tan but slightly deeper, kind of like mocha - I forgot which colour I used, sorry). This was dry brushed without dilution but the brush was worked until the pigment was almost dry so it went on very lightly. The brushing itself was feather touch passes, this part got a bit boring because it involved a brush pass then set aside for ten minutes until the paint cured a bit to see how light the layer was. This makes the process somewhat tedious but patience can provide some good results.

Next layer was a return to Testors flat rubber to re-darken the sunken portions - again the brush was worked until almost dry and then I stippled the pigment here and there. Note - for this part it's best to not 'fill' the colour zone but rather concentrate on the centre of it and let the brush stippling fade to the edges.

The final colour layer was another Humbrol colour I forgot, call it flat tan, maybe sand. This was diluted about 50/50, kind of a thick wash consistency, brush was worked to almost dry and skimmed over highlights so that the colour itself doesn't show so much as it adds a touch of subtle pop to portions of the wear.
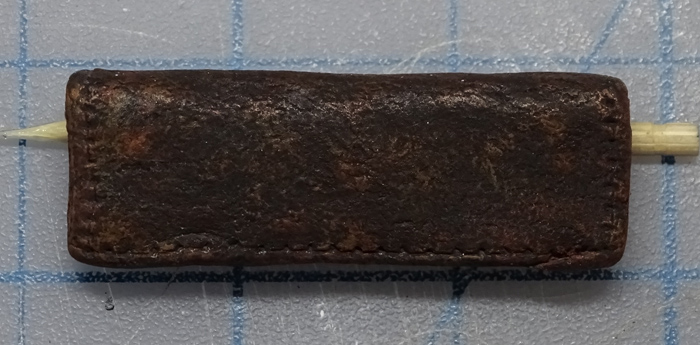
This photo was used as a teaser in the Dio thread with the 'almost done' billfold and the target object. I wasn't trying for an exact match but was pleasantly surprised by how close the experiment came to the target.
And here is the billfold after a couple of coats of clear matte shot with AB. Additional work will involve brushing some semi-gloss clear in spots to simulate the uneven gloss of worn leather.
And that's my experiment with hand brush leather paint effect. I'm happy with the result, so much so that the billfold will be included in the Dio accessories. For other colours of leather the simple formula is to study the leather and determine what's under all the wear as a base coat and then layer colours over it. The texture really adds to the effect so I recommend working in physical texture when possible. For smaller scale items it's possible to use colour to simulate texture with dry brush stippling.
The important things to remember - go slow and light, less is more, it's easier to add more paint later if needed, Let It Dry before continuing and most important, demanding that its Perfect can get in the way of achieving Good.
Hope this is of some help to someone at some time - paying it forward.
So we start with a photo already featured in the Dio thread - it's very hard to see the texture with the contrast. This is the primer coat shot with an AB using Tamiya acrylic matte black. The armoured blobject is also being experimentally painted, but I digress.
One thing when approaching any sort of paint effect project is to have a target for the appearance - this not only helps with achieving the goal but also can provide some necessary restraint from becoming too creative with colours or saturation. I just so happen to have an over 20 year old deer leather wallet which provided an easy and handy target, this saved me from having to do a lot of Net surfing for images.
When choosing which paint medium to use I decided to work with enamels instead of acrylics. Experience has shown that laying acrylic on top of acrylic, especially with thinners involved, can cause the base layer to lift. And as I was painting onto Milliput epoxy I figured why take chances. This is after the first colour layer was dry brushed on - Testor's flat rubber which is relatively new to me though it might have been around for a while. This is a very dark colour which looks almost black against a lighter colour but as you can see it takes on a brownish tinge when laid onto black.
The next colour layer used Testors flat rust diluted to an almost wash-ish solution and then dry brushed on repeatedly until I was satisfied with the saturation. The multiple application technique allows for an uneven colour gradient to set up areas of greater wear and tear.
The next colour layer used a Humbrol flat light brown (almost tan but slightly deeper, kind of like mocha - I forgot which colour I used, sorry). This was dry brushed without dilution but the brush was worked until the pigment was almost dry so it went on very lightly. The brushing itself was feather touch passes, this part got a bit boring because it involved a brush pass then set aside for ten minutes until the paint cured a bit to see how light the layer was. This makes the process somewhat tedious but patience can provide some good results.
Next layer was a return to Testors flat rubber to re-darken the sunken portions - again the brush was worked until almost dry and then I stippled the pigment here and there. Note - for this part it's best to not 'fill' the colour zone but rather concentrate on the centre of it and let the brush stippling fade to the edges.
The final colour layer was another Humbrol colour I forgot, call it flat tan, maybe sand. This was diluted about 50/50, kind of a thick wash consistency, brush was worked to almost dry and skimmed over highlights so that the colour itself doesn't show so much as it adds a touch of subtle pop to portions of the wear.
This photo was used as a teaser in the Dio thread with the 'almost done' billfold and the target object. I wasn't trying for an exact match but was pleasantly surprised by how close the experiment came to the target.
And here is the billfold after a couple of coats of clear matte shot with AB. Additional work will involve brushing some semi-gloss clear in spots to simulate the uneven gloss of worn leather.
And that's my experiment with hand brush leather paint effect. I'm happy with the result, so much so that the billfold will be included in the Dio accessories. For other colours of leather the simple formula is to study the leather and determine what's under all the wear as a base coat and then layer colours over it. The texture really adds to the effect so I recommend working in physical texture when possible. For smaller scale items it's possible to use colour to simulate texture with dry brush stippling.
The important things to remember - go slow and light, less is more, it's easier to add more paint later if needed, Let It Dry before continuing and most important, demanding that its Perfect can get in the way of achieving Good.
Hope this is of some help to someone at some time - paying it forward.

KatsZenJammer- Resident member

- Posts : 2600
Join date : 2016-05-20
Age : 57
Location : Vancouver, BC
A5h likes this post
Re: Brush painting worn leather effect.
![]() by beowulf Fri 13 Sep 2019, 9:12 am
by beowulf Fri 13 Sep 2019, 9:12 am
for an 'experiment' that very impressive!

beowulf- Resident member
- Posts : 2469
Join date : 2013-05-02
Age : 62
Location : Monkey Hanger Town, UK

RetiredMike- Advanced Member
- Posts : 3525
Join date : 2013-04-27
Age : 73
Location : Valparaiso, Indiana

A5h- Resident member
- Posts : 1529
Join date : 2014-08-11
Age : 44
Location : Sheffield UK
» Brush painting small parts
» Simple wood grain effect.
» Using real leather.
» How to simulate 'old leather'
» Race Worn tire (marble build up)
» Simple wood grain effect.
» Using real leather.
» How to simulate 'old leather'
» Race Worn tire (marble build up)
Permissions in this forum:
You cannot reply to topics in this forum|
|
|