
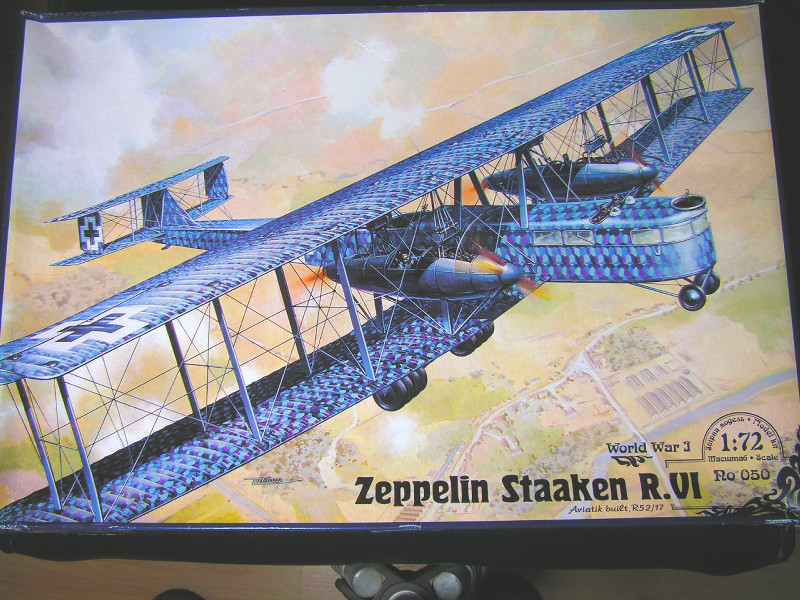
100th Anniversary Build - 1/72 Zeppelin Staaken R.VI
Skid's :: Works In Progress :: Aircraft
Page 1 of 2 • 1, 2 ![]()

100th Anniversary Build - 1/72 Zeppelin Staaken R.VI
![]() by RetiredMike Tue 13 Nov 2018, 1:40 am
by RetiredMike Tue 13 Nov 2018, 1:40 am
One of these:

Four of these:

Two of these:

One of these:

One of these:

One of these:

One of these:

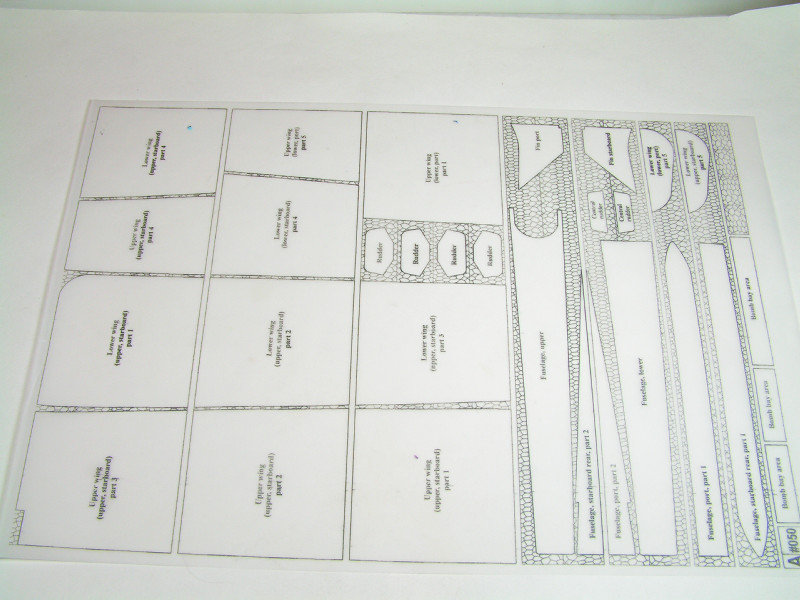
A lot of lozenge decals:

Templates for cutting lozenge decals:
And markings:

Wish me luck,
Mike

RetiredMike- Advanced Member

- Posts : 3525
Join date : 2013-04-27
Age : 73
Location : Valparaiso, Indiana
Re: 100th Anniversary Build - 1/72 Zeppelin Staaken R.VI
![]() by harron68 Tue 13 Nov 2018, 1:48 am
by harron68 Tue 13 Nov 2018, 1:48 am
harron68- Advanced Member
- Posts : 3616
Join date : 2013-02-28
Age : 73
Location : MIDWEST
Re: 100th Anniversary Build - 1/72 Zeppelin Staaken R.VI
![]() by RetiredMike Sat 08 Dec 2018, 12:37 am
by RetiredMike Sat 08 Dec 2018, 12:37 am
Also, if anyone else should attempt this beast, Roden's instruction writers kinda fell asleep at the wheel when they redid the pages from a previous version (different lozenge camo). They say to give the camo areas a brown basecoat to dull the decal color and fill in gaps between decals. But the decals for this version are all blues! A basecoat of dark blue will work much better. It also said to paint the engine pods aluminum. I painted those a dark metallic color before realizing the boxart showed them dark blue. DUH!!
Interior floor finished.

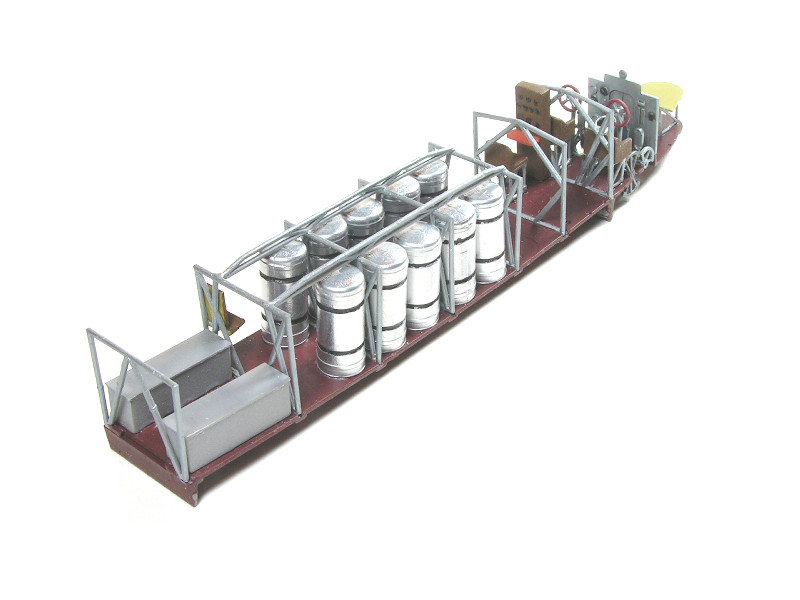
Bomb racks. To be mounted to floor underside.

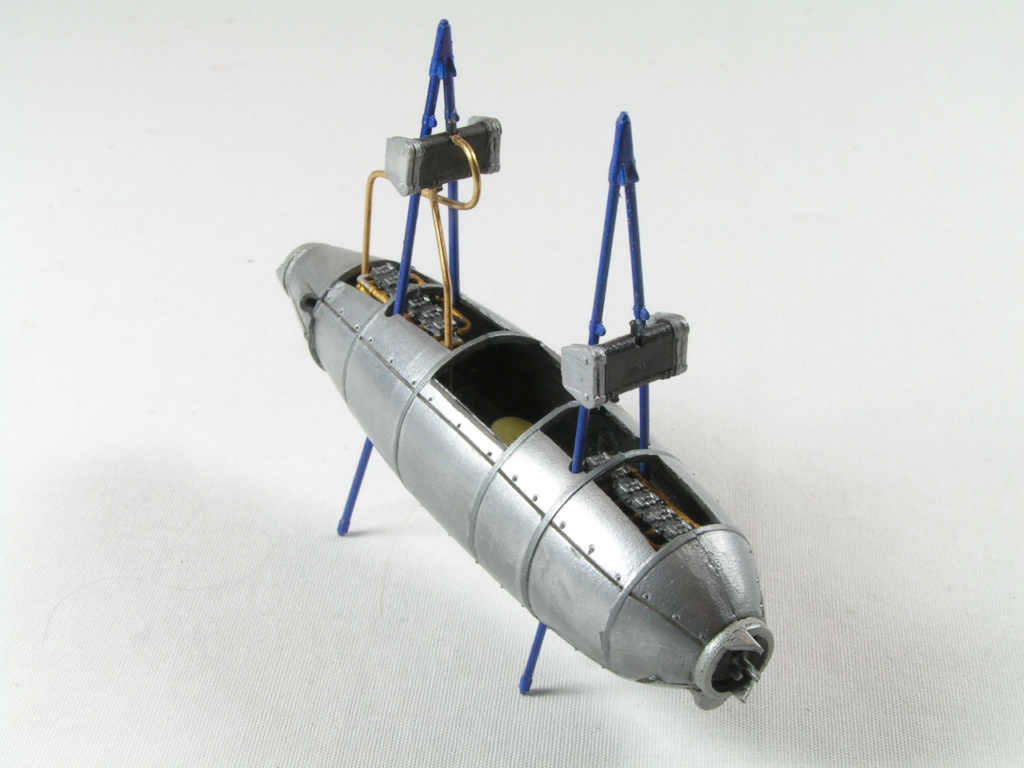
Landing gear:

Engine mountings.

Ground servicing eqpt.

They don't tell you much about decalling this beast, but after gluing on the bomb bay doors I now know it would have been easier to apply the lozenge to them beforehand.
Thanks for looking,
Mike
RetiredMike- Advanced Member
- Posts : 3525
Join date : 2013-04-27
Age : 73
Location : Valparaiso, Indiana
Re: 100th Anniversary Build - 1/72 Zeppelin Staaken R.VI
![]() by harron68 Sat 08 Dec 2018, 2:33 am
by harron68 Sat 08 Dec 2018, 2:33 am
harron68- Advanced Member
- Posts : 3616
Join date : 2013-02-28
Age : 73
Location : MIDWEST
Re: 100th Anniversary Build - 1/72 Zeppelin Staaken R.VI
![]() by beowulf Sat 08 Dec 2018, 9:41 am
by beowulf Sat 08 Dec 2018, 9:41 am
look forward to seeing it go together

beowulf- Resident member
- Posts : 2469
Join date : 2013-05-02
Age : 62
Location : Monkey Hanger Town, UK
Re: 100th Anniversary Build - 1/72 Zeppelin Staaken R.VI
![]() by webby Sun 09 Dec 2018, 12:17 am
by webby Sun 09 Dec 2018, 12:17 am

webby- Moderator

- Posts : 2194
Join date : 2013-02-27
Age : 64
Location : Strathpine Australia. Built over WW2 airstrip
Re: 100th Anniversary Build - 1/72 Zeppelin Staaken R.VI
![]() by GaryDainton Sun 09 Dec 2018, 12:35 pm
by GaryDainton Sun 09 Dec 2018, 12:35 pm

GaryDainton- Advanced Member
- Posts : 4433
Join date : 2014-03-06
Age : 56
Location : Bolton UK
Re: 100th Anniversary Build - 1/72 Zeppelin Staaken R.VI
![]() by KatsZenJammer Sun 09 Dec 2018, 5:55 pm
by KatsZenJammer Sun 09 Dec 2018, 5:55 pm

KatsZenJammer- Resident member
- Posts : 2600
Join date : 2016-05-20
Age : 57
Location : Vancouver, BC
Re: 100th Anniversary Build - 1/72 Zeppelin Staaken R.VI
![]() by RetiredMike Tue 11 Dec 2018, 9:56 pm
by RetiredMike Tue 11 Dec 2018, 9:56 pm
webby wrote:Braver than me! Great job so far, and what's the wing span. Even in 1/72 it's gotta be huge.
Wingspan was 42.2m - less than a meter short of the B29 Superfortress. The kit is comprised of 463 pieces.
This is the top wing next to a 1/72nd Pfalz DIII fighter.

Thanks.
RetiredMike- Advanced Member
- Posts : 3525
Join date : 2013-04-27
Age : 73
Location : Valparaiso, Indiana

GaryDainton- Advanced Member
- Posts : 4433
Join date : 2014-03-06
Age : 56
Location : Bolton UK
Re: 100th Anniversary Build - 1/72 Zeppelin Staaken R.VI
![]() by RetiredMike Wed 19 Dec 2018, 3:30 pm
by RetiredMike Wed 19 Dec 2018, 3:30 pm

Currently working on the engine pods. Roden's engineers seem to think we modellers have more than six hands to accomplish this. LOL
Thanks,
Mike
RetiredMike- Advanced Member
- Posts : 3525
Join date : 2013-04-27
Age : 73
Location : Valparaiso, Indiana
Re: 100th Anniversary Build - 1/72 Zeppelin Staaken R.VI
![]() by GaryDainton Thu 20 Dec 2018, 5:19 am
by GaryDainton Thu 20 Dec 2018, 5:19 am
GaryDainton- Advanced Member
- Posts : 4433
Join date : 2014-03-06
Age : 56
Location : Bolton UK
Re: 100th Anniversary Build - 1/72 Zeppelin Staaken R.VI
![]() by KatsZenJammer Mon 24 Dec 2018, 6:20 pm
by KatsZenJammer Mon 24 Dec 2018, 6:20 pm
KatsZenJammer- Resident member
- Posts : 2600
Join date : 2016-05-20
Age : 57
Location : Vancouver, BC
Re: 100th Anniversary Build - 1/72 Zeppelin Staaken R.VI
![]() by RetiredMike Sat 29 Dec 2018, 3:00 pm
by RetiredMike Sat 29 Dec 2018, 3:00 pm
Got a lot of pieces finished, here.

Getting the engine pods together is a task for folks with only 2 hands. On this one, I had to remove the side wings on the inner engine stand as it wouldn't allow it to set straight inside the assembly. But they're barely visible anyway. I left the color metallic silver. Archival photos show them closer to that than the dark blue suggested in the instructions.
The small cooler piping breaks easily coming off the sprue, so I'm using copper wire.

The exhaust is just a manifold on the engine - no outlet piping, nothing going to the outside of the pod. I feel for the engine tenders that flew the mission inside that pod, monitoring the engines. I wonder how many suffered from Carbon Monoxide poisoning.
Thanks for your comments,
Mike
RetiredMike- Advanced Member
- Posts : 3525
Join date : 2013-04-27
Age : 73
Location : Valparaiso, Indiana
Re: 100th Anniversary Build - 1/72 Zeppelin Staaken R.VI
![]() by KatsZenJammer Mon 07 Jan 2019, 3:20 am
by KatsZenJammer Mon 07 Jan 2019, 3:20 am
KatsZenJammer- Resident member
- Posts : 2600
Join date : 2016-05-20
Age : 57
Location : Vancouver, BC
Re: 100th Anniversary Build - 1/72 Zeppelin Staaken R.VI
![]() by harron68 Mon 07 Jan 2019, 5:25 pm
by harron68 Mon 07 Jan 2019, 5:25 pm
harron68- Advanced Member
- Posts : 3616
Join date : 2013-02-28
Age : 73
Location : MIDWEST
Re: 100th Anniversary Build - 1/72 Zeppelin Staaken R.VI
![]() by RetiredMike Thu 17 Jan 2019, 4:44 pm
by RetiredMike Thu 17 Jan 2019, 4:44 pm
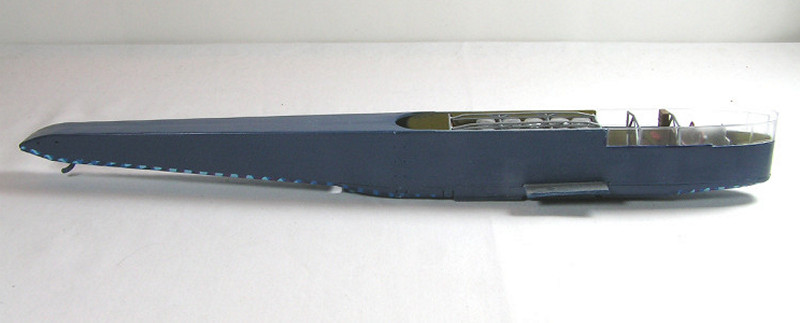
The fuselage sides are attached to the floor/interior. The window sections(3) are glued down, waiting for the roof section.

Lozenge decals applied on the underside.

And it waits for the cabin roof and more lozenge work.
So, while I gave the windows a few days for the glue to dry, I delved into some old projects from the WIP box. This seems to be an annual ritual - look at the WIP's and try to recall why I gave up. LOL
Thanks for looking,
Mike
RetiredMike- Advanced Member
- Posts : 3525
Join date : 2013-04-27
Age : 73
Location : Valparaiso, Indiana
Re: 100th Anniversary Build - 1/72 Zeppelin Staaken R.VI
![]() by GaryDainton Thu 17 Jan 2019, 9:15 pm
by GaryDainton Thu 17 Jan 2019, 9:15 pm
GaryDainton- Advanced Member
- Posts : 4433
Join date : 2014-03-06
Age : 56
Location : Bolton UK
Re: 100th Anniversary Build - 1/72 Zeppelin Staaken R.VI
![]() by RetiredMike Sat 26 Jan 2019, 8:41 pm
by RetiredMike Sat 26 Jan 2019, 8:41 pm
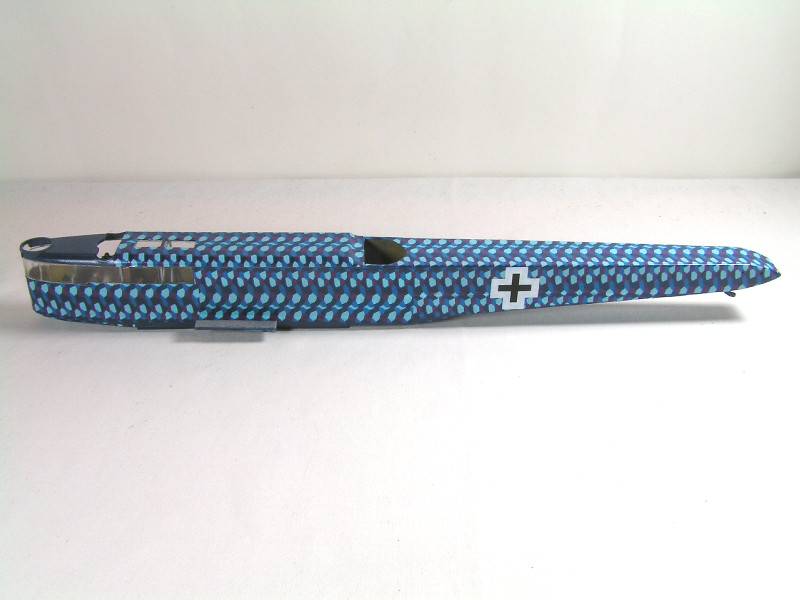

Never put so many decals on one model in my life!
Thanks for looking,
Mike
RetiredMike- Advanced Member
- Posts : 3525
Join date : 2013-04-27
Age : 73
Location : Valparaiso, Indiana
Re: 100th Anniversary Build - 1/72 Zeppelin Staaken R.VI
![]() by GaryDainton Sat 26 Jan 2019, 9:04 pm
by GaryDainton Sat 26 Jan 2019, 9:04 pm
GaryDainton- Advanced Member
- Posts : 4433
Join date : 2014-03-06
Age : 56
Location : Bolton UK
Re: 100th Anniversary Build - 1/72 Zeppelin Staaken R.VI
![]() by KatsZenJammer Mon 28 Jan 2019, 4:55 pm
by KatsZenJammer Mon 28 Jan 2019, 4:55 pm
KatsZenJammer- Resident member
- Posts : 2600
Join date : 2016-05-20
Age : 57
Location : Vancouver, BC
Re: 100th Anniversary Build - 1/72 Zeppelin Staaken R.VI
![]() by RetiredMike Fri 01 Feb 2019, 2:48 pm
by RetiredMike Fri 01 Feb 2019, 2:48 pm
Another unexpected problem I encountered was locating all the attachment holes once everything is covered in decals. A lot of measuring and careful poking got most of them so far.
Here's what the big beast looks like with full wingspan.

Thanks for following along,
Mike
RetiredMike- Advanced Member
- Posts : 3525
Join date : 2013-04-27
Age : 73
Location : Valparaiso, Indiana
Re: 100th Anniversary Build - 1/72 Zeppelin Staaken R.VI
![]() by GaryDainton Fri 01 Feb 2019, 3:39 pm
by GaryDainton Fri 01 Feb 2019, 3:39 pm
GaryDainton- Advanced Member
- Posts : 4433
Join date : 2014-03-06
Age : 56
Location : Bolton UK
Re: 100th Anniversary Build - 1/72 Zeppelin Staaken R.VI
![]() by KatsZenJammer Sat 02 Feb 2019, 4:37 am
by KatsZenJammer Sat 02 Feb 2019, 4:37 am
KatsZenJammer- Resident member
- Posts : 2600
Join date : 2016-05-20
Age : 57
Location : Vancouver, BC
Re: 100th Anniversary Build - 1/72 Zeppelin Staaken R.VI
![]() by RetiredMike Thu 07 Feb 2019, 11:43 pm
by RetiredMike Thu 07 Feb 2019, 11:43 pm


I will be taking this one slowly from here on, squeezing in a few other builds and WIP box revisits in between.
Mike
RetiredMike- Advanced Member
- Posts : 3525
Join date : 2013-04-27
Age : 73
Location : Valparaiso, Indiana
Page 1 of 2 • 1, 2 ![]()
» 75th Anniversary
» My commisioned build
» Lamborghini Countach 25th Anniversary
» GAZ-AAA Build
Skid's :: Works In Progress :: Aircraft
|
|
|