
Steampunk Harley - Tamiya 1/6 HD FLH Classic 'extreme' kit bash (Very Photo Heavy)
Page 10 of 25 •  1 ... 6 ... 9, 10, 11 ... 17 ... 25
 ![]()
Re: Steampunk Harley - Tamiya 1/6 HD FLH Classic 'extreme' kit bash (Very Photo Heavy)
![]() by Skid Sun 27 Nov 2016, 11:19 am
by Skid Sun 27 Nov 2016, 11:19 am
_________________
Al.
Constructive criticism is always welcome.
“Success always demands a greater effort.” Winston Churchill
"Success is failure turned inside out" Unknown

Skid- Admin
- Posts : 7129
Join date : 2013-02-15
Age : 75
Location : Newcastle. Good Old Blighty. -

Re: Steampunk Harley - Tamiya 1/6 HD FLH Classic 'extreme' kit bash (Very Photo Heavy)
![]() by Guest Sun 27 Nov 2016, 1:28 pm
by Guest Sun 27 Nov 2016, 1:28 pm
I too need notes for the same reason, sometimes late in the day at work I think I could get lost in a corner. I can usually tell when it's around 3, cause that's about the time when "3 o'clock curtis" shows up for work, the confusion and mistakes start to set in. So ya your practice of notes in your post is great and serves us as well as future Kats, lol.
Keep up the extraordinary work.
Guest- Guest
Re: Steampunk Harley - Tamiya 1/6 HD FLH Classic 'extreme' kit bash (Very Photo Heavy)
![]() by KatsZenJammer Mon 05 Dec 2016, 3:30 am
by KatsZenJammer Mon 05 Dec 2016, 3:30 am

A bit of follow through from the last post - I dry fit the rear fender and went through the kit parts while thinking about the boiler/fire box, the condensation recovery tank, the radiator, two pumps and fuel and water tanks. Everything except the battery, brake pedal and gear shift pedal went into a baggie and got doused with Easy Off Fume Free (which is far less toxic to the nostrils and works about the same). The cylinder sections had been painted with Humbrol Metal Cote and they were persistent. Probably another dousing with Easy Off will deal with that. Some half formed thoughts of really Steampunk-ish boilers have been floating around already, lol.
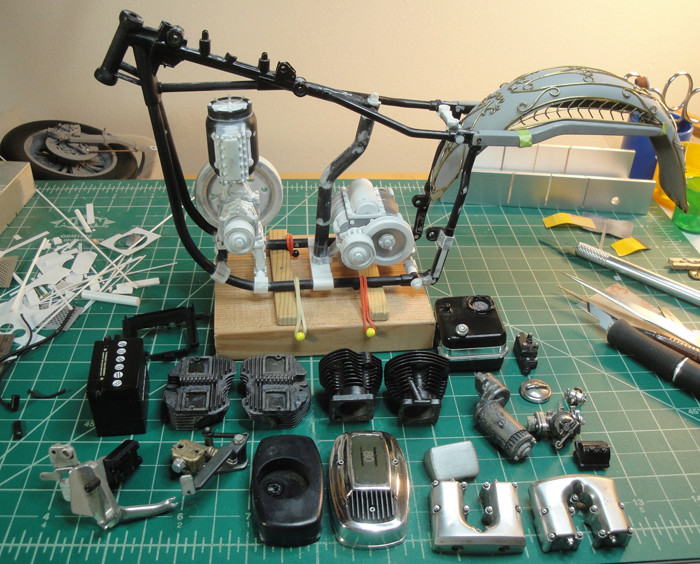
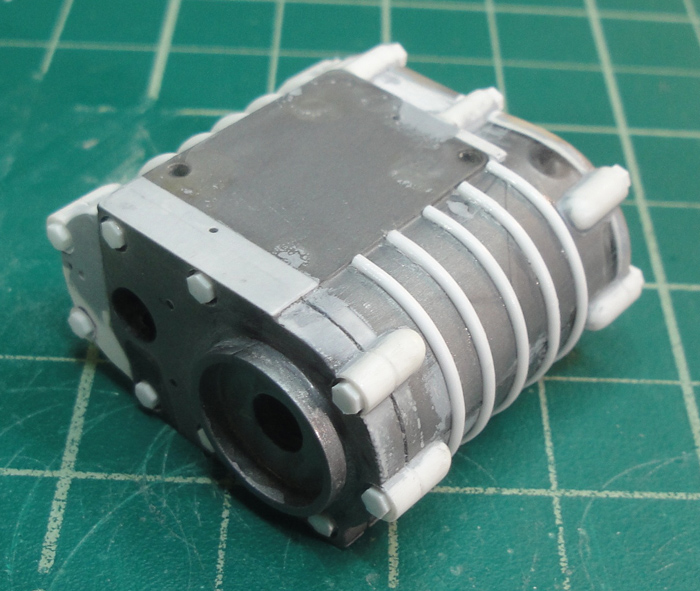
But before I got to that I returned to the now and added some ribbing to the tranny body. 1.0 mm half circle rod is flexible but the body curve was enough that I needed to put a bit of a curve into the individual pieces to help with gluing. Also, I used some old Tamiya thin cement which had thickened and lost potency over time - fresh MEK will cause the rod to snap under its own tension.

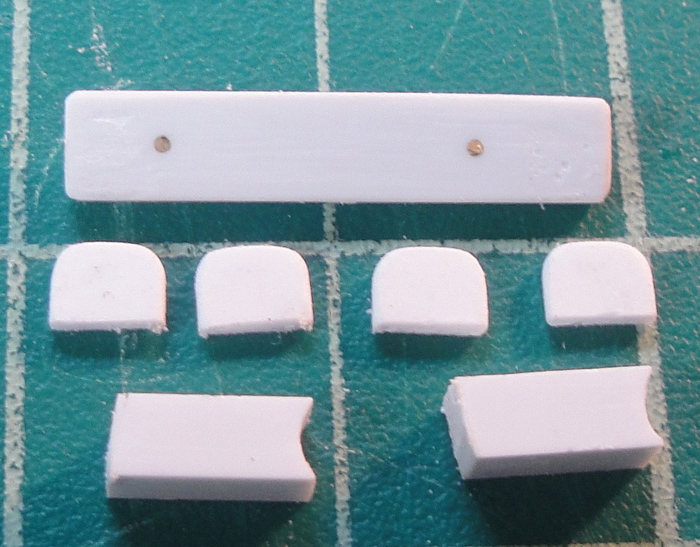
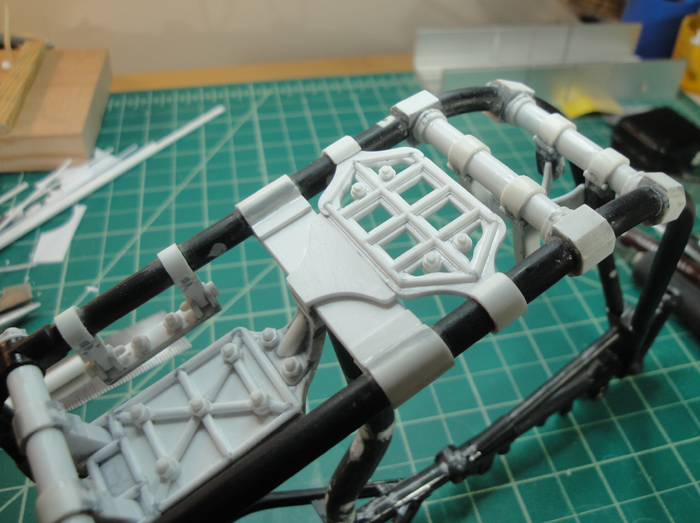
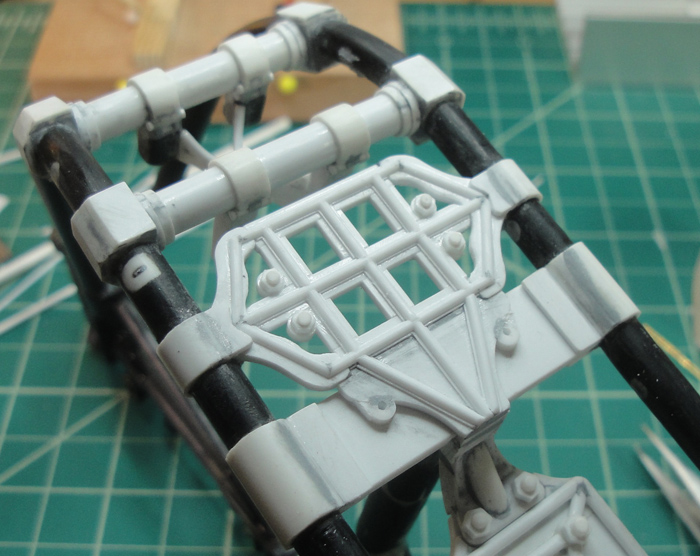
Previously I mentioned a side brace for the transmission so I started work on it and finished the evening by gluing the legs into place. *Insert screeching tires sound* I need to learn not to glue things when I stay up late, lol.

The legs came off easily enough, thankfully. Here are the parts for the side brace as planned.
Shaping and gluing occurs.
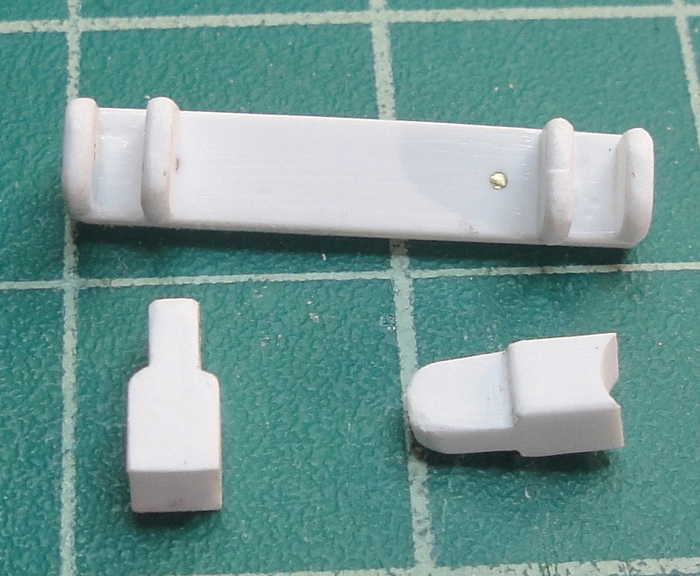
Additional details which mirror the rear of the transmission mount.
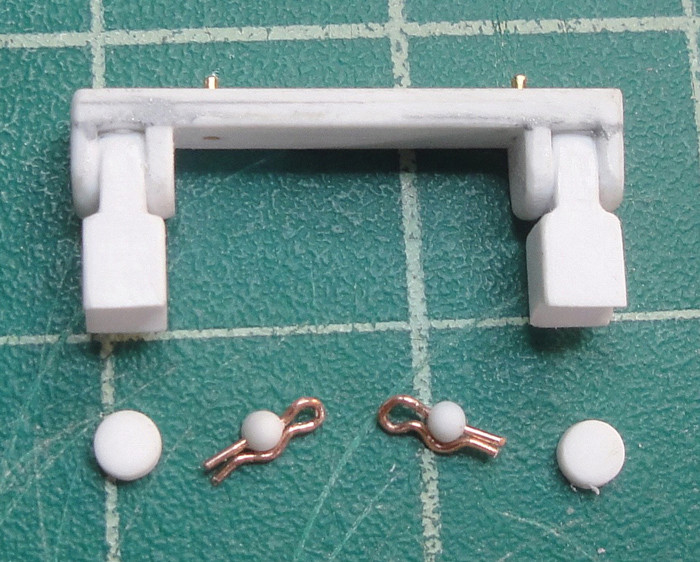
And finally some 'through bolts' with nuts.

Affixing the side brace to the frame. First a tiny bit of MEK to hold them followed by thin CA for strength.
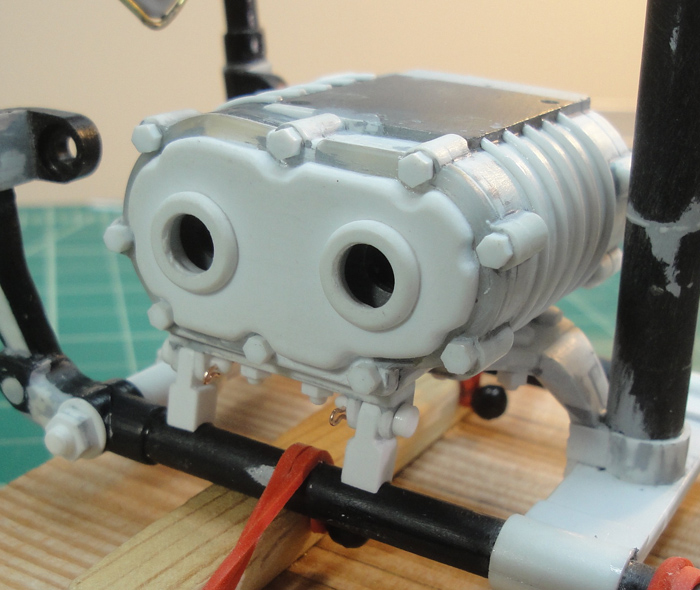
Clamp detail started.
The side brace worked up quickly thanks to the recent work with the main mount, I just re-used the same techniques I'd already figured out. I'm thinking of adding a 'drain reservoir' to the bottom of the transmission which will sit in the gap between the brace and mount. Plus there's the whole shifter mechanism to work out but my recent thoughts of going more 'fantastical' has given me a few weird thoughts about that as well. I am not exactly sure about things but I think I can say with some confidence that there is a serious amount of decorative complexity approaching, lol.
Just keep swimming ...

KatsZenJammer- Resident member

- Posts : 2600
Join date : 2016-05-20
Age : 57
Location : Vancouver, BC
Re: Steampunk Harley - Tamiya 1/6 HD FLH Classic 'extreme' kit bash (Very Photo Heavy)
![]() by GaryDainton Mon 05 Dec 2016, 9:10 am
by GaryDainton Mon 05 Dec 2016, 9:10 am


GaryDainton- Advanced Member
- Posts : 4433
Join date : 2014-03-06
Age : 56
Location : Bolton UK
Re: Steampunk Harley - Tamiya 1/6 HD FLH Classic 'extreme' kit bash (Very Photo Heavy)
![]() by Mr Hirakawa Mon 05 Dec 2016, 10:02 am
by Mr Hirakawa Mon 05 Dec 2016, 10:02 am

Mr Hirakawa- Resident member
- Posts : 1539
Join date : 2015-11-11
Age : 52
Re: Steampunk Harley - Tamiya 1/6 HD FLH Classic 'extreme' kit bash (Very Photo Heavy)
![]() by Geezerman Mon 05 Dec 2016, 11:42 am
by Geezerman Mon 05 Dec 2016, 11:42 am
Man, Just love watching it come together!!!


Geezerman- Advanced Member
- Posts : 3651
Join date : 2013-02-24
Age : 88
Location : Gulf coast of central Florids
Re: Steampunk Harley - Tamiya 1/6 HD FLH Classic 'extreme' kit bash (Very Photo Heavy)
![]() by disabled modeler Mon 05 Dec 2016, 11:51 am
by disabled modeler Mon 05 Dec 2016, 11:51 am
disabled modeler- Intermediate Member

- Posts : 979
Join date : 2016-05-22
Age : 60
Location : Quincy,IL. USA
Re: Steampunk Harley - Tamiya 1/6 HD FLH Classic 'extreme' kit bash (Very Photo Heavy)
![]() by Guest Mon 05 Dec 2016, 3:41 pm
by Guest Mon 05 Dec 2016, 3:41 pm
Guest- Guest
Re: Steampunk Harley - Tamiya 1/6 HD FLH Classic 'extreme' kit bash (Very Photo Heavy)
![]() by Speed Racer 65 Mon 05 Dec 2016, 4:33 pm
by Speed Racer 65 Mon 05 Dec 2016, 4:33 pm
Cannot wait for it to be in paint.

Speed Racer 65- Intermediate Member
- Posts : 865
Join date : 2015-08-06
Location : Louisville KY
Re: Steampunk Harley - Tamiya 1/6 HD FLH Classic 'extreme' kit bash (Very Photo Heavy)
![]() by KatsZenJammer Mon 12 Dec 2016, 4:31 am
by KatsZenJammer Mon 12 Dec 2016, 4:31 am
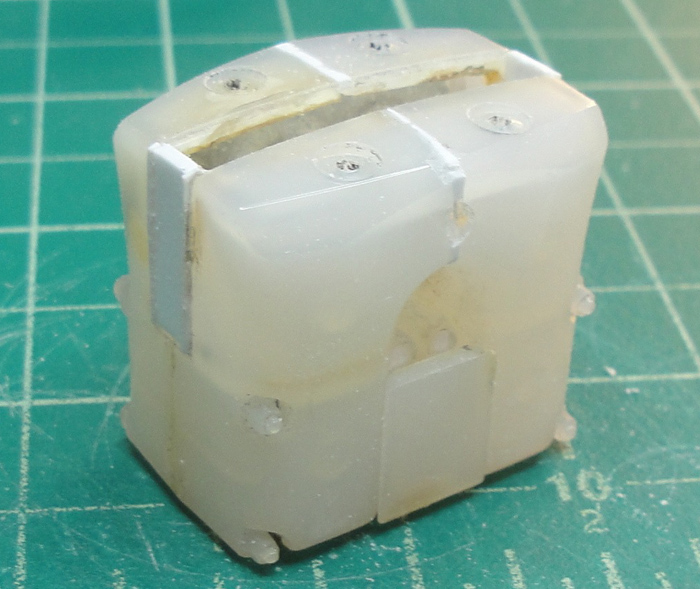
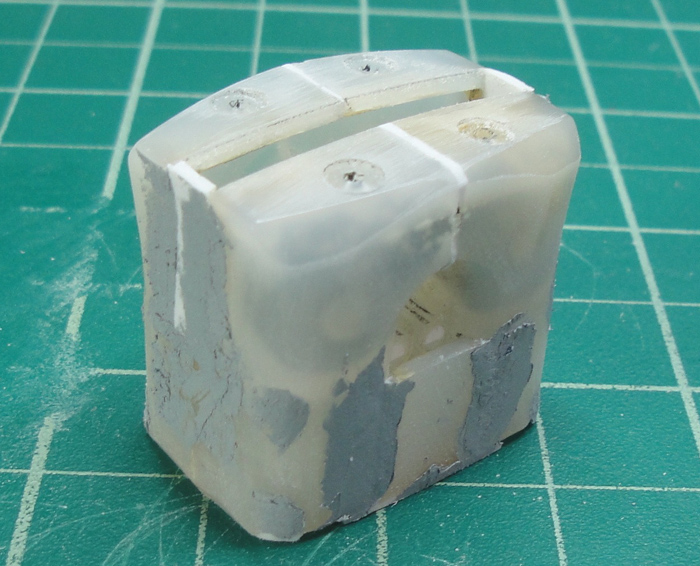
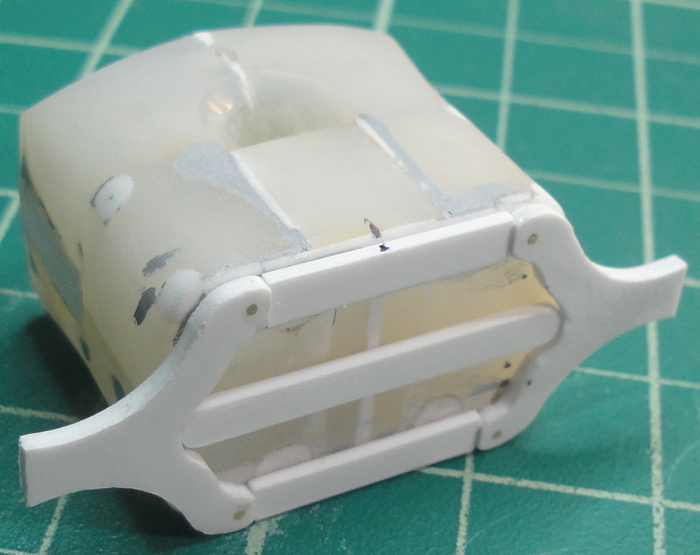
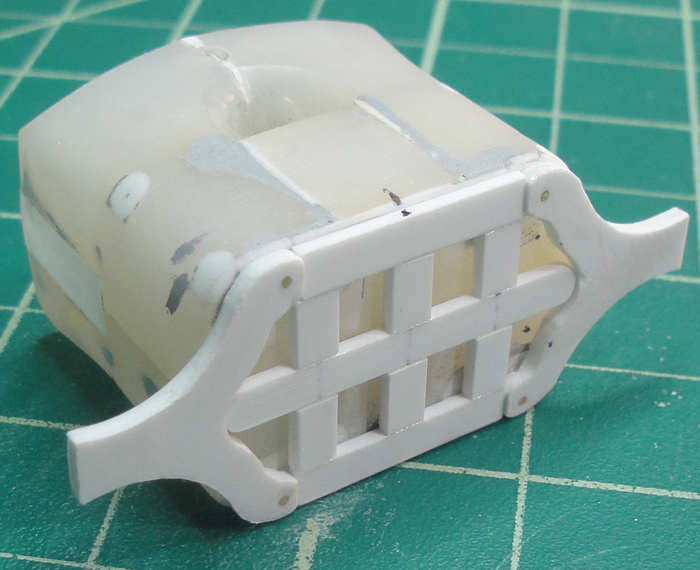
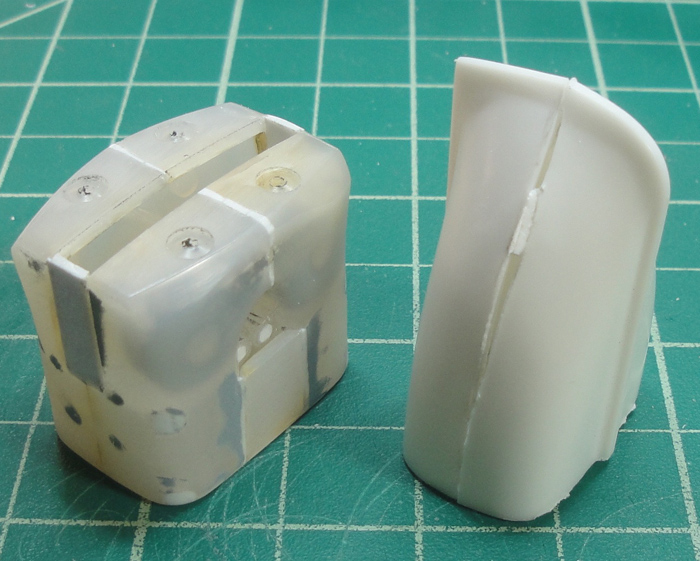
Whilst working on the stuff from the previous post I started thinking about the boiler/firebox and the space available for it. I thought of the cylinder covers and ...

... after de-chroming and some rough chopping to narrow the width I had the beginnings of the boiler unit.

Joining the halves and filling in.
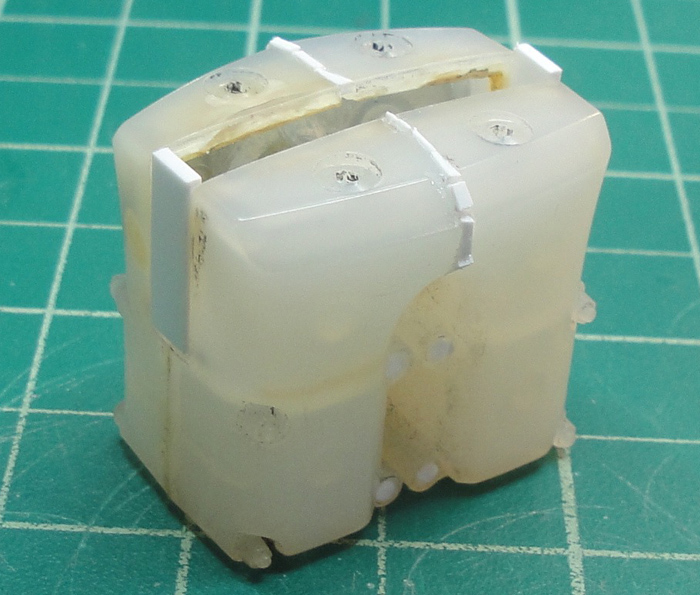
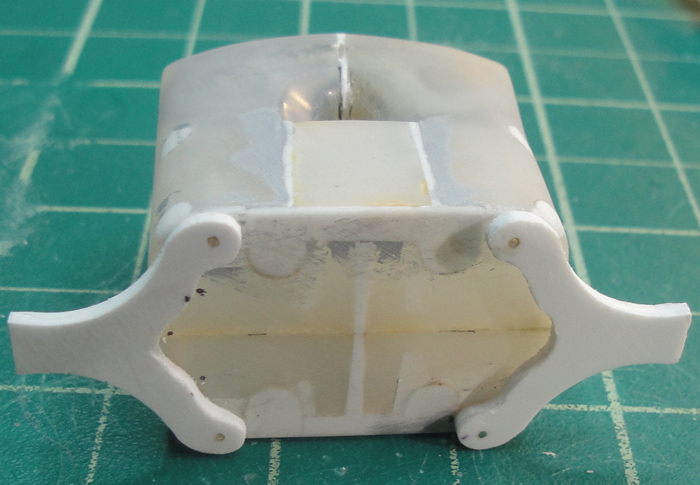
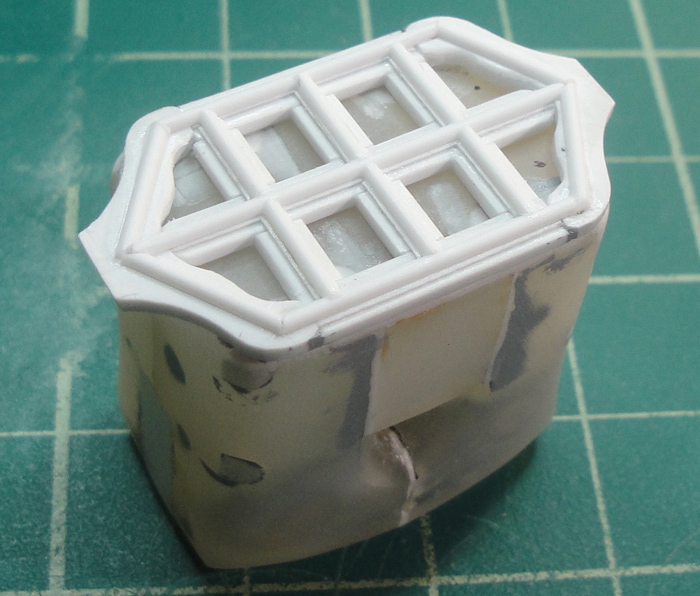
Flipped over to show the filling in of the bottom where the mount points will be located. I also chose to remove moulded nut and bolt details and fill in the divots.
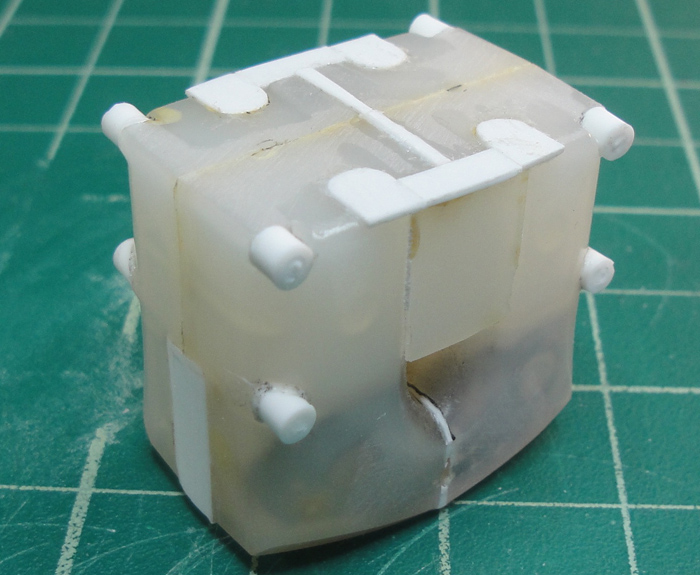
Some initial rough putty fill, still more work to be done yet.
The normally temperate Vancouver has been experiencing 'real' winter and with that has come much distraction, lol. Plus with the dreaded Holiday Season approaching I can sense my hobby time undergoing a serious shrinking, but there should be opportunities, one hopes.
Just keep swimming ...
KatsZenJammer- Resident member
- Posts : 2600
Join date : 2016-05-20
Age : 57
Location : Vancouver, BC
Re: Steampunk Harley - Tamiya 1/6 HD FLH Classic 'extreme' kit bash (Very Photo Heavy)
![]() by GaryDainton Mon 12 Dec 2016, 8:39 am
by GaryDainton Mon 12 Dec 2016, 8:39 am
GaryDainton- Advanced Member
- Posts : 4433
Join date : 2014-03-06
Age : 56
Location : Bolton UK
Re: Steampunk Harley - Tamiya 1/6 HD FLH Classic 'extreme' kit bash (Very Photo Heavy)
![]() by Geezerman Mon 12 Dec 2016, 10:07 am
by Geezerman Mon 12 Dec 2016, 10:07 am

Geezerman- Advanced Member
- Posts : 3651
Join date : 2013-02-24
Age : 88
Location : Gulf coast of central Florids
Re: Steampunk Harley - Tamiya 1/6 HD FLH Classic 'extreme' kit bash (Very Photo Heavy)
![]() by Guest Mon 12 Dec 2016, 2:01 pm
by Guest Mon 12 Dec 2016, 2:01 pm
Guest- Guest
Re: Steampunk Harley - Tamiya 1/6 HD FLH Classic 'extreme' kit bash (Very Photo Heavy)
![]() by Guest Mon 12 Dec 2016, 5:03 pm
by Guest Mon 12 Dec 2016, 5:03 pm

Guest- Guest
Re: Steampunk Harley - Tamiya 1/6 HD FLH Classic 'extreme' kit bash (Very Photo Heavy)
![]() by KatsZenJammer Sat 24 Dec 2016, 4:02 am
by KatsZenJammer Sat 24 Dec 2016, 4:02 am
The anticipated busy-thing was, for me, complicated by unseasonably winter-like weather which Vancouver is never prepared for (what would be a moderate snowfall anywhere else sends this city into chaos, lol). But I did get in some hobby time, so here's a pre-holiday update as the next one might be a few weeks, lol.
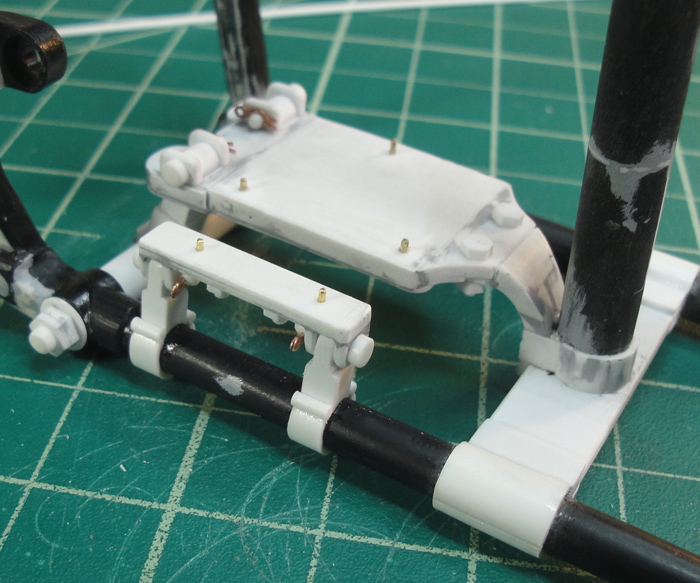
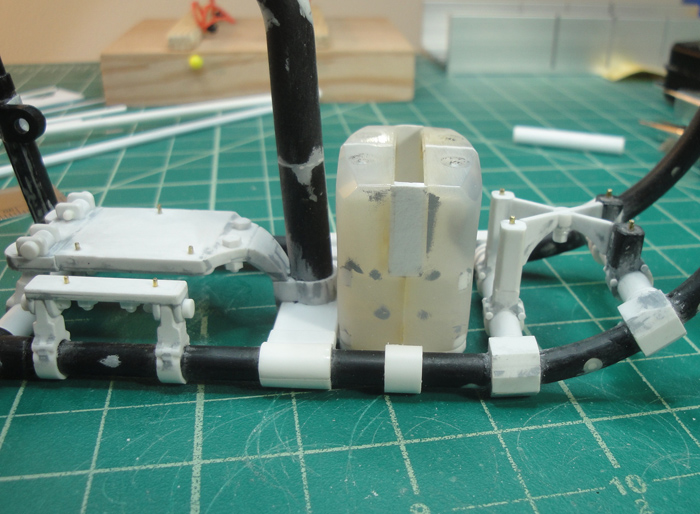
Before I could go further with the boiler/burner I needed to work out mounting it to the frame. This is another example of me having no clue what I wanted to do and letting the part develop itself as it went along. It starts with a pair of wish-bone like brackets and then drilling alignment holes and putting in bits of brass wire, 22 gauge in this case.

Creating the open cell cross frame just sort of happened as I was playing around with scrap bits and cut-off's.
Styrene strips were added as a base for the half-round layer on top.

The nut/bolt mounts and their seats.

Test fit with the additional plate which will be glued to the boiler mount.
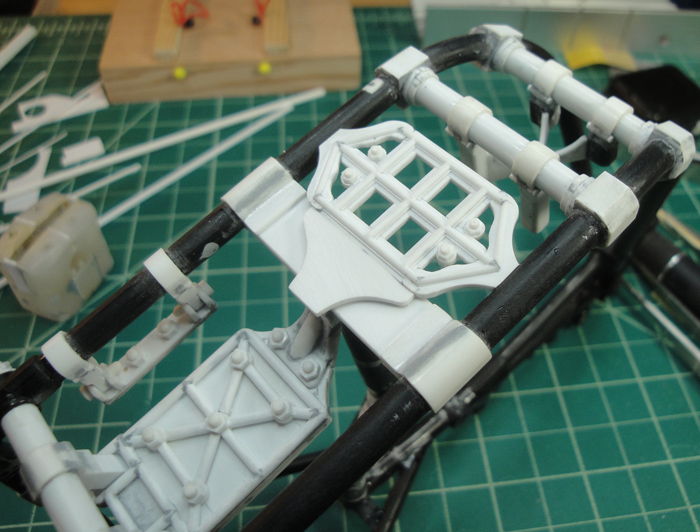
Parts glued and clamp detail begun. There's also going to be additional detailing to the crossmember and anywhere else that looks too empty

After everything was affixed the test to see how it sits. Now I can start kludging up the blank for the boiler, like adding to the height and also the inevitable plumbing.
And with that I will wish everyone a safe, warm, pleasant and food-filled festive fiesta and, of course, a very Merry Christmas and Happy New Year!
KatsZenJammer- Resident member
- Posts : 2600
Join date : 2016-05-20
Age : 57
Location : Vancouver, BC
Re: Steampunk Harley - Tamiya 1/6 HD FLH Classic 'extreme' kit bash (Very Photo Heavy)
![]() by GaryDainton Sat 24 Dec 2016, 9:24 am
by GaryDainton Sat 24 Dec 2016, 9:24 am
GaryDainton- Advanced Member
- Posts : 4433
Join date : 2014-03-06
Age : 56
Location : Bolton UK
Re: Steampunk Harley - Tamiya 1/6 HD FLH Classic 'extreme' kit bash (Very Photo Heavy)
![]() by Skid Sat 24 Dec 2016, 10:05 am
by Skid Sat 24 Dec 2016, 10:05 am
_________________
Al.
Constructive criticism is always welcome.
“Success always demands a greater effort.” Winston Churchill
"Success is failure turned inside out" Unknown
Skid- Admin
- Posts : 7129
Join date : 2013-02-15
Age : 75
Location : Newcastle. Good Old Blighty. -
Re: Steampunk Harley - Tamiya 1/6 HD FLH Classic 'extreme' kit bash (Very Photo Heavy)
![]() by disabled modeler Sat 24 Dec 2016, 12:47 pm
by disabled modeler Sat 24 Dec 2016, 12:47 pm
disabled modeler- Intermediate Member
- Posts : 979
Join date : 2016-05-22
Age : 60
Location : Quincy,IL. USA
Re: Steampunk Harley - Tamiya 1/6 HD FLH Classic 'extreme' kit bash (Very Photo Heavy)
![]() by Geezerman Tue 27 Dec 2016, 11:53 am
by Geezerman Tue 27 Dec 2016, 11:53 am
Geezerman- Advanced Member
- Posts : 3651
Join date : 2013-02-24
Age : 88
Location : Gulf coast of central Florids
Re: Steampunk Harley - Tamiya 1/6 HD FLH Classic 'extreme' kit bash (Very Photo Heavy)
![]() by Speed Racer 65 Tue 27 Dec 2016, 12:53 pm
by Speed Racer 65 Tue 27 Dec 2016, 12:53 pm
Speed Racer 65- Intermediate Member
- Posts : 865
Join date : 2015-08-06
Location : Louisville KY
Re: Steampunk Harley - Tamiya 1/6 HD FLH Classic 'extreme' kit bash (Very Photo Heavy)
![]() by Guest Tue 27 Dec 2016, 2:11 pm
by Guest Tue 27 Dec 2016, 2:11 pm
Guest- Guest
Re: Steampunk Harley - Tamiya 1/6 HD FLH Classic 'extreme' kit bash (Very Photo Heavy)
![]() by KatsZenJammer Mon 02 Jan 2017, 7:08 pm
by KatsZenJammer Mon 02 Jan 2017, 7:08 pm
Well the holiday break was what one would expect, filled with arranging, organizing, logistics and scheduling but thankfully everything worked out and I wound up repeatedly feeling like my stomach was a few sizes too small. My personal 'haul' this year was limited due to the fact that I told everyone not to get me anything gift wise - my personal preference is to spend the money on food and festivities - but there was more than enough convivial good tidings to compensate for the lack of swag, lol.
A bit of work was accomplished though, here's a shot of the underside of the boiler mount with added detailing.
The upper portion of the boiler starts to take shape. I found an old 'aftermarket' generic lifeboat in my 'bits and pieces' box and started chopping and gluing. This is just the beginning of the part but I like the look of the moulded curves and am going to try and work it in to the finished design.
And finally some New Year's Eve display photos. A couple of the invited guests to our NYE 'mellow' get together mentioned that they'd like to see my 'project' as it stands (and one demanded evidence of my mad obsessional tinkering, lol) so it seemed like the thing to do. Plus it gave me an opportunity to stare at the overall progress and re-assess the various ideas percolating in my noggin.
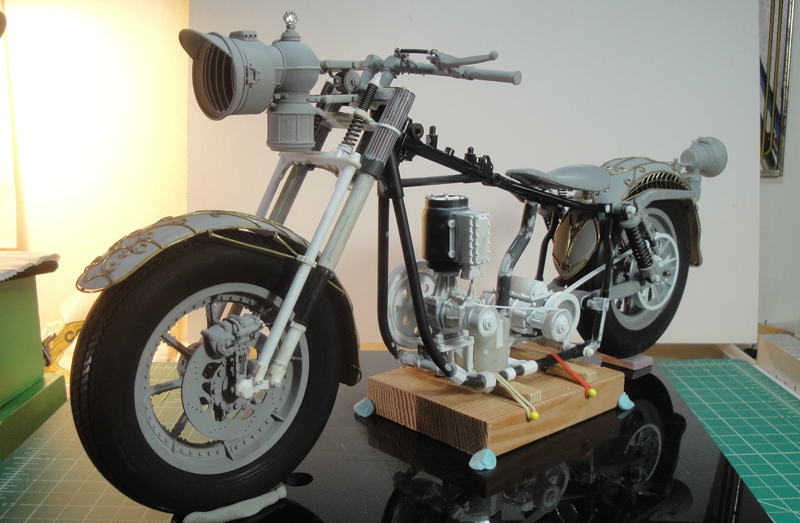
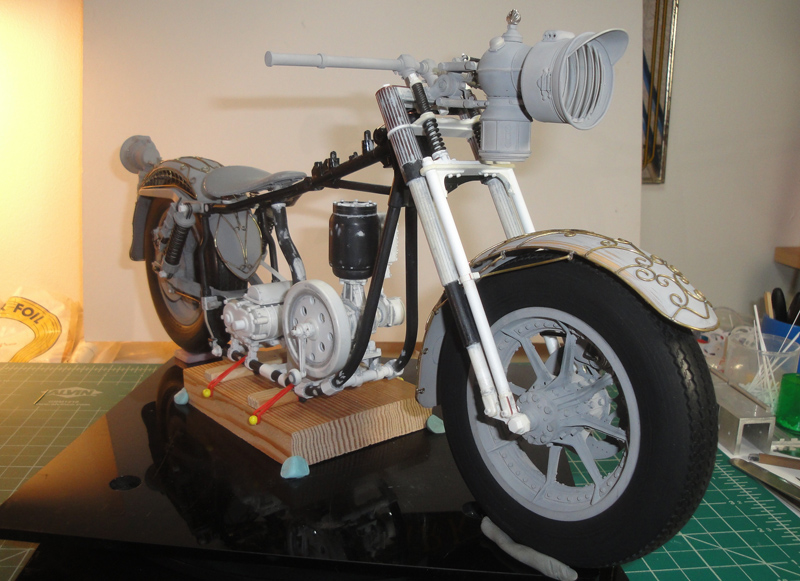
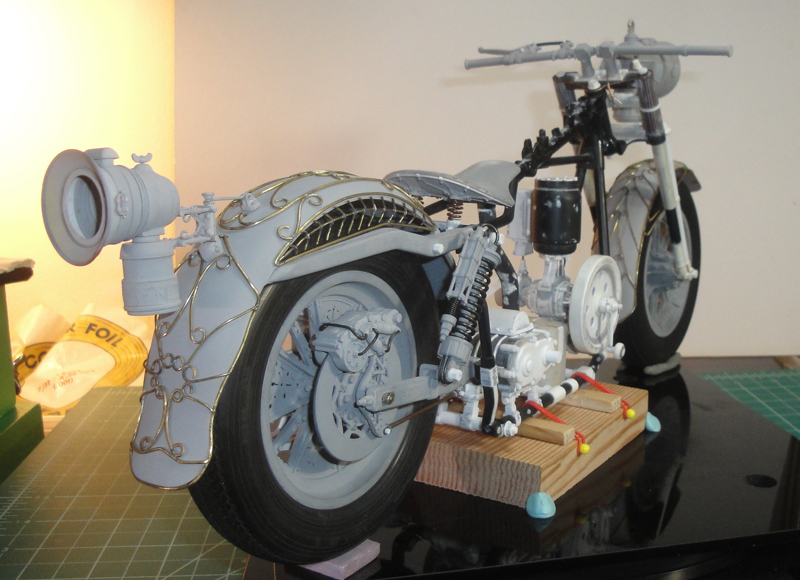
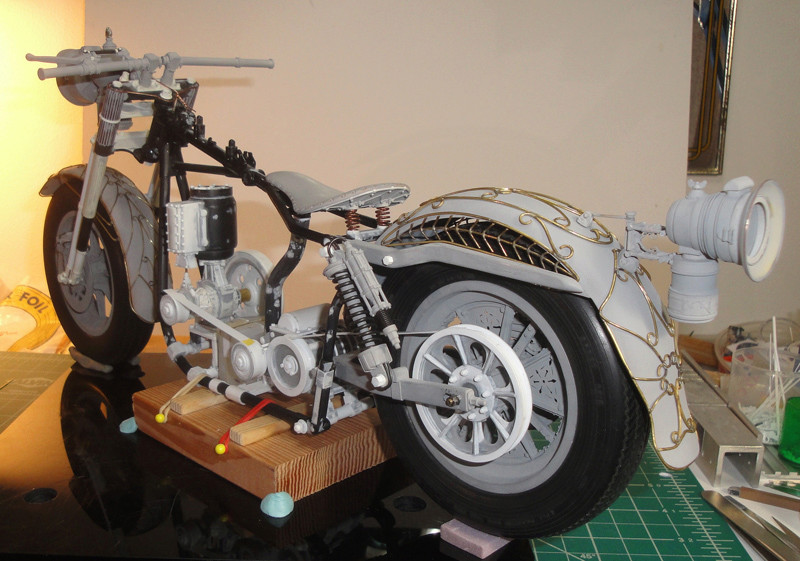
The resulting comments from my guests ranged from ego-boosting compliments to questions about my overall sanity so I consider the display a success, lol. With the return to the day job looming I doubt I will get in much work this week but after posting this I'm going to wander to one of the LHS's to indulge in some personal spending - today is the first day I've had the time to do so given the circumstances and weather.
Otherwise I will end this by wishing everyone a great start to their New Year and may we all suffer from an excess of good times, good energy and good building
KatsZenJammer- Resident member
- Posts : 2600
Join date : 2016-05-20
Age : 57
Location : Vancouver, BC
Re: Steampunk Harley - Tamiya 1/6 HD FLH Classic 'extreme' kit bash (Very Photo Heavy)
![]() by GaryDainton Mon 02 Jan 2017, 7:15 pm
by GaryDainton Mon 02 Jan 2017, 7:15 pm
GaryDainton- Advanced Member
- Posts : 4433
Join date : 2014-03-06
Age : 56
Location : Bolton UK
Re: Steampunk Harley - Tamiya 1/6 HD FLH Classic 'extreme' kit bash (Very Photo Heavy)
![]() by Skid Mon 02 Jan 2017, 10:12 pm
by Skid Mon 02 Jan 2017, 10:12 pm
_________________
Al.
Constructive criticism is always welcome.
“Success always demands a greater effort.” Winston Churchill
"Success is failure turned inside out" Unknown
Skid- Admin
- Posts : 7129
Join date : 2013-02-15
Age : 75
Location : Newcastle. Good Old Blighty. -
Re: Steampunk Harley - Tamiya 1/6 HD FLH Classic 'extreme' kit bash (Very Photo Heavy)
![]() by Geezerman Tue 03 Jan 2017, 11:48 am
by Geezerman Tue 03 Jan 2017, 11:48 am
Geezerman- Advanced Member
- Posts : 3651
Join date : 2013-02-24
Age : 88
Location : Gulf coast of central Florids
Re: Steampunk Harley - Tamiya 1/6 HD FLH Classic 'extreme' kit bash (Very Photo Heavy)
![]() by Sponsored content
by Sponsored content
Sponsored content
Page 10 of 25 • 1 ... 6 ... 9, 10, 11 ... 17 ... 25 ![]()
» Tamiya 1/6 Harley Davidson Fat Boy Lo
» Tamiya 1/6 Harley Davidson FLH1200
» Steampunk Ducati
» '57 Salvage bash-up
|
|
|