
200mm WWI British infantry.
Page 6 of 7 •  1, 2, 3, 4, 5, 6, 7
 ![]()
Re: 200mm WWI British infantry.
![]() by Guest Fri 21 Aug 2015 - 18:26
by Guest Fri 21 Aug 2015 - 18:26

Guest- Guest
Re: 200mm WWI British infantry.
![]() by GaryDainton Fri 21 Aug 2015 - 18:31
by GaryDainton Fri 21 Aug 2015 - 18:31


GaryDainton- Advanced Member

- Posts : 4433
Join date : 2014-03-06
Age : 56
Location : Bolton UK
Re: 200mm WWI British infantry.
![]() by Skid Fri 21 Aug 2015 - 18:40
by Skid Fri 21 Aug 2015 - 18:40
_________________
Al.
Constructive criticism is always welcome.
“Success always demands a greater effort.” Winston Churchill
"Success is failure turned inside out" Unknown

Skid- Admin
- Posts : 7129
Join date : 2013-02-15
Age : 75
Location : Newcastle. Good Old Blighty. -

Re: 200mm WWI British infantry.
![]() by GaryDainton Fri 21 Aug 2015 - 18:43
by GaryDainton Fri 21 Aug 2015 - 18:43
GaryDainton- Advanced Member
- Posts : 4433
Join date : 2014-03-06
Age : 56
Location : Bolton UK
Re: 200mm WWI British infantry.
![]() by GaryDainton Sat 22 Aug 2015 - 17:36
by GaryDainton Sat 22 Aug 2015 - 17:36
GaryDainton- Advanced Member
- Posts : 4433
Join date : 2014-03-06
Age : 56
Location : Bolton UK
Re: 200mm WWI British infantry.
![]() by A5h Sat 22 Aug 2015 - 22:12
by A5h Sat 22 Aug 2015 - 22:12


A5h- Resident member
- Posts : 1549
Join date : 2014-08-11
Age : 44
Location : Sheffield UK
GaryDainton- Advanced Member
- Posts : 4433
Join date : 2014-03-06
Age : 56
Location : Bolton UK
Re: 200mm WWI British infantry.
![]() by Guest Sun 23 Aug 2015 - 18:43
by Guest Sun 23 Aug 2015 - 18:43
Guest- Guest
Re: 200mm WWI British infantry.
![]() by GaryDainton Sun 23 Aug 2015 - 18:51
by GaryDainton Sun 23 Aug 2015 - 18:51
GaryDainton- Advanced Member
- Posts : 4433
Join date : 2014-03-06
Age : 56
Location : Bolton UK
Re: 200mm WWI British infantry.
![]() by GaryDainton Mon 31 Aug 2015 - 15:22
by GaryDainton Mon 31 Aug 2015 - 15:22


GaryDainton- Advanced Member
- Posts : 4433
Join date : 2014-03-06
Age : 56
Location : Bolton UK
Re: 200mm WWI British infantry.
![]() by A5h Mon 31 Aug 2015 - 18:14
by A5h Mon 31 Aug 2015 - 18:14
A5h- Resident member
- Posts : 1549
Join date : 2014-08-11
Age : 44
Location : Sheffield UK
Re: 200mm WWI British infantry.
![]() by Guest Mon 31 Aug 2015 - 18:54
by Guest Mon 31 Aug 2015 - 18:54
Guest- Guest
Re: 200mm WWI British infantry.
![]() by GaryDainton Mon 31 Aug 2015 - 21:35
by GaryDainton Mon 31 Aug 2015 - 21:35
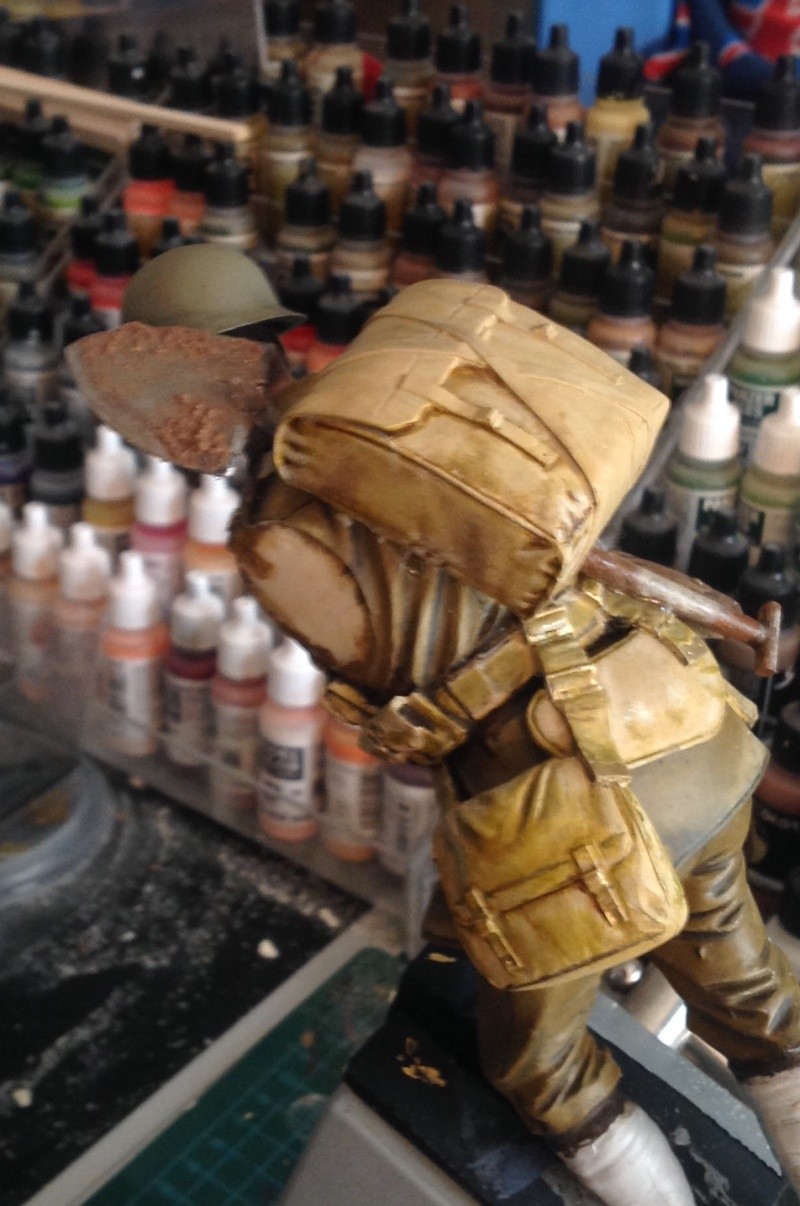
Buck, cheers, Im glad your finding it of interest.
GaryDainton- Advanced Member
- Posts : 4433
Join date : 2014-03-06
Age : 56
Location : Bolton UK
Re: 200mm WWI British infantry.
![]() by GaryDainton Sat 12 Sep 2015 - 14:28
by GaryDainton Sat 12 Sep 2015 - 14:28


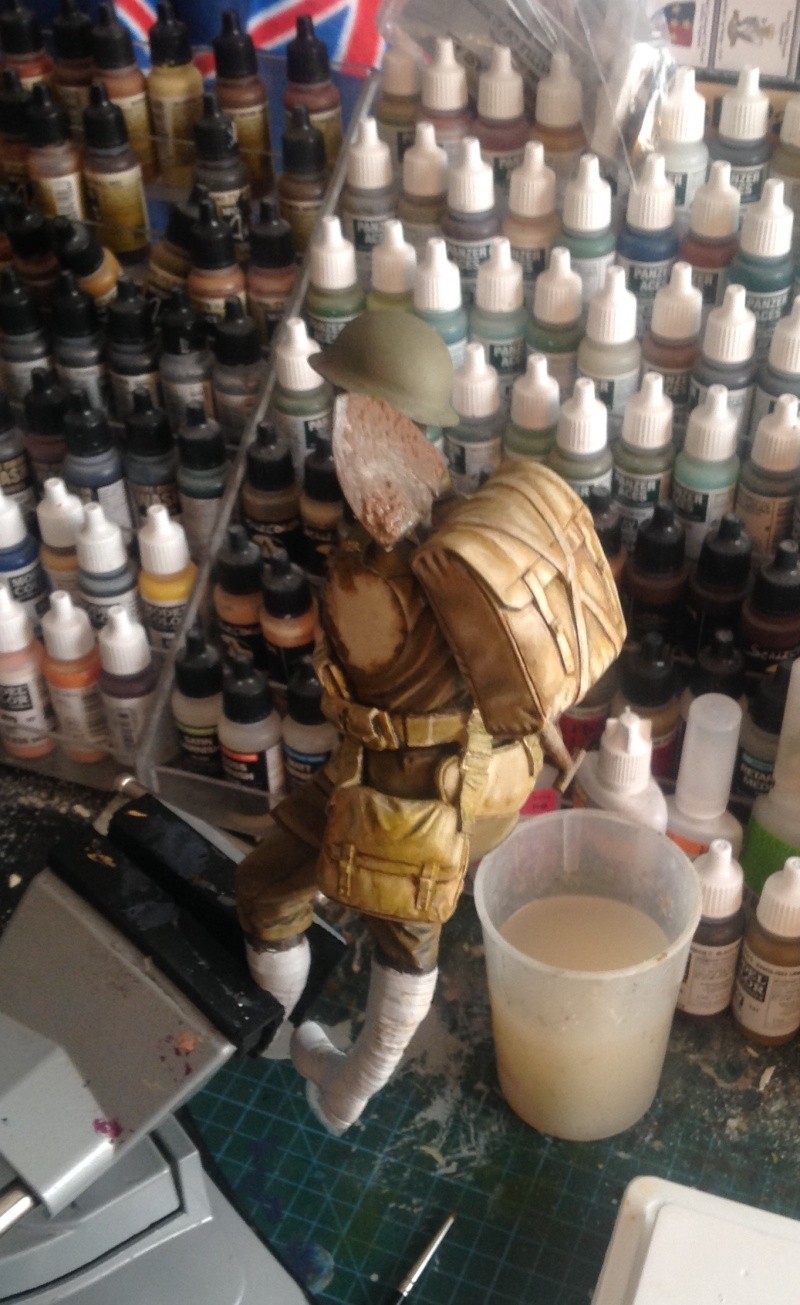
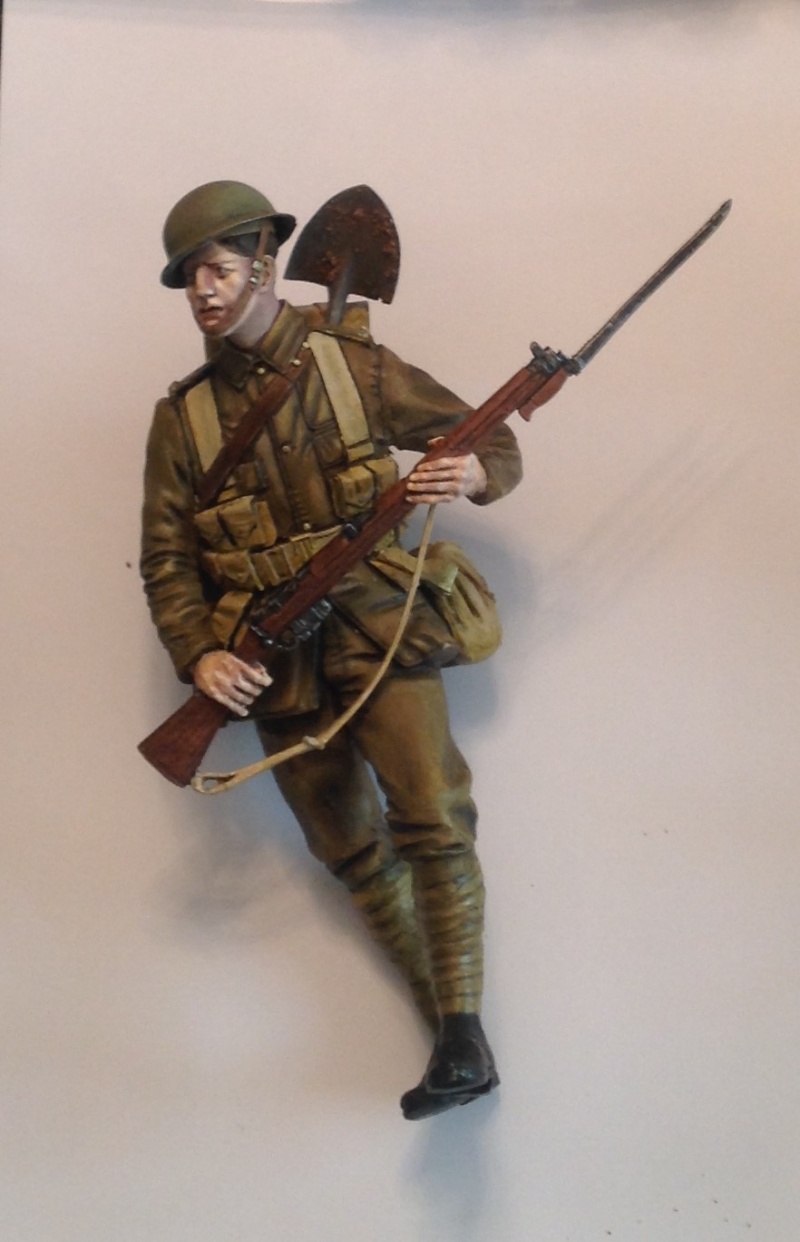
Cleaned up the arms and begun to attach and fill. I'm going to attach the arms then paint, however the hands are folded to the rifle and because he is holding the gun very close to his body I'll paint this before fixing it.


GaryDainton- Advanced Member
- Posts : 4433
Join date : 2014-03-06
Age : 56
Location : Bolton UK
Re: 200mm WWI British infantry.
![]() by Guest Sat 12 Sep 2015 - 17:51
by Guest Sat 12 Sep 2015 - 17:51
Guest- Guest
Re: 200mm WWI British infantry.
![]() by GaryDainton Sat 12 Sep 2015 - 18:09
by GaryDainton Sat 12 Sep 2015 - 18:09
G.
GaryDainton- Advanced Member
- Posts : 4433
Join date : 2014-03-06
Age : 56
Location : Bolton UK
Re: 200mm WWI British infantry.
![]() by GaryDainton Fri 9 Oct 2015 - 8:12
by GaryDainton Fri 9 Oct 2015 - 8:12
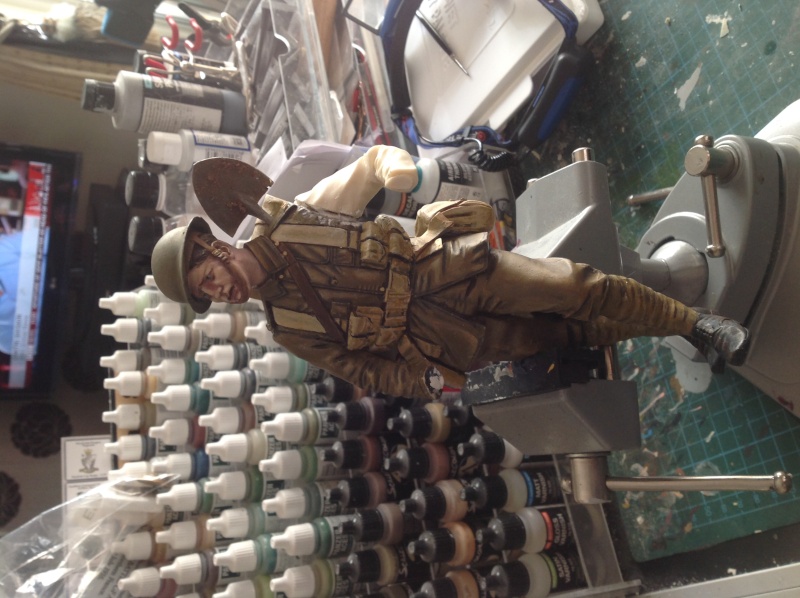
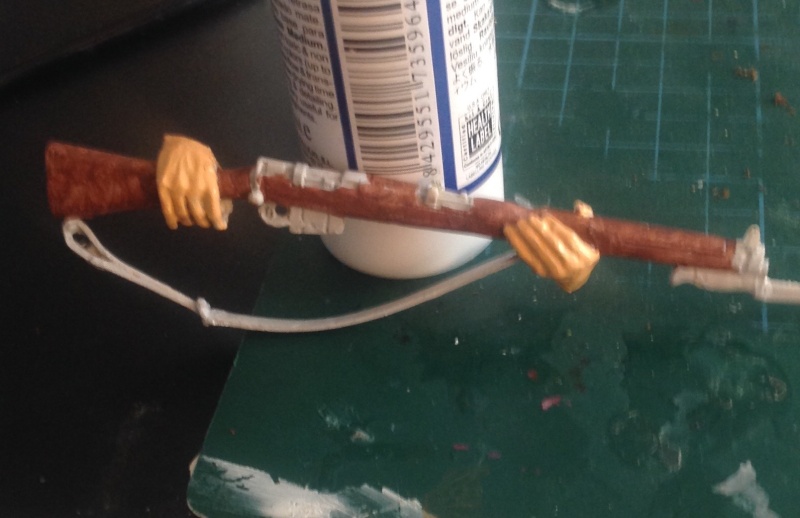
Started blocking in the rifle and hands.
rifle base coat in Vallejo Model Air (MA) flat brown.
strap and bayonet handle in MA sand
hands in Model Colour flat flesh.
Ive bought some of the new Vallejo metallic colour paints and will give them a try on the gun. If they're as good as they look Im going to re-touch the brass fittings etc on the figure.

GaryDainton- Advanced Member
- Posts : 4433
Join date : 2014-03-06
Age : 56
Location : Bolton UK
Re: 200mm WWI British infantry.
![]() by GaryDainton Thu 15 Oct 2015 - 15:05
by GaryDainton Thu 15 Oct 2015 - 15:05
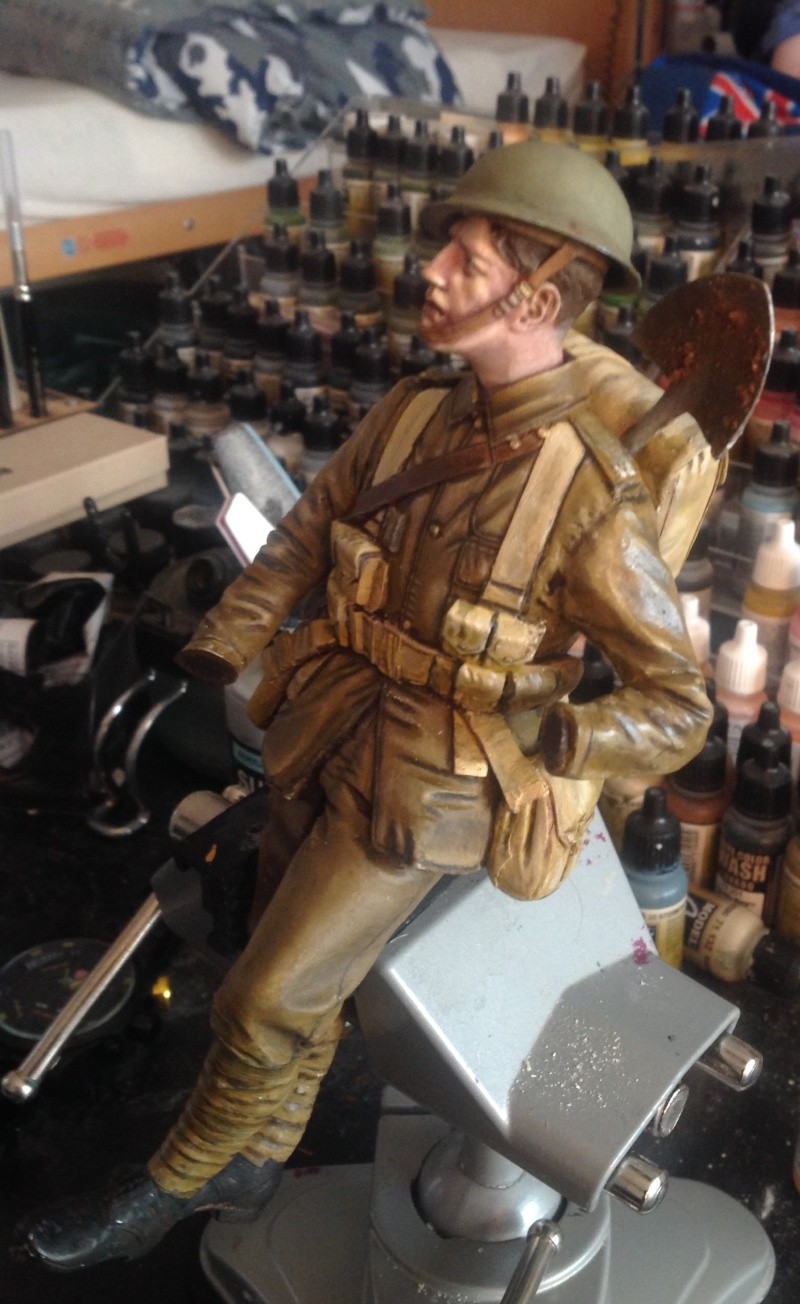
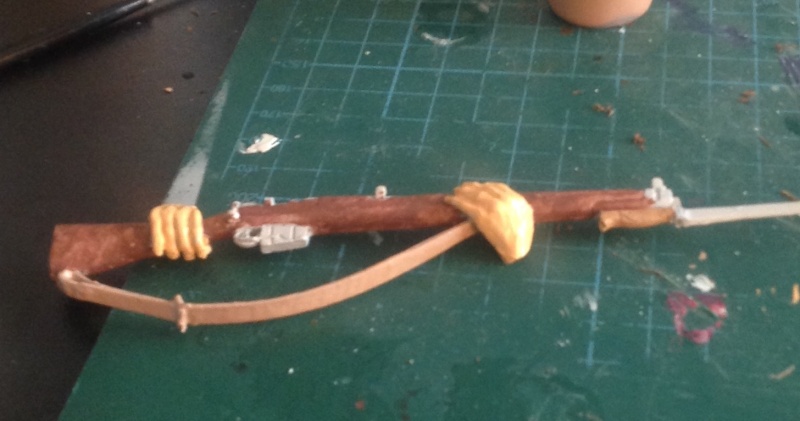
Vallejo metal colours, Steel, Gun metal and aluminium used for the guns metal elements and the bayonet blade.
I have re-touched the buttons and buckles with metal colour gold, which I think looks great as polished brass. Thats pretty much it for the figure apart from some touches when he's on the base, especially on his legs and boots which will be muddy and I intend to include some still and splashing water effects also.
If there is no objection I would like to continue with the base work as part of this thread as I will be scratch building a trench bottom 'duckboard', and muddy ground. This will also allow me to 'fully' finish the model and show any final touches I may do upon completion.

GaryDainton- Advanced Member
- Posts : 4433
Join date : 2014-03-06
Age : 56
Location : Bolton UK
Re: 200mm WWI British infantry.
![]() by Guest Thu 15 Oct 2015 - 16:57
by Guest Thu 15 Oct 2015 - 16:57
Guest- Guest
GaryDainton- Advanced Member
- Posts : 4433
Join date : 2014-03-06
Age : 56
Location : Bolton UK
Re: 200mm WWI British infantry.
![]() by Johnag Fri 16 Oct 2015 - 1:20
by Johnag Fri 16 Oct 2015 - 1:20
He is absolutely S T U N N I N G Sir, and as Mr Z said, I too would love to see the base come together as it will be a complete how to then...
Andy...
_________________
Andy...
Life isn't about how to survive the storm, but how to dance in the rain...

Johnag- Moderator

- Posts : 1576
Join date : 2013-10-12
Age : 58
Location : North Wales, U.K... -
Re: 200mm WWI British infantry.
![]() by GaryDainton Fri 16 Oct 2015 - 17:07
by GaryDainton Fri 16 Oct 2015 - 17:07
GaryDainton- Advanced Member
- Posts : 4433
Join date : 2014-03-06
Age : 56
Location : Bolton UK
Re: 200mm WWI British infantry.
![]() by GaryDainton Sat 17 Oct 2015 - 15:12
by GaryDainton Sat 17 Oct 2015 - 15:12
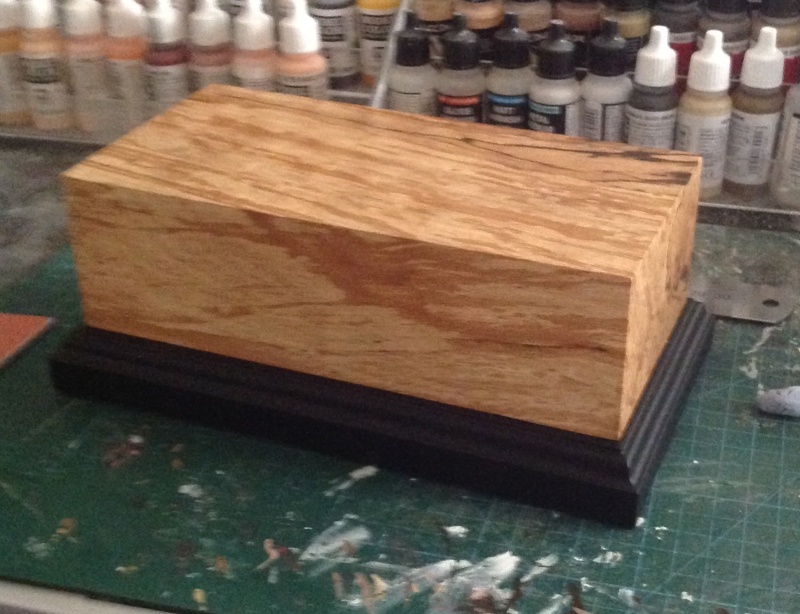
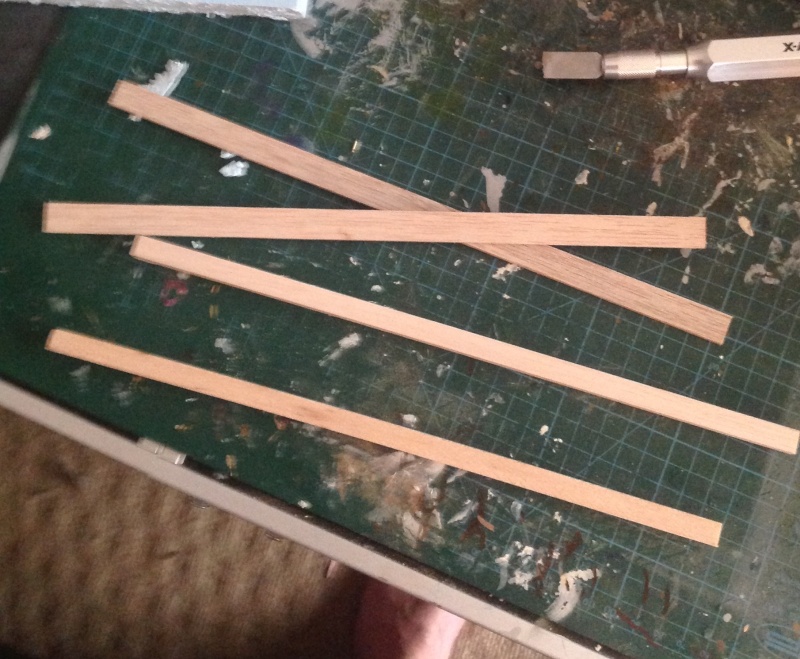
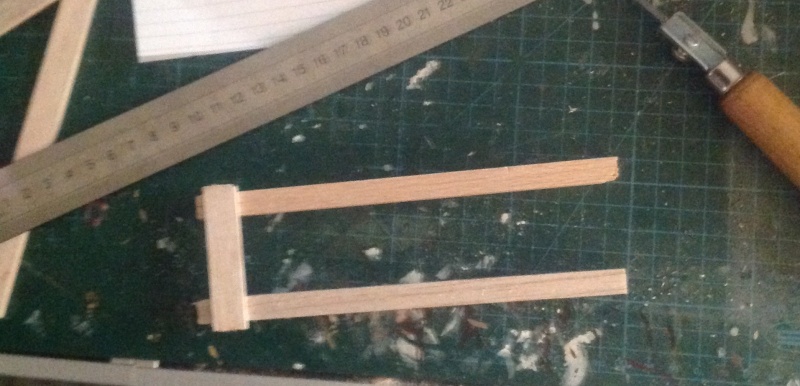
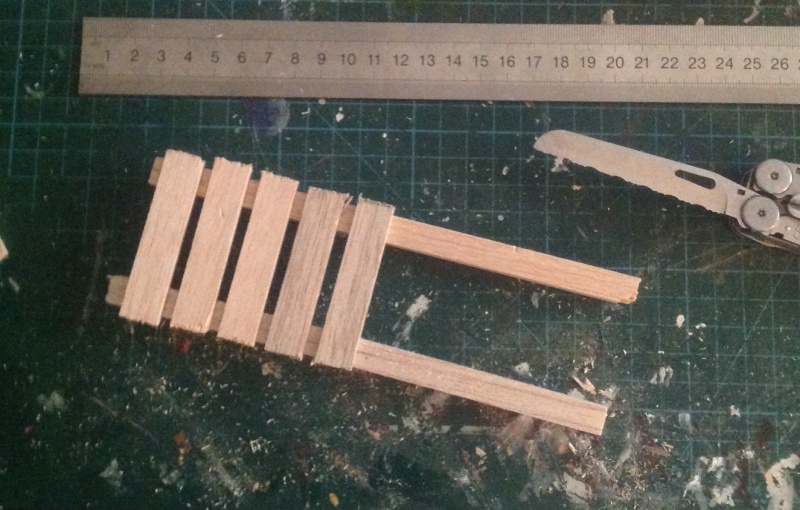
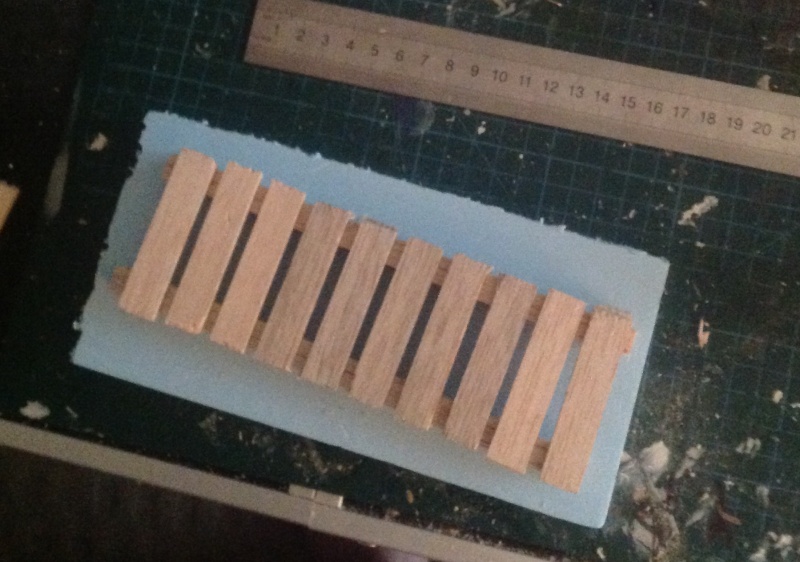
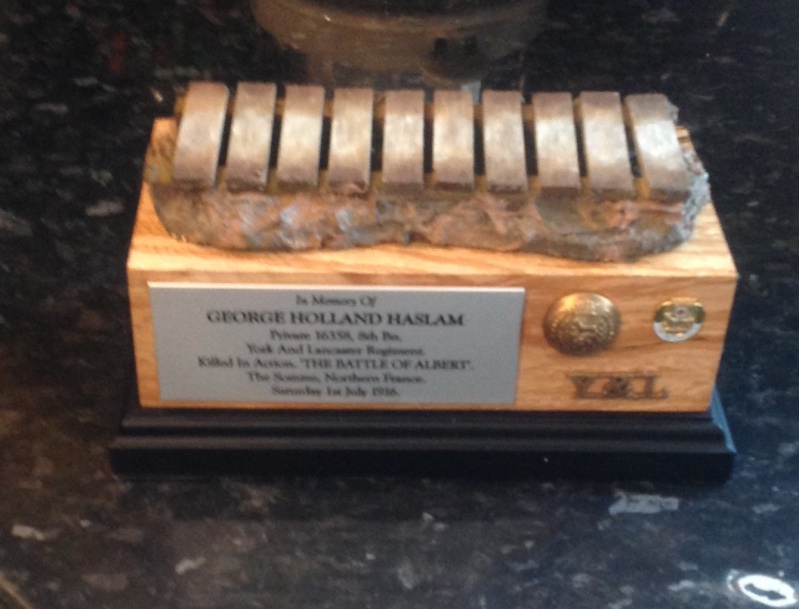
Cut 10mm styrofoam to fit the base and made the duck board from balsa wood using dimensions taken from the Imperial War Museum and scaled down to 1/9th. (200mm).
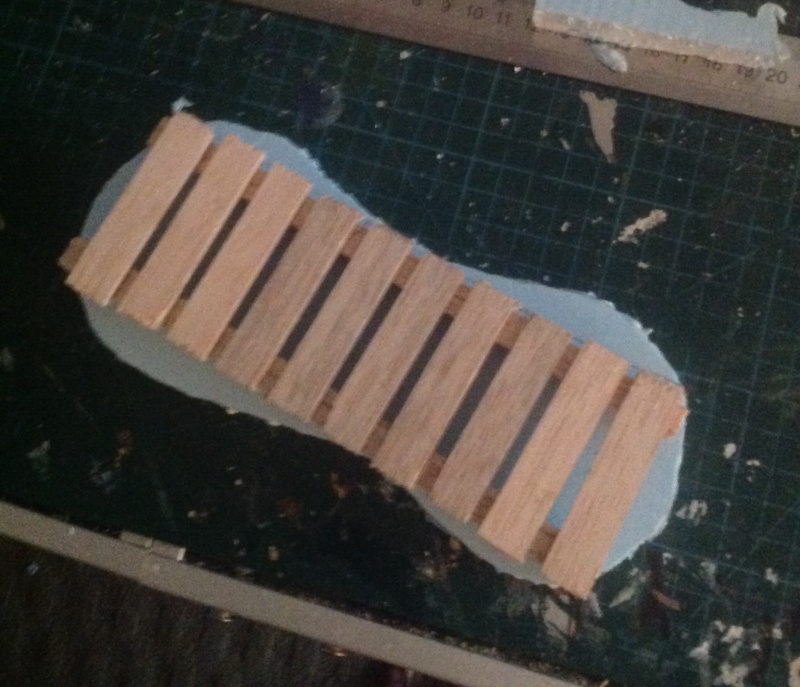
Then cut the foam into a more interesting shape.
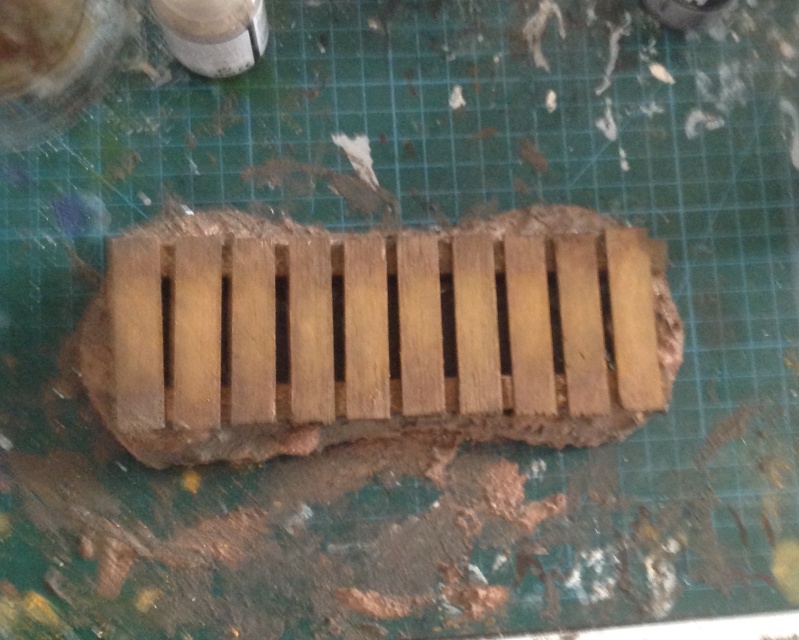
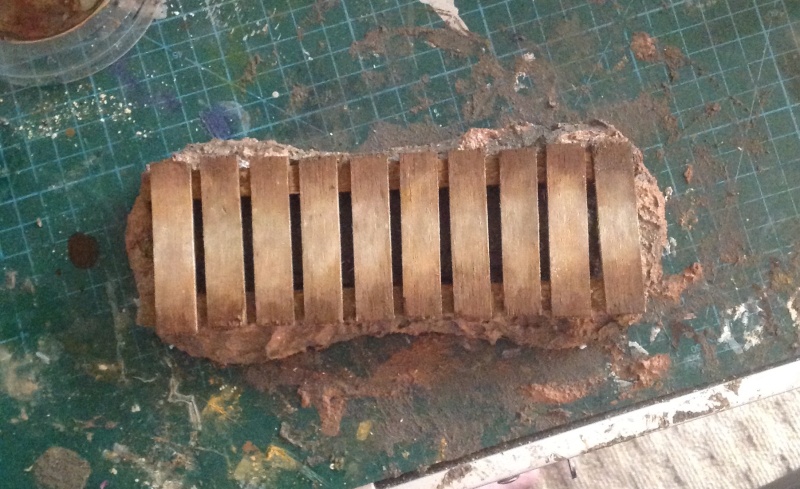
Coloured the duck board with Vallejo wash brown. And used MIG mud for the foam base. I have gradually put in the tread wear with light brown and grey pigments applied with a brush. Gave it a try on the base, then put in the nail holes.
I decided to break one of the rungs of the duck board and began to fill under the board with Vallejo still water effect. I will build up this in layers allowing it to dry between coats.
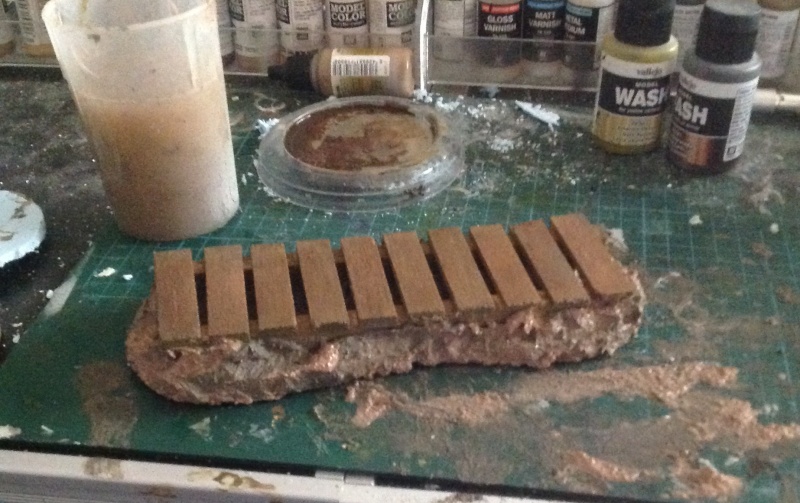

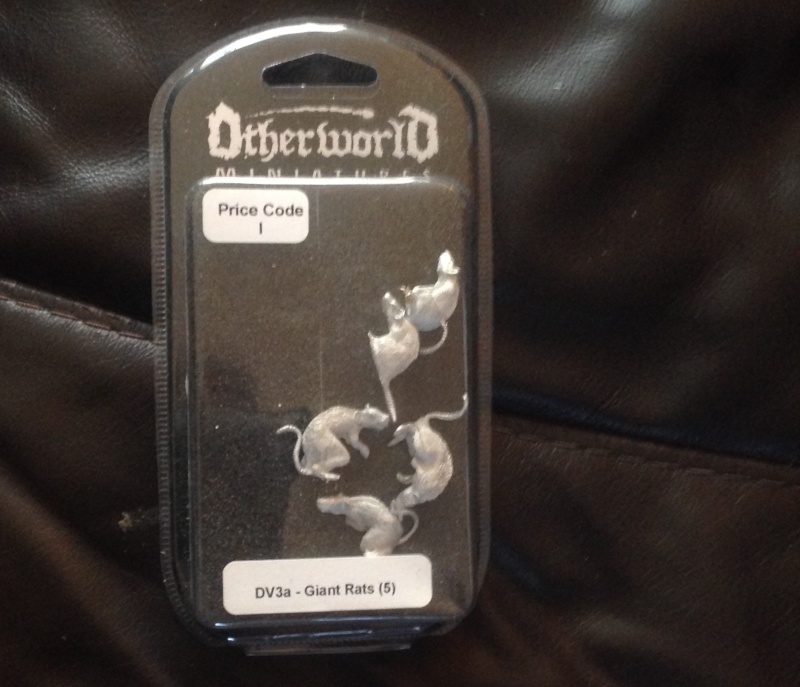
Have got some rats which look very accurate in the scale I'm using so I may give them a try.
Last edited by GaryDainton on Sun 18 Oct 2015 - 9:28; edited 1 time in total
GaryDainton- Advanced Member
- Posts : 4433
Join date : 2014-03-06
Age : 56
Location : Bolton UK
Re: 200mm WWI British infantry.
![]() by Guest Sat 17 Oct 2015 - 18:36
by Guest Sat 17 Oct 2015 - 18:36
I like the broken board and the lighter center on the boards makes them look well trod upon. Nice. Super Nice.
Guest- Guest
Re: 200mm WWI British infantry.
![]() by GaryDainton Sat 17 Oct 2015 - 19:55
by GaryDainton Sat 17 Oct 2015 - 19:55
G.
GaryDainton- Advanced Member
- Posts : 4433
Join date : 2014-03-06
Age : 56
Location : Bolton UK
Page 6 of 7 • 1, 2, 3, 4, 5, 6, 7 ![]()
» Airfix "Infantry Tank MkII Matilda" 1/72
» Airfix "Infantry Tank MkII Matilda" 1/72
» Proud to be British..............
» SE5 British WWI Fighter
|
|
|