'57 Corvette
+14
Firebird
dublin boy
harron68
hotrodmax
webby
dogfish7
Geezerman
john2308
Old Coyote
Johnag
Dave from Pleasanton
Shelby
RetiredMike
Skid
18 posters
Skid's :: Works In Progress :: Road cars
Page 2 of 4
Page 2 of 4 •  1, 2, 3, 4

Shelby- Intermediate Member

- Posts : 947
Join date : 2013-03-02
Location : Alberta, Canada
 Re: '57 Corvette
After clearing my head and and sorting a few things out on the bench I decided to get back at this one.
I had stopped this one because I had a snag when I spayed some detail with Alclad over the Tamiya and got some crazing that I just couldn't touch up. That was me shooting myself in the foot not testing things out first. So the body went for stripping in BF and I turned my attention to the truck.
So I got the body cleaned up and primed it with Tamiya grey primer/sealer, before applying any colour to it I thought I would check the ride height since it's been so long and I'm satisfied with how it looks.

Then proceeded with the same purple from Tamiya, this time it's just a base coat which I will clear later.
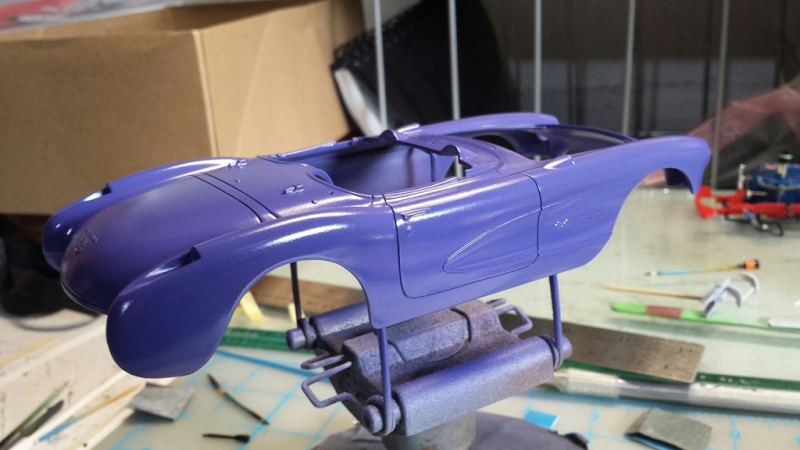
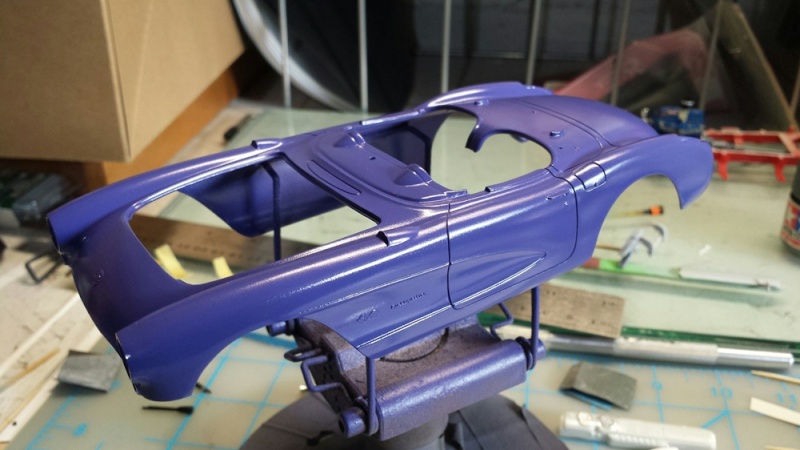
My camera has better specs than my phone camera yet it can't capture the purple on this car.
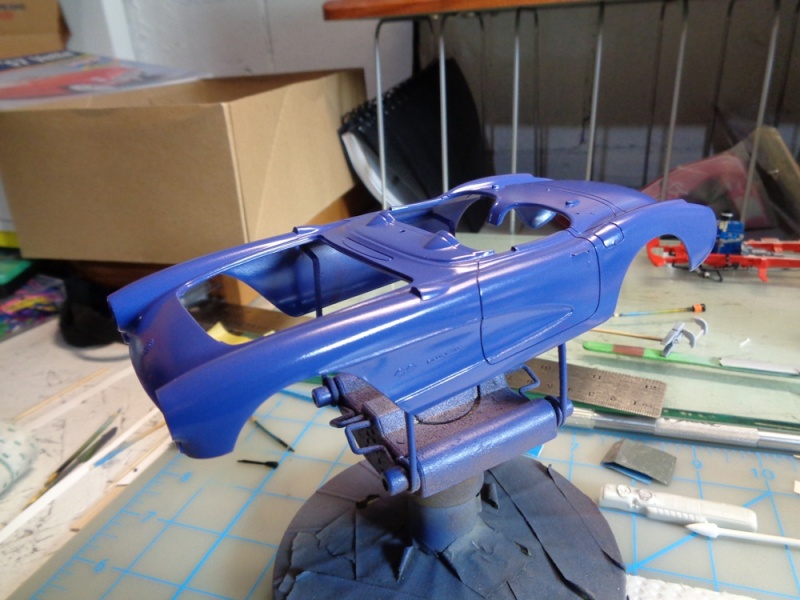
Ever since I bought this kit the windshield was loose in the box without a bag to protect it so that means scratches that needed to be taken care of. I didn't take pictures of the before but here it is after the restoration and without a future wax coat which will be added soon.

Things are going smoothly and I'm much more relaxed working on the Corvette than on the Chevy truck so hopefully things keep going in the same vein. Thanks for checking it out boys!
I had stopped this one because I had a snag when I spayed some detail with Alclad over the Tamiya and got some crazing that I just couldn't touch up. That was me shooting myself in the foot not testing things out first. So the body went for stripping in BF and I turned my attention to the truck.
So I got the body cleaned up and primed it with Tamiya grey primer/sealer, before applying any colour to it I thought I would check the ride height since it's been so long and I'm satisfied with how it looks.

Then proceeded with the same purple from Tamiya, this time it's just a base coat which I will clear later.


My camera has better specs than my phone camera yet it can't capture the purple on this car.

Ever since I bought this kit the windshield was loose in the box without a bag to protect it so that means scratches that needed to be taken care of. I didn't take pictures of the before but here it is after the restoration and without a future wax coat which will be added soon.

Things are going smoothly and I'm much more relaxed working on the Corvette than on the Chevy truck so hopefully things keep going in the same vein. Thanks for checking it out boys!

Shelby- Intermediate Member

- Posts : 947
Join date : 2013-03-02
Location : Alberta, Canada
 Re: '57 Corvette
It's looking good Denis but I think it's still a tad high at the front!
_________________
Al.
Constructive criticism is always welcome.
“Success always demands a greater effort.” Winston Churchill
"Success is failure turned inside out" Unknown
 Re: '57 Corvette
Hi Mr S,
This is looking very sweet Sir, I do like that colour...
Are the wheels standard with the kit, they look awesome...
Andy...
This is looking very sweet Sir, I do like that colour...
Are the wheels standard with the kit, they look awesome...
Andy...

_________________
Andy...
Life isn't about how to survive the storm, but how to dance in the rain...
 Re: '57 Corvette
Artificial and flash lighting doesn't do purples any favours, that's why I'm waiting for this sleet, snow and rain to finish up so I can get an outside shoot for the cherry bomb.
Looks a nice deep paint job on this though, should be even better when cleared.
I agree that the wheels looks nice on this, and that windscreen resto is very crisp and clean Denis.... Top job all round so far
Looks a nice deep paint job on this though, should be even better when cleared.
I agree that the wheels looks nice on this, and that windscreen resto is very crisp and clean Denis.... Top job all round so far
Guest- Guest
 Re: '57 Corvette
Thanks guys!
Better get used to it Al. The kits tires are larger and the front suspension was too simple to give me any room to lower it further to fill the wells with the parts box tires. I'm hoping it can come down a bit once assembled.
I used wheels and tires from the parts box, the kit's wheels were a little too cute for the look I'm going after Andy.
Ya I'm not going to worry a great deal about the photography until it's all done.
Skid wrote:It's looking good Denis but I think it's still a tad high at the front!
Better get used to it Al. The kits tires are larger and the front suspension was too simple to give me any room to lower it further to fill the wells with the parts box tires. I'm hoping it can come down a bit once assembled.
Johnag wrote:Hi Mr S,
This is looking very sweet Sir, I do like that colour...
Are the wheels standard with the kit, they look awesome...
Andy...
I used wheels and tires from the parts box, the kit's wheels were a little too cute for the look I'm going after Andy.
Snake wrote:Artificial and flash lighting doesn't do purples any favours, that's why I'm waiting for this sleet, snow and rain to finish up so I can get an outside shoot for the cherry bomb.
Looks a nice deep paint job on this though, should be even better when cleared.
I agree that the wheels looks nice on this, and that windscreen resto is very crisp and clean Denis.... Top job all round so far
Ya I'm not going to worry a great deal about the photography until it's all done.

Shelby- Intermediate Member

- Posts : 947
Join date : 2013-03-02
Location : Alberta, Canada
 Re: '57 Corvette
Dennis, I'm late the party here, but I like the purple better! Re the plug leads I think the horizonal
'structure' below the actual exhaust manifolds carries the plug leads, so the leads would only be exposed in the short section from the 'structure' to the plugs them self.
And I did the same thing when I wired the plugs on the '66 Corvette I junked recently
'structure' below the actual exhaust manifolds carries the plug leads, so the leads would only be exposed in the short section from the 'structure' to the plugs them self.
And I did the same thing when I wired the plugs on the '66 Corvette I junked recently

webby- Moderator

- Posts : 2220
Join date : 2013-02-27
Age : 65
Location : Strathpine Australia. Built over WW2 airstrip
 Re: '57 Corvette
Height looks good Denis, as do the wheels. Never been a fan of that shade of Tamiya purple but I am betting you will make it pop with your skills. 

Guest- Guest
 Re: '57 Corvette
Thanks guys!
I wasn't able to find reference pictures that clearly showed where the leads went and they won't really show in the bay one way or another. Right or wrong, it is what it is.
I got the scallops painted black again so back to where I was, next step will be the clear coat but so I have to make a trip to the hobby shop.

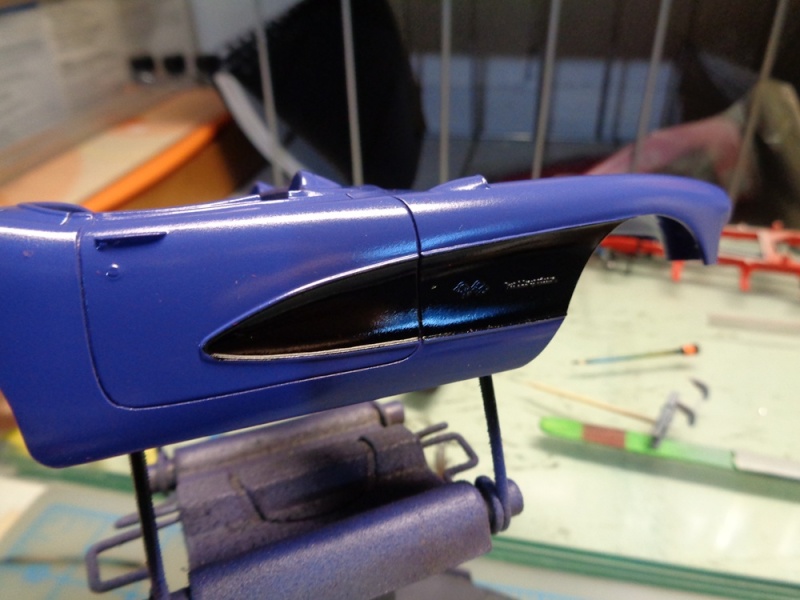
I test fitted the windshield frame once again to be on the safe side. All looks good!

Test fitted the windshield frame with the glass in...and I have a fair size pickle in on my hands.

The stretch is more than 2mm and there's no way I can shave enough to make it fit and look good and the parts box is not coming to the rescue on this one. I have two options to make this work.
1) I have some clear .005 sheet styrene that I could make a very thin windshield out of and would be a major pain to glue in place but at least I would have something.
2) I also remembered that I have a very stiff plastic sheet just the right thickness which I used once for the visor of a helmet for a Ferrari build. It has a film on each side which gives it a tinted appearance. The challenge here will be to ply and shape it just right to fit in the frame.
More to come later. Thanks for checking it out guys!
webby wrote:Dennis, I'm late the party here, but I like the purple better! Re the plug leads I think the horizonal
'structure' below the actual exhaust manifolds carries the plug leads, so the leads would only be exposed in the short section from the 'structure' to the plugs them self.
And I did the same thing when I wired the plugs on the '66 Corvette I junked recently
I wasn't able to find reference pictures that clearly showed where the leads went and they won't really show in the bay one way or another. Right or wrong, it is what it is.
I got the scallops painted black again so back to where I was, next step will be the clear coat but so I have to make a trip to the hobby shop.


I test fitted the windshield frame once again to be on the safe side. All looks good!

Test fitted the windshield frame with the glass in...and I have a fair size pickle in on my hands.

The stretch is more than 2mm and there's no way I can shave enough to make it fit and look good and the parts box is not coming to the rescue on this one. I have two options to make this work.
1) I have some clear .005 sheet styrene that I could make a very thin windshield out of and would be a major pain to glue in place but at least I would have something.
2) I also remembered that I have a very stiff plastic sheet just the right thickness which I used once for the visor of a helmet for a Ferrari build. It has a film on each side which gives it a tinted appearance. The challenge here will be to ply and shape it just right to fit in the frame.
More to come later. Thanks for checking it out guys!

Shelby- Intermediate Member

- Posts : 947
Join date : 2013-03-02
Location : Alberta, Canada
 Re: '57 Corvette
Just pop it in very hot water and then hold it just slightly tighter than the required width, when it cools it'll just spring back a little and hopefully it'll be about level ... or level enough to hold in place with some glue.
Guest- Guest
 Re: '57 Corvette
That totally blows Denis. I would cut the kit windshield in half. Getit to fit properly size wise in the frame then run a piece of trim down the middle on the inside and out. It might look cool with a split windshield if finish properly.
If that doesn't work I would still cut it in half and get it to fit and use it as a buck to make a new one with the supplies you mentioned.
The build is looking good so far.
If that doesn't work I would still cut it in half and get it to fit and use it as a buck to make a new one with the supplies you mentioned.
The build is looking good so far.
Guest- Guest
 Re: '57 Corvette
Man, this is looking good!! I like the color combo too!

hotrodmax- Rookie Member

- Posts : 379
Join date : 2015-02-15
Age : 67
Location : Willow Spring North Carolina
 Re: '57 Corvette
Thanks guys!
The trick to this one will be to keep the front flat because whenever I squeeze the sides the front curves up some and that would cause a gap. I hope I have more luck with the windshield than my past attempts with hoods using that method.
That's a very creative solution Curt. I already have a way to finish up the trim in mind if I have to go that way.
I already made a template to use for for both the thin styrene sheet and the stiff tinted plastic one.

Plan A: Stiff tinted plastic. It is see through, I wanted to tint the windshield anyway and I know it will keep its shape if I get it right.
Plan B: Hot water bend. It should be easy enough IF I do it right and if not the windshield should be in good enough shape for plan C
Plan C: Cut the windshield. I should be able to finish it nicely enough and it will give it a unique look.
Plan D: Thin styrene. At least it will still look somewhat like a windshield.
Thanks for the ideas Colin and Curt!
Snake wrote:Just pop it in very hot water and then hold it just slightly tighter than the required width, when it cools it'll just spring back a little and hopefully it'll be about level ... or level enough to hold in place with some glue.
The trick to this one will be to keep the front flat because whenever I squeeze the sides the front curves up some and that would cause a gap. I hope I have more luck with the windshield than my past attempts with hoods using that method.
Plastic Freak wrote:That totally blows Denis. I would cut the kit windshield in half. Getit to fit properly size wise in the frame then run a piece of trim down the middle on the inside and out. It might look cool with a split windshield if finish properly.
If that doesn't work I would still cut it in half and get it to fit and use it as a buck to make a new one with the supplies you mentioned.
The build is looking good so far.
That's a very creative solution Curt. I already have a way to finish up the trim in mind if I have to go that way.
I already made a template to use for for both the thin styrene sheet and the stiff tinted plastic one.

Plan A: Stiff tinted plastic. It is see through, I wanted to tint the windshield anyway and I know it will keep its shape if I get it right.
Plan B: Hot water bend. It should be easy enough IF I do it right and if not the windshield should be in good enough shape for plan C
Plan C: Cut the windshield. I should be able to finish it nicely enough and it will give it a unique look.
Plan D: Thin styrene. At least it will still look somewhat like a windshield.
Thanks for the ideas Colin and Curt!

Shelby- Intermediate Member

- Posts : 947
Join date : 2013-03-02
Location : Alberta, Canada
 Re: '57 Corvette
Update on where I am with the windshield:
Plan A: Stiff tinted plastic. I am able to work the plastic to make it fit and have it keep its shape.
The only thing is that the clarity of the plastic is not up to standards. So I will scratch that idea.
Here you can see I've gone a little too far but could easily shape it back to where it needs to be.

Plan B: Hot water bend. I was getting nowhere at a turtle pace with this. So I decided to be a little more aggressive and use tape wrapping it around to bend it then use the hair dryer then dunk it in cold water to seize it. As I taped around it...SNAP!!! On the plus side it now fits.

In that misfortune it broke pretty much in the middle so I should be able to go to Plan C and do a split window as Curt suggested. I have no margin for error though...ALL cuts will have to be precise and I am dealing with a flimsy frame and its shape makes it tricky to take measurements. A failure here and I won't be able to complete this until I find a new windshield frame.
Plan A: Stiff tinted plastic. I am able to work the plastic to make it fit and have it keep its shape.
The only thing is that the clarity of the plastic is not up to standards. So I will scratch that idea.
Here you can see I've gone a little too far but could easily shape it back to where it needs to be.

Plan B: Hot water bend. I was getting nowhere at a turtle pace with this. So I decided to be a little more aggressive and use tape wrapping it around to bend it then use the hair dryer then dunk it in cold water to seize it. As I taped around it...SNAP!!! On the plus side it now fits.


In that misfortune it broke pretty much in the middle so I should be able to go to Plan C and do a split window as Curt suggested. I have no margin for error though...ALL cuts will have to be precise and I am dealing with a flimsy frame and its shape makes it tricky to take measurements. A failure here and I won't be able to complete this until I find a new windshield frame.

Shelby- Intermediate Member

- Posts : 947
Join date : 2013-03-02
Location : Alberta, Canada
 Re: '57 Corvette
That's a shame Curt, it was looking good too.
I know you'll get there though.
I know you'll get there though.
_________________
Al.
Constructive criticism is always welcome.
“Success always demands a greater effort.” Winston Churchill
"Success is failure turned inside out" Unknown
 Re: '57 Corvette
ya Al it has been tough doing a remote build, put your glasses on old man. 

Denis tough gong for sure dude, sounds like you have it sorted. If your finding the frame too flimsy perhaps put some support rods on it like we do when doing a chop.
Good luck buddy. I have confidence in your abilities.


Denis tough gong for sure dude, sounds like you have it sorted. If your finding the frame too flimsy perhaps put some support rods on it like we do when doing a chop.
Good luck buddy. I have confidence in your abilities.

Guest- Guest
 Re: '57 Corvette
Right then Denis, sorry to clutter your thread up with pictures but it may be an alternative.
If you have a supermarket (mart or whatever) then look for a premade cake with this type of plastic around it .. it's perfect for glass in vehicles, very malleable indeed ... and you get a free cake with it too lol.
the actual stuff

wrapped around a pen to show how much you can bend it

even figure 8's aren't a problem

It cuts with scissors/scalpel and it takes a fine polish / lacquer (hairspray) / future polish (klear) coat too.
In the UK it's in the sainsburys cake isle
I have a small amount here but if you can't get any i don't mind sending you a 3 inch square bit over via snail-mail.
If you have a supermarket (mart or whatever) then look for a premade cake with this type of plastic around it .. it's perfect for glass in vehicles, very malleable indeed ... and you get a free cake with it too lol.
the actual stuff

wrapped around a pen to show how much you can bend it

even figure 8's aren't a problem

It cuts with scissors/scalpel and it takes a fine polish / lacquer (hairspray) / future polish (klear) coat too.
In the UK it's in the sainsburys cake isle
I have a small amount here but if you can't get any i don't mind sending you a 3 inch square bit over via snail-mail.
Guest- Guest
 Re: '57 Corvette
Skid wrote:That's a shame Curt, it was looking good too.
I know you'll get there though.
You know it Harry!

Plastic Freak wrote:ya Al it has been tough doing a remote build, put your glasses on old man.

Denis tough gong for sure dude, sounds like you have it sorted. If your finding the frame too flimsy perhaps put some support rods on it like we do when doing a chop.
Good luck buddy. I have confidence in your abilities.

I will be making a jig to keep the frame in place once I have the windshield cut down to size. I expected fit issues with this old kit and it really hasn't been bad this is the first real challenge to this build and I'm more than happy to get it worked out. Hopefully I take enough pictures and maybe make a tutorial out of it.
Snake wrote:Right then Denis, sorry to clutter your thread up with pictures but it may be an alternative.
If you have a supermarket (mart or whatever) then look for a premade cake with this type of plastic around it .. it's perfect for glass in vehicles, very malleable indeed ... and you get a free cake with it too lol.
the actual stuff
wrapped around a pen to show how much you can bend it
even figure 8's aren't a problem
It cuts with scissors/scalpel and it takes a fine polish / lacquer (hairspray) / future polish (klear) coat too.
In the UK it's in the sainsburys cake isle
I have a small amount here but if you can't get any i don't mind sending you a 3 inch square bit over via snail-mail.
Thanks for the offer Colin. Looking at the plastic it looks like .010 thickness so it won't be a problem for me to get something like it around here.
I've been using the same technique with the stiff plastic sheet I have but I use the smooth end of a #11 handle and heat it up with a hair dryer.

Shelby- Intermediate Member

- Posts : 947
Join date : 2013-03-02
Location : Alberta, Canada
 Re: '57 Corvette
Alright visual progress is not big yet but a lot of stuff has been done to make sure this works.
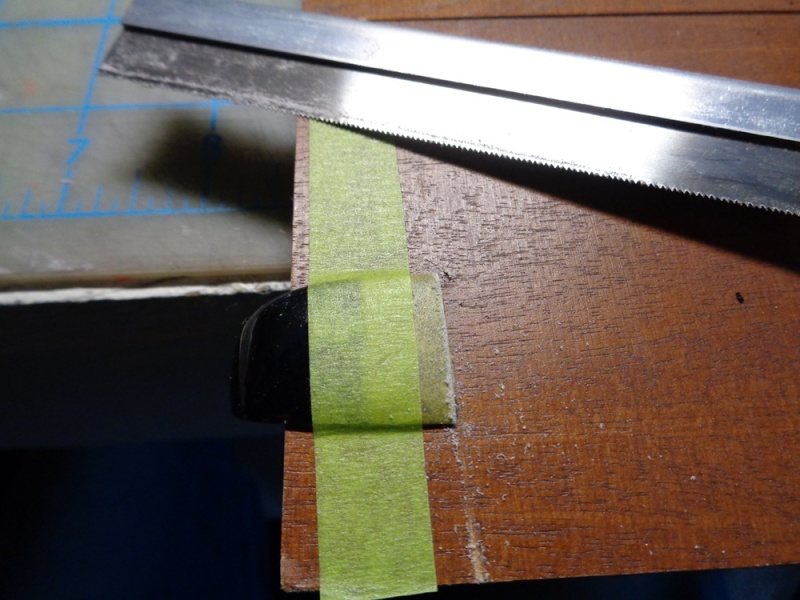
First I carefully placed the halves of the windshield in a mirror image so I could line up the cuts. Once that was done I used Tamiya tape for a guide to make my cut on each half.

Because of the sharp curve of the windshield I had to use a board to prop the windshield up and have it as flat as possible and taped it into place.

Then took a deep breath and the saw to cut the windshield halves carefully and slowly
I got the jig done up to keep the frame within the confines of what I'm working with on the body.

Because the frame curves up at the front I had to put a lip at the front to keep it stable for the rest of the work I will be doing.

The groove in the lip will allow me to see what I'm doing in the centre where the middle brace of the windshield will be located. As you can see I still have some room to work with. The windshield broke at a very good spot, sometimes it's better to be lucky than good.

More to come on the windshield saga. Thanks for checking it out!
First I carefully placed the halves of the windshield in a mirror image so I could line up the cuts. Once that was done I used Tamiya tape for a guide to make my cut on each half.

Because of the sharp curve of the windshield I had to use a board to prop the windshield up and have it as flat as possible and taped it into place.

Then took a deep breath and the saw to cut the windshield halves carefully and slowly

I got the jig done up to keep the frame within the confines of what I'm working with on the body.

Because the frame curves up at the front I had to put a lip at the front to keep it stable for the rest of the work I will be doing.

The groove in the lip will allow me to see what I'm doing in the centre where the middle brace of the windshield will be located. As you can see I still have some room to work with. The windshield broke at a very good spot, sometimes it's better to be lucky than good.

More to come on the windshield saga. Thanks for checking it out!

Shelby- Intermediate Member

- Posts : 947
Join date : 2013-03-02
Location : Alberta, Canada
 Re: '57 Corvette
Am I still on the right website? 

Good stuff DENIS!!


Good stuff DENIS!!
_________________
Al.
Constructive criticism is always welcome.
“Success always demands a greater effort.” Winston Churchill
"Success is failure turned inside out" Unknown
 Re: '57 Corvette
I hope so, otherwise we're both screwed. 


Shelby- Intermediate Member

- Posts : 947
Join date : 2013-03-02
Location : Alberta, Canada
 Re: '57 Corvette
Well I'm definitely waiting with bated breath here ......
That's some tidy prep work indeed!!!!
That's some tidy prep work indeed!!!!
Guest- Guest
Page 2 of 4 •  1, 2, 3, 4
 Similar topics
» '69 Corvette
» 58 Corvette - Old WIP's
» 1968 L-89 Corvette
» ‘65 Corvette Gasser (1/8th)
» Another easter Corvette.
» 58 Corvette - Old WIP's
» 1968 L-89 Corvette
» ‘65 Corvette Gasser (1/8th)
» Another easter Corvette.
Skid's :: Works In Progress :: Road cars
Page 2 of 4
Permissions in this forum:
You cannot reply to topics in this forum