
49 Merc, Redo/Detail
Skid's :: Works In Progress :: Road cars
Page 1 of 2 • 1, 2 ![]()

49 Merc, Redo/Detail
![]() by Guest Sat 29 Sep 2018, 12:14 am
by Guest Sat 29 Sep 2018, 12:14 am
I'd like to also add in some interior detailing, window cranks, dash bezels, etc, a colour change to something richer/classier looking is needed, gone will be the in your face blue/orange.
Another idea I have is to build a hood hinge configuration that will allow the hood to flip forward. With the current configuration the hood does not allow much light or viewing of the engine details. I will use one of my other 49 Merc kits as the mock up build mule to achieve the end result for this shell.
I know this may sound ludacris and perhaps I should just build something else but that paint took soooo long to do and it really is key to the look.
The process has been started.


Guest- Guest


Geezerman- Advanced Member

- Posts : 3651
Join date : 2013-02-24
Age : 88
Location : Gulf coast of central Florids
Re: 49 Merc, Redo/Detail
![]() by KatsZenJammer Sun 30 Sep 2018, 4:50 pm
by KatsZenJammer Sun 30 Sep 2018, 4:50 pm

KatsZenJammer- Resident member
- Posts : 2600
Join date : 2016-05-20
Age : 57
Location : Vancouver, BC
Re: 49 Merc, Redo/Detail
![]() by RetiredMike Mon 01 Oct 2018, 2:23 pm
by RetiredMike Mon 01 Oct 2018, 2:23 pm
And all these years, I've been gluing the parts together!! LOL

RetiredMike- Advanced Member
- Posts : 3525
Join date : 2013-04-27
Age : 73
Location : Valparaiso, Indiana
Re: 49 Merc, Redo/Detail
![]() by Guest Mon 08 Oct 2018, 2:50 pm
by Guest Mon 08 Oct 2018, 2:50 pm
I won't be touching the paint at all Kats, so no stress there. The challenge is going to be fitting the flip forward hood hinges once I configure the with the mock up kit.
Lol Mike, I try and use the least amount of glue possible. Oddly enough for some reason when I built this I intentionally did not glue the shell in place. Sometimes my subconscious mind has much more forward thinking then my conscious mind appears to have. This type of thing constantly happens to me.
Guest- Guest
Re: 49 Merc, Redo/Detail
![]() by Guest Fri 12 Oct 2018, 9:33 pm
by Guest Fri 12 Oct 2018, 9:33 pm
Well the house is finally done and listed so it's bench time and some desperately needed decompression for the next 10days.
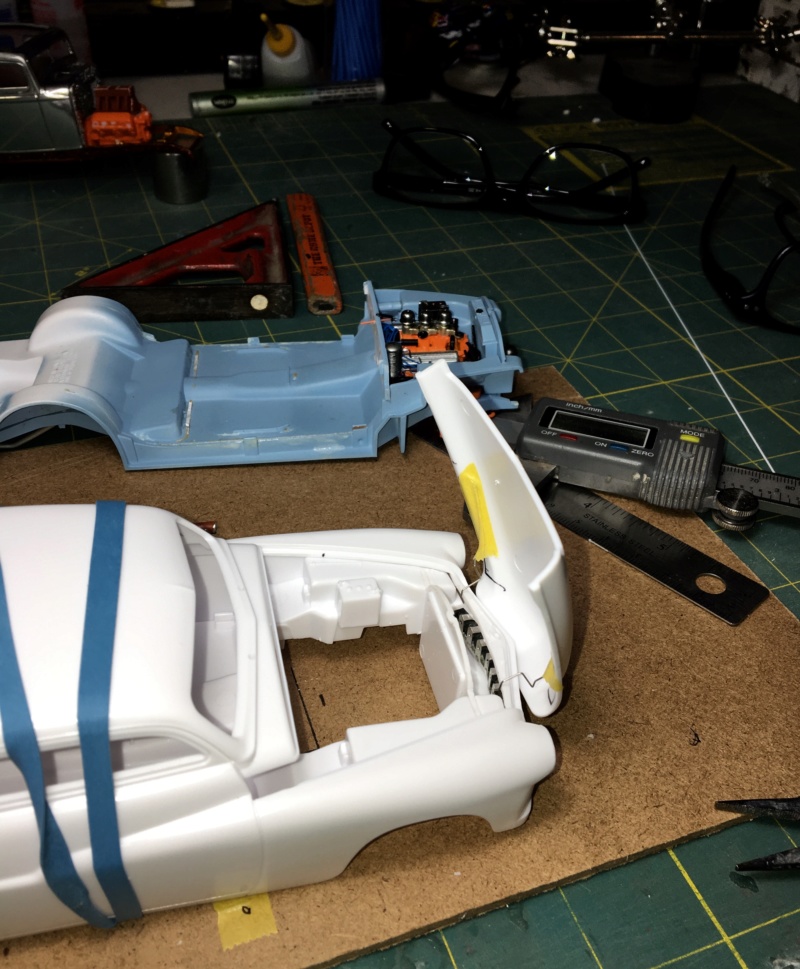
I 'think', this configuration is going to work. 90 mins to bend up both hinge rods. I snapped the first attempt at making the second one, these are mirror images of each other I got a bit anal with trying to match them. I am using spring steel rod that is .014" dia.
The actual hinge protion of this configuration will be a floating setup at the 'hinge' or pivot end. The rods will be secured permanently to the hood. I had to cut the rad support to provide clearance for the rods. All in all it has been rather simple so far.
The mocked up shell/chassis and hood seem to work pretty well.


Guest- Guest
Re: 49 Merc, Redo/Detail
![]() by Guest Sun 14 Oct 2018, 12:58 am
by Guest Sun 14 Oct 2018, 12:58 am
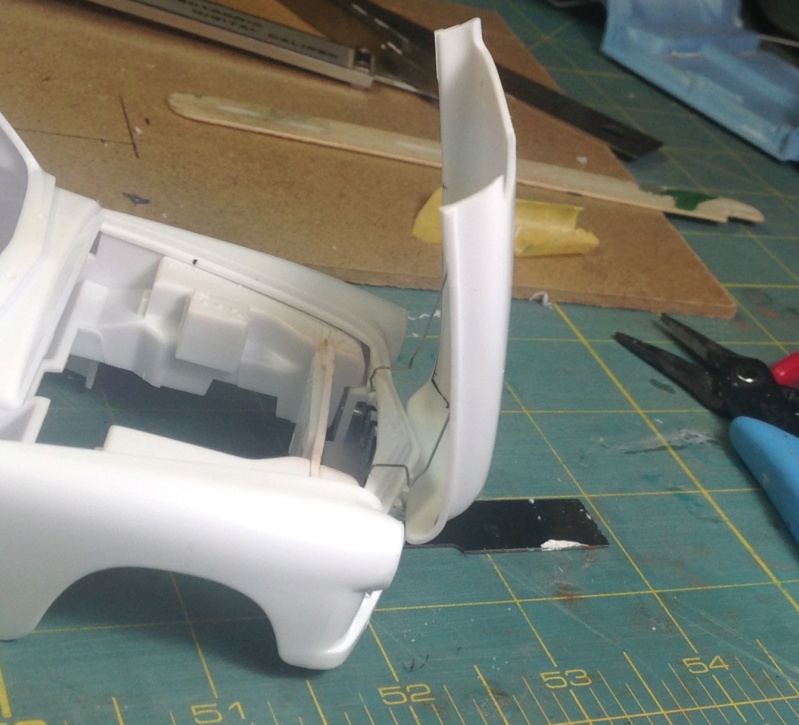
After some more fiddling around and trimming I have the proof of concept completed. The hood opens and closes without a hitch and sits flush when closed, as it should. Next will be transferring all this onto the actual model. This kit was nothing more then a test mule, and proof of concept.
I think I will bend up another set of hing rods to use on the finished model, these have been tweaked so many times they are no so crisp anymore. The hing rods and anchors points can be for this kit to be used when ever I actually build this up.
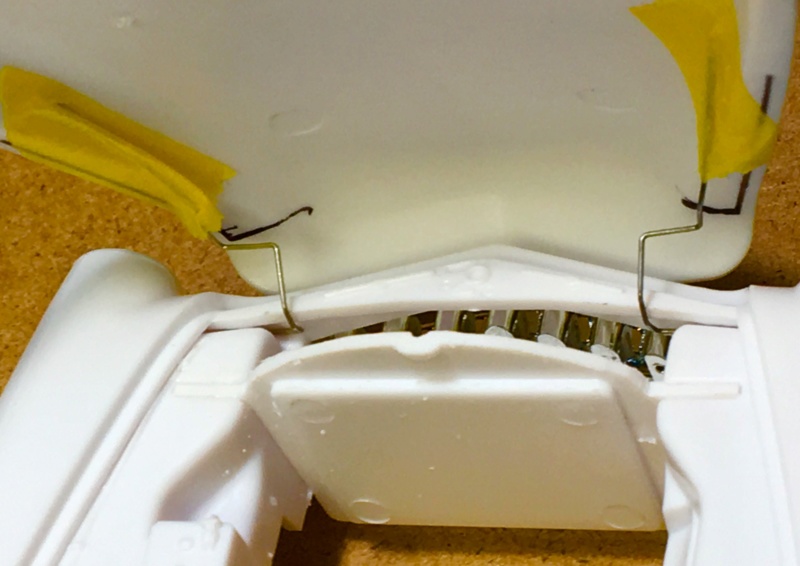
The last pic shows the anchor points, again, these will all be cleaned up on the finished shell. Both hing anchor points float, the anchors at the chassis end are a half moon rod configuration, allowing that end to pivot and move as need at the same time. The hood anchor point can float back and forth just enough so that when the hood is open the bottom swings out just enough to clear the grill.
Thanks for looking in on the progress.


Guest- Guest

dublin boy- Moderator

- Posts : 3862
Join date : 2013-02-27
Re: 49 Merc, Redo/Detail
![]() by GaryDainton Tue 16 Oct 2018, 3:13 pm
by GaryDainton Tue 16 Oct 2018, 3:13 pm

GaryDainton- Advanced Member
- Posts : 4433
Join date : 2014-03-06
Age : 56
Location : Bolton UK
Re: 49 Merc, Redo/Detail
![]() by KatsZenJammer Sun 21 Oct 2018, 5:16 pm
by KatsZenJammer Sun 21 Oct 2018, 5:16 pm
KatsZenJammer- Resident member
- Posts : 2600
Join date : 2016-05-20
Age : 57
Location : Vancouver, BC
RetiredMike- Advanced Member
- Posts : 3525
Join date : 2013-04-27
Age : 73
Location : Valparaiso, Indiana
Re: 49 Merc, Redo/Detail
![]() by Guest Thu 25 Oct 2018, 4:24 pm
by Guest Thu 25 Oct 2018, 4:24 pm
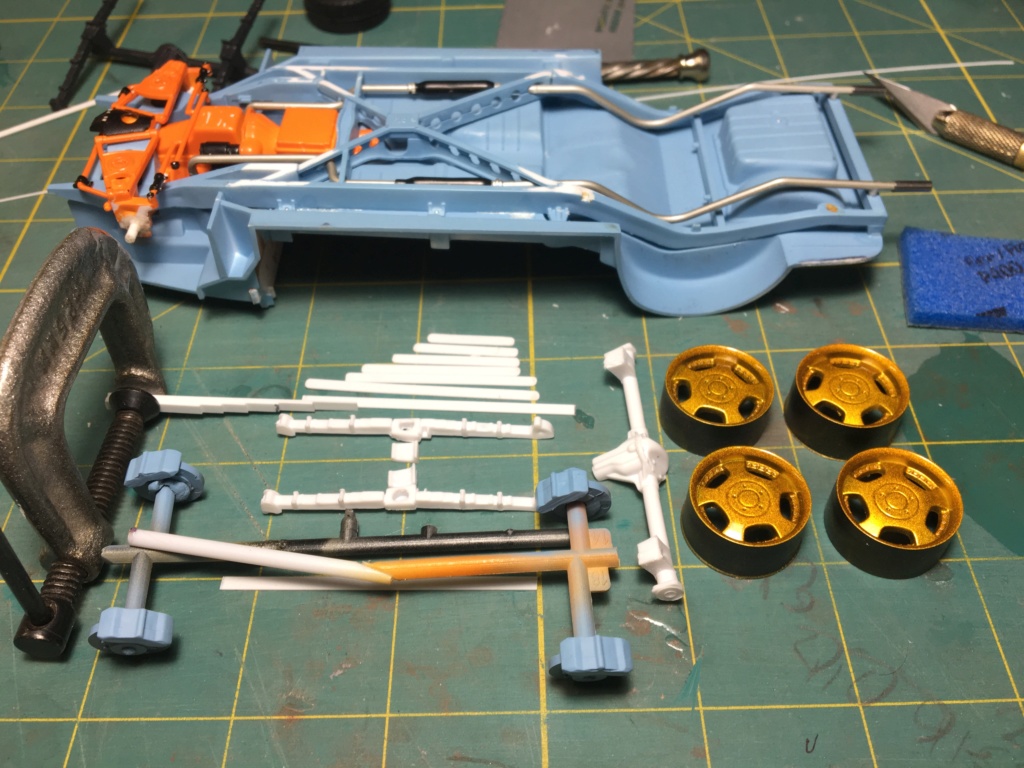
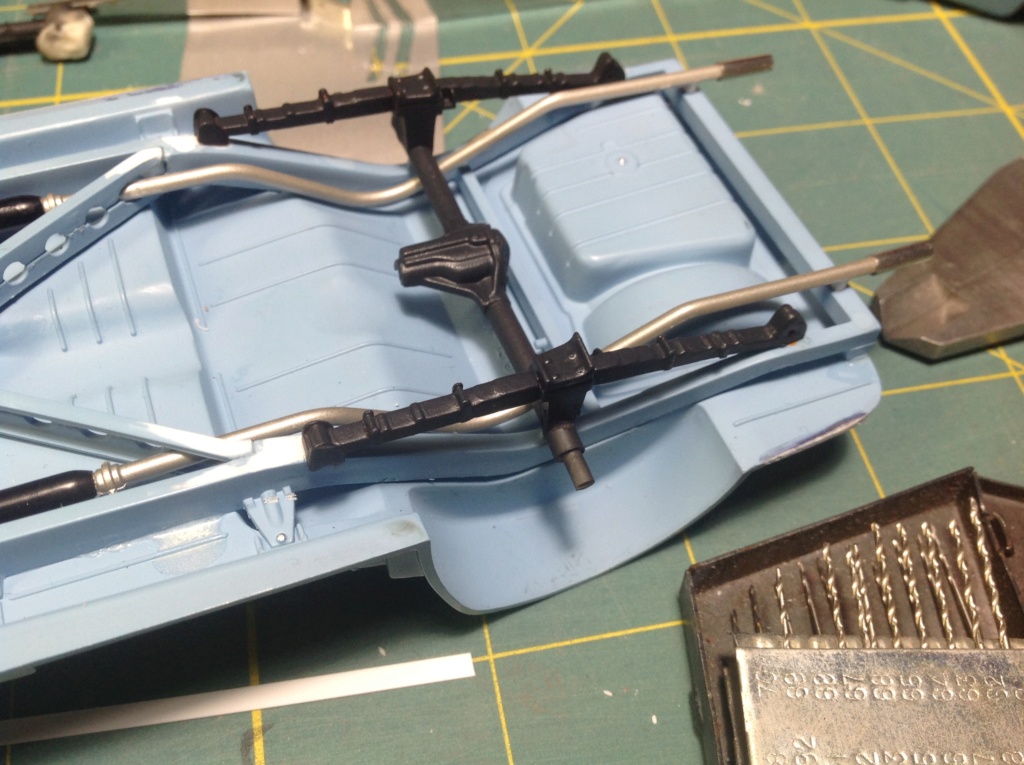
I have been messing around with this some more. I have started to scratch build some rear leaf springs. I am not sure if I will use them on this or not. It was more of a need then a want, I find building parts from scratch very relaxing. Relaxing is the hardest thing for me to do, especially when sitting at the bench.
The wheels/tire's will be switched up. The original wheel/tire combo never actually fit properly. The rear's were literally stuffed in place and held with sculpting expoy. The new wheels being an open design and slightly narrower allow me to install brakes and rotors. The brake/rotors are from a 90's 1/20 F1 kit. The calipers have been narrowed and fitted for clearance.
The kit rear axle has had back spacers for the rotors and a locating pins added.


Guest- Guest
Re: 49 Merc, Redo/Detail
![]() by Skid Thu 25 Oct 2018, 7:08 pm
by Skid Thu 25 Oct 2018, 7:08 pm

_________________
Al.
Constructive criticism is always welcome.
“Success always demands a greater effort.” Winston Churchill
"Success is failure turned inside out" Unknown

Skid- Admin
- Posts : 7128
Join date : 2013-02-15
Age : 75
Location : Newcastle. Good Old Blighty. -

Re: 49 Merc, Redo/Detail
![]() by Guest Sat 27 Oct 2018, 12:52 pm
by Guest Sat 27 Oct 2018, 12:52 pm
A bit more done. I am happy with how the springs turned out, although I won't be using them. More work and fiddling around then I am willing to put in at this point in time to make them work with this wheel/tire combo. I will use them on another build. The kit springs will simply get some dry brushing.
I also decided the wheels needed some colour detailing. It is a slow/slow process to mask and paint the blue, then remark and paint the chrome. Which I messed up, good thing I can hide the smudge up in the rear wheel well.


Guest- Guest
RetiredMike- Advanced Member
- Posts : 3525
Join date : 2013-04-27
Age : 73
Location : Valparaiso, Indiana
Re: 49 Merc, Redo/Detail
![]() by GaryDainton Sun 28 Oct 2018, 12:21 pm
by GaryDainton Sun 28 Oct 2018, 12:21 pm
GaryDainton- Advanced Member
- Posts : 4433
Join date : 2014-03-06
Age : 56
Location : Bolton UK
Re: 49 Merc, Redo/Detail
![]() by KatsZenJammer Sun 28 Oct 2018, 5:34 pm
by KatsZenJammer Sun 28 Oct 2018, 5:34 pm
KatsZenJammer- Resident member
- Posts : 2600
Join date : 2016-05-20
Age : 57
Location : Vancouver, BC
Re: 49 Merc, Redo/Detail
![]() by NISMOR34 Tue 30 Oct 2018, 1:39 am
by NISMOR34 Tue 30 Oct 2018, 1:39 am

NISMOR34- New Member

- Posts : 164
Join date : 2016-07-21
Age : 47
Location : Claremont, NC USA
Re: 49 Merc, Redo/Detail
![]() by Skid Tue 30 Oct 2018, 9:09 am
by Skid Tue 30 Oct 2018, 9:09 am
_________________
Al.
Constructive criticism is always welcome.
“Success always demands a greater effort.” Winston Churchill
"Success is failure turned inside out" Unknown
Skid- Admin
- Posts : 7128
Join date : 2013-02-15
Age : 75
Location : Newcastle. Good Old Blighty. -
Re: 49 Merc, Redo/Detail
![]() by Guest Fri 03 May 2019, 11:17 pm
by Guest Fri 03 May 2019, 11:17 pm
Guest- Guest

KatsZenJammer- Resident member
- Posts : 2600
Join date : 2016-05-20
Age : 57
Location : Vancouver, BC


GaryDainton- Advanced Member
- Posts : 4433
Join date : 2014-03-06
Age : 56
Location : Bolton UK
Re: 49 Merc, Redo/Detail
![]() by Spanky 19 Fri 12 Jul 2019, 4:37 am
by Spanky 19 Fri 12 Jul 2019, 4:37 am

Spanky 19- Rookie Member
- Posts : 297
Join date : 2014-07-27
Age : 60
Location : San Antonio, Texas
Page 1 of 2 • 1, 2 ![]()
» Revell '49 Merc.
» Revell chopped 49 Merc
» 1949 Merc Pro-Mod
» 1949 Merc Pro-Mod
Skid's :: Works In Progress :: Road cars
|
|
|