
Big Blue Chevy Truck
5 posters
Skid's :: Works In Progress :: Trucks
Page 1 of 1

Big Blue Chevy Truck
![]() by Guest Fri 08 Mar 2013, 12:12 am
by Guest Fri 08 Mar 2013, 12:12 am
When my son was in High School he spotted this rusty old truck sitting on the back row of a used car lot. It was love at first sight. He is now 38 years old and still has Big Blue. He says he will be buried in it. I say as long as I don't have to dig the hole , fine. This truck as been through so many engines and such in it's life it should be a piece of cake. Anything I do will be correct.
Right now I am thinking I will build it with a 383 inch small block. When he had that with a Turbo 350 he was the most successful with it on the drag strip. He raced the B&M Series. Made enough points to go to the Million Dollar Race in Memphis, Tenn. I flew back to watch him race. He didn't win but we had a ball hanging out at the Drag Strip for 4 days.
Here is the truck. I think this picture was taken at Montgomery, Alabama.

Bad picture, but it's hard to take a picture of a picture and have it turn out.
I am using these two kits to do this.

The street truck kit for the two wheel drive frame and suspension. The 4x4 kit for the correct body and fenders.
So this is were we start. I stock 2 wheel drive frame.

The rest of the pictures are the mock up to see how things will fit.
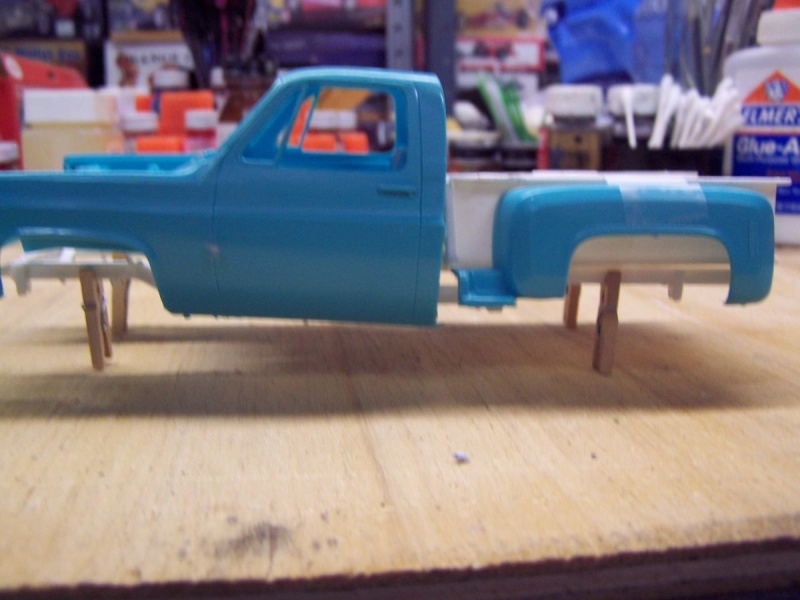
Iam using the street truck bed because the wood looks better in it than the 4x4 bed.
This tailgate doesn't fit. It's to narrow. I will cut the Chevrolet out of it and put it into the plain tailgate later on.

That's all I got for now. All comments and questions are welcome. Thanks for looking.
Right now I am thinking I will build it with a 383 inch small block. When he had that with a Turbo 350 he was the most successful with it on the drag strip. He raced the B&M Series. Made enough points to go to the Million Dollar Race in Memphis, Tenn. I flew back to watch him race. He didn't win but we had a ball hanging out at the Drag Strip for 4 days.
Here is the truck. I think this picture was taken at Montgomery, Alabama.
Bad picture, but it's hard to take a picture of a picture and have it turn out.
I am using these two kits to do this.
The street truck kit for the two wheel drive frame and suspension. The 4x4 kit for the correct body and fenders.
So this is were we start. I stock 2 wheel drive frame.
The rest of the pictures are the mock up to see how things will fit.
Iam using the street truck bed because the wood looks better in it than the 4x4 bed.
This tailgate doesn't fit. It's to narrow. I will cut the Chevrolet out of it and put it into the plain tailgate later on.
That's all I got for now. All comments and questions are welcome. Thanks for looking.
Guest- Guest
Re: Big Blue Chevy Truck
![]() by Guest Fri 08 Mar 2013, 12:44 am
by Guest Fri 08 Mar 2013, 12:44 am
Didn't do much yesterday, so this will be a small update. Most of the time was spent rounding up parts for the power train. I found a GM 12 bolt rear end in the junk yard. Got some Pro Star wheels from Competition Resins. Also got the Cowl induction Hood worked out. Again with parts from Competition Resins.
Got the tail gate cut out and the Chevrolet center section moved over. Got a little gap to fill but that's no big deal.

Looking in the engine bay I see 2 batteries, a jack and a windshield washer. Those will all have to go.

I used the trusty dremil to open the grille up.


The truck has a fiberglass hood with a huge cowl induction hood scoop on it. I thought the Competition Resins CRC-107 Cowl Induction Hood Scoop would do the trick. WRONG.
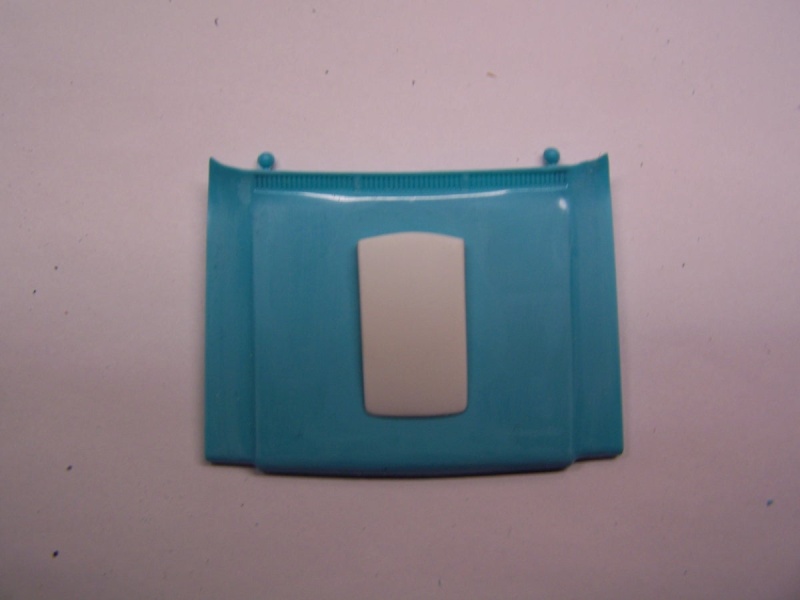
So I found this Scoop in the junk yard and thought with some pieces of styrene and some work It could be used.

Finally decided the best way to do it would be two of the CRC-107 scoops side by side.

Got the body and bed primered.

Even though it is way early in the build I had to do a mock up just to see.

So that's where Iam at with it for now. The only thing I haven't been able to come up with is a Turbo 350 transmission for this thing. Looking through my junk yard I found half an engine with half a turbo 350 on it so there is hope. If any one knows of a kit with a Turbo 350 on the engine please let me know.
Thanks for looking in. All comments and questions are welcome.
Got the tail gate cut out and the Chevrolet center section moved over. Got a little gap to fill but that's no big deal.
Looking in the engine bay I see 2 batteries, a jack and a windshield washer. Those will all have to go.
I used the trusty dremil to open the grille up.
The truck has a fiberglass hood with a huge cowl induction hood scoop on it. I thought the Competition Resins CRC-107 Cowl Induction Hood Scoop would do the trick. WRONG.
So I found this Scoop in the junk yard and thought with some pieces of styrene and some work It could be used.
Finally decided the best way to do it would be two of the CRC-107 scoops side by side.
Got the body and bed primered.
Even though it is way early in the build I had to do a mock up just to see.
So that's where Iam at with it for now. The only thing I haven't been able to come up with is a Turbo 350 transmission for this thing. Looking through my junk yard I found half an engine with half a turbo 350 on it so there is hope. If any one knows of a kit with a Turbo 350 on the engine please let me know.
Thanks for looking in. All comments and questions are welcome.
Guest- Guest
Re: Big Blue Chevy Truck
![]() by Guest Fri 08 Mar 2013, 12:59 am
by Guest Fri 08 Mar 2013, 12:59 am
Now that Christmas is behind us I will update this build to where Iam at now.
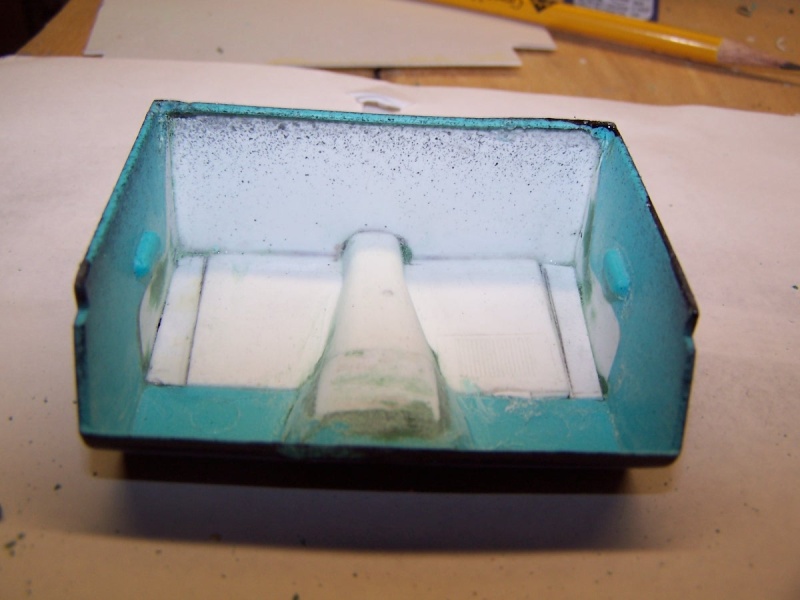
I wanted to get rid of the bench seat, so came the trusty Exacto with a #11 blade. Just like opening a door.

Using a junkyard floor and some .030 styrene I scratched up a tub. I wasn't to worried about having it perfect. I will use Black Flock to hide the uglies.
I didn't have a correct front end, and maybe still don't. The one kit was a 4x4 so that front suspension was out. The Street Rod Truck had a wimpy straight bar front axle. I know these trucks had a control arm front end in them so it was back to the junk yard. I finally came up with this setup. They look like GM control arms. The coil spring pockets are the right width to go on the frame,plus if I need to adjust the ride height it will be easy to do.

Here it is under the truck.

Now the rear end. With the mix and match of using two kits. The rear end is 5/16 " to far forward.

Here is a better picture to show how far out of whack the rear end is.

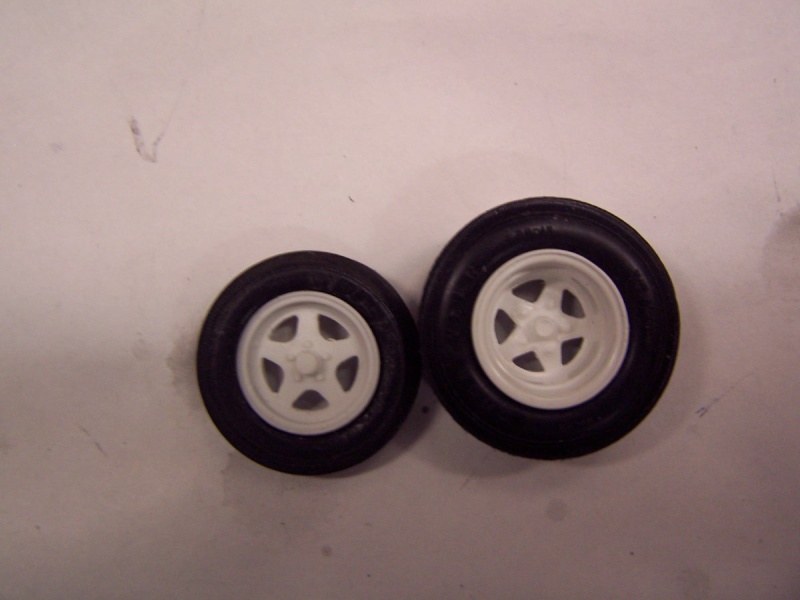
So it's back to the junk yard to see if I can find something that will work better. I needed so tires for the wheels. I got the wheels opened up and went looking. Tony runs a 10 inch slick on the back and a 27 inch Front Runner up front. In scale the 10" slick is .400 inches wide. The skinny Front Runners I just found so that looked right to the eye. Here is what they look like now.
So now it's back to the junk yard to work out the rear end. That will be the next update.
Thanks for looking in. All comments and questions are welcome.
I wanted to get rid of the bench seat, so came the trusty Exacto with a #11 blade. Just like opening a door.
Using a junkyard floor and some .030 styrene I scratched up a tub. I wasn't to worried about having it perfect. I will use Black Flock to hide the uglies.
I didn't have a correct front end, and maybe still don't. The one kit was a 4x4 so that front suspension was out. The Street Rod Truck had a wimpy straight bar front axle. I know these trucks had a control arm front end in them so it was back to the junk yard. I finally came up with this setup. They look like GM control arms. The coil spring pockets are the right width to go on the frame,plus if I need to adjust the ride height it will be easy to do.
Here it is under the truck.
Now the rear end. With the mix and match of using two kits. The rear end is 5/16 " to far forward.
Here is a better picture to show how far out of whack the rear end is.
So it's back to the junk yard to see if I can find something that will work better. I needed so tires for the wheels. I got the wheels opened up and went looking. Tony runs a 10 inch slick on the back and a 27 inch Front Runner up front. In scale the 10" slick is .400 inches wide. The skinny Front Runners I just found so that looked right to the eye. Here is what they look like now.
So now it's back to the junk yard to work out the rear end. That will be the next update.
Thanks for looking in. All comments and questions are welcome.
Guest- Guest
Re: Big Blue Chevy Truck
![]() by Guest Fri 08 Mar 2013, 1:13 am
by Guest Fri 08 Mar 2013, 1:13 am
Hi guys I am back.
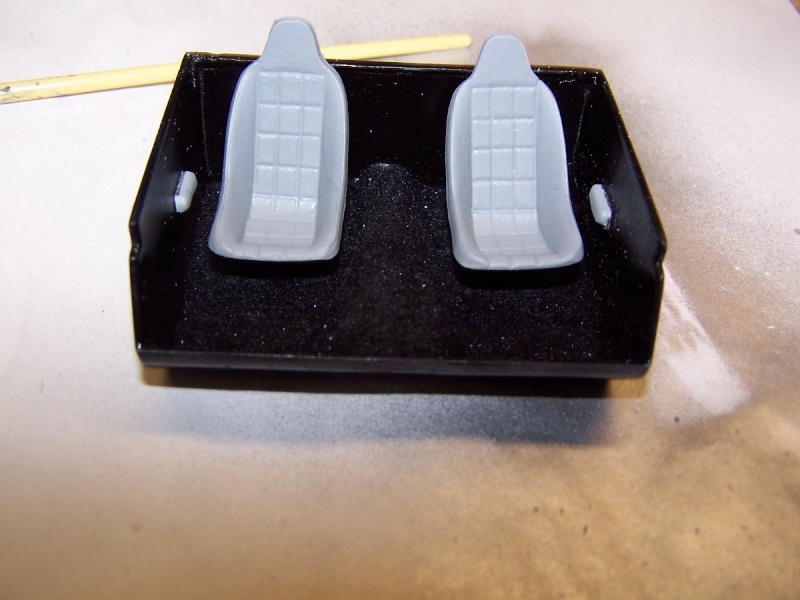
Let's start with the interior. I got the tub finished and painted. Flocked the floor to hide the ugly and found a pair of bucket seats that look like Kirkey
seats. Later I will add a 5 point harness. Waiting for it to arrive from Model Express.
On the frame I got some new spring perches made that will let me move the leaf spring inward. Got that all done and the Frame painted Semi Gloss Black.

This mock up picture will give you a better idea of what the chassis will look like.

I got the wheels painted and good to go. I painted them with Dulpi-color Chrome. The Chrome paint is put over a Gloss Black base, just like using Alcad. I think it works just as well at half the price.

I found a Small block Chevy motor with a Powerglide trans and started getting it ready for the aluminum heads and intake.

Got the intake, heads and distributor ready. The chrome Holly Demon will be detailed and fuel lines added later.

Found a set of Lakewood slapper bars.

The stance is set, the body is in primer. time to wet sand this baby and get it in color. Maybe I will have that done by the next update.

See you later.
Let's start with the interior. I got the tub finished and painted. Flocked the floor to hide the ugly and found a pair of bucket seats that look like Kirkey
seats. Later I will add a 5 point harness. Waiting for it to arrive from Model Express.
On the frame I got some new spring perches made that will let me move the leaf spring inward. Got that all done and the Frame painted Semi Gloss Black.
This mock up picture will give you a better idea of what the chassis will look like.
I got the wheels painted and good to go. I painted them with Dulpi-color Chrome. The Chrome paint is put over a Gloss Black base, just like using Alcad. I think it works just as well at half the price.
I found a Small block Chevy motor with a Powerglide trans and started getting it ready for the aluminum heads and intake.
Got the intake, heads and distributor ready. The chrome Holly Demon will be detailed and fuel lines added later.
Found a set of Lakewood slapper bars.
The stance is set, the body is in primer. time to wet sand this baby and get it in color. Maybe I will have that done by the next update.
See you later.
Guest- Guest
Re: Big Blue Chevy Truck
![]() by Guest Fri 08 Mar 2013, 1:45 am
by Guest Fri 08 Mar 2013, 1:45 am
You are doing some really awesome work here Buck. The stance is perfect for that truck. Looking forward to the next update.
Guest- Guest
Re: Big Blue Chevy Truck
![]() by Guest Fri 08 Mar 2013, 1:54 am
by Guest Fri 08 Mar 2013, 1:54 am
Happy New Year everyone. I was just reading this OTB over and I can't believe how much it jumps around. Thinking about it I guess the reason is the way the build is going. I used the frame from one kit, body parts from both kits and everything else has came out of the junkyard. So Iam just going to update what has happened and go from there.
Needless to say no color on the body yet. Way to early for that.
I got the roll bar built and ready for the interior.

Got the dash done. scratch built the Tach and shift light. Roll bar is painted and installed.

Here is a better shot of the dash. Man I love those GelPens. Sure make it easy for an old guy to do detail work.

Got the Fuel cell and the battery box done.
I decided not to paint the bed wood. I got a piece of Ken's Model Wood, Birch, and stained it dark oak. I will make some chrome strips for runners using .060" I beam Evergreen styrene and some BMF.

Got the ProTech 5 point harness kits Saturday so this is my next step on the to do list.

I moved the engine back so it looked better in the engine bay. Here you can see how far forward it sat.

These were the headers that I wanted to use, because they look cool. But they wouldn't fit around the control arm suspension I put in the truck.

So I ended up using this set. The only bad part is they are small block ford headers. Maybe nobody will notice. LOL.

Well I guess that's it for now. I will be back to post when I have more done. Thanks for looking in. All comments and questions are welcome.
Needless to say no color on the body yet. Way to early for that.
I got the roll bar built and ready for the interior.
Got the dash done. scratch built the Tach and shift light. Roll bar is painted and installed.
Here is a better shot of the dash. Man I love those GelPens. Sure make it easy for an old guy to do detail work.
Got the Fuel cell and the battery box done.
I decided not to paint the bed wood. I got a piece of Ken's Model Wood, Birch, and stained it dark oak. I will make some chrome strips for runners using .060" I beam Evergreen styrene and some BMF.
Got the ProTech 5 point harness kits Saturday so this is my next step on the to do list.
I moved the engine back so it looked better in the engine bay. Here you can see how far forward it sat.
These were the headers that I wanted to use, because they look cool. But they wouldn't fit around the control arm suspension I put in the truck.
So I ended up using this set. The only bad part is they are small block ford headers. Maybe nobody will notice. LOL.
Well I guess that's it for now. I will be back to post when I have more done. Thanks for looking in. All comments and questions are welcome.
Guest- Guest
Re: Big Blue Chevy Truck
![]() by Guest Fri 08 Mar 2013, 2:17 am
by Guest Fri 08 Mar 2013, 2:17 am
Thanks to everyone for the comments. Brent, I washed my mouth out with soap after typing that. LOL.
The interior is done. I used the ProTech 5 point harness kits. When I first saw them in the package I was a little disappointed in them. I wanted the set with blue ribbon for the belts. With this kit you paint paper the color you want your belts and then cut it to fit. After mixing my own color of blue to try to match the Simpson belt I got after it.
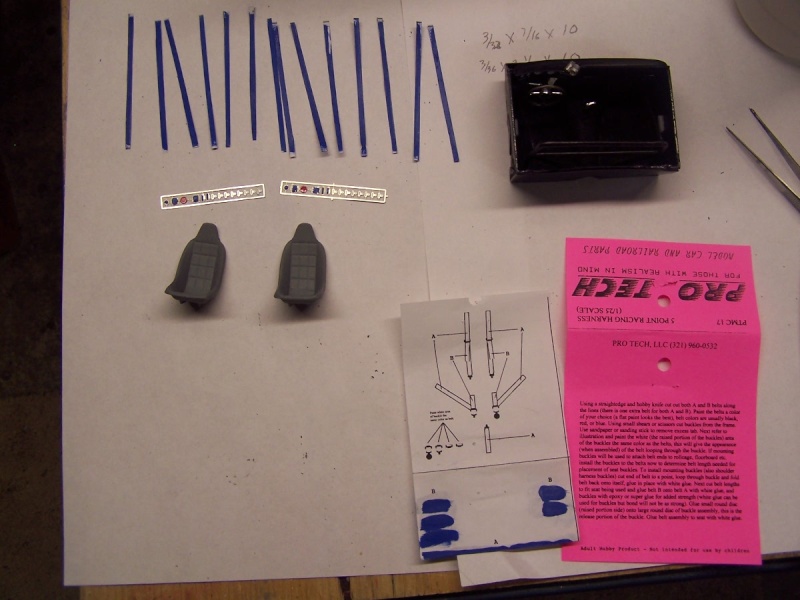
When the smoke had cleared and the dust had settled, I ended up with this.

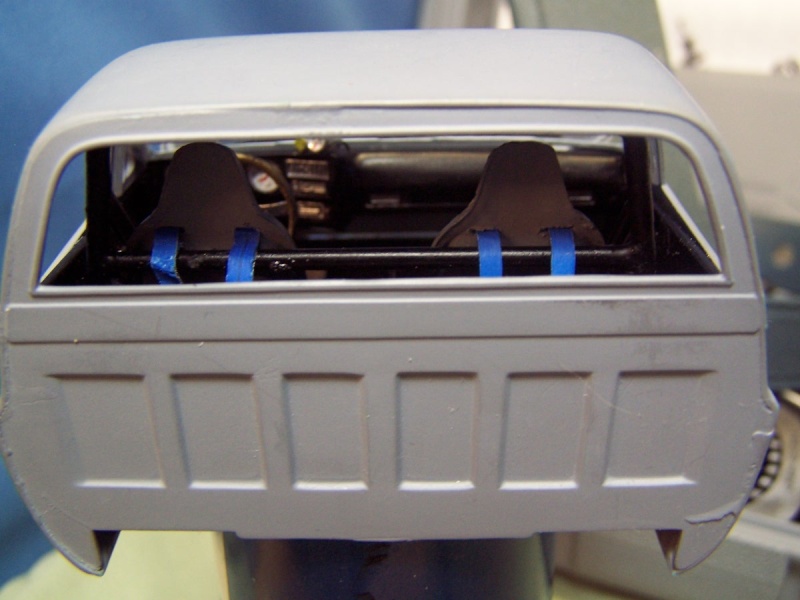
I had to touch up the paint on the belts in a couple places. I used a blue Gel Pen to do that worked out sweet.


I did a mock up with the windshield in place to make sure everything fit.


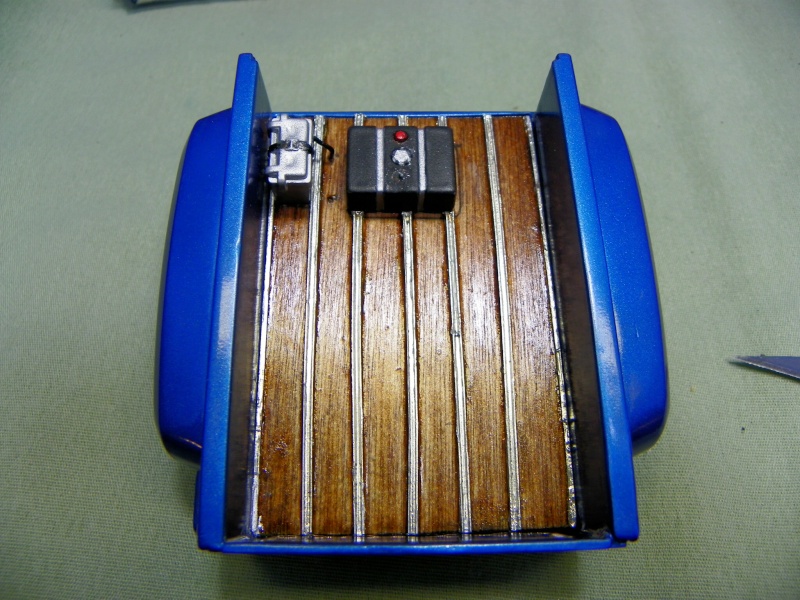
Now on to the bed of the truck.
Here is the wood with the strips in place. Cut out is for the fuel cell. Battery will also be back here.


Now that I know it all fits. I will BMF the runners and then give everything a few coats of Dulpi-color clear top coat. I will post more when I have more done. Thanks for looking in, all comments and questions are welcome
The interior is done. I used the ProTech 5 point harness kits. When I first saw them in the package I was a little disappointed in them. I wanted the set with blue ribbon for the belts. With this kit you paint paper the color you want your belts and then cut it to fit. After mixing my own color of blue to try to match the Simpson belt I got after it.
When the smoke had cleared and the dust had settled, I ended up with this.
I had to touch up the paint on the belts in a couple places. I used a blue Gel Pen to do that worked out sweet.
I did a mock up with the windshield in place to make sure everything fit.
Now on to the bed of the truck.
Here is the wood with the strips in place. Cut out is for the fuel cell. Battery will also be back here.
Now that I know it all fits. I will BMF the runners and then give everything a few coats of Dulpi-color clear top coat. I will post more when I have more done. Thanks for looking in, all comments and questions are welcome
Guest- Guest
Re: Big Blue Chevy Truck
![]() by Guest Fri 08 Mar 2013, 2:27 am
by Guest Fri 08 Mar 2013, 2:27 am
Time to get the engine finished to the point it can be installed. I wanted to make a fuel line for the Holley carb that looked like a braided line with A&N fittings. So I used .018 7 strand craft wire for the line and seed beads for the fittings.
This is what I started with.

And this is what I ended up with.

I was mass happy about how that turned out.

The line coming off of the fuel line will later go to a pressure regulator mounted on the fender well.
Got the spark plug wires done, with Model Car Garage loom separators.

Here it is test fitted into the frame. I also got the front and rear end mounted to the frame.

That's it for now. I will update again later. I got a new camera man what a difference. 12 mega pixel pictures are detailed but man are they huge files. LOL Thanks for looking in. All comments and questions are welcome
This is what I started with.
And this is what I ended up with.
I was mass happy about how that turned out.
The line coming off of the fuel line will later go to a pressure regulator mounted on the fender well.
Got the spark plug wires done, with Model Car Garage loom separators.
Here it is test fitted into the frame. I also got the front and rear end mounted to the frame.
That's it for now. I will update again later. I got a new camera man what a difference. 12 mega pixel pictures are detailed but man are they huge files. LOL Thanks for looking in. All comments and questions are welcome
Guest- Guest
Re: Big Blue Chevy Truck
![]() by Guest Fri 08 Mar 2013, 2:40 am
by Guest Fri 08 Mar 2013, 2:40 am
The new camera is working great. I turned it down from the 12 meg pics to 6.1 meg. Much easier and faster to manage.
Got quite a bit done to the truck. I followed Wisdonm's advice and bought a Ferrule assortment from Ferrule Direct.
http://www.ferrulesdirect.com
There are so many choices that you have to start somewhere to get the right size for what you want. Anyway. There was one size that worked perfect for a header collector.

I plan on making the exhaust from 3/32 aluminum tubing so these worked perfect. Thanks Don.
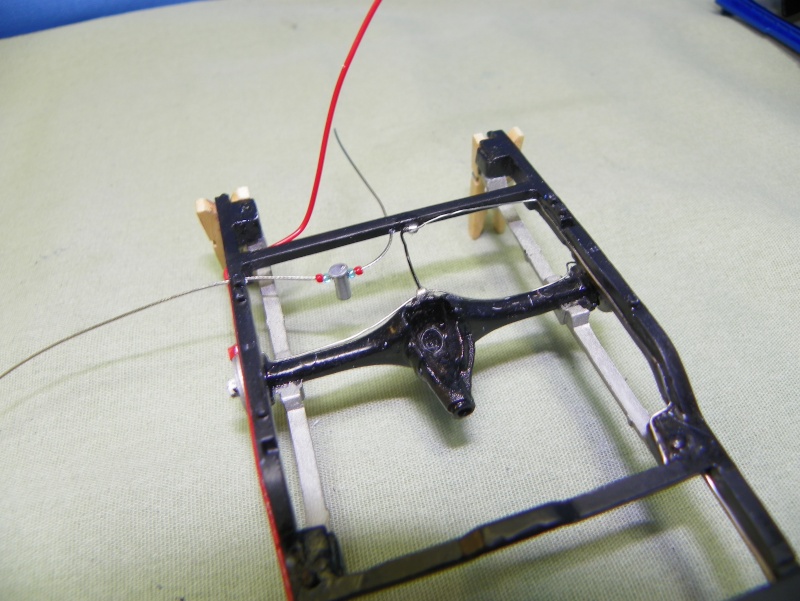
I made a brake system from craft wire and beads. Here is the start for the part that goes over the rear end.

After that was done I put the color to the body. Here it is right out of the booth.


I used a Black Gel Pen to do the molding around the windshield and rear window. Used BMF on the side maker lights and painted them ,amber front and red rear, then cleared the whole thing.

Here is the in color mock up.

With all that done it's time to move on again. Next I will get the engine in the frame and the fuel system wired and plumbed. The battery cables will be added at the same time.
Thanks for looking, All comments and questions are welcome. Again thanks for the tip on those ferrules Don, They are awesome.
Got quite a bit done to the truck. I followed Wisdonm's advice and bought a Ferrule assortment from Ferrule Direct.
http://www.ferrulesdirect.com
There are so many choices that you have to start somewhere to get the right size for what you want. Anyway. There was one size that worked perfect for a header collector.
I plan on making the exhaust from 3/32 aluminum tubing so these worked perfect. Thanks Don.
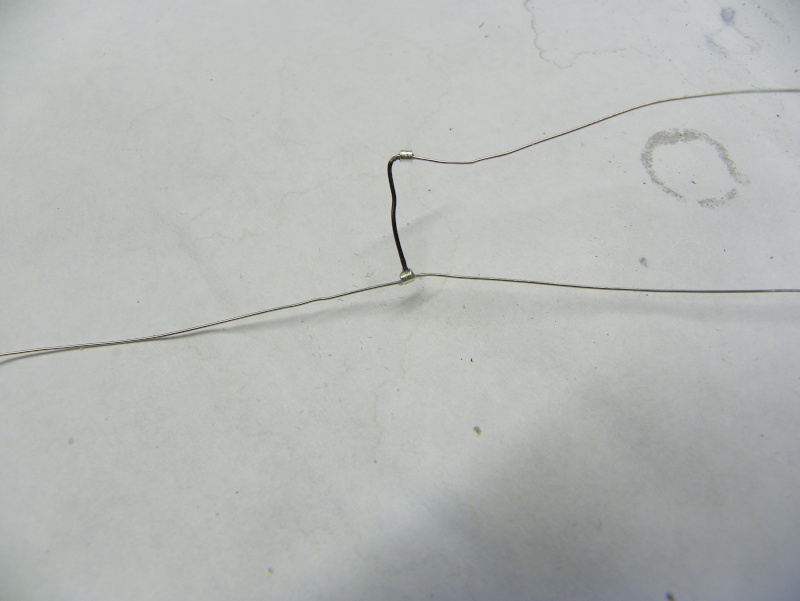
I made a brake system from craft wire and beads. Here is the start for the part that goes over the rear end.
After that was done I put the color to the body. Here it is right out of the booth.
I used a Black Gel Pen to do the molding around the windshield and rear window. Used BMF on the side maker lights and painted them ,amber front and red rear, then cleared the whole thing.
Here is the in color mock up.
With all that done it's time to move on again. Next I will get the engine in the frame and the fuel system wired and plumbed. The battery cables will be added at the same time.
Thanks for looking, All comments and questions are welcome. Again thanks for the tip on those ferrules Don, They are awesome.
Guest- Guest
Re: Big Blue Chevy Truck
![]() by Guest Fri 08 Mar 2013, 2:47 am
by Guest Fri 08 Mar 2013, 2:47 am
I got more done on this one. I am going to share some with ya, but want to hold back a little for the New Model Announcement. There has been so much scratch building and time spent looking through my junk yard I feel that over half the time has been spent there and not on the build it's self.
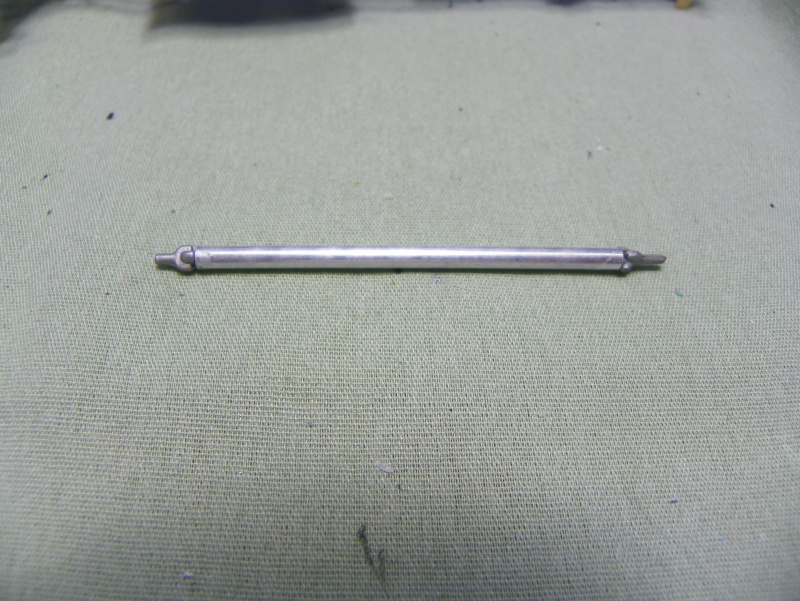
I made the drive shaft from 1/8 aluminum tubing. Trying to replicate a 3 inch aluminum drive shaft.
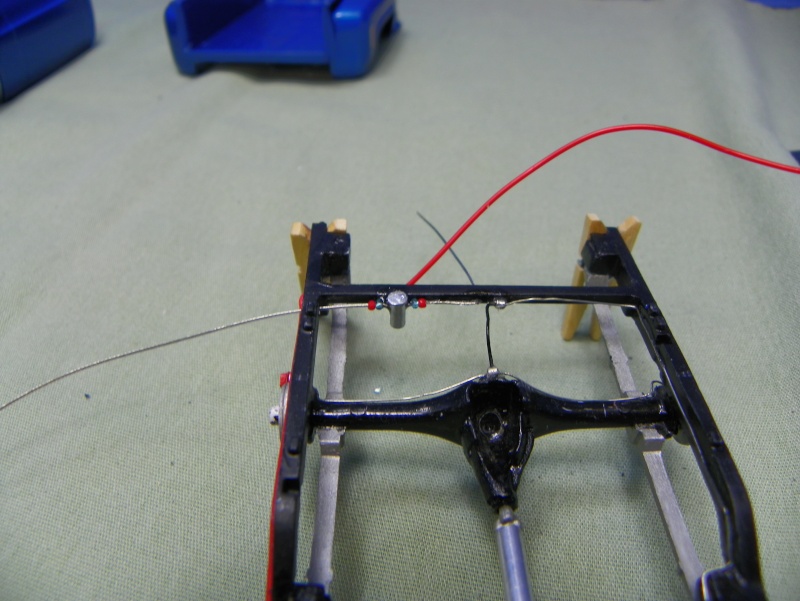
The whole fuel system is plumbed. I wanted to share with you how I made the fuel pump. It is an old coil that I filed flat on top and drilled. Then added the seed beads. The line is 7 strand .015 braided cable.
In this photo you can see the finished fuel pump and the back half of the drive line.
That's all for now. I have to get the Model of the Year prize wrapped and mailed. Thanks for looking in. Any comments or questions are welcome.
I made the drive shaft from 1/8 aluminum tubing. Trying to replicate a 3 inch aluminum drive shaft.
The whole fuel system is plumbed. I wanted to share with you how I made the fuel pump. It is an old coil that I filed flat on top and drilled. Then added the seed beads. The line is 7 strand .015 braided cable.
In this photo you can see the finished fuel pump and the back half of the drive line.
That's all for now. I have to get the Model of the Year prize wrapped and mailed. Thanks for looking in. Any comments or questions are welcome.
Guest- Guest
Re: Big Blue Chevy Truck
![]() by Guest Fri 08 Mar 2013, 3:00 am
by Guest Fri 08 Mar 2013, 3:00 am
These trucks were the same for a long time. I think they started the body style in 1973 and used it until the mid 80's. Not sure I am not into trucks all that much.
Thanks for the comments guys.
Just a couple more and then the NMA maybe tomorrow.
This shows the alternator 'Down Low" mount. I know things look a little rough but I haven't touched up on stuff yet.

The finished Bed.
I am going to scratch build the exhaust system out of 1/8" Aluminum tubing. Same as the drive line. I think it will all look close to 3 inch.
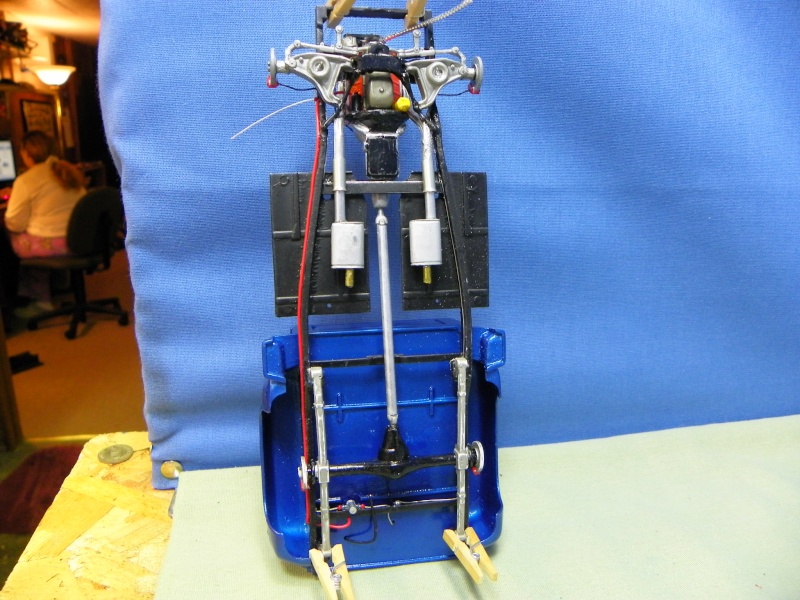
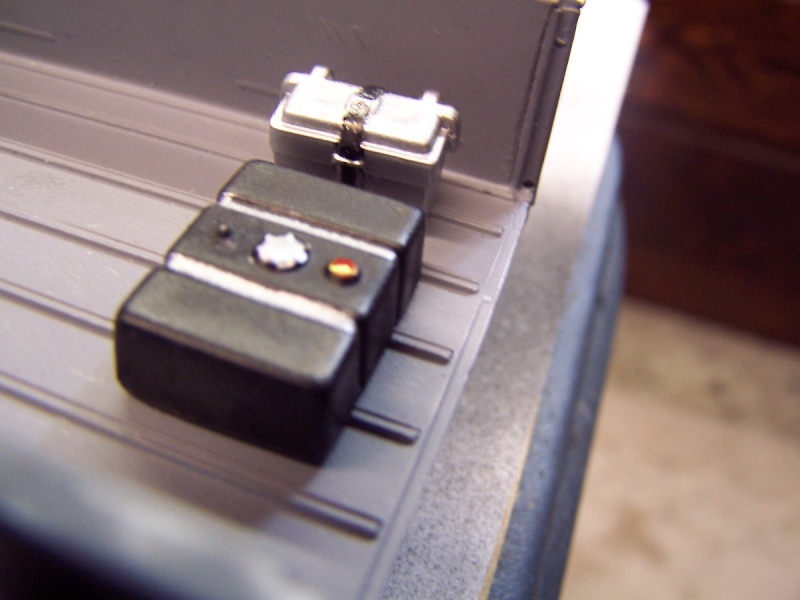
This shows the cab located and mounted to the frame and the engine bay. Not all the detailing is done. But you can see the homemade MSD box. The fuel pressure regulator is scratched from a piece of spruce.

So with all that done. I can finish the exhaust. And when I was done it looked like this.

Here are the home made license plates decided to put on it.

Well that's all for this one. All that's left is bumpers, rear shocks and some lettering. That will be revealed in the NMA. Tomorrow.
I will say that this was a lot harder than I thought it would be when I started. I figured that I would build the truck out of the 2 kits and move on. The only thing I used from the kits was the two wheel drive frame from the Street Truck kit and the body from the 4x4. Everything else came out of the junk yard ,was after market or scratch built. I think I did alright. It is not exactly like his truck, he'd never run a Goodyear Slick for one, but close enough that he enjoyed the build. I know he has been lurking here watching. Him and his buddy Matt. More on Matt and the truck later.
Thanks for the comments guys.
Just a couple more and then the NMA maybe tomorrow.
This shows the alternator 'Down Low" mount. I know things look a little rough but I haven't touched up on stuff yet.
The finished Bed.
I am going to scratch build the exhaust system out of 1/8" Aluminum tubing. Same as the drive line. I think it will all look close to 3 inch.
This shows the cab located and mounted to the frame and the engine bay. Not all the detailing is done. But you can see the homemade MSD box. The fuel pressure regulator is scratched from a piece of spruce.
So with all that done. I can finish the exhaust. And when I was done it looked like this.
Here are the home made license plates decided to put on it.
Well that's all for this one. All that's left is bumpers, rear shocks and some lettering. That will be revealed in the NMA. Tomorrow.
I will say that this was a lot harder than I thought it would be when I started. I figured that I would build the truck out of the 2 kits and move on. The only thing I used from the kits was the two wheel drive frame from the Street Truck kit and the body from the 4x4. Everything else came out of the junk yard ,was after market or scratch built. I think I did alright. It is not exactly like his truck, he'd never run a Goodyear Slick for one, but close enough that he enjoyed the build. I know he has been lurking here watching. Him and his buddy Matt. More on Matt and the truck later.
Guest- Guest
Re: Big Blue Chevy Truck
![]() by Walt Francis Fri 08 Mar 2013, 3:16 am
by Walt Francis Fri 08 Mar 2013, 3:16 am
:affraid: This is one bad boy, I am loving all the detail work going into her.

Walt Francis- New Member

- Posts : 68
Join date : 2013-02-26
Location : West Monroe, NY -

Re: Big Blue Chevy Truck
![]() by Skid Fri 08 Mar 2013, 10:48 am
by Skid Fri 08 Mar 2013, 10:48 am
Terrific work Buck. The bed looks fantastic.
_________________
Al.
Constructive criticism is always welcome.
“Success always demands a greater effort.” Winston Churchill
"Success is failure turned inside out" Unknown

Skid- Admin
- Posts : 7128
Join date : 2013-02-15
Age : 75
Location : Newcastle. Good Old Blighty. -
Re: Big Blue Chevy Truck
![]() by Geezerman Fri 08 Mar 2013, 12:06 pm
by Geezerman Fri 08 Mar 2013, 12:06 pm
Great lookin model, Buck.
Detailing is incredible!
Detailing is incredible!

Geezerman- Advanced Member

- Posts : 3651
Join date : 2013-02-24
Age : 88
Location : Gulf coast of central Florids
Re: Big Blue Chevy Truck
![]() by Guest Fri 08 Mar 2013, 5:21 pm
by Guest Fri 08 Mar 2013, 5:21 pm
Thanks guys. I did enjoy this build. I spent a lot of time in the scrap yard digging up parts.
Guest- Guest
dogfish7- Intermediate Member

- Posts : 668
Join date : 2013-02-27
Age : 77
Location : Hoodsport, WA
Re: Big Blue Chevy Truck
![]() by VirusX Fri 08 Mar 2013, 9:55 pm
by VirusX Fri 08 Mar 2013, 9:55 pm
Well done, ZB. I loved all the detail work you added (lines, fittings, etc.). Great WIP

VirusX- New Member
- Posts : 73
Join date : 2013-03-01
Age : 37
Location : Cold Lake, Alberta, Canada
» Big Blue Chevy Truck
» 57 Chevy Truck
» Chevy truck with Russian Snowmobile trailer.
» Chevy truck with Russian snowmobile trailer (commission build)
» Chevy truck with sled deck and 1/24th scale diecast sled.
» 57 Chevy Truck
» Chevy truck with Russian Snowmobile trailer.
» Chevy truck with Russian snowmobile trailer (commission build)
» Chevy truck with sled deck and 1/24th scale diecast sled.
Skid's :: Works In Progress :: Trucks
Page 1 of 1
Permissions in this forum:
You cannot reply to topics in this forum|
|
|