
Orange Crate
4 posters
Skid's :: Works In Progress :: Race cars
Page 1 of 1

Orange Crate
![]() by Guest Sat 23 Mar 2013, 9:48 pm
by Guest Sat 23 Mar 2013, 9:48 pm

"Orange Crate" when someone speaks those words everything around goes silent. I don't know how old this kit is. I tried to build it as a kid and that didn't work out well. Just to many small parts to deal with. This kit is a 1991 reissue. The flash is terrible. I have part of another kit in case of emergency but the flash is even worse on it. I guess this is one of those kits you really have to want to build to do it.
I have been looking at this kit for 4 or 5 years thinking "Some day", well it's time. I have a poster of this car hanging on the wall, I have an issue of Rodders Journal that has a 10 or 12 page spread on the car. It has the history of the car back to when it was primer and had a Ford Flathead engine. Then when it had a Ardun headed Ford Flathead. Then in the late 50's Bob Tindle got ah old of it. He didn't own the car but did build it and his brother drove it. I am not going to go into any more history on the car now because it is long and I don't want to sit here and type all day. :)
I saw the car in person and talked with the present owner at the 50TH Portland Roadster Show. I figured it would be there. The car was built in Portland, Oregon. From 20 feet the car looks good. From 5 feet it's a little rough, showing it's age really. The chrome on the frame is starting to peel, paint is chipped here and there. And that's OK just adds caricature to the car. The hood wasn't with the car. It's damaged somehow. The car now has some green ghost flames that looks like stems and leaves of the orange. I ain't doing none of that. The car was wrecked a couple times and rebuilt so it's hard to build an accurate model. My goal is just to build a good looking Orange Crate. So no braided lines, no anodized A&N Fittings, etc. Just try to build like they did in 1959 Brass, black rubber, stainless those kind of things. Let's get started.
The lettering on the M&H drag slicks and Firestone front tires is painted Orange. That is something I wanted to bring into the build. I used the Slicks from the Double Dragster Kit, with the white lettering, and these ultra fine point pens I found at Staples. The tip is only .3 mm so you can do some fine work with them. The ink seems like a paint more than an ink. Works good. They were less than 10 bucks.
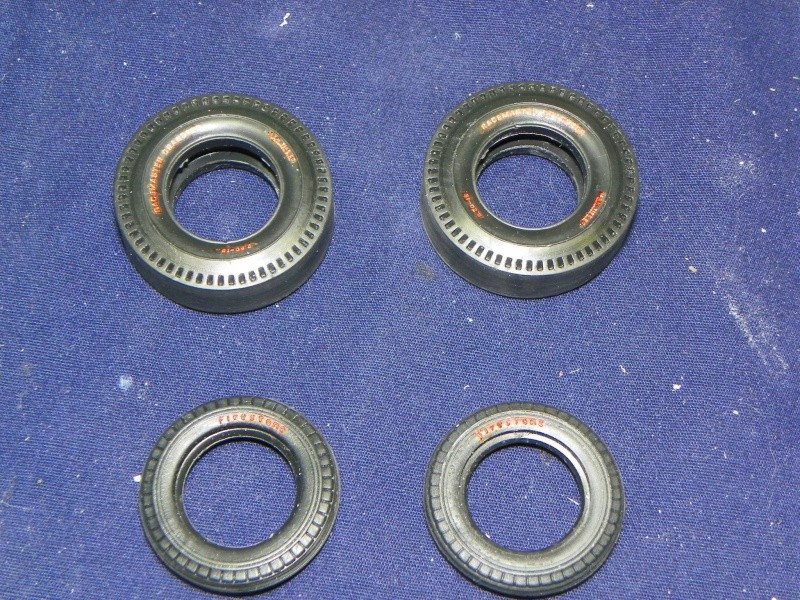

The front tires were a little harder to do. The Orange didn't show well on the black lettering. I used a fine tipped "White Out" pen to go over them. Let it set a day or two then do the Orange. Not perfect but it'll fly.
That done I wanted to hang the doors on the body. That way if there was any body work to do I could do it before primer. So it's on to the tiny hinges.


In this picture you can see the Green Ghost flames I was talking about.

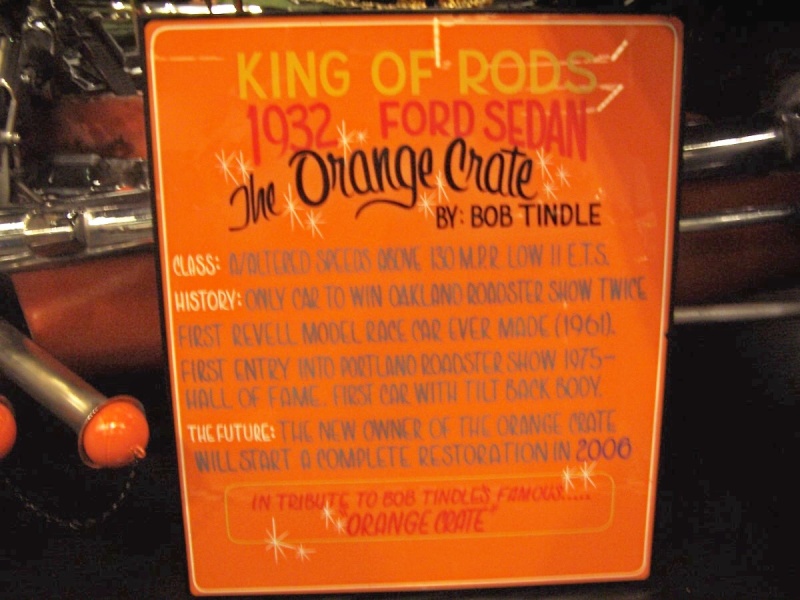
Here is the Place Card that was at the PRS with the car. It says that a complete restoration would start in 2008. I don't know if that happened or not.
OK time to wrap this up and go work on it. Thanks for looking in. All questions and comments are welcome.
Guest- Guest
Re: Orange Crate
![]() by Guest Sat 23 Mar 2013, 10:03 pm
by Guest Sat 23 Mar 2013, 10:03 pm
Thanks for the comments and following along.
So here it is day 2 of the build and already I am having trouble with this kit. Same problems I remember as a kid. I got the door hinges all cleaned up. Got the doors hung and the hinges held in place with MEK. Man I love that stuff. Just a little gap at the bottom of the passenger side door. I can fix that with some flat styrene.

Drivers side looks good,

That's when it all went south. The lower hinge on the passenger side broke and the lower hinge pin on the drivers side broke off.

No problem I thought. I have a parted out kit of the street version of this kit as a donor. I knew the wheels and tires were gone but hadn't really looked at the rest of the kit. So I dig out the body and doors. Guess what. The hinge pins are broken on one of the doors.

The other half of the hinge was glued into the body already. This explains why this kit was parted out. So rather than mess with it any more I found some straight pins with a very small head. I taped the doors in place and then drilled through both hinge halves at the same time with a .025 drill bit. Then hung the doors with the home made pins.
That got the doors hung and the belt line is fairly close to lining up. It never was perfect on any of these cars even when they were new. The down side is now I can't get them back apart to paint. So I put the primer on pins and all. Everything still works and I think I can pull it off.

I will just have to be very gentle with it. Probably display it with the body up and the doors shut anyway.
So with that behind me I moved on to the engine. It comes in several pieces so I looked at the reference pictures and put together everything that will be orange. Then the primer.

Then a coat of Dulpi-color GM Medium Orange part number DSGM 249. This is an older can of paint. Dulpi-color has changed all their part numbers so that number may or may not work.

So the body primer is setting and the engine color is drying I moved on to the frame. The frame comes on the chrome tree and has a bunch of little parts inside of it. You can see the flash also.

By the time I got it off the tree and cleaned up there was almost no chrome left. I threw it in the bleach and waited. Then I sanded it down smooth and put some Gloss Black on it. I will shoot it with Alcad later. Same program for the firewall. On the real car it is chrome in the kit it is orange. So I got it ready for the Alcad also.

So that brings everybody up to date. I was going to paint the car with House of Kolor Candy Orange but didn't have any. So I will use the Dulpi-Color Medium Orange. It is very close to the pictures I have.
Thanks for looking in all comments and questions are welcome.
So here it is day 2 of the build and already I am having trouble with this kit. Same problems I remember as a kid. I got the door hinges all cleaned up. Got the doors hung and the hinges held in place with MEK. Man I love that stuff. Just a little gap at the bottom of the passenger side door. I can fix that with some flat styrene.
Drivers side looks good,
That's when it all went south. The lower hinge on the passenger side broke and the lower hinge pin on the drivers side broke off.
No problem I thought. I have a parted out kit of the street version of this kit as a donor. I knew the wheels and tires were gone but hadn't really looked at the rest of the kit. So I dig out the body and doors. Guess what. The hinge pins are broken on one of the doors.
The other half of the hinge was glued into the body already. This explains why this kit was parted out. So rather than mess with it any more I found some straight pins with a very small head. I taped the doors in place and then drilled through both hinge halves at the same time with a .025 drill bit. Then hung the doors with the home made pins.
That got the doors hung and the belt line is fairly close to lining up. It never was perfect on any of these cars even when they were new. The down side is now I can't get them back apart to paint. So I put the primer on pins and all. Everything still works and I think I can pull it off.
I will just have to be very gentle with it. Probably display it with the body up and the doors shut anyway.
So with that behind me I moved on to the engine. It comes in several pieces so I looked at the reference pictures and put together everything that will be orange. Then the primer.
Then a coat of Dulpi-color GM Medium Orange part number DSGM 249. This is an older can of paint. Dulpi-color has changed all their part numbers so that number may or may not work.
So the body primer is setting and the engine color is drying I moved on to the frame. The frame comes on the chrome tree and has a bunch of little parts inside of it. You can see the flash also.
By the time I got it off the tree and cleaned up there was almost no chrome left. I threw it in the bleach and waited. Then I sanded it down smooth and put some Gloss Black on it. I will shoot it with Alcad later. Same program for the firewall. On the real car it is chrome in the kit it is orange. So I got it ready for the Alcad also.
So that brings everybody up to date. I was going to paint the car with House of Kolor Candy Orange but didn't have any. So I will use the Dulpi-Color Medium Orange. It is very close to the pictures I have.
Thanks for looking in all comments and questions are welcome.
Guest- Guest
Re: Orange Crate
![]() by Sam Sat 23 Mar 2013, 10:39 pm
by Sam Sat 23 Mar 2013, 10:39 pm
Buck, I will suffer through this with you because I must have half a dozen of these kits. lol
Sam- Resident member

- Posts : 1962
Join date : 2013-02-23
Age : 57
Location : Back in Toledo, Oregon
Re: Orange Crate
![]() by Guest Sat 23 Mar 2013, 11:20 pm
by Guest Sat 23 Mar 2013, 11:20 pm
Thanks for the comments guys. Now that I have the hinges behind me I have been making a little progress on this build. There is so much flash and so much to be done I have been kinda working on everything at once.
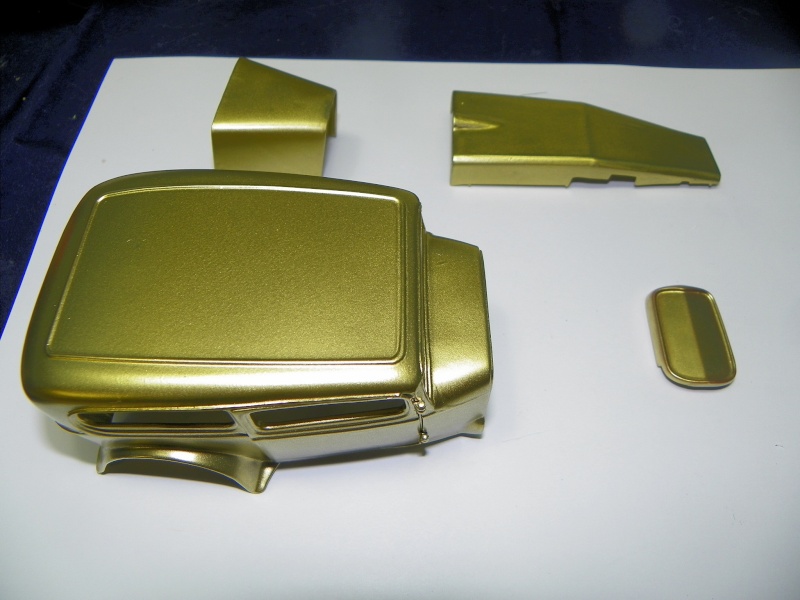
The Dulpi-Color GM Medium Orange is really a transparent paint and it was hard to cover the primer with the paint. So I wet sanded the body parts with 2000 grit and gave the a pop coat. I used Rust-Oleum Specialty Metallic Brass for the pop coat. I am not sure what kind of paint it is but Dupli-color paint will go over the top of it with no bad effect.
So I went from this .

To this.
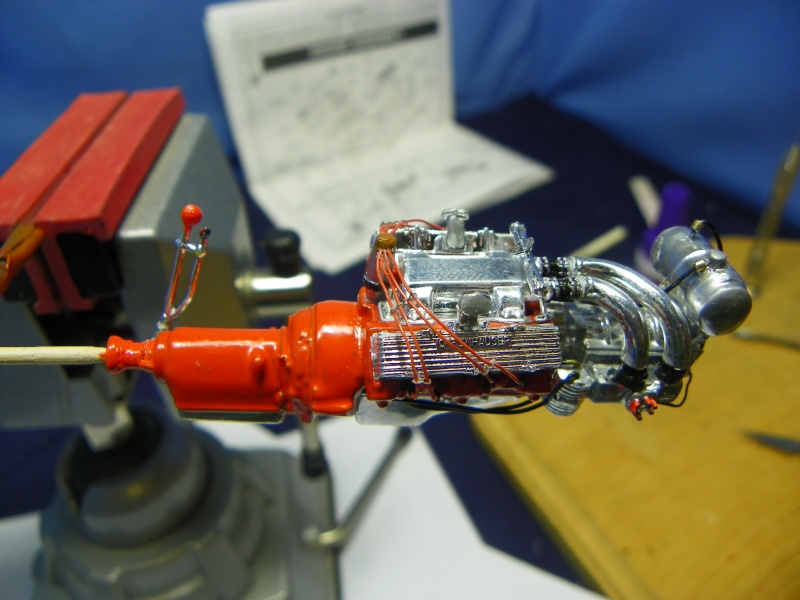
Then while the paint was drying and airing out I did some of the engine stuff.
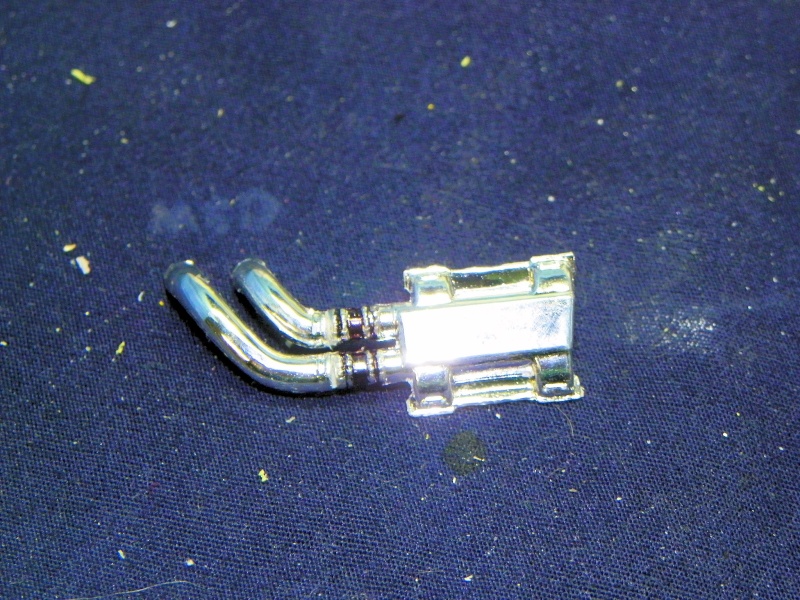
Got the intake hoses onto the intake manifold and the rubber connections done.
got the starter and magneto done.

Even had 28 guage orange craft wire for the spark plug wires. That surprised me I thought I would have to paint some.

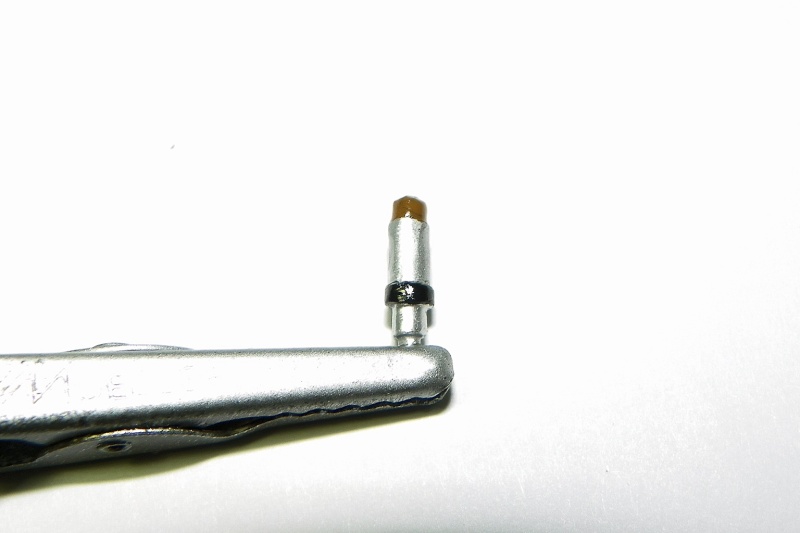
Got the fire extinguisher done. That is dulpi-color red anodize paint over the Rust-Oleum Brass. did the high lights with gel pen. I will do the guage face later. Man gel pens take a couple or three days to dry.

Valley pan is done in Flat Aluminum say the instructions say.

mock up the intake.

The engine oil pan is kit chrome. The transmission bottom pan and side pan are BMF with 2 coats of clear over them.

I think it will be a good looking engine when done.

In this picture you can see that the blower has a safety blow off valve on the side. Looks like it is just spring loaded so it the intake pressure gets to high it will open up.
So that's where I am at. Going to make this piece look like that. I have some .018" wire I have painted orange. I will use them to replicate the springs. The part its self will be treated to some type of chrome when I am through cleaning it up and drilling it.

So that's where we are at. I hope to have another up date soon. This is just a tough kit to build. Tons of flash to deal with.
Thanks for looking in all comments and question are welcome.
The Dulpi-Color GM Medium Orange is really a transparent paint and it was hard to cover the primer with the paint. So I wet sanded the body parts with 2000 grit and gave the a pop coat. I used Rust-Oleum Specialty Metallic Brass for the pop coat. I am not sure what kind of paint it is but Dupli-color paint will go over the top of it with no bad effect.
So I went from this .
To this.
Then while the paint was drying and airing out I did some of the engine stuff.
Got the intake hoses onto the intake manifold and the rubber connections done.
got the starter and magneto done.
Even had 28 guage orange craft wire for the spark plug wires. That surprised me I thought I would have to paint some.
Got the fire extinguisher done. That is dulpi-color red anodize paint over the Rust-Oleum Brass. did the high lights with gel pen. I will do the guage face later. Man gel pens take a couple or three days to dry.
Valley pan is done in Flat Aluminum say the instructions say.
mock up the intake.
The engine oil pan is kit chrome. The transmission bottom pan and side pan are BMF with 2 coats of clear over them.
I think it will be a good looking engine when done.
In this picture you can see that the blower has a safety blow off valve on the side. Looks like it is just spring loaded so it the intake pressure gets to high it will open up.
So that's where I am at. Going to make this piece look like that. I have some .018" wire I have painted orange. I will use them to replicate the springs. The part its self will be treated to some type of chrome when I am through cleaning it up and drilling it.
So that's where we are at. I hope to have another up date soon. This is just a tough kit to build. Tons of flash to deal with.
Thanks for looking in all comments and question are welcome.
Guest- Guest
Re: Orange Crate
![]() by Guest Sat 23 Mar 2013, 11:22 pm
by Guest Sat 23 Mar 2013, 11:22 pm
I have often wondered about that Al. I think you maybe right. But if you let them set a couple days it seems to get better. I am talking about the gel pens. Once you get clear over the ink you are ok. Just takes awhile before you can do that.
Sharpie now has pens (permannet marker) with a .30 mm tip. They are a lot better but the colors are limited
Guest- Guest
Re: Orange Crate
![]() by Guest Sat 23 Mar 2013, 11:42 pm
by Guest Sat 23 Mar 2013, 11:42 pm
Thanks for looking in. Thanks for the comments. I hope everyone is doing good.
Since the last update I have gotten some done, had some set backs and worked through most of them. The body is in color and the engine is done. So let's look at them.
Here is the body parts in Dulpi-color GM Medium Orange.

Doors still work!!!!!!!!!!!!!!!

Well that's not entirely true. After the paint had set for a couple hours I noticed that the body in the back down low was a little scarce on paint. You could see the brass pop coat under it. No problem said the Buck we'll put another coat of paint on it. So on the way back to the paint booth I dropped the body. The passengers side door came open and it landed on it breaking the bottom hinge. I tried to repair it but all I managed to do it MEK the hinge shut. So I am not going to mess with the doors anymore. The Orange Crate wins again. I am going to finish it but the doors won't work when it's done.
The interior was a piece of cake. Everything is Semi Gloss Black.

I will detail the buckles with paint and call it good.

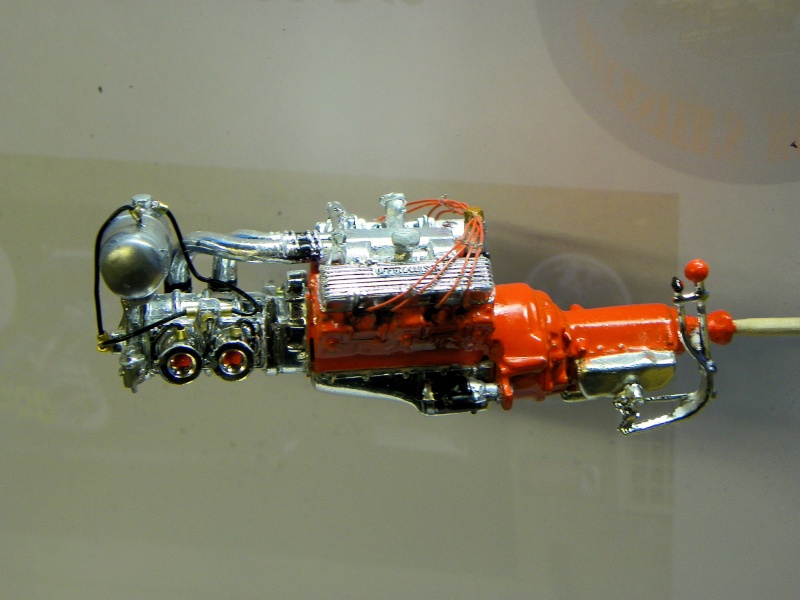
On to the engine. When putting the blower together I noticed that all the fuel lines are molded into the fuel tank and the front blower cover. The fuel pump is even there.

After looking at the photos I have I thought I can do this. So I filed and sanded all the lines off the tank and gave it a shot of Krylon Chrome.

On the intake plenum I wanted to make it look right so I use some .018 brass craft wire and painted it engine color. Then drilled the 6 holes in the "popoff valve" filed them flat and painted the ends black.


The rest of it was done with Brass #1 crimps and .023 craft wire.
When the dust settled it looked like this.
With all that done (except one vacuum line) I put the blower on the engine block and the intake on the engine. That's when I found out the intake tubes don't touch the blower.
So I got some styrene rod the same size and made some disc's to go between the two.
That took care of that. Added the missing vacuum line also. It doesn't make sense to me but I think it is some type of fuel shut off. That line runs from the intake plenum to the fuel pump, so if there was a big pressure change in the plenum it would shut off the fuel. Just a guess.

Then I added the magneto, spark plug wires and boots , oil filter and oil lines and it was a done deal.
So that's where we are. Time to mount up the wheels and tires and start on the chassis. I will wet sand the body decal and clear it also.
Thanks for looking in all comments and questions are welcome.
Since the last update I have gotten some done, had some set backs and worked through most of them. The body is in color and the engine is done. So let's look at them.
Here is the body parts in Dulpi-color GM Medium Orange.
Doors still work!!!!!!!!!!!!!!!
Well that's not entirely true. After the paint had set for a couple hours I noticed that the body in the back down low was a little scarce on paint. You could see the brass pop coat under it. No problem said the Buck we'll put another coat of paint on it. So on the way back to the paint booth I dropped the body. The passengers side door came open and it landed on it breaking the bottom hinge. I tried to repair it but all I managed to do it MEK the hinge shut. So I am not going to mess with the doors anymore. The Orange Crate wins again. I am going to finish it but the doors won't work when it's done.
The interior was a piece of cake. Everything is Semi Gloss Black.
I will detail the buckles with paint and call it good.
On to the engine. When putting the blower together I noticed that all the fuel lines are molded into the fuel tank and the front blower cover. The fuel pump is even there.
After looking at the photos I have I thought I can do this. So I filed and sanded all the lines off the tank and gave it a shot of Krylon Chrome.
On the intake plenum I wanted to make it look right so I use some .018 brass craft wire and painted it engine color. Then drilled the 6 holes in the "popoff valve" filed them flat and painted the ends black.
The rest of it was done with Brass #1 crimps and .023 craft wire.
When the dust settled it looked like this.
With all that done (except one vacuum line) I put the blower on the engine block and the intake on the engine. That's when I found out the intake tubes don't touch the blower.
So I got some styrene rod the same size and made some disc's to go between the two.
That took care of that. Added the missing vacuum line also. It doesn't make sense to me but I think it is some type of fuel shut off. That line runs from the intake plenum to the fuel pump, so if there was a big pressure change in the plenum it would shut off the fuel. Just a guess.
Then I added the magneto, spark plug wires and boots , oil filter and oil lines and it was a done deal.
So that's where we are. Time to mount up the wheels and tires and start on the chassis. I will wet sand the body decal and clear it also.
Thanks for looking in all comments and questions are welcome.
Guest- Guest
Re: Orange Crate
![]() by Guest Sat 23 Mar 2013, 11:58 pm
by Guest Sat 23 Mar 2013, 11:58 pm
Hey everyone I am back. Thanks for all the comments. I know I updated a couple days ago but wanted to write this while it was fresh in my mind.
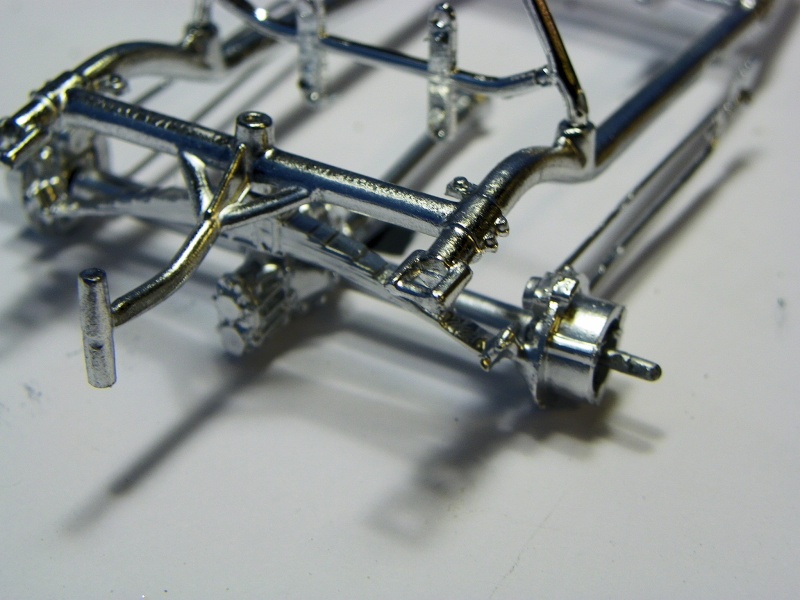
After finishing the power train it was time to move to the rear end. Also wanted to get the frame in Alcad so it could dry. The backs of the wheels needed to be painted Orange like the real car, so here we go.
This is the rear end as the kit would have you build it.

I have never seen anything so flimsy in my life. if you pick it up to move it the whole thing will bend. The two points where the spring goes into the backing plate is all that holds it together.

I mixed up some 3 minute epoxy and reinforced the spot but even after it sat up I could tell there was no gain in strength. I don't expect to race the thing but I do want to haul it around to model shows and not have it in pieces when I arrive there. So I measured the axle inside to inside at the brake drums, Subtracted the width of the differential and divided by 2. Then I cut two tubes to the length and put them over the axle. So they are like the tubes in a real differential.

Some more epoxy and it was good to go. while the epoxy was setting up I painted the frame with Alcad Chrome.

Looks good you say. I agree but with Alcad at 8 bucks an ounce that is $512.00 a gallon. That is expensive paint. And for that price I think it should look better. Maybe some of that is paint technique I will give you that. But here is a picture I want you to look at.
And this one.

Why does this old guy want me to look at these two pictures? Here's the deal. The roll bar is kit chrome, the frame is Alcad Chrome, and the rear end assembly is painted with Krylon Matte Aluminum. It comes in an 11 ounce can for 3 bucks. That's only 234.24 cents a Gallon. Much better deal. :o Not only that but if you want you can clear over it with not bad effect.
In this picture I used it on the firewall and then took a picture of the reflection of a pencil in it.

Here are the wheels and tires already yo go.


And here is the finished rear end assembly.


So that's it for now. I am going to start putting the chassis together and then mount the power train, Oh yes one more picture of the finished power train. this picture was taken before I added the tubes to the differential.

Thanks for looking in all comments and questions are welcome.
After finishing the power train it was time to move to the rear end. Also wanted to get the frame in Alcad so it could dry. The backs of the wheels needed to be painted Orange like the real car, so here we go.
This is the rear end as the kit would have you build it.
I have never seen anything so flimsy in my life. if you pick it up to move it the whole thing will bend. The two points where the spring goes into the backing plate is all that holds it together.
I mixed up some 3 minute epoxy and reinforced the spot but even after it sat up I could tell there was no gain in strength. I don't expect to race the thing but I do want to haul it around to model shows and not have it in pieces when I arrive there. So I measured the axle inside to inside at the brake drums, Subtracted the width of the differential and divided by 2. Then I cut two tubes to the length and put them over the axle. So they are like the tubes in a real differential.
Some more epoxy and it was good to go. while the epoxy was setting up I painted the frame with Alcad Chrome.
Looks good you say. I agree but with Alcad at 8 bucks an ounce that is $512.00 a gallon. That is expensive paint. And for that price I think it should look better. Maybe some of that is paint technique I will give you that. But here is a picture I want you to look at.
And this one.
Why does this old guy want me to look at these two pictures? Here's the deal. The roll bar is kit chrome, the frame is Alcad Chrome, and the rear end assembly is painted with Krylon Matte Aluminum. It comes in an 11 ounce can for 3 bucks. That's only 234.24 cents a Gallon. Much better deal. :o Not only that but if you want you can clear over it with not bad effect.
In this picture I used it on the firewall and then took a picture of the reflection of a pencil in it.
Here are the wheels and tires already yo go.
And here is the finished rear end assembly.
So that's it for now. I am going to start putting the chassis together and then mount the power train, Oh yes one more picture of the finished power train. this picture was taken before I added the tubes to the differential.
Thanks for looking in all comments and questions are welcome.
Guest- Guest
Re: Orange Crate
![]() by Guest Sun 24 Mar 2013, 12:04 am
by Guest Sun 24 Mar 2013, 12:04 am
Thanks Max.
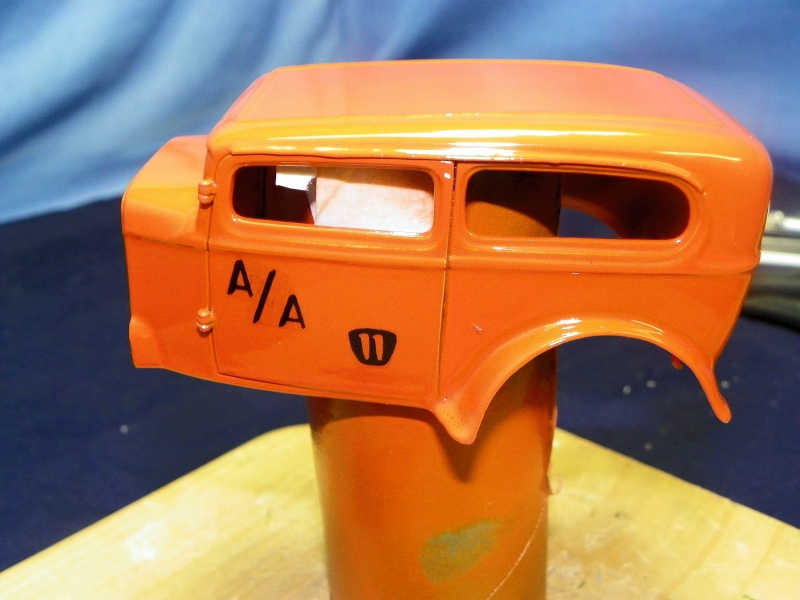
Well this build is on hold until I can resolve a decal issue. Now you would believe that Buck has a decal issue? Man O Man I'll tell ya. I never even thought about the kit being 20 years old. I thought that I would decal the body and they could be drying while I finish the chassis. So this is how they turned out.

And I thought well you can work through this. I got the rear kinda into shape and then looked at the front one it looked like this.


I am now looking around for a set of after market decals. I guess I will finish the chassis and then set it aside until I can get it fixed.
Well this build is on hold until I can resolve a decal issue. Now you would believe that Buck has a decal issue? Man O Man I'll tell ya. I never even thought about the kit being 20 years old. I thought that I would decal the body and they could be drying while I finish the chassis. So this is how they turned out.
And I thought well you can work through this. I got the rear kinda into shape and then looked at the front one it looked like this.
I am now looking around for a set of after market decals. I guess I will finish the chassis and then set it aside until I can get it fixed.
Guest- Guest
Re: Orange Crate
![]() by Guest Sun 24 Mar 2013, 12:13 am
by Guest Sun 24 Mar 2013, 12:13 am
Wow!!!!!!!!!!!!It's been almost a week. So here is where we are at. I haven't gotten anything for decals yet. I did go to Revell's Website
and ask about decals. I got an email back from them telling me to order a set and if they were in stock they would send me a set at no cost. I haven't heard anything from them after I ordered so don't know where that will end up. Have heard back from Dave Fletcher either. But I know he is a busy man and probably forgot.
So what I decided to do was finish the car and if I ever get decals I will remove the body and grille/ They are designed to come off very easily for display purposes.
Thanks for all the comments and suggestions. They are appreciated for sure.
Here is the chassis without the engine. Front and rear suspension mounted and car setting level.

At this point the only thing left to add is glue the engine into the chassis, add the belly pan, fire extinguisher, guages and steering wheel. Then the chassis is done.


So now and will finish the body minus decals and then one more post before the NMA.
Thanks for looking in. All questions and comments are welcome.
and ask about decals. I got an email back from them telling me to order a set and if they were in stock they would send me a set at no cost. I haven't heard anything from them after I ordered so don't know where that will end up. Have heard back from Dave Fletcher either. But I know he is a busy man and probably forgot.
So what I decided to do was finish the car and if I ever get decals I will remove the body and grille/ They are designed to come off very easily for display purposes.
Thanks for all the comments and suggestions. They are appreciated for sure.
Here is the chassis without the engine. Front and rear suspension mounted and car setting level.
At this point the only thing left to add is glue the engine into the chassis, add the belly pan, fire extinguisher, guages and steering wheel. Then the chassis is done.
So now and will finish the body minus decals and then one more post before the NMA.
Thanks for looking in. All questions and comments are welcome.
Guest- Guest
Re: Orange Crate
![]() by Guest Sun 24 Mar 2013, 12:14 am
by Guest Sun 24 Mar 2013, 12:14 am
Update, Update, Update!!!!!!!!!!!!!!!! OK I got the decal scan from Dave Fletcher. How cool is that. Resized the scan, printed the test sheet. Worked perfect, Then,Then,Then No decal paper. So I ordered some from Micromark now just have to wait it out. Anyway the old gal might end up dressed for the ball after all. You can probably tell I am a happy camper.
Guest- Guest
Re: Orange Crate
![]() by Guest Sun 24 Mar 2013, 12:15 am
by Guest Sun 24 Mar 2013, 12:15 am
Just to bring you up to date on this one. I printed the decals today. They turned out pretty good. Of course the problem is no White so they are not perfect. The Yellow is a little transparent so I doubled that part up when I put them on. Still not perfect. I am going to fly it anyway. The body and radiator shell are drying now. I will clear it tomorrow and polish it out. Then this one will be behind me.
Orange Crate 3
Buck 0
That's it the game is over. I won't build it again. I know when to tuck and roll.
Guest- Guest
Re: Orange Crate
![]() by Guest Sun 24 Mar 2013, 12:20 am
by Guest Sun 24 Mar 2013, 12:20 am
OK last update and then this one is put to bed. I really want to thank everyone that followed along on this one. It has been a long build and a trying build, but it's done.
All I really want to show on this last update is the decals. I got an excellent scan from Fletch at SABA. Got the decals printed out and they were very transparent. I see what Wisdonm is talking about now. Any way I tried to double them to bring the yellow out more but it didn't help a bit. Rather than stacking decal on decal I call it a day. Here ya go.


So there you have it. The Orange Crate is done and I am off to bigger and better things. Like A 1937 Ford Sedan.
Thanks for following along all comments and questions are welcome.
All I really want to show on this last update is the decals. I got an excellent scan from Fletch at SABA. Got the decals printed out and they were very transparent. I see what Wisdonm is talking about now. Any way I tried to double them to bring the yellow out more but it didn't help a bit. Rather than stacking decal on decal I call it a day. Here ya go.
So there you have it. The Orange Crate is done and I am off to bigger and better things. Like A 1937 Ford Sedan.
Thanks for following along all comments and questions are welcome.
Guest- Guest
Re: Orange Crate
![]() by Tumbler75 Sun 24 Mar 2013, 12:29 am
by Tumbler75 Sun 24 Mar 2013, 12:29 am
Lookin' killer Buck. I've always passed by this kit on Ebay. Glad I did. It'd end up parts fodder. Can't wait to see more on this stunning build.

Tumbler75- Intermediate Member

- Posts : 854
Join date : 2013-02-25
Age : 49
Location : Prosperity, SC
Re: Orange Crate
![]() by Skid Sun 24 Mar 2013, 11:09 am
by Skid Sun 24 Mar 2013, 11:09 am
It looks good Buck, shame about the decals. I have to get this kit someday.
_________________
Al.
Constructive criticism is always welcome.
“Success always demands a greater effort.” Winston Churchill
"Success is failure turned inside out" Unknown

Skid- Admin
- Posts : 7128
Join date : 2013-02-15
Age : 75
Location : Newcastle. Good Old Blighty. -


craig betts- New Member

- Posts : 233
Join date : 2013-02-22
Location : New Brunswick,Canada
Skid's :: Works In Progress :: Race cars
Page 1 of 1
Permissions in this forum:
You cannot reply to topics in this forum|
|
|