
Cobratee parts box build
Skid's :: Works In Progress :: Road cars
Page 2 of 2 •  1, 2
1, 2
Re: Cobratee parts box build
![]() by Skid Sun 16 Aug 2015, 5:18 pm
by Skid Sun 16 Aug 2015, 5:18 pm
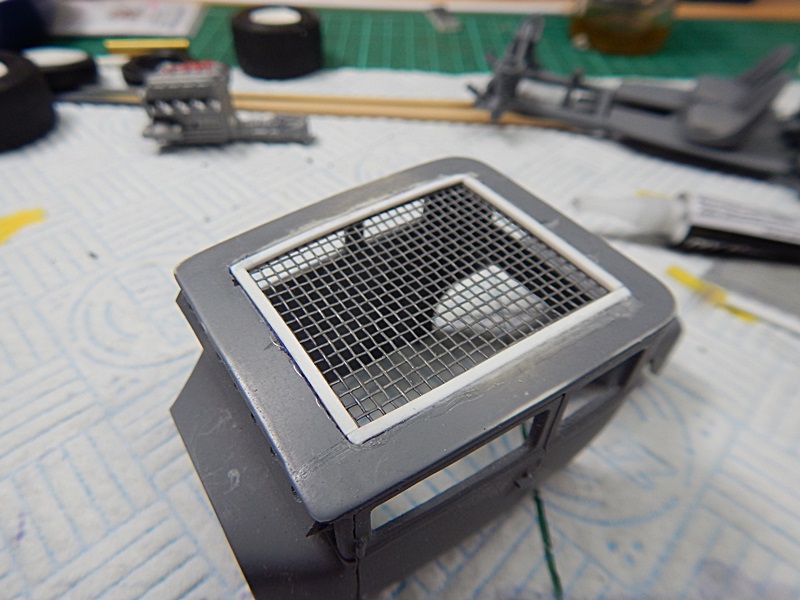
Any way you can bevel the roof opening so the thickness isn't quite so obvious? wrote:
Got a couple of ideas on that John.
In the meantime, I found some more suitable mesh:

The interior is more visible:...

.... and it lets in even more light.

_________________
Al.
Constructive criticism is always welcome.
“Success always demands a greater effort.” Winston Churchill
"Success is failure turned inside out" Unknown

Skid- Admin
- Posts : 7128
Join date : 2013-02-15
Age : 75
Location : Newcastle. Good Old Blighty. -

Re: Cobratee parts box build
![]() by Guest Sun 16 Aug 2015, 6:07 pm
by Guest Sun 16 Aug 2015, 6:07 pm
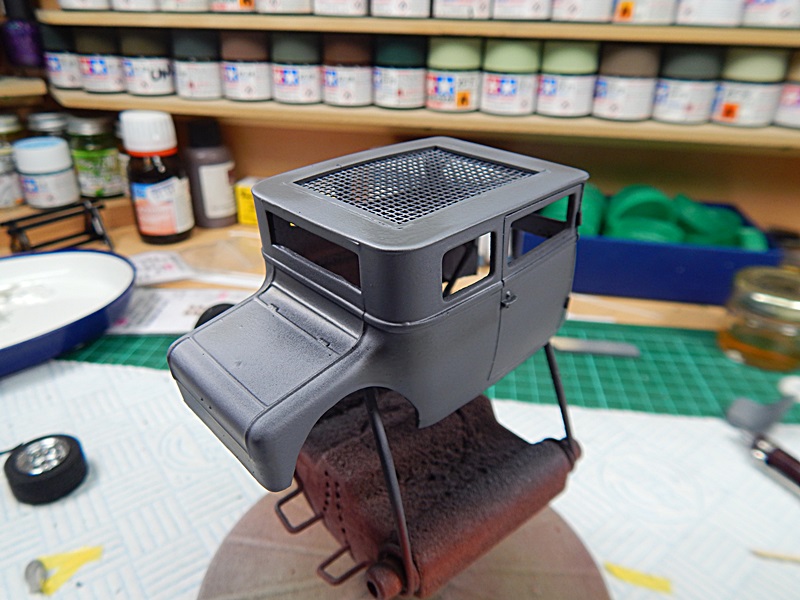
mesh looks a little more in keeping with the theme being a tad heavier gauge
Guest- Guest
Re: Cobratee parts box build
![]() by Skid Sun 16 Aug 2015, 6:40 pm
by Skid Sun 16 Aug 2015, 6:40 pm


Needs a bit of tidying up yet but not too much as it is a rat rod after all.!! LOL
_________________
Al.
Constructive criticism is always welcome.
“Success always demands a greater effort.” Winston Churchill
"Success is failure turned inside out" Unknown
Skid- Admin
- Posts : 7128
Join date : 2013-02-15
Age : 75
Location : Newcastle. Good Old Blighty. -
Re: Cobratee parts box build
![]() by Guest Sun 16 Aug 2015, 6:55 pm
by Guest Sun 16 Aug 2015, 6:55 pm
The opinions expressed here are completely my own..

Guest- Guest
Re: Cobratee parts box build
![]() by Skid Sun 16 Aug 2015, 6:58 pm
by Skid Sun 16 Aug 2015, 6:58 pm
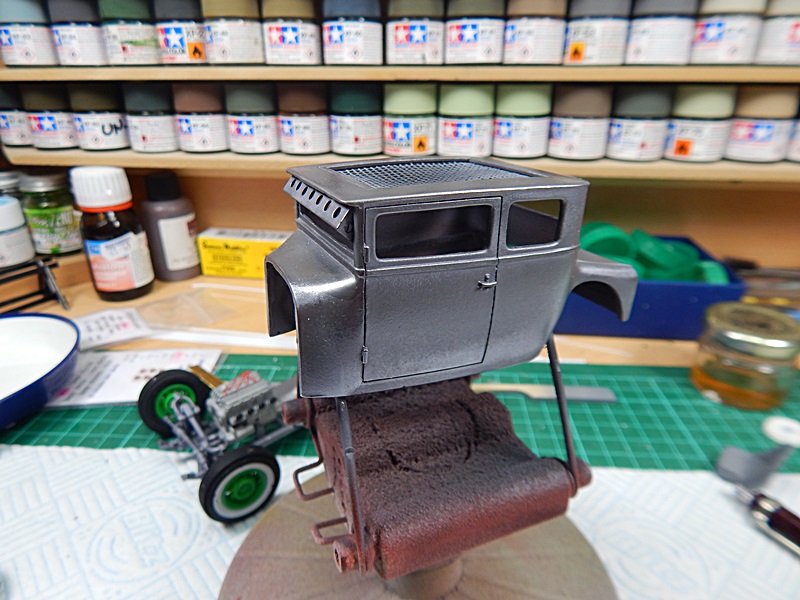
I have the slat's in mind, never fear!! LOL
_________________
Al.
Constructive criticism is always welcome.
“Success always demands a greater effort.” Winston Churchill
"Success is failure turned inside out" Unknown
Skid- Admin
- Posts : 7128
Join date : 2013-02-15
Age : 75
Location : Newcastle. Good Old Blighty. -
Re: Cobratee parts box build
![]() by Guest Sun 16 Aug 2015, 7:19 pm
by Guest Sun 16 Aug 2015, 7:19 pm

Guest- Guest
Re: Cobratee parts box build
![]() by Skid Sun 16 Aug 2015, 10:29 pm
by Skid Sun 16 Aug 2015, 10:29 pm
Last edited by Skid on Sun 16 Aug 2015, 11:46 pm; edited 1 time in total
_________________
Al.
Constructive criticism is always welcome.
“Success always demands a greater effort.” Winston Churchill
"Success is failure turned inside out" Unknown
Skid- Admin
- Posts : 7128
Join date : 2013-02-15
Age : 75
Location : Newcastle. Good Old Blighty. -
Re: Cobratee parts box build
![]() by Johnag Sun 16 Aug 2015, 11:43 pm
by Johnag Sun 16 Aug 2015, 11:43 pm
Skid wrote:
Get outta here!!!

_________________
Andy...
Life isn't about how to survive the storm, but how to dance in the rain...

Johnag- Moderator

- Posts : 1576
Join date : 2013-10-12
Age : 58
Location : North Wales, U.K... -
Re: Cobratee parts box build
![]() by Skid Sun 16 Aug 2015, 11:45 pm
by Skid Sun 16 Aug 2015, 11:45 pm


_________________
Al.
Constructive criticism is always welcome.
“Success always demands a greater effort.” Winston Churchill
"Success is failure turned inside out" Unknown
Skid- Admin
- Posts : 7128
Join date : 2013-02-15
Age : 75
Location : Newcastle. Good Old Blighty. -
Re: Cobratee parts box build
![]() by Skid Mon 17 Aug 2015, 6:36 pm
by Skid Mon 17 Aug 2015, 6:36 pm
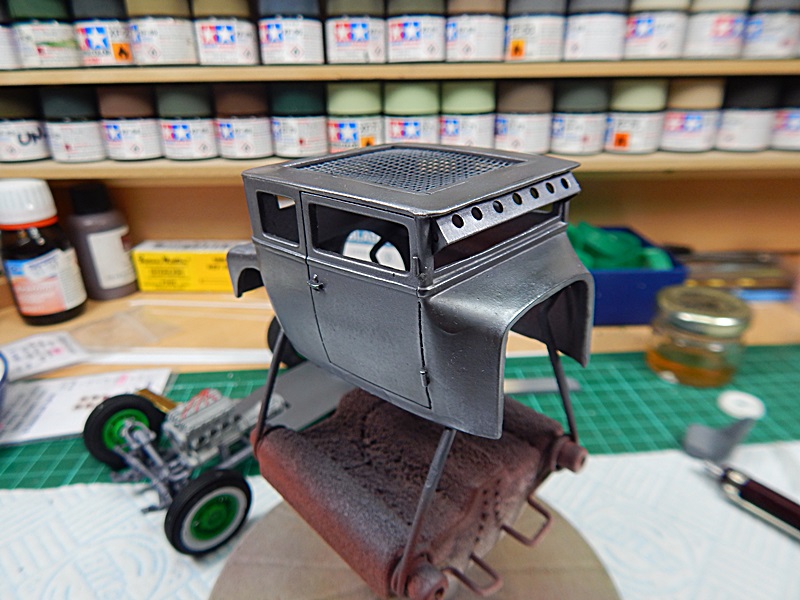
I also painted the wheels and changed the front tyres for fat whitewalls. There are a few chips out of the white walls but I think they will fit in OK when the body etc is 'weathered'.


_________________
Al.
Constructive criticism is always welcome.
“Success always demands a greater effort.” Winston Churchill
"Success is failure turned inside out" Unknown
Skid- Admin
- Posts : 7128
Join date : 2013-02-15
Age : 75
Location : Newcastle. Good Old Blighty. -
Re: Cobratee parts box build
![]() by Speed Racer 65 Mon 17 Aug 2015, 6:44 pm
by Speed Racer 65 Mon 17 Aug 2015, 6:44 pm

Speed Racer 65- Intermediate Member

- Posts : 865
Join date : 2015-08-06
Location : Louisville KY
Re: Cobratee parts box build
![]() by Guest Mon 17 Aug 2015, 8:05 pm
by Guest Mon 17 Aug 2015, 8:05 pm
Looks good mate.
Guest- Guest
Re: Cobratee parts box build
![]() by Skid Mon 17 Aug 2015, 11:31 pm
by Skid Mon 17 Aug 2015, 11:31 pm

... so I started by spraying it with Red Oxide primer, followed by Humbrol Metalcote Steel.

It dried a little patchy over the red primer which is just perfect for the look I want. I then gave it a light buffing:


It still has the slightly patchy look I was hoping for, so now it's on to some light weathering.
_________________
Al.
Constructive criticism is always welcome.
“Success always demands a greater effort.” Winston Churchill
"Success is failure turned inside out" Unknown
Skid- Admin
- Posts : 7128
Join date : 2013-02-15
Age : 75
Location : Newcastle. Good Old Blighty. -
Re: Cobratee parts box build
![]() by Skid Tue 18 Aug 2015, 6:50 pm
by Skid Tue 18 Aug 2015, 6:50 pm
SO..... I looked in my paint stash and came up with Tamiya Flat Dark Iron. Test show it's impervious to the fixer solvent.....

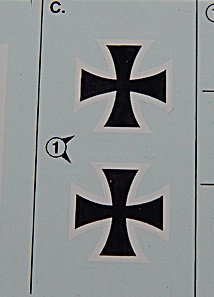
but you know, I think it would look good as is with maybe the addition of door decals.
_________________
Al.
Constructive criticism is always welcome.
“Success always demands a greater effort.” Winston Churchill
"Success is failure turned inside out" Unknown
Skid- Admin
- Posts : 7128
Join date : 2013-02-15
Age : 75
Location : Newcastle. Good Old Blighty. -
Re: Cobratee parts box build
![]() by Guest Tue 18 Aug 2015, 7:18 pm
by Guest Tue 18 Aug 2015, 7:18 pm
Use this technique all the time with weathering whether it be rust, mud, sand, soil ... works everytime
If you're going with decals Al ... maybe a skull and crossbones or similar???
Guest- Guest
Re: Cobratee parts box build
![]() by Skid Wed 19 Aug 2015, 12:48 am
by Skid Wed 19 Aug 2015, 12:48 am
This time around I went for the solid body but with old surface rust look:

This is what I ended up with, which I'm pretty pleased with:

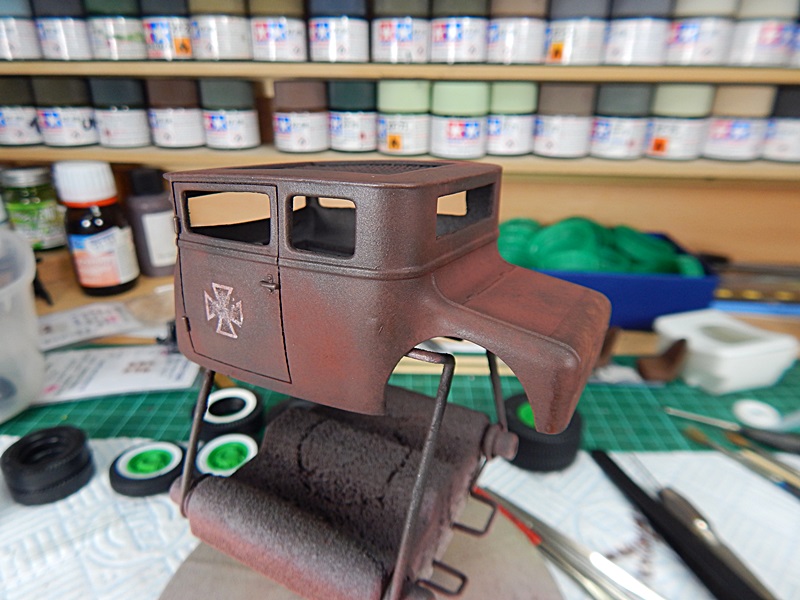


Ever mindful of the 'less is more' principle when weathering, I stopped here. But I'm wondering now, should I add a little even lighter coloured rust?
I also added a firewall and distressed the Maltese Cross. (No skull and crossbones Colin)
BTW, I used Bragdon Weathering Powders which were sent across the pond to me by by good buddie, JohnJ.
Thanks Bro.

_________________
Al.
Constructive criticism is always welcome.
“Success always demands a greater effort.” Winston Churchill
"Success is failure turned inside out" Unknown
Skid- Admin
- Posts : 7128
Join date : 2013-02-15
Age : 75
Location : Newcastle. Good Old Blighty. -


Geezerman- Advanced Member

- Posts : 3651
Join date : 2013-02-24
Age : 88
Location : Gulf coast of central Florids
Re: Cobratee parts box build
![]() by Skid Wed 19 Aug 2015, 5:20 pm
by Skid Wed 19 Aug 2015, 5:20 pm


_________________
Al.
Constructive criticism is always welcome.
“Success always demands a greater effort.” Winston Churchill
"Success is failure turned inside out" Unknown
Skid- Admin
- Posts : 7128
Join date : 2013-02-15
Age : 75
Location : Newcastle. Good Old Blighty. -
Re: Cobratee parts box build
![]() by Johnag Wed 19 Aug 2015, 5:22 pm
by Johnag Wed 19 Aug 2015, 5:22 pm
Looks great Sir, may I ask how do you use these powders please, do you spray them on with the airbrush and dab them on with a normal hairy brush, maybe time for a tutorial (pretty please)...
Andy...

_________________
Andy...
Life isn't about how to survive the storm, but how to dance in the rain...
Johnag- Moderator
- Posts : 1576
Join date : 2013-10-12
Age : 58
Location : North Wales, U.K... -
Re: Cobratee parts box build
![]() by Skid Wed 19 Aug 2015, 5:40 pm
by Skid Wed 19 Aug 2015, 5:40 pm
OK... fair do's. Gimme a couple of days and I'll work up a proper tutorial.
_________________
Al.
Constructive criticism is always welcome.
“Success always demands a greater effort.” Winston Churchill
"Success is failure turned inside out" Unknown
Skid- Admin
- Posts : 7128
Join date : 2013-02-15
Age : 75
Location : Newcastle. Good Old Blighty. -
Re: Cobratee parts box build
![]() by Guest Wed 19 Aug 2015, 5:50 pm
by Guest Wed 19 Aug 2015, 5:50 pm
 Looks great, Nice work on the weathering.
Guest- Guest
Re: Cobratee parts box build
![]() by Johnag Wed 19 Aug 2015, 8:03 pm
by Johnag Wed 19 Aug 2015, 8:03 pm
Skid wrote:Thanks Andy.
OK... fair do's. Gimme a couple of days and I'll work up a proper tutorial.
Thank you very much Sir, I am ready for class to start...

Andy...
_________________
Andy...
Life isn't about how to survive the storm, but how to dance in the rain...
Johnag- Moderator
- Posts : 1576
Join date : 2013-10-12
Age : 58
Location : North Wales, U.K... -
Re: Cobratee parts box build
![]() by Speed Racer 65 Wed 19 Aug 2015, 10:55 pm
by Speed Racer 65 Wed 19 Aug 2015, 10:55 pm
Skid wrote:Thanks Andy.
OK... fair do's. Gimme a couple of days and I'll work up a proper tutorial.
I am interested too.
It looks awesome by the way.
Speed Racer 65- Intermediate Member
- Posts : 865
Join date : 2015-08-06
Location : Louisville KY
Page 2 of 2 • 1, 2
» Another parts box build
» A Bomb - a parts build
» Bantam Street Rod - A Parts Box Build
» spare parts hot rod
Skid's :: Works In Progress :: Road cars
|
|
|