Salt Shaker Bonneville Bug
+10
harron68
Brizio
dogfish7
Skid
BrentH
Johnag
webby
Geezerman
Tumbler75
pete s
14 posters
Skid's :: Works In Progress :: Race cars
Page 1 of 3
Page 1 of 3 • 1, 2, 3 
 Salt Shaker Bonneville Bug
Since I did not get this one done in time for the Bonneville Community Build, I am moving it over to the race car thread. 
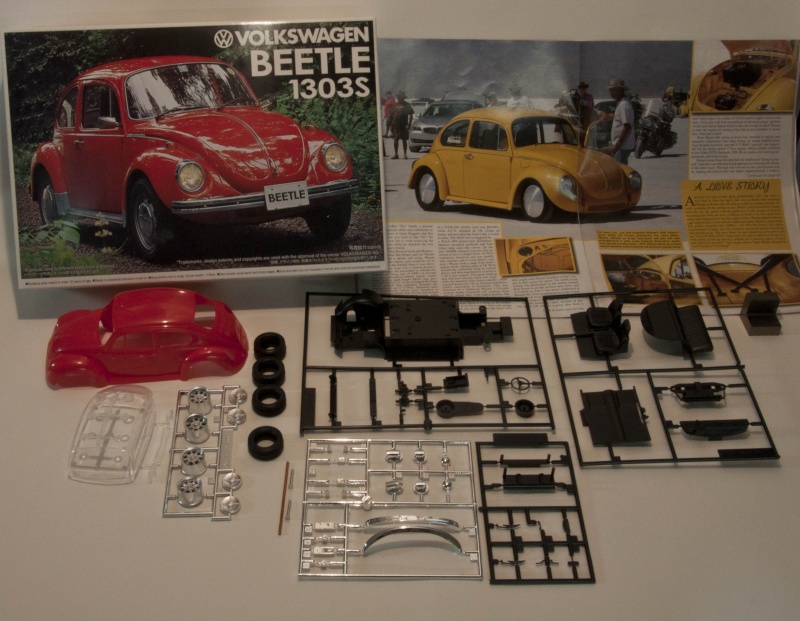
To refresh everyone's memory, I am working on a VW Super Beetle Bonneville car. It appeared in Hot VWs magazine a number of months back. I started with the Aroshima kit of extremely poor quality, as it is designed for electric power via batteries. The body from this kit is good though. Here is what I started with:

The chassis was not usable, so the Tamiya VW kit one was used, and modified for the strut front and IRS rear suspensions. The front suspension from the super beetle kit was grafted to the Tamiya pan. Here is the chassis:

The interior has been modified with the rear seat area (less seat) scratch built, a brass roll cage made, seats from the parts box and the front trunk area modified for the super beetle. The dash has been filled, for the addition of a aluminum panel with turned gauges (in process).

The body doors and front and rear deck lids were opened up. The rear deck lid uses the Tamiya kit hinge, and the rest are brass. Here are the pictures:


The front suspension needed to be scratch built, so some aluminum parts were turned for the struts and spindles. The springs came from a stash I have, and steering arms still need to be added. The hubs are from the parts box, and the sway bar is brass rod and alum tube.

Aluminum discs were turned for the wheels:

The exhaust system is now in process. The headers will be identical to that on my red bug model, except for a stinger instead of a muffler. Here is a photo of the red bug one, and the new one on the fixture fabricated. The stinger is made from turned aluminum:


So this model has many turned aluminum parts, including gauges, "monster" tach, and steering hub. Many of the engine details have been turned on the lathe, including pulleys, external oil filter, oil filler tube, coil, velocity stack, etc.
Now that all of the summer bicycle tours are over, I can get back to modeling. I did manage to make it up to around 2000 miles of bicycle riding this year so far! Now I can get back to modeling!

To refresh everyone's memory, I am working on a VW Super Beetle Bonneville car. It appeared in Hot VWs magazine a number of months back. I started with the Aroshima kit of extremely poor quality, as it is designed for electric power via batteries. The body from this kit is good though. Here is what I started with:

The chassis was not usable, so the Tamiya VW kit one was used, and modified for the strut front and IRS rear suspensions. The front suspension from the super beetle kit was grafted to the Tamiya pan. Here is the chassis:

The interior has been modified with the rear seat area (less seat) scratch built, a brass roll cage made, seats from the parts box and the front trunk area modified for the super beetle. The dash has been filled, for the addition of a aluminum panel with turned gauges (in process).

The body doors and front and rear deck lids were opened up. The rear deck lid uses the Tamiya kit hinge, and the rest are brass. Here are the pictures:


The front suspension needed to be scratch built, so some aluminum parts were turned for the struts and spindles. The springs came from a stash I have, and steering arms still need to be added. The hubs are from the parts box, and the sway bar is brass rod and alum tube.

Aluminum discs were turned for the wheels:

The exhaust system is now in process. The headers will be identical to that on my red bug model, except for a stinger instead of a muffler. Here is a photo of the red bug one, and the new one on the fixture fabricated. The stinger is made from turned aluminum:


So this model has many turned aluminum parts, including gauges, "monster" tach, and steering hub. Many of the engine details have been turned on the lathe, including pulleys, external oil filter, oil filler tube, coil, velocity stack, etc.
Now that all of the summer bicycle tours are over, I can get back to modeling. I did manage to make it up to around 2000 miles of bicycle riding this year so far!
 Now I can get back to modeling!
pete s- Intermediate Member

- Posts : 797
Join date : 2013-02-26
Age : 74
Location : Beaverton, OR
 Re: Salt Shaker Bonneville Bug
Pete its looking great! I decided to go more street with mine since the "Spun Aluminum" discs I made for mine have disappeared. Keep them updates comin'! I like this!

Tumbler75- Intermediate Member

- Posts : 854
Join date : 2013-02-25
Age : 49
Location : Prosperity, SC
 Re: Salt Shaker Bonneville Bug
Looking good Pete. Glad to see you back at it. I hope to see you at the OSSM Show this Saturday.
Guest- Guest
 Re: Salt Shaker Bonneville Bug
Thanks Buck. I will be at the show, so see you then!

pete s- Intermediate Member

- Posts : 797
Join date : 2013-02-26
Age : 74
Location : Beaverton, OR
 Re: Salt Shaker Bonneville Bug
Some really nice bits of metalwork there - looking forward to your updates on this one.
Guest- Guest
 Re: Salt Shaker Bonneville Bug
Fantastic looking work, Pete !!!

Geezerman- Advanced Member

- Posts : 3651
Join date : 2013-02-24
Age : 89
Location : Gulf coast of central Florids
 Re: Salt Shaker Bonneville Bug
Seconded. 001

webby- Moderator

- Posts : 2220
Join date : 2013-02-27
Age : 65
Location : Strathpine Australia. Built over WW2 airstrip
 Re: Salt Shaker Bonneville Bug
Hi Pete,
WOW, I am lost for words Sir, this is going to be a fantastic looking Bug, hope it is ok for me to tag along in the audience...
Andy...
WOW, I am lost for words Sir, this is going to be a fantastic looking Bug, hope it is ok for me to tag along in the audience...
Andy...
_________________
Andy...
Life isn't about how to survive the storm, but how to dance in the rain...
 Re: Salt Shaker Bonneville Bug
Wicked project and is coming along beautifully. I bought a small lathe/milling machine combo for my business 4 years ago I think it might be time to start playing with it more for hobby building. Loving the turned pieces!

BrentH- New Member

- Posts : 236
Join date : 2013-05-21
 Re: Salt Shaker Bonneville Bug
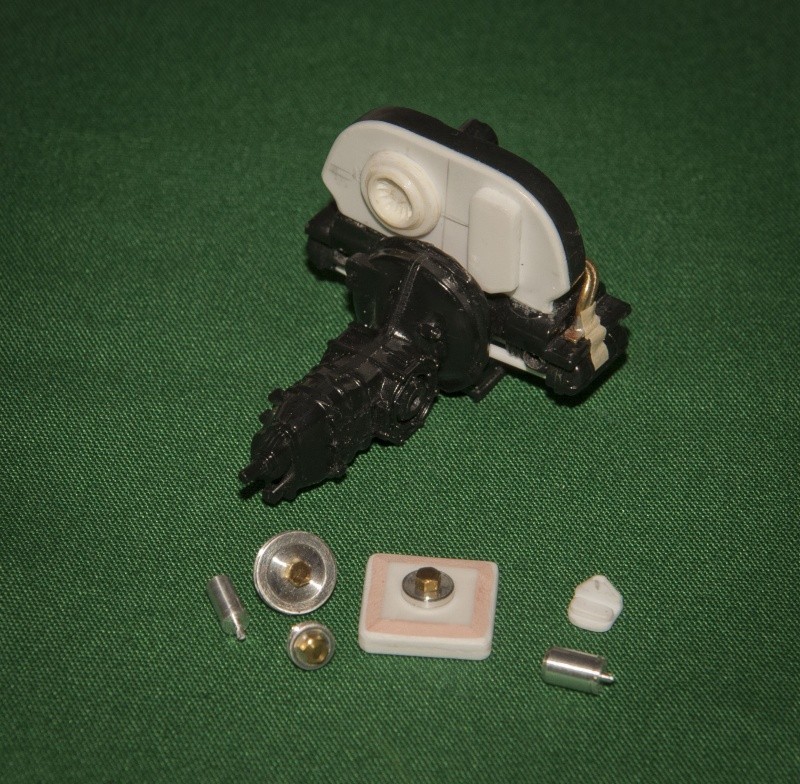
So I have made some progress on the engine. Here is a photo of the engine mock up, with the exhaust complete.

There is also a new intake manifold from brass. The kit one is not correct, as it is too small and for single port heads. The one I made is for dual port. I used the kit carb, and turned a "velocity stack". This is in quotes, as the magazine article said that the builder used an aluminum coffee mug part (low buck racing). So I tuned one on the lathe to match!
Here is a photo of the backside of the engine, where I added a back to the fan housing, the cooling fan and a "doghouse" oil cooler. Even though this is not seen, the detail needed to be there!

Below the engine are the other engine details: a turned coil, turned pulleys, a deep oil sump (with turned sump plate) and an external oil filter.
I am now working on the inner details of the body where I opened up the doors/trunk/deck lid. This includes door inners, trunk and deck lid inners, and door inner panels. Getting closer to priming, and painting the school bus yellow.

There is also a new intake manifold from brass. The kit one is not correct, as it is too small and for single port heads. The one I made is for dual port. I used the kit carb, and turned a "velocity stack". This is in quotes, as the magazine article said that the builder used an aluminum coffee mug part (low buck racing). So I tuned one on the lathe to match!
Here is a photo of the backside of the engine, where I added a back to the fan housing, the cooling fan and a "doghouse" oil cooler. Even though this is not seen, the detail needed to be there!

Below the engine are the other engine details: a turned coil, turned pulleys, a deep oil sump (with turned sump plate) and an external oil filter.
I am now working on the inner details of the body where I opened up the doors/trunk/deck lid. This includes door inners, trunk and deck lid inners, and door inner panels. Getting closer to priming, and painting the school bus yellow.

pete s- Intermediate Member

- Posts : 797
Join date : 2013-02-26
Age : 74
Location : Beaverton, OR
 Re: Salt Shaker Bonneville Bug
Really looks good Pete. Now that I see the intake I understand what you were trying to explain to me at OSSM.

Guest- Guest
 Re: Salt Shaker Bonneville Bug
Outstanding work Pete! This is gonna be one stunning Bonneville Roller! Keep it up!
001
001

Tumbler75- Intermediate Member

- Posts : 854
Join date : 2013-02-25
Age : 49
Location : Prosperity, SC
 Re: Salt Shaker Bonneville Bug
Great stuff Pete. Love the 'plumbing'
_________________
Al.
Constructive criticism is always welcome.
“Success always demands a greater effort.” Winston Churchill
"Success is failure turned inside out" Unknown
 Re: Salt Shaker Bonneville Bug
So I have been working on some of the other details of the Bonneville Bug before it gets its first coat of primer. First off is the trunk area, where a fuel cell was made, including mounting straps from .005 brass shim stock. In front of the fuel cell is an electric fuel pump, fuel filter and plumbing. Still needs a little finessing, but it is close.

Second, came the interior panels. This photo shows the rear seat area:

Which needed some extra material added to mate up with the rear interior panels, shown here:

Next up will be fitting and fixing the doors and hinges. The front and rear deck lids are done, and so is the inner door structure. I may need to add some roof inner structure, and lower a-pillar structure too. All this is a lot of work, when a car like this has been gutted of interior upholstery and panels!
So this model has been gathering quite a few metal bits, so here is a photo of all the metal!

Also made on the lathe was a steering rack for the front suspension. So with all this extra weight from the metal, I may have to add some more air to the tires!!!
Having fun!!!

Second, came the interior panels. This photo shows the rear seat area:

Which needed some extra material added to mate up with the rear interior panels, shown here:

Next up will be fitting and fixing the doors and hinges. The front and rear deck lids are done, and so is the inner door structure. I may need to add some roof inner structure, and lower a-pillar structure too. All this is a lot of work, when a car like this has been gutted of interior upholstery and panels!
So this model has been gathering quite a few metal bits, so here is a photo of all the metal!

Also made on the lathe was a steering rack for the front suspension. So with all this extra weight from the metal, I may have to add some more air to the tires!!!
Having fun!!!


pete s- Intermediate Member

- Posts : 797
Join date : 2013-02-26
Age : 74
Location : Beaverton, OR
 Re: Salt Shaker Bonneville Bug
Those homemade parts look great Pete. The interior parts are spot on.
Guest- Guest
 Re: Salt Shaker Bonneville Bug
Fantastic work.
This will be an exquisite model !!!
This will be an exquisite model !!!

Geezerman- Advanced Member

- Posts : 3651
Join date : 2013-02-24
Age : 89
Location : Gulf coast of central Florids
 Re: Salt Shaker Bonneville Bug
WAY COOL, fantastic metal work. This is going to be a great WIP to follow.
Guest- Guest
 Re: Salt Shaker Bonneville Bug
Over the top build and loving it!!

BrentH- New Member

- Posts : 236
Join date : 2013-05-21
 Re: Salt Shaker Bonneville Bug
Fantastic work! 001

dogfish7- Intermediate Member

- Posts : 668
Join date : 2013-02-27
Age : 78
Location : Hoodsport, WA
 Re: Salt Shaker Bonneville Bug
I have been working on the Salt Shaker, so it is time for an update on the build.
I have completed the interior "body work", since the car needs this because it is essentially stripped of upholstery for racing. Here are photos of the interior, including the overlaps where the doors and decklids were opened up:


The only interior trim panels will be the aluminum panels on the doors and the rear seat areas.
The door hinges have been attached, and the doors put on. The hinges are made to try to simulate the stock ones, so there are small brass tubes soldered to angles. These are bonded to the body, and the doors have matching .030 wire pins. The doors slip in from the top. They still need a little bending of the wire for proper alignment:


I was not happy with my first attempt at the front fuel plumbing, so it has been re-done. It is not accurate to the actual car, but I think it looks better from the fuel cell to the filter/fuel pump:

Lastly, I have added the last interior panel "bumps and ridges:, to simulate the interior strengthening ribs:

Need to add a few more door opening overlaps by the hinges, but that is about it. So it almost ready for primer.
I have completed the interior "body work", since the car needs this because it is essentially stripped of upholstery for racing. Here are photos of the interior, including the overlaps where the doors and decklids were opened up:


The only interior trim panels will be the aluminum panels on the doors and the rear seat areas.
The door hinges have been attached, and the doors put on. The hinges are made to try to simulate the stock ones, so there are small brass tubes soldered to angles. These are bonded to the body, and the doors have matching .030 wire pins. The doors slip in from the top. They still need a little bending of the wire for proper alignment:


I was not happy with my first attempt at the front fuel plumbing, so it has been re-done. It is not accurate to the actual car, but I think it looks better from the fuel cell to the filter/fuel pump:

Lastly, I have added the last interior panel "bumps and ridges:, to simulate the interior strengthening ribs:

Need to add a few more door opening overlaps by the hinges, but that is about it. So it almost ready for primer.

pete s- Intermediate Member

- Posts : 797
Join date : 2013-02-26
Age : 74
Location : Beaverton, OR
 Re: Salt Shaker Bonneville Bug
001
_________________
Al.
Constructive criticism is always welcome.
“Success always demands a greater effort.” Winston Churchill
"Success is failure turned inside out" Unknown
Page 1 of 3 • 1, 2, 3 
 Similar topics
» Salt Flats '17
» Bonneville salt '17
» Testors 1/32 salt flat racer
» World's Best Paint Shaker
» 1/6th Scale Hemi with Shaker Scoop
» Bonneville salt '17
» Testors 1/32 salt flat racer
» World's Best Paint Shaker
» 1/6th Scale Hemi with Shaker Scoop
Skid's :: Works In Progress :: Race cars
Page 1 of 3
Permissions in this forum:
You cannot reply to topics in this forum
