
1950 Olsmobile Coupe
4 posters
Skid's :: Works In Progress :: Road cars
Page 1 of 1

1950 Olsmobile Coupe
![]() by Guest Mon 25 Mar 2013, 4:14 am
by Guest Mon 25 Mar 2013, 4:14 am
I know I have a lot going and that I am ignoring some of it. I have the twin Blue max build going but don't need them until July. I have the Challenger 1959 build going but I am stumped on making some stuff so that is on hole while I think. We have a Motor Cycle build starting January 1 St 2013. So I decided while my bench was empty I would build one of these.

I didn't want to step on Craig's toes so I waited until he had finished that Race Car Version he built. A very beautiful build. Love the colors he used. I am going to build this one Showroom Stock. Not sure if I will put the Skirts on it yet but will have them ready when it's time to make that call.
The body color is a Honda Color by Dulpi-color it's called Hampsted Green. It looks like a color that would have been used in the 1950's but with a touch of Metallic. The interior will be done in Grays and Silvers.
This is the body in color.


Not finished but started on the chassis and floor pan.

Wheels and skirts done to match body.

That's about it for a start. I will update again in a couple days. I did run down the correct engine color but it took over a week. More on that next update.
All questions and comments are welcome.
I didn't want to step on Craig's toes so I waited until he had finished that Race Car Version he built. A very beautiful build. Love the colors he used. I am going to build this one Showroom Stock. Not sure if I will put the Skirts on it yet but will have them ready when it's time to make that call.
The body color is a Honda Color by Dulpi-color it's called Hampsted Green. It looks like a color that would have been used in the 1950's but with a touch of Metallic. The interior will be done in Grays and Silvers.
This is the body in color.
Not finished but started on the chassis and floor pan.
Wheels and skirts done to match body.
That's about it for a start. I will update again in a couple days. I did run down the correct engine color but it took over a week. More on that next update.
All questions and comments are welcome.
Guest- Guest
Re: 1950 Olsmobile Coupe
![]() by Guest Mon 25 Mar 2013, 4:16 am
by Guest Mon 25 Mar 2013, 4:16 am
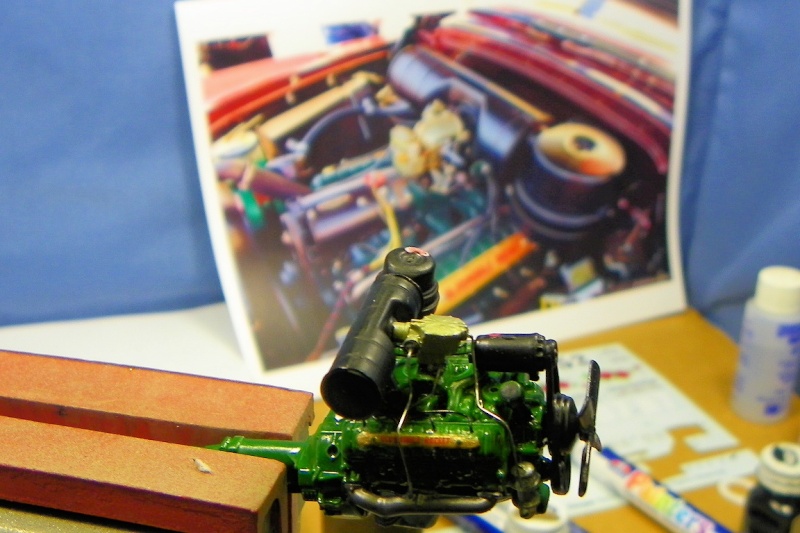
This is the reference picture I used for the engine. The box art car is so wrong it shows the engine as blue.

Guest- Guest
Re: 1950 Olsmobile Coupe
![]() by Guest Mon 25 Mar 2013, 4:20 am
by Guest Mon 25 Mar 2013, 4:20 am
OK Thanksgiving is over and everyone survived. I hope it was a great day for each and everyone of ya.
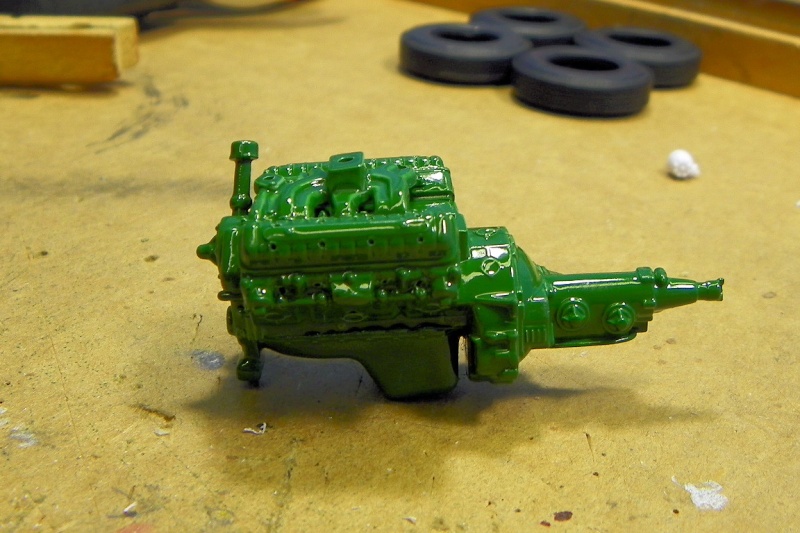
I have quite a bit more progress now, or at least it seems like it. I spent a lot of time trying to research the proper green paint for the engine. I found a forum that said use Dark John Deere Green so I started to research that. Never knew there was a light and dark John Deere Green. I bought 4 cans of spray paint and none of them were really right. So I went to Carquest. It's the only parts store with a machine shop left in town. So I talked with the machinist there and ask him about the proper color green. He looked in a couple books and then poked around on the computer. He handed me a piece of paper with the carquest part number 14-284 on it. he said he are supposed to have a can in stock. So I went up to the front counter and when it was all over I had a can of Carquest Oliver Green #14-284. I also bought a can of the John Deere Green. It turns out that Dark John Deere Green is the color they are using now on there equipment, so it's easy to find.
So here is the engine ready to go to the paint booth. I painted the intake separate to make it easier to paint.

I pre drilled the holes in the valve covers for the spark plug wires and the heads also. The n I painted it when it was done it looked like this.
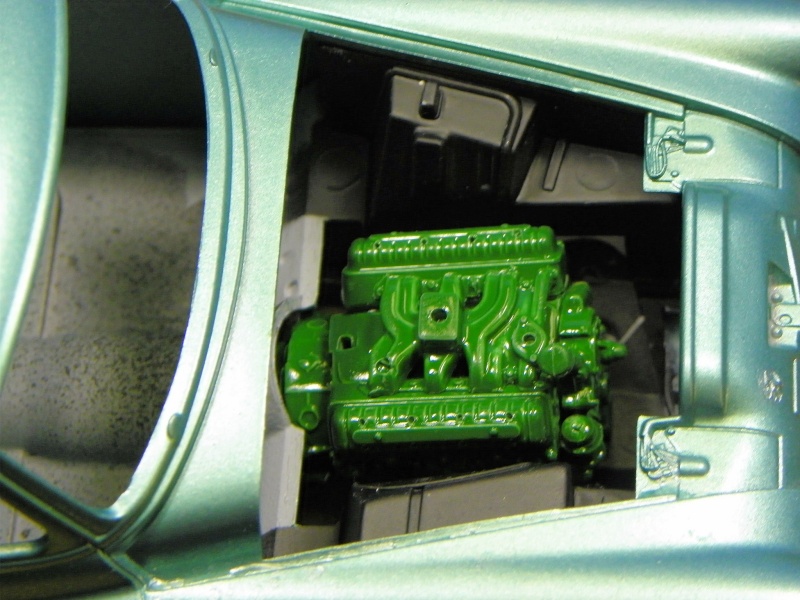
And here it is mocked up into the engine bay.
I was looking at the decal sheet over the Holiday and it is really nice. The decals for the engine are all there. Air Cleaner, Generator and Valve Covers. I have a Gold that is pretty close for the Valve covers or the wire looms on them. So now it's off to drill the distributor, That is always my favorite part. That's OK we will get it done.
Thanks for looking in all comments and questions are welcome.
I have quite a bit more progress now, or at least it seems like it. I spent a lot of time trying to research the proper green paint for the engine. I found a forum that said use Dark John Deere Green so I started to research that. Never knew there was a light and dark John Deere Green. I bought 4 cans of spray paint and none of them were really right. So I went to Carquest. It's the only parts store with a machine shop left in town. So I talked with the machinist there and ask him about the proper color green. He looked in a couple books and then poked around on the computer. He handed me a piece of paper with the carquest part number 14-284 on it. he said he are supposed to have a can in stock. So I went up to the front counter and when it was all over I had a can of Carquest Oliver Green #14-284. I also bought a can of the John Deere Green. It turns out that Dark John Deere Green is the color they are using now on there equipment, so it's easy to find.
So here is the engine ready to go to the paint booth. I painted the intake separate to make it easier to paint.
I pre drilled the holes in the valve covers for the spark plug wires and the heads also. The n I painted it when it was done it looked like this.
And here it is mocked up into the engine bay.
I was looking at the decal sheet over the Holiday and it is really nice. The decals for the engine are all there. Air Cleaner, Generator and Valve Covers. I have a Gold that is pretty close for the Valve covers or the wire looms on them. So now it's off to drill the distributor, That is always my favorite part. That's OK we will get it done.
Thanks for looking in all comments and questions are welcome.
Guest- Guest
Re: 1950 Olsmobile Coupe
![]() by Guest Mon 25 Mar 2013, 4:27 am
by Guest Mon 25 Mar 2013, 4:27 am
WOW!!!!!!! I didn't think it had been this long since an update. No real reason just lost track of time. I have been plugging away at it a little bit at a time. On the engine end I have quite as bit done. All the little stuff is painted and detailed, started, generator, oil filter, Etc. Got the valve covers done and decals put on. This is the tricky part. On the real motors they had a loom or separator that unbolted from the valve covers to keep the plug wires separated (AM Radio only). So all of that detail is cast into the valve cover. I drilled both sides of it and then did the spark plug wires in two sections. From distributor to the valve cover and from the valve cover to the spark plug wire. Plug wires are .013" and the holes are .018" The plug boots are cut to 3/32 or .096" her is where that is at.


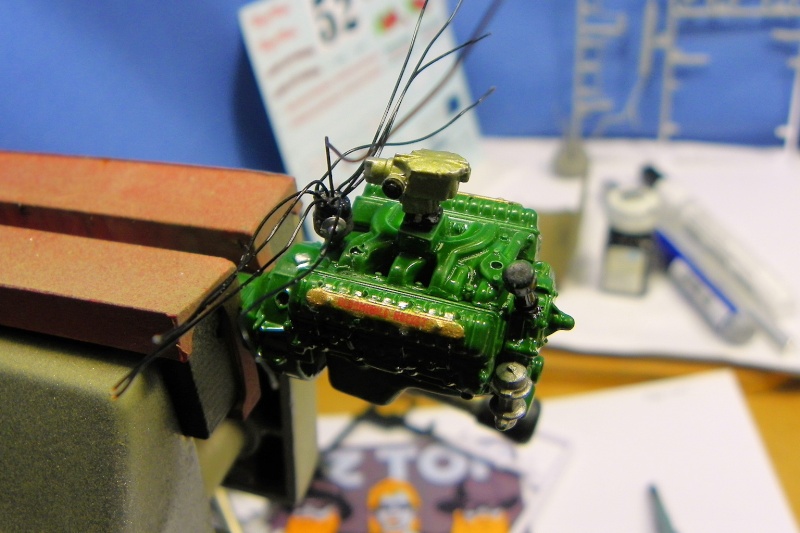
The carb is an experiment in painting. I painted it with Orr-Lac Dull Aluminum and then misted it from about 2 feet away with Dupli-Color Metalcast Yellow (Gold). I think it would have worked been better with a little less of the metalcast. Didn't want to redo it and it is close to the real color so I am flying it.
While all this is going on I have been working on the wheels and tires. I was having big trouble trying to get the kit Whitewall decal to lay flat or even be round when it went on the tire. So I scrapped that program and went with one on the Elmer's White Paint Sticks (Walmart) then after three coats on the white I gave it a coat of dull coat.
two coats.

Finished.

Then I spent some time trying to get the hubcap decals to lay right. They are so small and the hubcap has a raised emblem on it the decal doesn't want to lay into. So after two coats of decal set and a 24 hour drying period they were ready to go. Here are the finished wheels and tires.
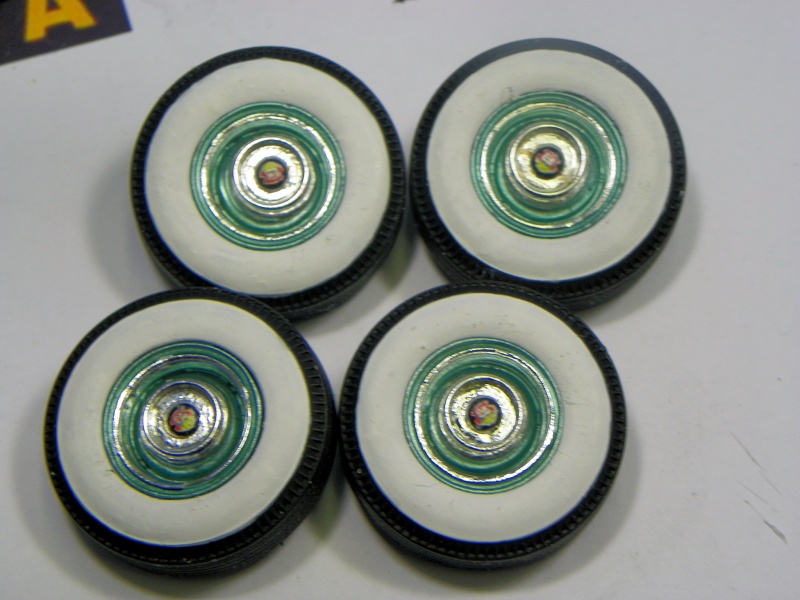
I will decide which are the ugliest two and use them on the rear under the skirts.
So that where I am at. Now going to finish the engine and try to have a roller in the next update. it won't be so long. LOL
All comments and questions are welcome.
The carb is an experiment in painting. I painted it with Orr-Lac Dull Aluminum and then misted it from about 2 feet away with Dupli-Color Metalcast Yellow (Gold). I think it would have worked been better with a little less of the metalcast. Didn't want to redo it and it is close to the real color so I am flying it.
While all this is going on I have been working on the wheels and tires. I was having big trouble trying to get the kit Whitewall decal to lay flat or even be round when it went on the tire. So I scrapped that program and went with one on the Elmer's White Paint Sticks (Walmart) then after three coats on the white I gave it a coat of dull coat.
two coats.
Finished.
Then I spent some time trying to get the hubcap decals to lay right. They are so small and the hubcap has a raised emblem on it the decal doesn't want to lay into. So after two coats of decal set and a 24 hour drying period they were ready to go. Here are the finished wheels and tires.
I will decide which are the ugliest two and use them on the rear under the skirts.
So that where I am at. Now going to finish the engine and try to have a roller in the next update. it won't be so long. LOL
All comments and questions are welcome.
Guest- Guest
Re: 1950 Olsmobile Coupe
![]() by Guest Mon 25 Mar 2013, 4:41 am
by Guest Mon 25 Mar 2013, 4:41 am
With only 5 days left till the end of the Mayan Calendar I have a pocketful of peanuts and a towel in my coat pocket. Ready to go.
Now back to the 1950 Oldsmobile. I got the engine finished. Got the dash done, all the chassis parts painted. All that's left to to pick out the shades of gray I will do the interior in and foil the body. Foiling the body will take some doing. Not as bad as the 53 Hudson but still a lot of chrome on this "Old Gal".
I added spark plug wires, vacuum line for vacuum advance, fuel line pump to carb and the heat riser tube from the exhaust manifold to the choke housing. So when all the dust had settled this is what it looked like.


This will give you an idea of how the finished engine bay will look.

Painted the inside of the headlight buckets with Elmer's White Glue. When it dries it gives a foggy kinda look to the headlights makes them look more realistic.
wet glue.

dry glue.

Tail lights painted.

black wash in the hood and trunk emblems
finished dash. the instructions called for the center section of the dash to be gray no matter the body color. couldn't find any reference pictures so just used Krylon Classic Gray for the center section. Cleared over the decals once they were in place. Since my plan was to do the interior in Grays I will used this to pick the other shades of gray.
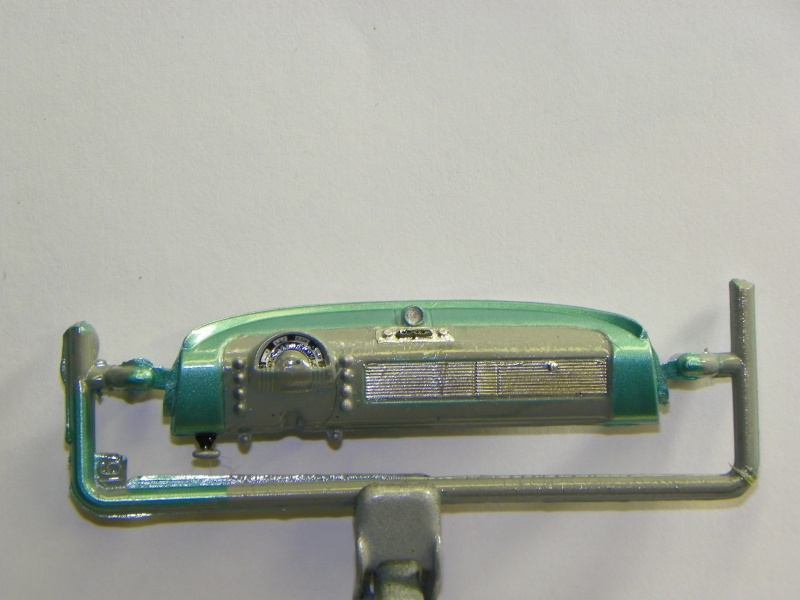
Steering wheel with the Olds logo in place.

When I fitted the engine into the body I found that the exhaust manifolds are a little wide. It really is a hidden area and I will probably file a little off each side so the engine doesn't hit the inner fender wells.


So now I am off to foil the body and do the interior. Then I will put this bad boy together and be ready to build my first motorcycle. All comments and questions are welcome.
Now back to the 1950 Oldsmobile. I got the engine finished. Got the dash done, all the chassis parts painted. All that's left to to pick out the shades of gray I will do the interior in and foil the body. Foiling the body will take some doing. Not as bad as the 53 Hudson but still a lot of chrome on this "Old Gal".
I added spark plug wires, vacuum line for vacuum advance, fuel line pump to carb and the heat riser tube from the exhaust manifold to the choke housing. So when all the dust had settled this is what it looked like.
This will give you an idea of how the finished engine bay will look.
Painted the inside of the headlight buckets with Elmer's White Glue. When it dries it gives a foggy kinda look to the headlights makes them look more realistic.
wet glue.
dry glue.
Tail lights painted.
black wash in the hood and trunk emblems
finished dash. the instructions called for the center section of the dash to be gray no matter the body color. couldn't find any reference pictures so just used Krylon Classic Gray for the center section. Cleared over the decals once they were in place. Since my plan was to do the interior in Grays I will used this to pick the other shades of gray.
Steering wheel with the Olds logo in place.
When I fitted the engine into the body I found that the exhaust manifolds are a little wide. It really is a hidden area and I will probably file a little off each side so the engine doesn't hit the inner fender wells.
So now I am off to foil the body and do the interior. Then I will put this bad boy together and be ready to build my first motorcycle. All comments and questions are welcome.
Guest- Guest
Re: 1950 Olsmobile Coupe
![]() by Guest Mon 25 Mar 2013, 4:47 am
by Guest Mon 25 Mar 2013, 4:47 am
Thanks for all the comments guys. It make the build much more fun. I know it's Christmas Eve but I didn't realize I hadn't updated this build in awhile until I went to empty my camera card and there were 5 pages of pictures on it. So I uploaded them to Fotki and now will sort trough and do an update.
What have I been up to? Well I got the interior all done. I kept it simple and did it in Gray's ans Silvers to match the dash. I did add a little BMF here and there.
Door Panels

Seats.

I started to put the chassis together and then I just didn't like the kit springs. No matter what you do they don't look right.

So I got out my caliper and started measuring the springs. Then digging through my box of shift kit springs from the tranny shop I found so that are very close.

So then some cleaning is lacquer thinner, some primer and some Steel metalizer and they look like this.
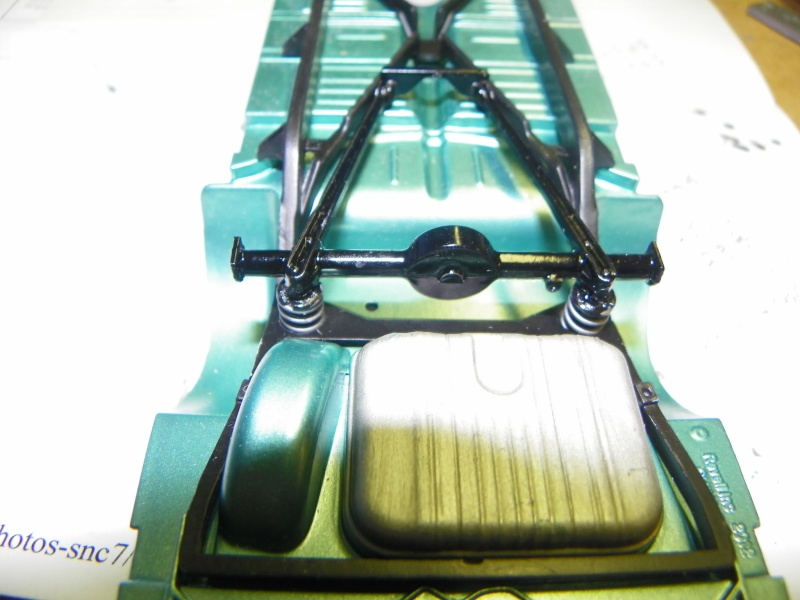
Much Better. I got the front and the rear springs all done and will now put the chassis together and have a roller. Christmas may get in the way but I will have it done soon.
What have I been up to? Well I got the interior all done. I kept it simple and did it in Gray's ans Silvers to match the dash. I did add a little BMF here and there.
Door Panels
Seats.
I started to put the chassis together and then I just didn't like the kit springs. No matter what you do they don't look right.
So I got out my caliper and started measuring the springs. Then digging through my box of shift kit springs from the tranny shop I found so that are very close.
So then some cleaning is lacquer thinner, some primer and some Steel metalizer and they look like this.
Much Better. I got the front and the rear springs all done and will now put the chassis together and have a roller. Christmas may get in the way but I will have it done soon.
Guest- Guest
Re: 1950 Olsmobile Coupe
![]() by Guest Mon 25 Mar 2013, 4:50 am
by Guest Mon 25 Mar 2013, 4:50 am
It seems like forever since I worked on this one. After finishing the Motorcycle I got this all back out again. It dawned on me that I hadn't done a mock up on this since it was in primer. Knowing that when you paint something it quits fitting I decided to do a mock up before I wet sand and polish the body. Then after looking back at the OTB I noticed I had never done a Mock up with the Wheels and tires finished. So here it is.


That's about it for this time. My plans are to wet sand the body with 2000 grit and then polish it with Turtle Wax polishing compound. Then decals and wax it a couple coats of Meguiar's Clear Coat Wax. I'll see you then with another update.
Thanks for looking in all comments and questions are welcome.
Guest- Guest
Re: 1950 Olsmobile Coupe
![]() by Tumbler75 Mon 25 Mar 2013, 5:25 pm
by Tumbler75 Mon 25 Mar 2013, 5:25 pm
I'm still waiting to see this one finished! Hurry up and get back to it. I'm lovin' this as I gotta get me one, two, maybe three soon. LoL

Tumbler75- Intermediate Member

- Posts : 854
Join date : 2013-02-25
Age : 49
Location : Prosperity, SC
Re: 1950 Olsmobile Coupe
![]() by Guest Fri 05 Apr 2013, 6:56 pm
by Guest Fri 05 Apr 2013, 6:56 pm
Buck: This is looking great. I really like the work you did on the engine. BTW, I don't know if I missed the info or not: Was the Carquest paint a rattle can or did you AB it???
Guest- Guest
Re: 1950 Olsmobile Coupe
![]() by Guest Fri 05 Apr 2013, 11:30 pm
by Guest Fri 05 Apr 2013, 11:30 pm
Thanks guys. I will be back on this one soon.
John the paint is rattle can.
John the paint is rattle can.
Guest- Guest
Re: 1950 Olsmobile Coupe
![]() by Skid Sat 06 Apr 2013, 7:58 pm
by Skid Sat 06 Apr 2013, 7:58 pm
It's looking great Buck.
I'm not a fan of taildraggers but the slight nose up attitude looks just right for this period car. Nice one!
I'm not a fan of taildraggers but the slight nose up attitude looks just right for this period car. Nice one!
_________________
Al.
Constructive criticism is always welcome.
“Success always demands a greater effort.” Winston Churchill
"Success is failure turned inside out" Unknown

Skid- Admin
- Posts : 7128
Join date : 2013-02-15
Age : 75
Location : Newcastle. Good Old Blighty. -

Sam- Resident member

- Posts : 1962
Join date : 2013-02-23
Age : 57
Location : Back in Toledo, Oregon
Re: 1950 Olsmobile Coupe
![]() by Guest Sat 06 Apr 2013, 9:11 pm
by Guest Sat 06 Apr 2013, 9:11 pm
Looking very nice. Can't wait to see it all shined up.
exactly...LOL
Tumbler75 wrote:I gotta get me one, two, maybe three soon. LoL
exactly...LOL
Guest- Guest
Re: 1950 Olsmobile Coupe
![]() by Guest Sat 06 Apr 2013, 9:58 pm
by Guest Sat 06 Apr 2013, 9:58 pm
I just noticed your tip about painting the headlight sockets with white glue. Excellent!! I would never have thought of it. Thanks.
Guest- Guest
Re: 1950 Olsmobile Coupe
![]() by Guest Mon 22 Apr 2013, 4:56 am
by Guest Mon 22 Apr 2013, 4:56 am
Thanks for the comments guys. I'll bet you thought I had given up completely on building. Not the case at all just needed a break to get caught up on other stuff.
John on the headlight sockets. Practice on some scrap grilles. To much glue and the look to white. not enough and the look to chrome. I use a flat toothpick to drop it in and spread it around te headlight. Just enough that the lens is covered but it doesn't over flow the surround. Hope that makes sense.
Well I have been working on the body. got the headlights, taillights, glass in it. things like that. Next step will be putting the body on the chassis and then a New Model Announcement. I am thinking only about an hours work left on it.
Guest- Guest
Re: 1950 Olsmobile Coupe
![]() by webby Mon 22 Apr 2013, 7:02 am
by webby Mon 22 Apr 2013, 7:02 am
Super paint- look at the gloss on the bonnet. I've been watching this, stealing ideas for my own version. It's still in the sanding parts stage.
Cheers,
Chris
Cheers,
Chris

webby- Moderator

- Posts : 2194
Join date : 2013-02-27
Age : 64
Location : Strathpine Australia. Built over WW2 airstrip
Re: 1950 Olsmobile Coupe
![]() by Skid Mon 22 Apr 2013, 2:04 pm
by Skid Mon 22 Apr 2013, 2:04 pm
It's looking good Buck. The BMF, the colour, the stance. Everything.
LOL. How long have you been modeling???
I am thinking only about an hours work left on it.
LOL. How long have you been modeling???
_________________
Al.
Constructive criticism is always welcome.
“Success always demands a greater effort.” Winston Churchill
"Success is failure turned inside out" Unknown
Skid- Admin
- Posts : 7128
Join date : 2013-02-15
Age : 75
Location : Newcastle. Good Old Blighty. -
Re: 1950 Olsmobile Coupe
![]() by Tumbler75 Mon 22 Apr 2013, 4:13 pm
by Tumbler75 Mon 22 Apr 2013, 4:13 pm
That shine is absolutely amazing! The headlights are perfect. Great job so far Buck! I can't wait to see the end results. Been holding my breath far too long. LoL 8)
Tumbler75- Intermediate Member
- Posts : 854
Join date : 2013-02-25
Age : 49
Location : Prosperity, SC
» 1950 Oldsmobile Coupe
» 1950 Oldsmobile Coupe
» 1950 Ford Coupe
» 1950 Ford Coupe
» 1950 Oldsmobile Club Coupe -- CHP
» 1950 Oldsmobile Coupe
» 1950 Ford Coupe
» 1950 Ford Coupe
» 1950 Oldsmobile Club Coupe -- CHP
Skid's :: Works In Progress :: Road cars
Page 1 of 1
Permissions in this forum:
You cannot reply to topics in this forum|
|
|