
Steampunk Harley - Tamiya 1/6 HD FLH Classic 'extreme' kit bash (Very Photo Heavy)
Page 11 of 25 •  1 ... 7 ... 10, 11, 12 ... 18 ... 25
 ![]()
Re: Steampunk Harley - Tamiya 1/6 HD FLH Classic 'extreme' kit bash (Very Photo Heavy)
![]() by disabled modeler Tue 03 Jan 2017, 12:40 pm
by disabled modeler Tue 03 Jan 2017, 12:40 pm

disabled modeler- Intermediate Member

- Posts : 979
Join date : 2016-05-22
Age : 60
Location : Quincy,IL. USA
Re: Steampunk Harley - Tamiya 1/6 HD FLH Classic 'extreme' kit bash (Very Photo Heavy)
![]() by Guest Tue 03 Jan 2017, 7:29 pm
by Guest Tue 03 Jan 2017, 7:29 pm

Guest- Guest
Re: Steampunk Harley - Tamiya 1/6 HD FLH Classic 'extreme' kit bash (Very Photo Heavy)
![]() by Nipponrookie Wed 04 Jan 2017, 10:19 am
by Nipponrookie Wed 04 Jan 2017, 10:19 am

Nipponrookie- Intermediate Member
- Posts : 568
Join date : 2015-08-29
Age : 63
Location : Kyushu, Japan
Re: Steampunk Harley - Tamiya 1/6 HD FLH Classic 'extreme' kit bash (Very Photo Heavy)
![]() by Speed Racer 65 Wed 04 Jan 2017, 3:21 pm
by Speed Racer 65 Wed 04 Jan 2017, 3:21 pm

Speed Racer 65- Intermediate Member
- Posts : 865
Join date : 2015-08-06
Location : Louisville KY
Re: Steampunk Harley - Tamiya 1/6 HD FLH Classic 'extreme' kit bash (Very Photo Heavy)
![]() by KatsZenJammer Mon 16 Jan 2017, 3:14 am
by KatsZenJammer Mon 16 Jan 2017, 3:14 am

A bit of a longer gap due to mundane complications, nothing serious, amongst which the most significant is milady's re-found obsession with jigsaw puzzles. Being a dutiful mate, and fellow obsessive/compulsive, needless to say I have joined in with much vigour, lol.
However, things have been going on - workbench wise - and the development of the boiler/burner has continued. The chopped lifeboat ends get a widening on the sides from 1/2 inch tube cut in half and then flattened.
I missed a few steps. photo-wise, but we catch up here with 'filler' plates having been affixed, the two parts of the boiler being attached and more 1/2 inch tube halves being added to give this that weird /steampunk/ look I am hoping for.

After much deliberation I went with this option of initial 'casing look.'

Adding half-round posts as accents. The plan is to imply a very complex interior by making an elaborate exterior housing - and this also allows me to not have to think about whether or not it would actually work so long as it looks 'cool.' But I also have to be mindful not to get too gadgety ... 'tis a fine line ...

Finally some more work on the transmission - reattaching a bit I cut off the original tranny at the start of this. This also falls into the realm of 'unknown purpose' but I figure it will look cool and add to the density of stuff to look at, lol.

Hopefully I will be back to weekly posting but no guarantees ... there are a few 2000 piece Ravensberger brain-breakers lurking about ... maybe if I hide them ...

KatsZenJammer- Resident member

- Posts : 2600
Join date : 2016-05-20
Age : 57
Location : Vancouver, BC
Re: Steampunk Harley - Tamiya 1/6 HD FLH Classic 'extreme' kit bash (Very Photo Heavy)
![]() by GaryDainton Mon 16 Jan 2017, 9:14 am
by GaryDainton Mon 16 Jan 2017, 9:14 am

GaryDainton- Advanced Member
- Posts : 4433
Join date : 2014-03-06
Age : 56
Location : Bolton UK
Re: Steampunk Harley - Tamiya 1/6 HD FLH Classic 'extreme' kit bash (Very Photo Heavy)
![]() by Geezerman Mon 16 Jan 2017, 11:10 am
by Geezerman Mon 16 Jan 2017, 11:10 am
Imaginering, my friend ! The laws of physics go out the window in this realm !
Loving the build, as usual !!


Geezerman- Advanced Member
- Posts : 3651
Join date : 2013-02-24
Age : 88
Location : Gulf coast of central Florids
Re: Steampunk Harley - Tamiya 1/6 HD FLH Classic 'extreme' kit bash (Very Photo Heavy)
![]() by disabled modeler Mon 16 Jan 2017, 12:56 pm
by disabled modeler Mon 16 Jan 2017, 12:56 pm
Geezerman wrote:"not have to think about whether or not it would actually work so long as it looks 'cool.' "
Imaginering, my friend ! The laws of physics go out the window in this realm !
Loving the build, as usual !!
I agree completely....if it looks cool its fine...besides your inventing it after all. Awesome work..!
disabled modeler- Intermediate Member
- Posts : 979
Join date : 2016-05-22
Age : 60
Location : Quincy,IL. USA
Re: Steampunk Harley - Tamiya 1/6 HD FLH Classic 'extreme' kit bash (Very Photo Heavy)
![]() by RetiredMike Mon 16 Jan 2017, 3:17 pm
by RetiredMike Mon 16 Jan 2017, 3:17 pm


RetiredMike- Advanced Member
- Posts : 3525
Join date : 2013-04-27
Age : 73
Location : Valparaiso, Indiana
Re: Steampunk Harley - Tamiya 1/6 HD FLH Classic 'extreme' kit bash (Very Photo Heavy)
![]() by KatsZenJammer Sun 29 Jan 2017, 12:06 am
by KatsZenJammer Sun 29 Jan 2017, 12:06 am
Another gap due to the usual - including the weird irony of having my attention diverted at work by the chance to build a scale model of the maintenance shop building out of cardboard as part of a big scale cardboard diorama of Granville Island. Depending on how it develops I might post a photo here, or not, as there is a strong possibility of complete and utter failure, lol.
So ... while working on the boiler during those idle times waiting for glue to cure I got back to the last of the detailing on the tranny. Here's that bit from the kit part I ended the last post with now in place with tabs and all that. Just before I glued down the nut/bolt bits I had the inspiration to set them sunken instead of flush. I'm quite pleased with the result.


And a view of the how it sits between the mounts. Of course this is barely noticeable unless you're directly underneath it ...

Back to the boiler/burner - the top is filled in and everything will be cleaned up for further detailing.

It seemed like a good idea to add ribbing to the peak, but part way into it I realized how finicky it was, so I kept going even though it took way too long ...

Finally the rough work is done. Lots of tweaking and shaping yet but this first hack worked out ok.

Back to the tranny - additional detailing on both end caps and the beginnings of the part for the shifter set-up.

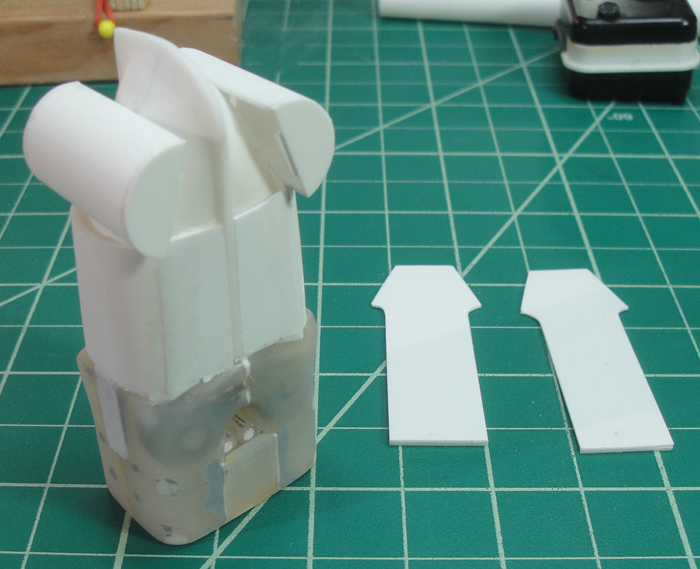
We end with the halves of the ... oil tank? It originally sat under the saddle on one side with the battery on the other ... anyway, I was thinking about using it for part of the condenser return tank, realized it was too big when I was playing with it and decided to use the halves separately. The 'window frame' is step one in prepping these for mods, it gives me more area to attach things to instead of just the edges of the wall. How this works out is still obscured from me but with the push towards 'cool looking' instead of 'functional' I'm hoping it will be elaborate and just a little weird.

Just keep swimming ...
KatsZenJammer- Resident member
- Posts : 2600
Join date : 2016-05-20
Age : 57
Location : Vancouver, BC
Re: Steampunk Harley - Tamiya 1/6 HD FLH Classic 'extreme' kit bash (Very Photo Heavy)
![]() by GaryDainton Sun 29 Jan 2017, 9:16 am
by GaryDainton Sun 29 Jan 2017, 9:16 am
GaryDainton- Advanced Member
- Posts : 4433
Join date : 2014-03-06
Age : 56
Location : Bolton UK
Re: Steampunk Harley - Tamiya 1/6 HD FLH Classic 'extreme' kit bash (Very Photo Heavy)
![]() by Skid Sun 29 Jan 2017, 10:23 am
by Skid Sun 29 Jan 2017, 10:23 am
I'm quite pleased with the result. wrote:
I should think so too Kats.
Marvellous stuff.
_________________
Al.
Constructive criticism is always welcome.
“Success always demands a greater effort.” Winston Churchill
"Success is failure turned inside out" Unknown

Skid- Admin
- Posts : 7128
Join date : 2013-02-15
Age : 75
Location : Newcastle. Good Old Blighty. -

Re: Steampunk Harley - Tamiya 1/6 HD FLH Classic 'extreme' kit bash (Very Photo Heavy)
![]() by Geezerman Sun 29 Jan 2017, 10:36 am
by Geezerman Sun 29 Jan 2017, 10:36 am
Geezerman- Advanced Member
- Posts : 3651
Join date : 2013-02-24
Age : 88
Location : Gulf coast of central Florids
Re: Steampunk Harley - Tamiya 1/6 HD FLH Classic 'extreme' kit bash (Very Photo Heavy)
![]() by KatsZenJammer Mon 20 Feb 2017, 12:12 am
by KatsZenJammer Mon 20 Feb 2017, 12:12 am
Bit of a longer gap between posts again but things have still been progressing, albeit slowly. Here's further work on the boiler/burner starting with decorative 'dots' to fill some gaps - purpose unknown, lol.

More detail added to the top - I'm calling this the 'steam cap' and basing its existence on similar portions of locomotive boilers.

The steam engines that had 'superheating' systems ran their incoming water and the final steam outflow through the firebox/burner to add that extra oomph. With that in mind I decided to add something that could look a bit like such a system partially exposed.
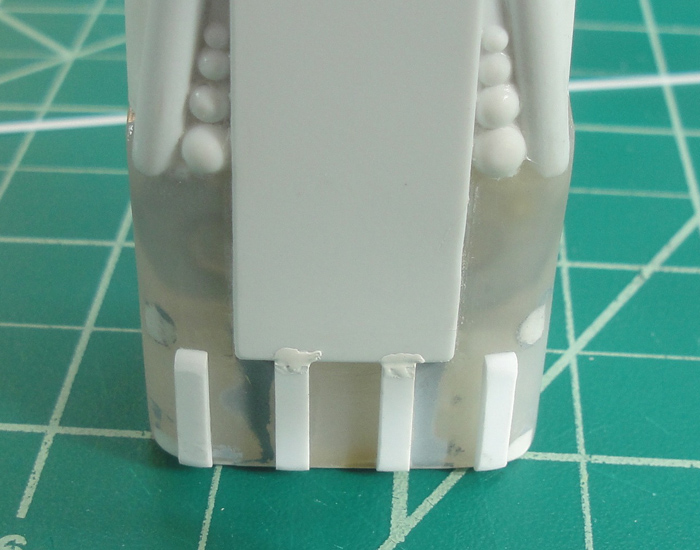

Working up panels for the upper portion. I cut rings out of sheet styrene using a drafting compass, cut those rings in half and glued them to very thin sheet styrene cut to shape in advance. Fill in with lengths of styrene and the blanks are ready for further detailing.

The 'rear' panel which will be mostly obscured so I'm not going too crazy on the added detail - some 1 mm half round gives it a nice look.

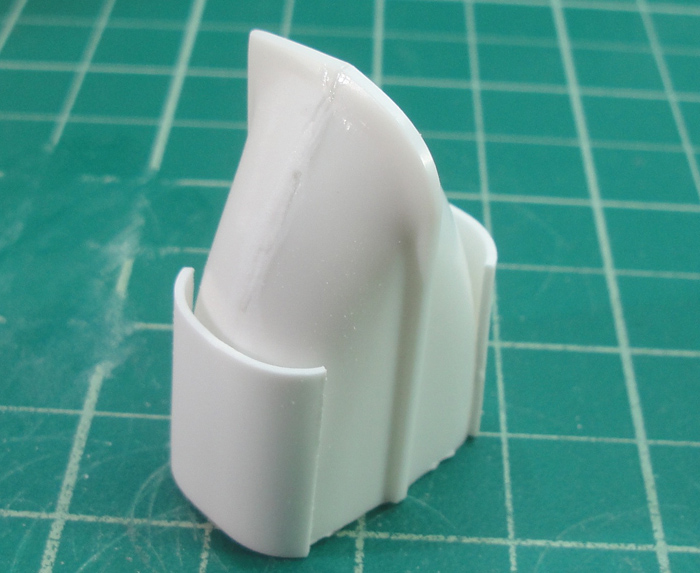
While pondering the front panel I was inspired to cut it in half and leave a gap for ... something. To be determined, let's say. At the bottom you can see where I added some more to the 'exposed plumbing' sides.

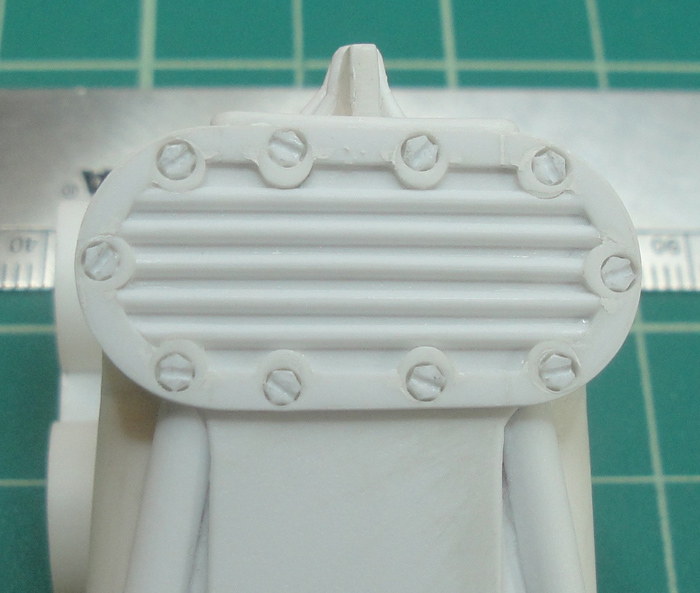
Ideas sometimes queue up in the wrong order, in this case the inspiration for inset bolts in the rear panel came a couple of steps too late but I figured out how to make it happen anyway, lol.

Not cleaned up but a good idea of what's going to happen. The hex nuts are cut from 1mm rod and the screwdriver slot was cut in with a combo of X-Acto blade and Zona saw - tedious but worth it I hope.

The add on to the shifter mechanism for the tranny gets added onto - this part is going slow because I'm still trying to visualize a potential gear/lever shift mechanism and I don't want to commit to anything until I have that part sussed out a bit more.

And the steam return condenser, or at least half of it, starts to take rough form. I'm approaching this part with the same aesthetic as the boiler - functionality takes a back seat to form. Plus with all the upcoming plumbing I'm going to have to figure out I thought it would be good to make this part capable of handling lots of connections from all over ... just in case.

I wish I had more to show but a lot of my recent work has been cleaning up parts and adding nut/bolt details where I've been putting them off. There is a lot of fiddly work on the frame mods already in place and still a pile of little details waiting in line. And I'm still working on how to make stabilizer mounts for the cylinder ... egads ...
Just keep swimming ...
KatsZenJammer- Resident member
- Posts : 2600
Join date : 2016-05-20
Age : 57
Location : Vancouver, BC
Re: Steampunk Harley - Tamiya 1/6 HD FLH Classic 'extreme' kit bash (Very Photo Heavy)
![]() by disabled modeler Mon 20 Feb 2017, 12:46 am
by disabled modeler Mon 20 Feb 2017, 12:46 am
disabled modeler- Intermediate Member
- Posts : 979
Join date : 2016-05-22
Age : 60
Location : Quincy,IL. USA
Re: Steampunk Harley - Tamiya 1/6 HD FLH Classic 'extreme' kit bash (Very Photo Heavy)
![]() by Guest Mon 20 Feb 2017, 2:42 am
by Guest Mon 20 Feb 2017, 2:42 am
Guest- Guest
Re: Steampunk Harley - Tamiya 1/6 HD FLH Classic 'extreme' kit bash (Very Photo Heavy)
![]() by GaryDainton Mon 20 Feb 2017, 7:51 am
by GaryDainton Mon 20 Feb 2017, 7:51 am
GaryDainton- Advanced Member
- Posts : 4433
Join date : 2014-03-06
Age : 56
Location : Bolton UK
Re: Steampunk Harley - Tamiya 1/6 HD FLH Classic 'extreme' kit bash (Very Photo Heavy)
![]() by Skid Mon 20 Feb 2017, 10:41 am
by Skid Mon 20 Feb 2017, 10:41 am
_________________
Al.
Constructive criticism is always welcome.
“Success always demands a greater effort.” Winston Churchill
"Success is failure turned inside out" Unknown
Skid- Admin
- Posts : 7128
Join date : 2013-02-15
Age : 75
Location : Newcastle. Good Old Blighty. -
Re: Steampunk Harley - Tamiya 1/6 HD FLH Classic 'extreme' kit bash (Very Photo Heavy)
![]() by Geezerman Mon 20 Feb 2017, 11:06 am
by Geezerman Mon 20 Feb 2017, 11:06 am
Geezerman- Advanced Member
- Posts : 3651
Join date : 2013-02-24
Age : 88
Location : Gulf coast of central Florids
Re: Steampunk Harley - Tamiya 1/6 HD FLH Classic 'extreme' kit bash (Very Photo Heavy)
![]() by Mence Sun 26 Feb 2017, 9:01 pm
by Mence Sun 26 Feb 2017, 9:01 pm
Eye wateringly brilliant work, keep it up...

Mence- New Member

- Posts : 100
Join date : 2015-05-31
Age : 61
Location : Southwater, West Sussex U.K.
Re: Steampunk Harley - Tamiya 1/6 HD FLH Classic 'extreme' kit bash (Very Photo Heavy)
![]() by KatsZenJammer Sun 26 Feb 2017, 11:16 pm
by KatsZenJammer Sun 26 Feb 2017, 11:16 pm
Trying my best to get back my previous weekly posting routine, we'll see how that goes, lol.
So ... while reviewing my previous update I noticed that a couple of the holes I drilled through the rear plate for the boiler top were 'off,' something that I missed in real life but the camera (and Photoshop cropping) brought it to my attention. Time for some re-do's, starting with fill-in's of the misaligned holes.

And after the re-do with the plate and the nuts affixed to the boiler.
I've mentioned in previous posts that a lot of my time is taken up with detail and accessory work that doesn't necessarily merit photos being taken. But this week I was whipping up enough of a batch that I felt it was worth documenting. This is the result of a 'day' at the work bench in terms of production - also involved was drilling holes in the frame parts where required and stuff like cleaning up and sanding the little nuts, which is where a lot of time goes.
Follow up with where those little bits go - I forgot to take a photo of the other side but you get the idea. Oh, and some of the details in this pic were already in place ... and there's probably still more to come, lol.

More hex nuts in place on the shifter part. I'm still dithering with this piece in terms of advancing ... can't seem to nail down a clear idea of what's going to be involved but I'm thinking gears, linkages and posts at this time.

The last of the hex nuts wind up on the boiler. Here I cut a couple of strips to act as a 'flange' instead of my original idea of in-setting the nuts within the steam cap plate.

And so it goes. I also started using Tamiya White Putty recently, not a conscious decision but rather one of availability at the LHS, and I have to say it is remarkable for fine detail work though I'd hate to have to use it in large amounts. It comes in a tube like the regular grey putty but is more 'flowy' though not like other white putty's which are close to liquid. Anyone looking for a really fine grained filler for small bits should check this stuff out ... but I repeat that this stuff would not suit if you needed to fill bigger gaps.
Just keep swimming ...
KatsZenJammer- Resident member
- Posts : 2600
Join date : 2016-05-20
Age : 57
Location : Vancouver, BC
Re: Steampunk Harley - Tamiya 1/6 HD FLH Classic 'extreme' kit bash (Very Photo Heavy)
![]() by Geezerman Tue 28 Feb 2017, 11:09 am
by Geezerman Tue 28 Feb 2017, 11:09 am
Geezerman- Advanced Member
- Posts : 3651
Join date : 2013-02-24
Age : 88
Location : Gulf coast of central Florids
Re: Steampunk Harley - Tamiya 1/6 HD FLH Classic 'extreme' kit bash (Very Photo Heavy)
![]() by Speed Racer 65 Tue 28 Feb 2017, 2:21 pm
by Speed Racer 65 Tue 28 Feb 2017, 2:21 pm
Speed Racer 65- Intermediate Member
- Posts : 865
Join date : 2015-08-06
Location : Louisville KY
Re: Steampunk Harley - Tamiya 1/6 HD FLH Classic 'extreme' kit bash (Very Photo Heavy)
![]() by KatsZenJammer Mon 06 Mar 2017, 5:28 pm
by KatsZenJammer Mon 06 Mar 2017, 5:28 pm
It seems that I have one of those never ending, up and down cold/flu things and this past week has definitely been a down time. But I did manage to get in a little bit of work in between blowing my nose, sneezing and all the other fun stuff.
Working up the details on the boiler led me to think that I wanted to use the 'hole' though the body which I had covered with panels but only on the rear side so I cut away the panel as a start.

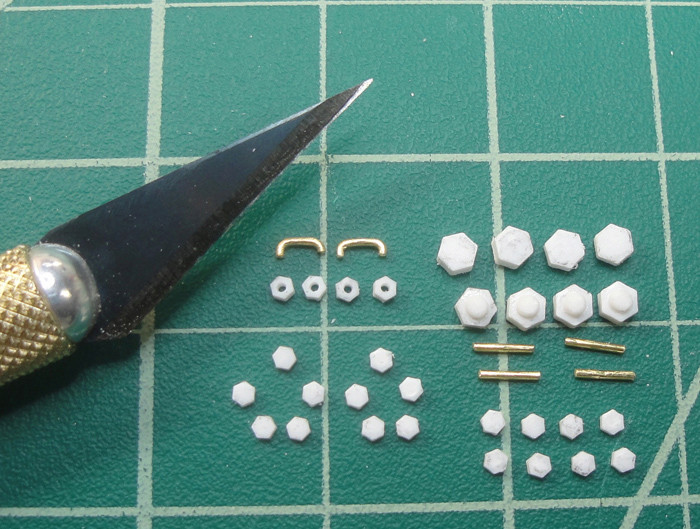
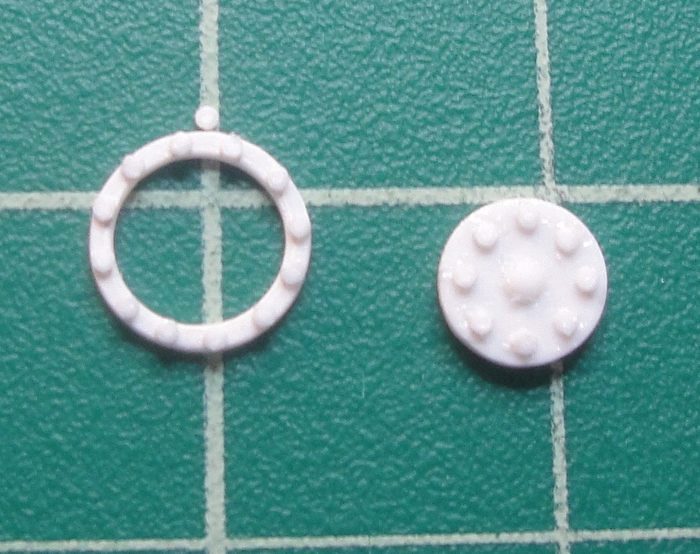
An example of re-use of cut offs and bits ... here I rummaged through the bits and pieces and found a bunch of stuff which would suit. At this point I've added some half-circles to the bottom of the plate and am test fitting some rings and circles.

After the expected fiddly shaping and adjusting and stuff I wound up with these two parts. The nuts were cut from 0.8 mm hex rod.
And the pieces in place.

From here there will be some 'framing' and the addition of stuff like rivets and pressure reinforcing plates and stuff - all of which will help inform the further detailing of the front of the boiler which will be more visible. And with any luck I will be able to get more done as the need to keep tissues to honker recedes ...
Just keep swimming ...
KatsZenJammer- Resident member
- Posts : 2600
Join date : 2016-05-20
Age : 57
Location : Vancouver, BC
Re: Steampunk Harley - Tamiya 1/6 HD FLH Classic 'extreme' kit bash (Very Photo Heavy)
![]() by GaryDainton Mon 06 Mar 2017, 6:00 pm
by GaryDainton Mon 06 Mar 2017, 6:00 pm
GaryDainton- Advanced Member
- Posts : 4433
Join date : 2014-03-06
Age : 56
Location : Bolton UK
Re: Steampunk Harley - Tamiya 1/6 HD FLH Classic 'extreme' kit bash (Very Photo Heavy)
![]() by Sponsored content
by Sponsored content
Sponsored content
Page 11 of 25 • 1 ... 7 ... 10, 11, 12 ... 18 ... 25 ![]()
» Tamiya 1/6 Harley Davidson Fat Boy Lo
» Tamiya 1/6 Harley Davidson FLH1200
» Steampunk Ducati
» '57 Salvage bash-up
|
|
|