
Handley Page 0-400 WWI Bomber
Skid's :: Works In Progress :: Aircraft
Page 2 of 3 •  1, 2, 3
 ![]()
Re: Handley Page 0-400 WWI Bomber
![]() by Guest Tue 22 Jul 2014, 5:24 pm
by Guest Tue 22 Jul 2014, 5:24 pm

Guest- Guest

Tumbler75- Intermediate Member

- Posts : 854
Join date : 2013-02-25
Age : 49
Location : Prosperity, SC
Re: Handley Page 0-400 WWI Bomber
![]() by RetiredMike Wed 23 Jul 2014, 11:27 pm
by RetiredMike Wed 23 Jul 2014, 11:27 pm


I set it up to clamp it under tension overnight when I glue it. In the morning, I added gap filling CA in the crevice in place of filler.

This is where it is now. I can live with this and continue on.


We're good for now.
Mike

RetiredMike- Advanced Member

- Posts : 3525
Join date : 2013-04-27
Age : 73
Location : Valparaiso, Indiana
Re: Handley Page 0-400 WWI Bomber
![]() by Guest Thu 24 Jul 2014, 9:18 am
by Guest Thu 24 Jul 2014, 9:18 am
Excellent recovery!!
Guest- Guest
Re: Handley Page 0-400 WWI Bomber
![]() by RetiredMike Wed 30 Jul 2014, 9:00 pm
by RetiredMike Wed 30 Jul 2014, 9:00 pm

I also assembled the tail section. The center pieces fit very well, but the outer pieces will have to be squeezed together during gluing to make proper contact. That issue allowed me to leave the two fins off until later. Airfix did not provide any holes for rigging back here as they did on the front wings. I'll add an abbreviated version of the rigging and include the elevator cabling when I discover where it exits the fuselage. Below is the factory's illustration of the actual rigging.


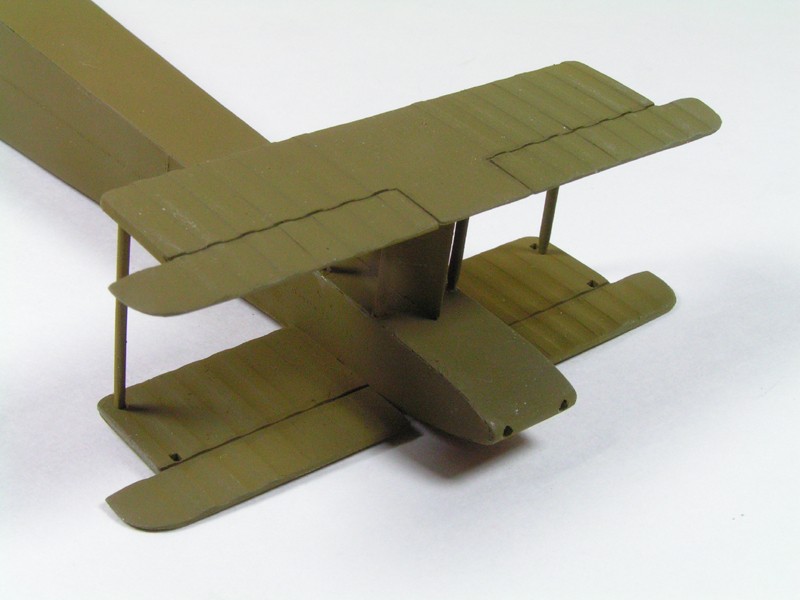
I started putting the struts on the front lower wing pieces, but after thinking about it, I may have goofed. There is a 4 degree angle the wing needs to be at. I believe the struts should be perfectly upright when at that angle - not when flat. It might have to wait until I complete more of the fuselage center section, so I can mock up the outer wing sections and see how it looks. This is a bit of a complicated kit to build.

Thanks again for your comments.
Mike
RetiredMike- Advanced Member
- Posts : 3525
Join date : 2013-04-27
Age : 73
Location : Valparaiso, Indiana
Re: Handley Page 0-400 WWI Bomber
![]() by Guest Thu 31 Jul 2014, 2:27 am
by Guest Thu 31 Jul 2014, 2:27 am
Guest- Guest
Tumbler75- Intermediate Member
- Posts : 854
Join date : 2013-02-25
Age : 49
Location : Prosperity, SC
Re: Handley Page 0-400 WWI Bomber
![]() by john2308 Thu 31 Jul 2014, 4:52 am
by john2308 Thu 31 Jul 2014, 4:52 am
Good luck with the rear tail rigging 

john2308- Full Member
- Posts : 1142
Join date : 2013-04-10
Age : 79
Location : Phoenix, AZ
Re: Handley Page 0-400 WWI Bomber
![]() by harron68 Thu 31 Jul 2014, 2:24 pm
by harron68 Thu 31 Jul 2014, 2:24 pm
harron68- Advanced Member
- Posts : 3616
Join date : 2013-02-28
Age : 73
Location : MIDWEST
Re: Handley Page 0-400 WWI Bomber
![]() by harron68 Thu 31 Jul 2014, 2:39 pm
by harron68 Thu 31 Jul 2014, 2:39 pm
harron68- Advanced Member
- Posts : 3616
Join date : 2013-02-28
Age : 73
Location : MIDWEST
Re: Handley Page 0-400 WWI Bomber
![]() by RetiredMike Thu 31 Jul 2014, 3:01 pm
by RetiredMike Thu 31 Jul 2014, 3:01 pm
harron68 wrote:I checked google images and got to the "Internet Modeler" site and a scratchbuilt bomber in 1/48 scale. This proves we are sane. A scratch builder of that plane may not be. Here's a link to the article http://www.wwi-models.org/IM/British/hp_0-400.html
Yes, I saw that article. Excellent work. I have a tendency to have numerous projects started at one time. When a rush of insanity strikes, I revert to scratchbuilding. LOL
RetiredMike- Advanced Member
- Posts : 3525
Join date : 2013-04-27
Age : 73
Location : Valparaiso, Indiana
Re: Handley Page 0-400 WWI Bomber
![]() by Geezerman Fri 01 Aug 2014, 1:12 am
by Geezerman Fri 01 Aug 2014, 1:12 am

Geezerman- Advanced Member
- Posts : 3651
Join date : 2013-02-24
Age : 88
Location : Gulf coast of central Florids
Re: Handley Page 0-400 WWI Bomber
![]() by Skid Sat 02 Aug 2014, 11:16 pm
by Skid Sat 02 Aug 2014, 11:16 pm
_________________
Al.
Constructive criticism is always welcome.
“Success always demands a greater effort.” Winston Churchill
"Success is failure turned inside out" Unknown

Skid- Admin
- Posts : 7128
Join date : 2013-02-15
Age : 75
Location : Newcastle. Good Old Blighty. -

Re: Handley Page 0-400 WWI Bomber
![]() by webby Sun 03 Aug 2014, 12:36 am
by webby Sun 03 Aug 2014, 12:36 am

webby- Moderator

- Posts : 2194
Join date : 2013-02-27
Age : 64
Location : Strathpine Australia. Built over WW2 airstrip
Re: Handley Page 0-400 WWI Bomber
![]() by RetiredMike Wed 06 Aug 2014, 5:10 am
by RetiredMike Wed 06 Aug 2014, 5:10 am


Also started rigging the tail. Chose to go with EZLine instead of the silk thread. After looking at the thread a lot, it seems to have a flat side to it in its appearance. The EZLine also went on easily on the Albatross, so I'll stick with it for now. I found I don't need to dip the tip of the line in CA accelerator - a drop can be placed near the CA and it works better. And it doesn't leave any mark on the paint it contacts. I just did a test with the silver rub-on to see if anything will affect the line when colored. The wax works ok. Next will be using metallizer paint - hope it doesn't react.


After dullcoating the fuselage and wings, the wings can start being installed. That's going to be the tricky part - lots of factors involved in getting it right.
Thanks for your comments and for following along,
Mike
RetiredMike- Advanced Member
- Posts : 3525
Join date : 2013-04-27
Age : 73
Location : Valparaiso, Indiana
Re: Handley Page 0-400 WWI Bomber
![]() by Geezerman Wed 06 Aug 2014, 11:11 am
by Geezerman Wed 06 Aug 2014, 11:11 am

Geezerman- Advanced Member
- Posts : 3651
Join date : 2013-02-24
Age : 88
Location : Gulf coast of central Florids

coyote- Intermediate Member
- Posts : 605
Join date : 2013-03-30
Location : Sydney, Australia
Re: Handley Page 0-400 WWI Bomber
![]() by Guest Wed 06 Aug 2014, 6:12 pm
by Guest Wed 06 Aug 2014, 6:12 pm
Guest- Guest
Re: Handley Page 0-400 WWI Bomber
![]() by RetiredMike Wed 06 Aug 2014, 9:00 pm
by RetiredMike Wed 06 Aug 2014, 9:00 pm

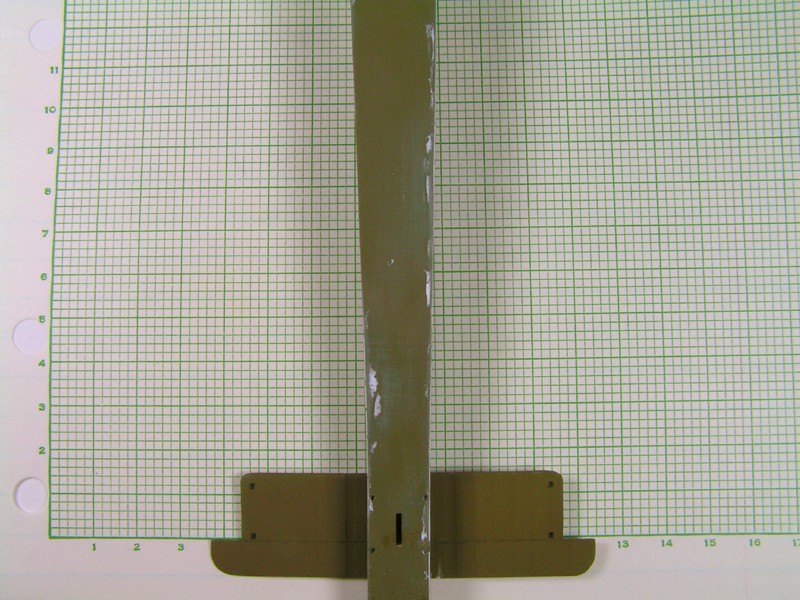
Taking the struts out of the lower wing I had previously done, I found that a 4 degree inclination was equal to a little less than .5" rise over the 4.75" length of that wing piece. So I found a clip that would support the wing tip at about that height while I reglued the struts in correctly. You can see in the photo that the tab at the inner end of the wing is now parallel to the surface.


Surprisingly it's still looking on track. LOL
Thanks, again,
Mike
RetiredMike- Advanced Member
- Posts : 3525
Join date : 2013-04-27
Age : 73
Location : Valparaiso, Indiana
Re: Handley Page 0-400 WWI Bomber
![]() by Skid Wed 06 Aug 2014, 11:39 pm
by Skid Wed 06 Aug 2014, 11:39 pm

_________________
Al.
Constructive criticism is always welcome.
“Success always demands a greater effort.” Winston Churchill
"Success is failure turned inside out" Unknown
Skid- Admin
- Posts : 7128
Join date : 2013-02-15
Age : 75
Location : Newcastle. Good Old Blighty. -
Re: Handley Page 0-400 WWI Bomber
![]() by RetiredMike Fri 15 Aug 2014, 6:00 pm
by RetiredMike Fri 15 Aug 2014, 6:00 pm
Got windows installed using .020" clear styrene instead of the clear kit parts. Also scratched up a generator to replace the missing one on the right side. The wings and fuselage have been dullcoated. The engine nacelles have been installed with their struts. For the most part they seem pretty straight. The instructions say to install the top wing center wing section before the engine work, but it seemed kinda chancy. Luckily for me, I did it this way - I didn't pay close enough attention to the instructions and glued the lower to the upper piece in backwards! But CA snaps cleanly with a little pressure and that was corrected. EZLine pieces were glued in at the most difficult locations before assembly to make things easier.


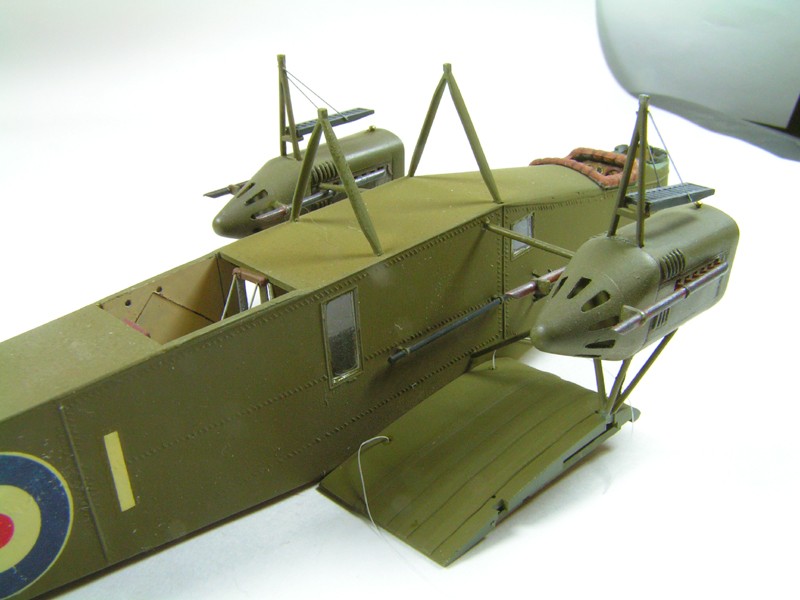
Don't know why there's splotches in the pictures - they aren't on the model. Maybe it's time for a new camera. Tired of changing AA batteries. LOL
That's it for now.
Thanks for looking,
Mike
RetiredMike- Advanced Member
- Posts : 3525
Join date : 2013-04-27
Age : 73
Location : Valparaiso, Indiana
Re: Handley Page 0-400 WWI Bomber
![]() by Tumbler75 Fri 15 Aug 2014, 8:23 pm
by Tumbler75 Fri 15 Aug 2014, 8:23 pm
Lookin' good! As for the spots. Check your lens. Might have a bit of dust on there.
I got tired of changing batteries and upgraded cameras about 2 yrs ago now. Has been a joy just to plug'n charge the camera when needed. LoL
Tumbler75- Intermediate Member
- Posts : 854
Join date : 2013-02-25
Age : 49
Location : Prosperity, SC
Re: Handley Page 0-400 WWI Bomber
![]() by Geezerman Sat 16 Aug 2014, 10:22 am
by Geezerman Sat 16 Aug 2014, 10:22 am
Gonna be a great model!
Geezerman- Advanced Member
- Posts : 3651
Join date : 2013-02-24
Age : 88
Location : Gulf coast of central Florids
Page 2 of 3 • 1, 2, 3 ![]()
» Polikarpov R-5 Soviet Night Bomber
» Polikarpov R5 - WWII Soviet Night Bomber
» Custom page
» Handley Page O-400 - Airfix 1/72
Skid's :: Works In Progress :: Aircraft
|
|
|