Building Side Pipes By Brent
 Building Side Pipes By Brent
Title
Building Your Own Side Pipes
Author
Brent
Original Published
Monday, October 31, 2005
We will need some supplies. I'm using solder 2.5mm dia (.098") and a piece of solid styrene 4.78MM (.188") round. Also a piece of electrical shrink tubing that will fit over the styrene.
This tutorial will build one side so double everything that is needed.
First cut four pieces of solder. Make sure you have extra. I cut mine to 3.175CM or 1.25". The length will depend on the car.
You will need to figure out how far down the side of the car you want to go with the four collector pipes and how far you will need to go under the car - in my case through the car - to connect to the headers.

Once the four pieces are cut you will need to make them straight.
The way I do it is to put some tape on a piece of glass, or a very smooth flat surface and roll the solder with a piece of hard wood or something very smooth. The tape is to keep the solder from slipping while trying to roll it. Some Brillo pad or similar can be used to polish the soldier while straight.
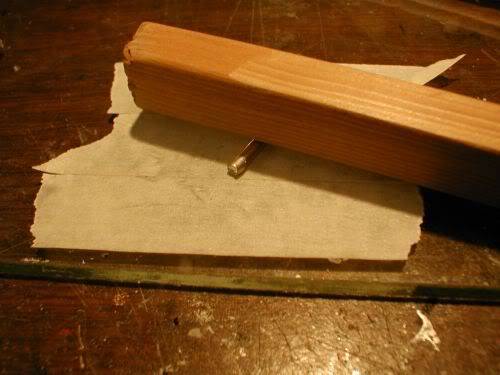
With the pieces straight, glue two pieces together with epoxy or super glue making sure they're flush at one end. My preference is super glue. But only glue one end. We do not want the entire length glued together. You will see why later.
[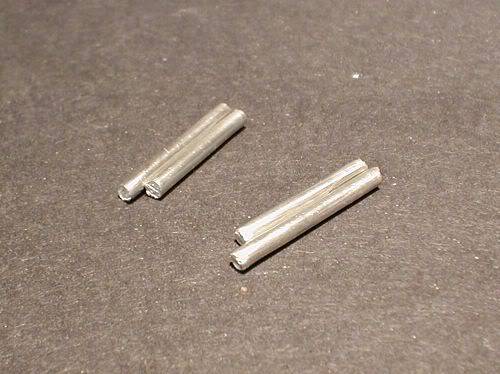
Then take the two sets and glue them into a nice tight box. Remember to only glue the ends as shown by the red arrows.
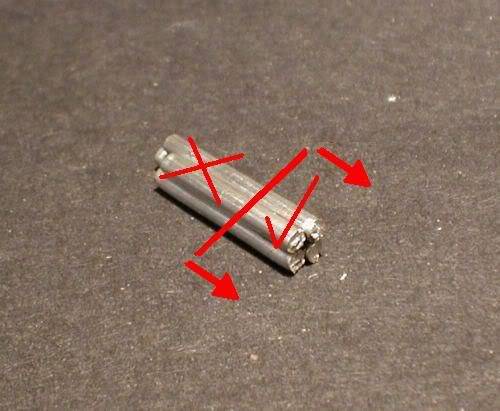
Let this dry completely. Do not rush the next step!
With a pair of smooth pliers or a vice with smooth jaws - you don't want to put marks in the solder - grab the glued end and make a bend to the required angle you need. This again will be dictated by the model.
Notice how the length of the solder changes as we bend it. The outside pieces will appear to shrink and be shorter as they have a longer distance to bend because they have to go around the inside pieces.
This is the reason we don't want to glue the entire length of the solder when making our box pattern. If you do glue the entire length the pieces will break apart every time!
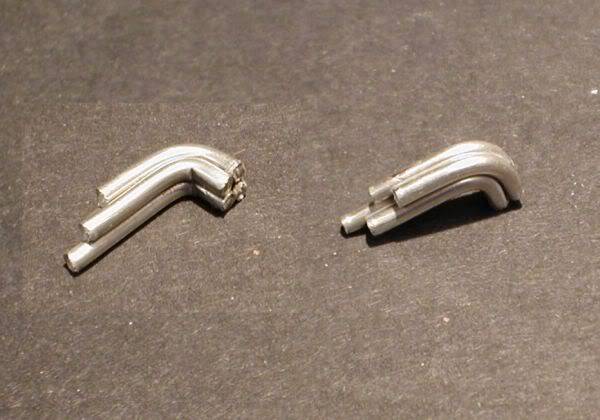
We will get back to the collectors later on during final assembly.
For now we'll move on to the side pipe itself.
Take a long piece of your styrene and slowly make a 90 degree bend in it. It will spring back so add some heat, but not to much, and you will be able to take the spring out of it. We want to have the styrene remain at 90 degrees without holding it. Then take a saw or hobby knife and cut in line with the main length as shown. I cut mine a bit out away from the main length and sanded it down to the required depth.
This cut is important to get the look we want. If you cut too far away you will end up with a piece that looks like it belongs on a big-rig and not on the side of a car or truck.

Using what ever you have, a Dremel bit or a drill bit remove some material out of the end of the side pipe. You don't have to go far as we will be painting the inside of this area. This will help make it look hollow.

Now we are getting into the critical area. You will have to take the collector and cut it down to fit the car. Once that is done you will need to cut down the side pipe to fit the car and then glue the two pieces together.
If the collector pipes are a bit wider than the side pipe tube sand them down so you get a smooth transfer from the four pipes to the single pipe.
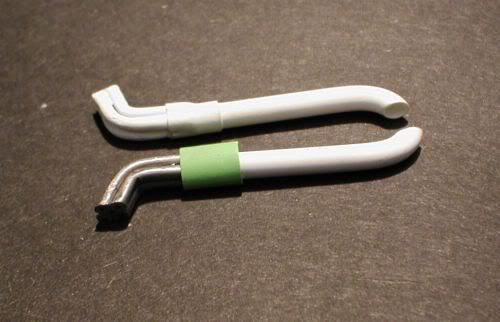
Once done you should end up with something like this.

We now need a piece of the electrical shrink tubing. This will make a very nice transition from the four collector pieces to the side pipe. Make sure you cut the shrink tube perfectly straight or it won't look nice.
We could stop at this stage, but to get a bit more realism take a tooth pick and slip some glue under the shrink tubing in the seams of the four collector pipes.
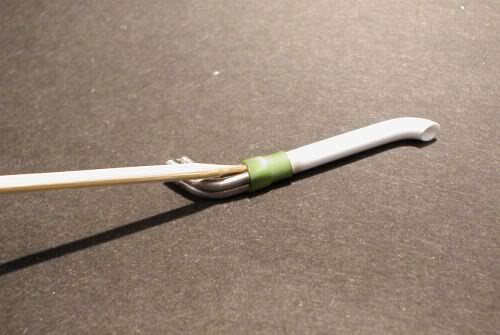
Press down with the back of a hobby knife until the glue is dry. Repeat this four times. Now we have a realistic looking joint in the collector.
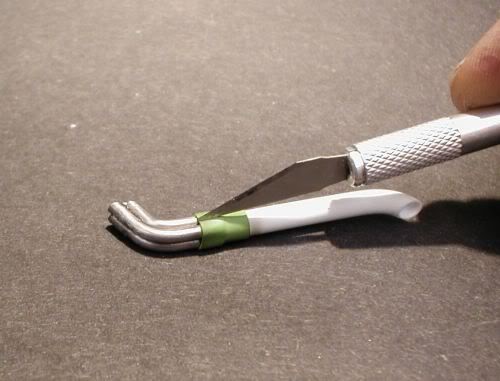
Prime and paint your side pipes. Don't forget to paint in the ends for that hollow look and mount them as required. You may need to put some tabs on the back of them to hang them.
With this car they went through the side of the car so this was enough to secure them in place.
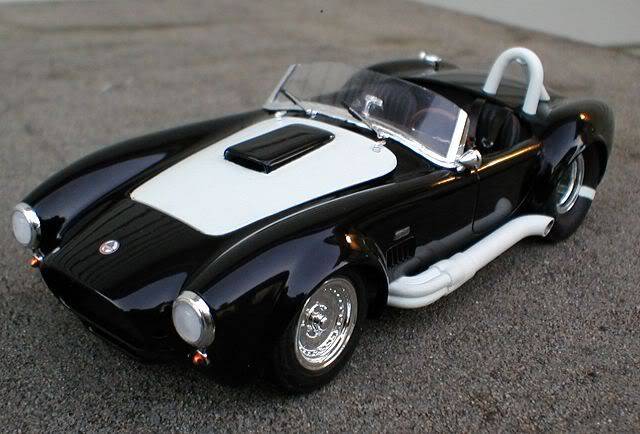
Now this is what it is all about. Some real attitude!

Building Your Own Side Pipes
Author
Brent
Original Published
Monday, October 31, 2005
We will need some supplies. I'm using solder 2.5mm dia (.098") and a piece of solid styrene 4.78MM (.188") round. Also a piece of electrical shrink tubing that will fit over the styrene.
This tutorial will build one side so double everything that is needed.
First cut four pieces of solder. Make sure you have extra. I cut mine to 3.175CM or 1.25". The length will depend on the car.
You will need to figure out how far down the side of the car you want to go with the four collector pipes and how far you will need to go under the car - in my case through the car - to connect to the headers.

Once the four pieces are cut you will need to make them straight.
The way I do it is to put some tape on a piece of glass, or a very smooth flat surface and roll the solder with a piece of hard wood or something very smooth. The tape is to keep the solder from slipping while trying to roll it. Some Brillo pad or similar can be used to polish the soldier while straight.

With the pieces straight, glue two pieces together with epoxy or super glue making sure they're flush at one end. My preference is super glue. But only glue one end. We do not want the entire length glued together. You will see why later.
[

Then take the two sets and glue them into a nice tight box. Remember to only glue the ends as shown by the red arrows.

Let this dry completely. Do not rush the next step!
With a pair of smooth pliers or a vice with smooth jaws - you don't want to put marks in the solder - grab the glued end and make a bend to the required angle you need. This again will be dictated by the model.
Notice how the length of the solder changes as we bend it. The outside pieces will appear to shrink and be shorter as they have a longer distance to bend because they have to go around the inside pieces.
This is the reason we don't want to glue the entire length of the solder when making our box pattern. If you do glue the entire length the pieces will break apart every time!

We will get back to the collectors later on during final assembly.
For now we'll move on to the side pipe itself.
Take a long piece of your styrene and slowly make a 90 degree bend in it. It will spring back so add some heat, but not to much, and you will be able to take the spring out of it. We want to have the styrene remain at 90 degrees without holding it. Then take a saw or hobby knife and cut in line with the main length as shown. I cut mine a bit out away from the main length and sanded it down to the required depth.
This cut is important to get the look we want. If you cut too far away you will end up with a piece that looks like it belongs on a big-rig and not on the side of a car or truck.

Using what ever you have, a Dremel bit or a drill bit remove some material out of the end of the side pipe. You don't have to go far as we will be painting the inside of this area. This will help make it look hollow.

Now we are getting into the critical area. You will have to take the collector and cut it down to fit the car. Once that is done you will need to cut down the side pipe to fit the car and then glue the two pieces together.
If the collector pipes are a bit wider than the side pipe tube sand them down so you get a smooth transfer from the four pipes to the single pipe.
Once done you should end up with something like this.

We now need a piece of the electrical shrink tubing. This will make a very nice transition from the four collector pieces to the side pipe. Make sure you cut the shrink tube perfectly straight or it won't look nice.

We could stop at this stage, but to get a bit more realism take a tooth pick and slip some glue under the shrink tubing in the seams of the four collector pipes.

Press down with the back of a hobby knife until the glue is dry. Repeat this four times. Now we have a realistic looking joint in the collector.

Prime and paint your side pipes. Don't forget to paint in the ends for that hollow look and mount them as required. You may need to put some tabs on the back of them to hang them.
With this car they went through the side of the car so this was enough to secure them in place.
Now this is what it is all about. Some real attitude!


Guest- Guest
 Similar topics
» Building Headers. By Brent
» Tip for building roll bars, roll cages. by Brent
» Cheep and Easy exhaust pipes/air pipes for big Rigs
» 1972 GMC Step Side
» Hobby's side trawler
» Tip for building roll bars, roll cages. by Brent
» Cheep and Easy exhaust pipes/air pipes for big Rigs
» 1972 GMC Step Side
» Hobby's side trawler
Permissions in this forum:
You cannot reply to topics in this forum