Left For Dead Part 1
+5
john2308
Gothic Kustomz
Geezerman
Sam
Tumbler75
9 posters
Skid's :: Works In Progress :: Dioramas
Page 1 of 1
 Left For Dead Part 1
This is part 1 of this Diorama build. I know I'm doin' this a bit backwards by starting on the cars first and not the base and buildings. But I promise I'll get there. The title will change as things progress so let's prepare for this journey.
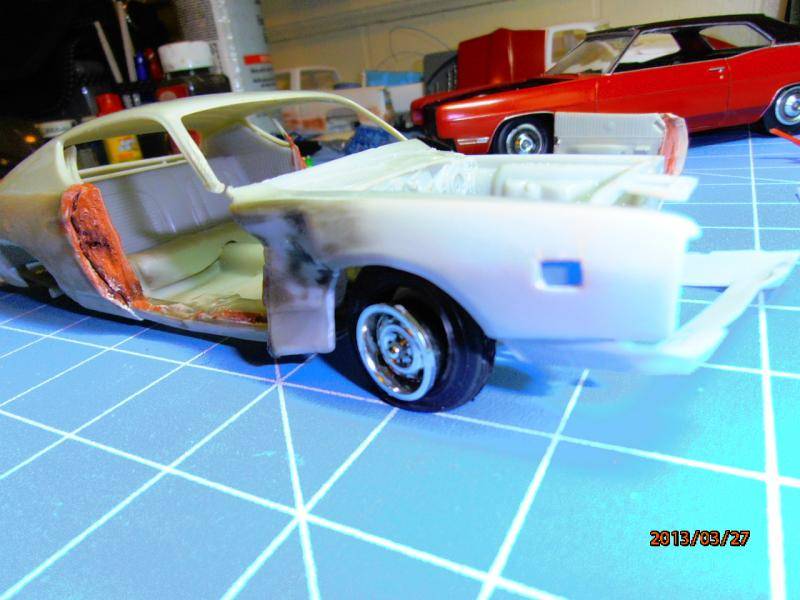
This is the Junker Charger. It's a 1971 Dodge Charger R/T I gave a friend of mine named Pete M. He wanted to try a model and was going to do a diorama with this car. Upon his passing his wife found it in a desk drawer and gave it back to me. She felt I could finish where he left off. It has been moved around a few times, box got crushed, body separated from the pan, and a few parts became AWOL. But I got parts and spares of a few parts so I'll manage.
What I started with: Passenger side was crashed on the car, doors, trunk lid, and a fender were removed from the body. Some of the interior has been assembled. The door jambs have been made with Bondo, the driver door had the interior panel attached with 5 minute epoxy and then Bondo'd in the holes to complete the door. Here's the pics.



Continued .... :scratch:
This is the Junker Charger. It's a 1971 Dodge Charger R/T I gave a friend of mine named Pete M. He wanted to try a model and was going to do a diorama with this car. Upon his passing his wife found it in a desk drawer and gave it back to me. She felt I could finish where he left off. It has been moved around a few times, box got crushed, body separated from the pan, and a few parts became AWOL. But I got parts and spares of a few parts so I'll manage.
What I started with: Passenger side was crashed on the car, doors, trunk lid, and a fender were removed from the body. Some of the interior has been assembled. The door jambs have been made with Bondo, the driver door had the interior panel attached with 5 minute epoxy and then Bondo'd in the holes to complete the door. Here's the pics.


Continued .... :scratch:

Tumbler75- Intermediate Member

- Posts : 854
Join date : 2013-02-25
Age : 49
Location : Prosperity, SC
 Re: Left For Dead Part 1
Before I could continue on with the my part of the contribution. I had to figure out how to get the dash in place and make it where I could still remove it in needed. So my solution was simple. Two pieces of square tubing that slide into one another. I attached one to the underside of the cowl with MEK and then stuck the other tube inside that one and put some glue on the other end where it would meet the dash. And presto! It holds the dash like the factory did and looks correct for what I needed.


See y'all soon with the next installment to this project! 8)


See y'all soon with the next installment to this project! 8)

Tumbler75- Intermediate Member

- Posts : 854
Join date : 2013-02-25
Age : 49
Location : Prosperity, SC
 Re: Left For Dead Part 1
I really want to see where you go with this dio. Right now it looks like it could be sitting in a vacant lot with a couple of bums warming their hands around a barrel.
Sam- Resident member

- Posts : 2016
Join date : 2013-02-23
Age : 57
Location : Back in Toledo, Oregon
 Re: Left For Dead Part 1
Looks good, Jason!
Like the tire separated from the rim. 8)
Junkin 'em sure is fun, eh?
Like the tire separated from the rim. 8)
Junkin 'em sure is fun, eh?

Geezerman- Advanced Member

- Posts : 3651
Join date : 2013-02-24
Age : 89
Location : Gulf coast of central Florids
 Re: Left For Dead Part 1
Looks like this will be fun.
Gothic Kustomz- New Member

- Posts : 103
Join date : 2013-02-27
 Re: Left For Dead Part 1
Great start, looks like a major fender bender happened :affraid: John

john2308- Full Member

- Posts : 1142
Join date : 2013-04-10
Age : 79
Location : Phoenix, AZ
 Re: Left For Dead Part 1
Thanx everyone for the comments. This is a tough build as I've never done a severe weathering job on a model before. I'm hoping that I can finish what someone else has started. Not easy stepping into someone else's shoes.
Here is another shot of the dash in place on it's hanger.

As you've seen in previous pictures the driver door is now hinged, there is patch panel to cover the hole in the firewall where the fender was removed.


Yes it sags like all these big doored cars do after all the years of neglect.

I have drilled holes in the engine bay to simulate where the missing fender would bolt up. I've also made some of the inner fender details. I did put a lip on the fender and drilled holes to mimic the mounting points.


Then I started in on the brakes. I took a few bits and turned it into the rear brake backing plate, axel hub, and lug studs.


And I've started the same process to make the front disc brake.

Enjoy! 8)
Here is another shot of the dash in place on it's hanger.

As you've seen in previous pictures the driver door is now hinged, there is patch panel to cover the hole in the firewall where the fender was removed.


Yes it sags like all these big doored cars do after all the years of neglect.

I have drilled holes in the engine bay to simulate where the missing fender would bolt up. I've also made some of the inner fender details. I did put a lip on the fender and drilled holes to mimic the mounting points.


Then I started in on the brakes. I took a few bits and turned it into the rear brake backing plate, axel hub, and lug studs.


And I've started the same process to make the front disc brake.

Enjoy! 8)

Tumbler75- Intermediate Member

- Posts : 854
Join date : 2013-02-25
Age : 49
Location : Prosperity, SC
 Re: Left For Dead Part 1
As yer finding out, Jason, the nature of this genre does not require super neatness. Attention to details is what sells this junker stuff. Realistic weathering and appropriate detailing make it happen.
You are doing a great job !!
You are doing a great job !!

Geezerman- Advanced Member

- Posts : 3651
Join date : 2013-02-24
Age : 89
Location : Gulf coast of central Florids
 Re: Left For Dead Part 1
Looks like it should. Good eye for the detail. I like the bolt holes in the fender. Nice touch. The brakes are going to be cool when worked out.
Guest- Guest
 Re: Left For Dead Part 1
Thanx guys for the comments and compliments. I've always heard the Devil is in the details and for some reason it's so true with this build. I'll get this done someday. LoL
Ok. I've sat down at the desk with Laptop beside me and worked on a few fiddly bits. I got the hood latch bracket and the lower valance mounting brackets made up and installed.


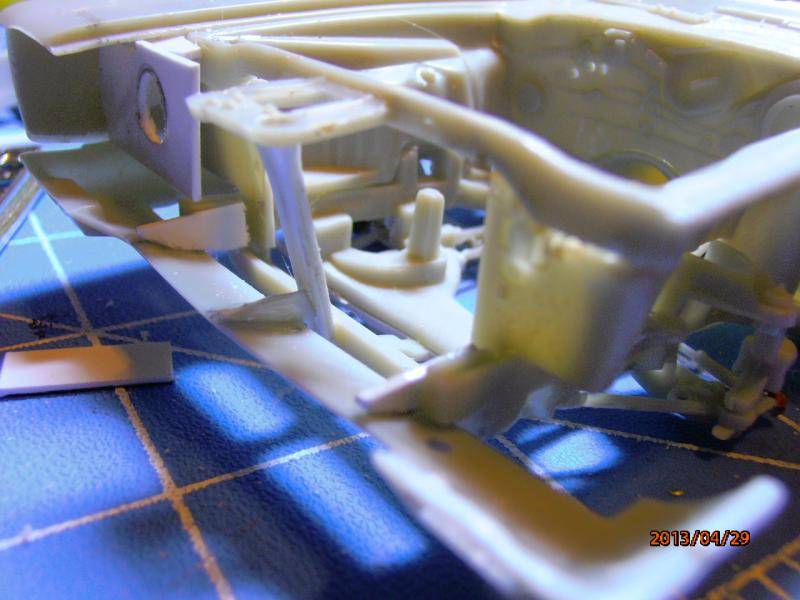
Then moved my attention to the truck area. I already had the inner lip made but it still lacked some detail and looked rather crude. So I added another strip to connect the two sides, made a flat panel to hide the rear bumper/taillights when assembled, and added a .10 diameter rod to simulate weather stripping.


Next it was time to work on the headlights and brackets that hold the buckets. So I broke out some extra headlights I had and filed them down to look like buckets. Make the brackets out of styrene sheet .20 in thickness. And here is where I am now.
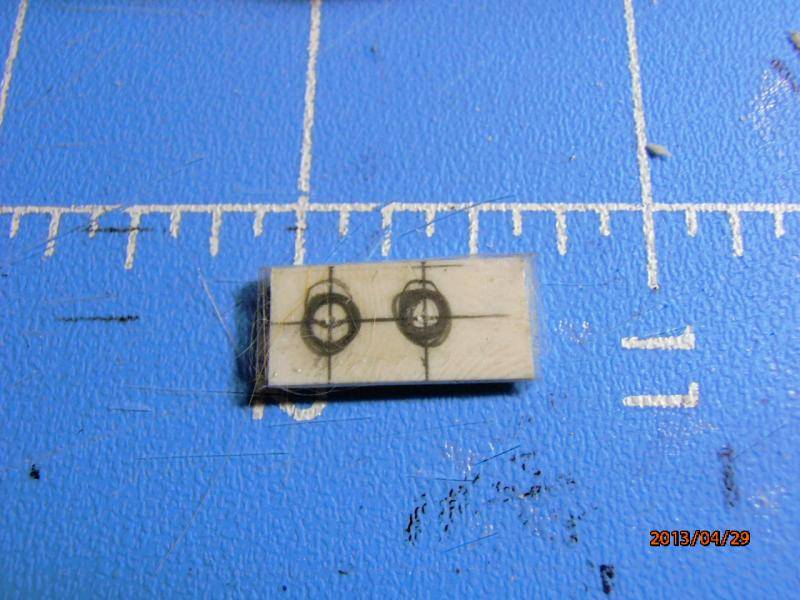


So there ya have it. I'm still workin' on other li'l fiddly bits and then it'll be time to hit it with Primers, paints, and try and weather it up some. Enjoy! 8)
Ok. I've sat down at the desk with Laptop beside me and worked on a few fiddly bits. I got the hood latch bracket and the lower valance mounting brackets made up and installed.


Then moved my attention to the truck area. I already had the inner lip made but it still lacked some detail and looked rather crude. So I added another strip to connect the two sides, made a flat panel to hide the rear bumper/taillights when assembled, and added a .10 diameter rod to simulate weather stripping.


Next it was time to work on the headlights and brackets that hold the buckets. So I broke out some extra headlights I had and filed them down to look like buckets. Make the brackets out of styrene sheet .20 in thickness. And here is where I am now.


So there ya have it. I'm still workin' on other li'l fiddly bits and then it'll be time to hit it with Primers, paints, and try and weather it up some. Enjoy! 8)

Tumbler75- Intermediate Member

- Posts : 854
Join date : 2013-02-25
Age : 49
Location : Prosperity, SC
 Re: Left For Dead Part 1
Awesome detail and scratchbuildin' Like it a lot. John

john2308- Full Member

- Posts : 1142
Join date : 2013-04-10
Age : 79
Location : Phoenix, AZ
 Re: Left For Dead Part 1
Lots of attention to lots of details, Jason. A fine start.
Chris
Chris

webby- Moderator

- Posts : 2220
Join date : 2013-02-27
Age : 65
Location : Strathpine Australia. Built over WW2 airstrip
 Re: Left For Dead Part 1
I missed this on at the begining and just caught up.
Great stuff Jason and I like the way you attached the dash.
Great stuff Jason and I like the way you attached the dash.
Last edited by Skid on Fri 03 May 2013, 8:12 am; edited 1 time in total
_________________
Al.
Constructive criticism is always welcome.
“Success always demands a greater effort.” Winston Churchill
"Success is failure turned inside out" Unknown
 Re: Left For Dead Part 1
Enjoying your build, as I'm sure you are !! :drunken:

Geezerman- Advanced Member

- Posts : 3651
Join date : 2013-02-24
Age : 89
Location : Gulf coast of central Florids
 Re: Left For Dead Part 1
Heavy Duty! You're doin a bang up job :D
dogfish7- Intermediate Member

- Posts : 668
Join date : 2013-02-27
Age : 78
Location : Hoodsport, WA
 Re: Left For Dead Part 1
You have a real winner going here Jason. Your attention to detail is astounding.
Guest- Guest
 Re: Left For Dead Part 1
The detail is great. I'm looking forward watching where this goes.
Guest- Guest
 Re: Left For Dead Part 1
Damaged vehicles are always a tuff challenge. Once you do one thing well, you want to do the rest as good. It takes time and there are usually a few imperfect defects, but doing what you can and seeing the finished model makes it worth while. Good luck!
harron68- Advanced Member

- Posts : 3621
Join date : 2013-02-28
Age : 74
Location : MIDWEST
 Similar topics
» Took A Left At Albuquerque
» Oh, No !!! Who left the door open ?
» I'm back!! I'm not dead, tho .....
» US based car part
» 57 Corvette part needed
» Oh, No !!! Who left the door open ?
» I'm back!! I'm not dead, tho .....
» US based car part
» 57 Corvette part needed
Skid's :: Works In Progress :: Dioramas
Page 1 of 1
Permissions in this forum:
You cannot reply to topics in this forum