
Spraybox Version 3
3 posters

Spraybox Version 3
![]() by KatsZenJammer Sat 13 Jul 2019, 5:39 pm
by KatsZenJammer Sat 13 Jul 2019, 5:39 pm
So I'm putting this thread into Tutorials though I don't consider it a 'How To' but rather an offering of suggestions.
Back in the day when I was just beginning my journey along the path of learning how to use an airbrush I bashed together a quick and dirty spray box using a cardboard box, a modified laptop cooling pad and plexi panels for windows. The filtering medium was just those pre-cut dust filters for vent registers and the exhaust was just sent out back. Call this version 1.0

Once the main build portion of the steamcycle was complete I revamped the spray box for better ventilation and exhaust management thinking that airbrushing was going to be the primary work from that point on. I featured this pic in the steamcycle WIP but I didn't bother to document the process of modification. Basically I got rid of the laptop cooling pad and worked in an actual vent register thingy at the back, four inch ducting which led to a plumbing 'tee-join' which was then attached to a small extractor fan. Call this version 2.0 even though it's more like version 1.5.

With the completion of the steamcycle came the hiatus from constant painting and thought of how I could make things better. We begin by removing the vent register thingy from the back of the old spray box. You can see how much the thingy stuck out the back of the box and this was an issue I wanted to address with the re-think.
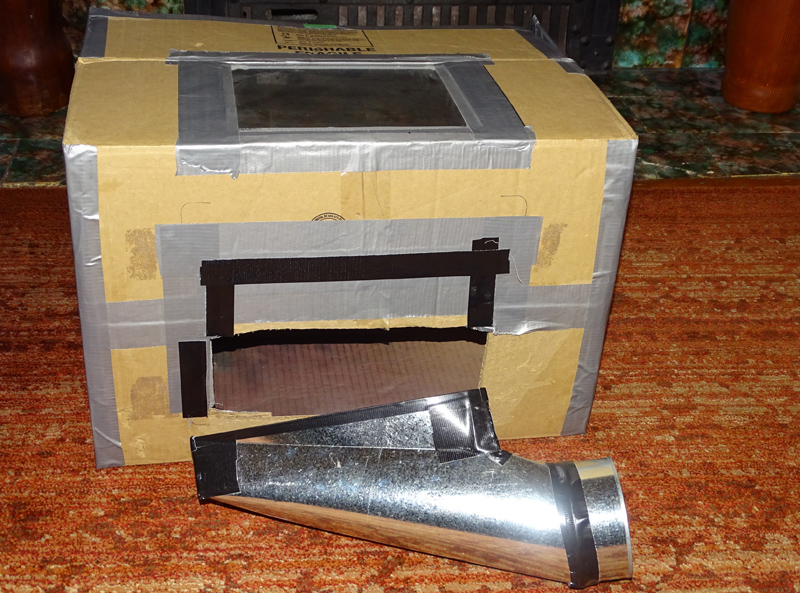
Part of the re-think involved the footprint and working area of the spray box. The old one was wide and kind of deep to accommodate big things. The next one wasn't going to be as wide but I still wanted depth and, most importantly, I wanted the register thingy to sit within the box instead of sticking out the back. So I found a box roughly 15 inches per side (approx 37.5 cm for the metrics). Here's the beginning of that set up with the hole cut into the side. *Note - this is Not sponsored by Crate & Barrel, lol*
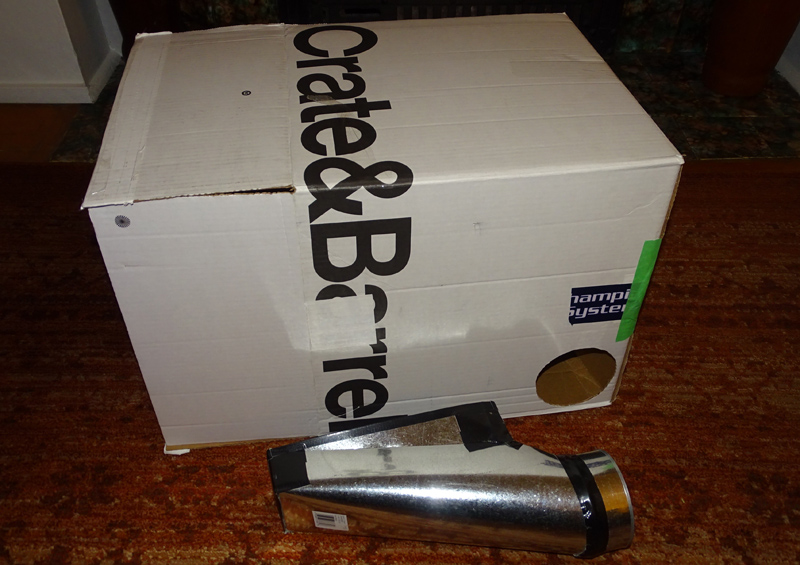
Test fit for proof of concept.

How the thingy sits inside.

Then I completely dropped the ball as far as documenting is concerned but remembered at this point to take some pics. Basically there is a 'drop in' recess for the filter which attached to the register thingy. The register thingy was angled slightly up and back and everything was affixed using Gorilla Tape (like duct tape only beefier). The plexi panels from the old spray box were utilized, though I had to cut the side panels slightly as the originals were a tad too big (accomplished by scribing both sides of the plexi then breaking it evenly by closing a door on it). And the cardboard for the interior partitions and stuff was also scavenged from the old spray box.
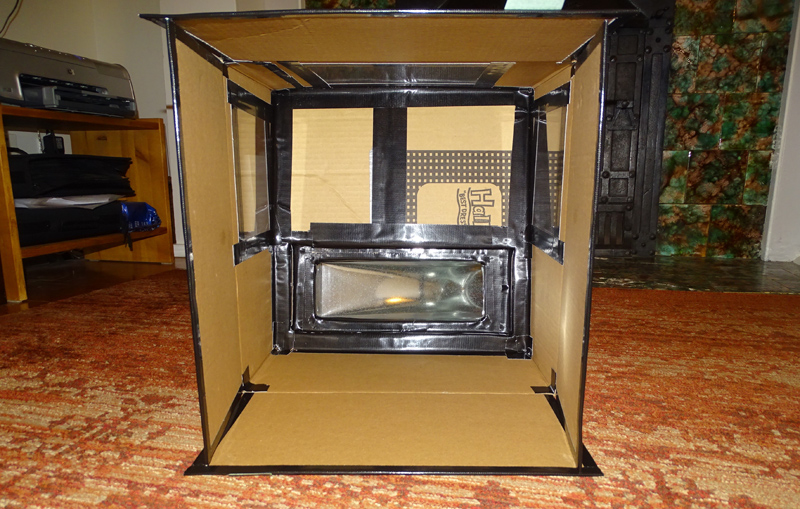
Side view - you can see the slight tilt back of the inner wall here.

Setting it up. The same spot as the old spray box but slightly readjusted. The main filter is a 'cut to size' furnace filter with strips of foamboard top and bottom affixed with a combination of hot glue 'tacks' for placement followed by carefully applied PVA (white glue) to seal it all up. And a bottle of Tamiya acrylic for size reference.

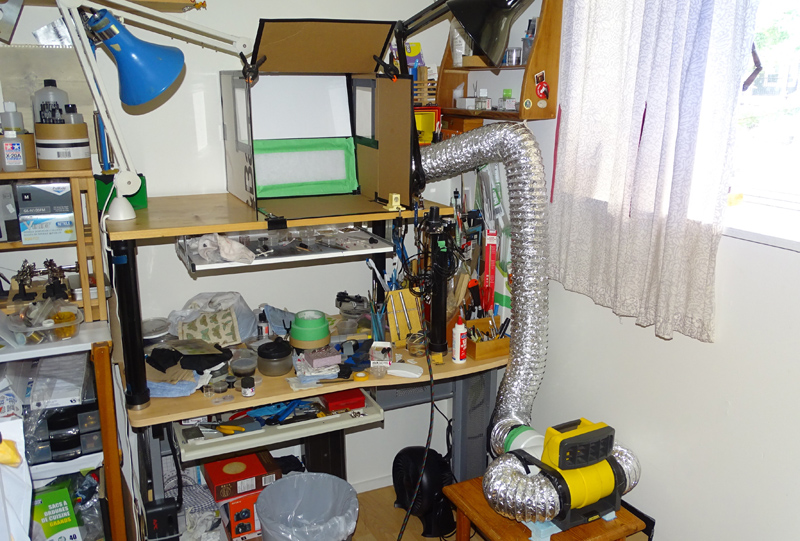
Wide shot showing the full set up, which I neglected to do back in the day. The fan blows out a baffle made from press board which happens to fit nicely in the sliding window grooves. This is mostly because of the variable breezes so even if the prevailing wind is coming in from outside the force of the fan through the exhaust slot is enough to overcome all but the really strong gusts. And the baffle is foldable to make is easier to store when not in use.

Mostly complete at this point. A chunk of white foam board was affixed to the interior using double sided tape for better light reflection and stuff. The main filter was sealed in to the recess using painters tape then two layers of sheet filter medium over top. I used pre-cut vent filters in the beginning but now I'm using big sheets of air conditioner filter cut to size, it's a beter quality filter and more economical this way to boot. This is also the 'not in use' arrangement with the extractor fan sitting on its little table.
Total time making this new spray box is about 10 hours all told, including thinking time, spaced out over a month.
Once again, not a 'How To' in any definitive sense but rather an offering of suggestions on how to make a small spray box instead of spending hundreds of dollars (or euros) on a manufactured one. The most time consuming part of this kind of set up is customizing the furnace filters which can take a few days of on and off work (glue drying and all that) but the filters last quite a while before getting clogged. During the year of painting the steamcycle I think I went through four or five customized furnace filters - though I could have gotten away with less as I was changing them on a time cycle instead of using them until they were completely gunked up.
Anyway, thanks for looking in and hope that something in this might provide some inspiration or assistance for others.
Back in the day when I was just beginning my journey along the path of learning how to use an airbrush I bashed together a quick and dirty spray box using a cardboard box, a modified laptop cooling pad and plexi panels for windows. The filtering medium was just those pre-cut dust filters for vent registers and the exhaust was just sent out back. Call this version 1.0
Once the main build portion of the steamcycle was complete I revamped the spray box for better ventilation and exhaust management thinking that airbrushing was going to be the primary work from that point on. I featured this pic in the steamcycle WIP but I didn't bother to document the process of modification. Basically I got rid of the laptop cooling pad and worked in an actual vent register thingy at the back, four inch ducting which led to a plumbing 'tee-join' which was then attached to a small extractor fan. Call this version 2.0 even though it's more like version 1.5.
With the completion of the steamcycle came the hiatus from constant painting and thought of how I could make things better. We begin by removing the vent register thingy from the back of the old spray box. You can see how much the thingy stuck out the back of the box and this was an issue I wanted to address with the re-think.
Part of the re-think involved the footprint and working area of the spray box. The old one was wide and kind of deep to accommodate big things. The next one wasn't going to be as wide but I still wanted depth and, most importantly, I wanted the register thingy to sit within the box instead of sticking out the back. So I found a box roughly 15 inches per side (approx 37.5 cm for the metrics). Here's the beginning of that set up with the hole cut into the side. *Note - this is Not sponsored by Crate & Barrel, lol*
Test fit for proof of concept.
How the thingy sits inside.
Then I completely dropped the ball as far as documenting is concerned but remembered at this point to take some pics. Basically there is a 'drop in' recess for the filter which attached to the register thingy. The register thingy was angled slightly up and back and everything was affixed using Gorilla Tape (like duct tape only beefier). The plexi panels from the old spray box were utilized, though I had to cut the side panels slightly as the originals were a tad too big (accomplished by scribing both sides of the plexi then breaking it evenly by closing a door on it). And the cardboard for the interior partitions and stuff was also scavenged from the old spray box.
Side view - you can see the slight tilt back of the inner wall here.
Setting it up. The same spot as the old spray box but slightly readjusted. The main filter is a 'cut to size' furnace filter with strips of foamboard top and bottom affixed with a combination of hot glue 'tacks' for placement followed by carefully applied PVA (white glue) to seal it all up. And a bottle of Tamiya acrylic for size reference.
Wide shot showing the full set up, which I neglected to do back in the day. The fan blows out a baffle made from press board which happens to fit nicely in the sliding window grooves. This is mostly because of the variable breezes so even if the prevailing wind is coming in from outside the force of the fan through the exhaust slot is enough to overcome all but the really strong gusts. And the baffle is foldable to make is easier to store when not in use.
Mostly complete at this point. A chunk of white foam board was affixed to the interior using double sided tape for better light reflection and stuff. The main filter was sealed in to the recess using painters tape then two layers of sheet filter medium over top. I used pre-cut vent filters in the beginning but now I'm using big sheets of air conditioner filter cut to size, it's a beter quality filter and more economical this way to boot. This is also the 'not in use' arrangement with the extractor fan sitting on its little table.
Total time making this new spray box is about 10 hours all told, including thinking time, spaced out over a month.
Once again, not a 'How To' in any definitive sense but rather an offering of suggestions on how to make a small spray box instead of spending hundreds of dollars (or euros) on a manufactured one. The most time consuming part of this kind of set up is customizing the furnace filters which can take a few days of on and off work (glue drying and all that) but the filters last quite a while before getting clogged. During the year of painting the steamcycle I think I went through four or five customized furnace filters - though I could have gotten away with less as I was changing them on a time cycle instead of using them until they were completely gunked up.
Anyway, thanks for looking in and hope that something in this might provide some inspiration or assistance for others.

KatsZenJammer- Resident member

- Posts : 2600
Join date : 2016-05-20
Age : 57
Location : Vancouver, BC
Re: Spraybox Version 3
![]() by Mr Hirakawa Sun 14 Jul 2019, 9:03 am
by Mr Hirakawa Sun 14 Jul 2019, 9:03 am
Very interesting. I don't have an airbrush and I'm not going to learn to use one now, but I enjoyed looking at all the effort gone into this. I like seeing other peoples work spaces and how they go about things.

Mr Hirakawa- Resident member
- Posts : 1530
Join date : 2015-11-11
Age : 52
Re: Spraybox Version 3
![]() by RetiredMike Sun 14 Jul 2019, 2:31 pm
by RetiredMike Sun 14 Jul 2019, 2:31 pm
A great tutorial on building your own box. Thanks for that.

RetiredMike- Advanced Member
- Posts : 3525
Join date : 2013-04-27
Age : 73
Location : Valparaiso, Indiana
» Tamiya R1 my version #2
» Tamiya R1 my version #2
» Citroen HY Van (Fe2O3 version)
» Jaguar XKR GT3 'Fantasy' version.
» Hetzer 38t early version
» Tamiya R1 my version #2
» Citroen HY Van (Fe2O3 version)
» Jaguar XKR GT3 'Fantasy' version.
» Hetzer 38t early version
Permissions in this forum:
You cannot reply to topics in this forum|
|
|