
1991 Lamborghini Diablo VT
Skid's :: Works In Progress :: Road cars
Page 2 of 3 •  1, 2, 3
 ![]()
Re: 1991 Lamborghini Diablo VT
![]() by dublin boy Sat 23 Apr 2016, 6:06 pm
by dublin boy Sat 23 Apr 2016, 6:06 pm

dublin boy- Moderator

- Posts : 3862
Join date : 2013-02-27
Re: 1991 Lamborghini Diablo VT
![]() by Mr Hirakawa Sat 23 Apr 2016, 10:11 pm
by Mr Hirakawa Sat 23 Apr 2016, 10:11 pm
I think the blue used on this is excellent by the way and i'm sure the finished model will look really great.

Mr Hirakawa- Resident member

- Posts : 1524
Join date : 2015-11-11
Age : 52
Re: 1991 Lamborghini Diablo VT
![]() by Skid Sat 23 Apr 2016, 10:33 pm
by Skid Sat 23 Apr 2016, 10:33 pm
Plastic Freak wrote:Really you never use clear? You sure have had a long string of good luck Al. I clear the edges of everything I tape. Hope Colin is right.
I think you misread my meaning Curt: ("I have never masked and cleared coated, to seal clearparts before" Masked and cleared solid styrene many times.
Shelby wrote:Al did you use automotive clear for this? If that's the case that is likely the problem here.
Yes it was rattle can auto clear Denis. Used the same stuff on the body colour masking without any problems.
Mr Hirakawa wrote:I have never ever used clear for sealing off edges, in fact this is the first i've heard of the technique so I am a little perplexed as to why you would need to as i've always managed my windows trims with freehand brushing. You learn something new every day.
I think the blue used on this is excellent by the way and i'm sure the finished model will look really great.
Thanks for the paint compliment MrH. I retrospect the demarcation lines on this one were large enough for hand brushing but hey ho!
Clear coating over the masking tape when doing two or more body colours is a must though IMO.
_________________
Al.
Constructive criticism is always welcome.
“Success always demands a greater effort.” Winston Churchill
"Success is failure turned inside out" Unknown

Skid- Admin
- Posts : 7128
Join date : 2013-02-15
Age : 75
Location : Newcastle. Good Old Blighty. -

Re: 1991 Lamborghini Diablo VT
![]() by Shelby Sat 23 Apr 2016, 10:52 pm
by Shelby Sat 23 Apr 2016, 10:52 pm

Shelby- Intermediate Member

- Posts : 947
Join date : 2013-03-02
Location : Alberta, Canada
Re: 1991 Lamborghini Diablo VT
![]() by Skid Sat 23 Apr 2016, 11:28 pm
by Skid Sat 23 Apr 2016, 11:28 pm
Applied Tamiya masking tape to the areas to be kept clear. Masked off ALL of the inside too but with painters blue tape. Sprayed two coats of Promatic rattle can clear. (same stuff I used on the body). Left it twenty four hours to dry. Sprayed the black with several light coats of Promatic rattle can gloss black.
I think I may have this figured out, at least in part.
Look at this photo:
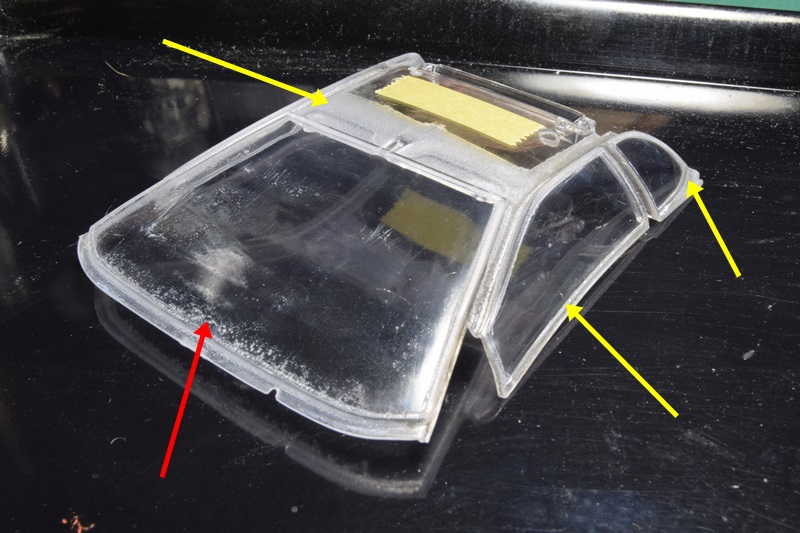
All of the 'fogged' areas indicated by the yellow areas were exposed and directly sprayed with the clear coat, which must have reacted with the clear plastic, causing the fogging.
The area indicated with the red arrow, I think must be clear 'creep' and hence has also reacted with the plastic.
So I think all of the fogged areas are as a result of the clear coming in direct contact with the clear plastic.
As for the windscreen marks, I wonder if the clear coats 'penetrated' the Tamiya masking tape?
I'm going to see if I can get a replacement screen from Revell. If I do, I will, as a test, spray this one with the clear coat and see what happens.
_________________
Al.
Constructive criticism is always welcome.
“Success always demands a greater effort.” Winston Churchill
"Success is failure turned inside out" Unknown
Skid- Admin
- Posts : 7128
Join date : 2013-02-15
Age : 75
Location : Newcastle. Good Old Blighty. -
Re: 1991 Lamborghini Diablo VT
![]() by Shelby Sun 24 Apr 2016, 1:21 am
by Shelby Sun 24 Apr 2016, 1:21 am
Automotive lacquer can cause more reactions with different things than even the Tamiya lacquer.
Can you not fix the clear parts by sanding off with 800 grit then working your way back up to 12 000?
It is a tedious process but I think it should work, unless you have craters in your glass.

Shelby- Intermediate Member
- Posts : 947
Join date : 2013-03-02
Location : Alberta, Canada
Re: 1991 Lamborghini Diablo VT
![]() by Guest Sun 24 Apr 2016, 3:14 am
by Guest Sun 24 Apr 2016, 3:14 am
Very strange indeed, and very interesting. These are problems you want/need to find the root cause so you/we don't have it happen again.
Guest- Guest
Re: 1991 Lamborghini Diablo VT
![]() by Guest Sun 24 Apr 2016, 9:05 am
by Guest Sun 24 Apr 2016, 9:05 am
I've used halfords lacquer on lots of clear plastic with no issues, although normally use hairspray if I'm honest.
Back to the model build ..... Could you just fine sand this back and pop a tint on it Al?
I think it would look awesome against the blue
Guest- Guest
Re: 1991 Lamborghini Diablo VT
![]() by Skid Sun 24 Apr 2016, 9:16 am
by Skid Sun 24 Apr 2016, 9:16 am
Shelby wrote:Can you not fix the clear parts by sanding off with 800 grit then working your way back up to 12 000?
It is a tedious process but I think it should work, unless you have craters in your glass.
That's always a possibility Denis but the lower edge of the windscreen does indeed have 'craters' plus there is a raised edge all around the windscreen which would make it difficult to sand up to.
I have requested a replacement from Revell, (which could take up to eight weeks to arrive) but if they cannot supplly then I shall try to polish it out.
Plastic Freak wrote:Sorry Al, I did misread your post.
Very strange indeed, and very interesting. These are problems you want/need to find the root cause so you/we don't have it happen again.
No problem Denis. When I read it again just now, I think I wasn't as clear (LOL) as I could have been.
Assuming I get a replacement, I'm going to spray the original with the clear to confirm my suspicions.
_________________
Al.
Constructive criticism is always welcome.
“Success always demands a greater effort.” Winston Churchill
"Success is failure turned inside out" Unknown
Skid- Admin
- Posts : 7128
Join date : 2013-02-15
Age : 75
Location : Newcastle. Good Old Blighty. -
Re: 1991 Lamborghini Diablo VT
![]() by Skid Sun 24 Apr 2016, 9:21 am
by Skid Sun 24 Apr 2016, 9:21 am
Hair laquer........ interesting? Do you think it would prevent creep?
Tinting the windscreen could be a way forward if I don't get a replacement. It will be a last resort though, as it would hide all my hard work on the interior.
What would you suggest tinting with? Tamiya clears?
_________________
Al.
Constructive criticism is always welcome.
“Success always demands a greater effort.” Winston Churchill
"Success is failure turned inside out" Unknown
Skid- Admin
- Posts : 7128
Join date : 2013-02-15
Age : 75
Location : Newcastle. Good Old Blighty. -
Re: 1991 Lamborghini Diablo VT
![]() by Guest Sun 24 Apr 2016, 2:25 pm
by Guest Sun 24 Apr 2016, 2:25 pm
Guest- Guest
Re: 1991 Lamborghini Diablo VT
![]() by Guest Sun 24 Apr 2016, 4:32 pm
by Guest Sun 24 Apr 2016, 4:32 pm
I wouldn't know what stuff to use for the tint, Curt mentions some methods above, I normally just cheat and try and use some film negative I processed blank when I had the photography shop. Might have to sniff that out again for the next build.
Guest- Guest
Re: 1991 Lamborghini Diablo VT
![]() by Shelby Sun 24 Apr 2016, 5:29 pm
by Shelby Sun 24 Apr 2016, 5:29 pm

Al - Alclad also has a smoke for tinting windows. I've been doing some experiments with the Tamiya stuff and I will take a picture to show you some of the results.
Shelby- Intermediate Member
- Posts : 947
Join date : 2013-03-02
Location : Alberta, Canada
Re: 1991 Lamborghini Diablo VT
![]() by Shelby Sun 24 Apr 2016, 8:34 pm
by Shelby Sun 24 Apr 2016, 8:34 pm
My first experiment was with the Tamiya smoke and I found it a little thick so I added just a little thinner and it just ran like crazy and send it to take a bath right away and didn't take a pic.
Lesson: DON"T thin the stuff!
I moved on to the blue clear for a top band tint.
NOT thinned and shot at 20psi through my Iawata.
4 mist coats and increased the paint flow with each coat.
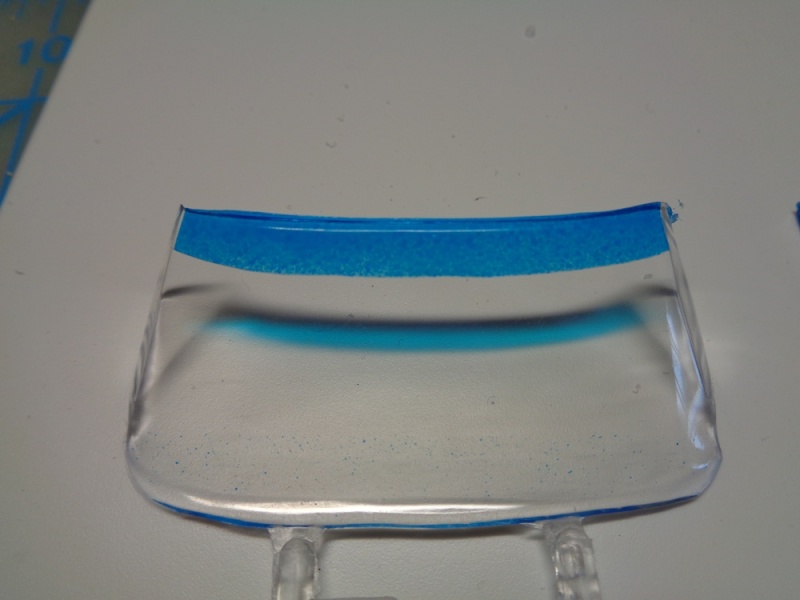
Difficult to lay it down smoothly as you can see.

Then I decided to go for a full tint laying more coats at the 20psi but high paint flow from the start.
I quickly cleaned the brush and follow with red clear at the bottom to see if I would get a purple blend but by that time it was too late and just came out as brownish.

I did a bit of polishing with Tamiya coarse polish but it really didn't do a lot to improve thing.
Wet sanding will certainly help lighten up the tint but of course the danger is to cut through the paint and scratching the glass.

On to the red clear...I found this to lay down better than the blue and cover more smoothly using the same process and psi.

I found the red to be more transparent than the blue coat for coat.

I still have a lot experimenting to do and will get on with it when I have a little down time on my Corvette build. Eventually I hope to be proficient enough to do a comprehensive tutorial.
I hope this gives you an idea of the path you'll choose.
Shelby- Intermediate Member
- Posts : 947
Join date : 2013-03-02
Location : Alberta, Canada
Re: 1991 Lamborghini Diablo VT
![]() by Skid Tue 03 May 2016, 10:36 am
by Skid Tue 03 May 2016, 10:36 am
Thanks for showing all of this and when the new glass comes from Revell, I may well consider tinting it.

_________________
Al.
Constructive criticism is always welcome.
“Success always demands a greater effort.” Winston Churchill
"Success is failure turned inside out" Unknown
Skid- Admin
- Posts : 7128
Join date : 2013-02-15
Age : 75
Location : Newcastle. Good Old Blighty. -
Re: 1991 Lamborghini Diablo VT
![]() by Guest Tue 03 May 2016, 12:19 pm
by Guest Tue 03 May 2016, 12:19 pm
Guest- Guest
Re: 1991 Lamborghini Diablo VT
![]() by Skid Thu 09 Jun 2016, 8:23 am
by Skid Thu 09 Jun 2016, 8:23 am
_________________
Al.
Constructive criticism is always welcome.
“Success always demands a greater effort.” Winston Churchill
"Success is failure turned inside out" Unknown
Skid- Admin
- Posts : 7128
Join date : 2013-02-15
Age : 75
Location : Newcastle. Good Old Blighty. -
Re: 1991 Lamborghini Diablo VT
![]() by Guest Thu 09 Jun 2016, 3:02 pm
by Guest Thu 09 Jun 2016, 3:02 pm
Guest- Guest
Re: 1991 Lamborghini Diablo VT
![]() by GaryDainton Thu 09 Jun 2016, 5:47 pm
by GaryDainton Thu 09 Jun 2016, 5:47 pm
You are a MACHINE Al lol.

GaryDainton- Advanced Member
- Posts : 4433
Join date : 2014-03-06
Age : 56
Location : Bolton UK
Re: 1991 Lamborghini Diablo VT
![]() by Promodmerc Thu 09 Jun 2016, 7:24 pm
by Promodmerc Thu 09 Jun 2016, 7:24 pm
Skid wrote:The new glass arrived from Revell a couple of days ago, so now I should be able to compete it soon.
Did they include the forking back up lenses? I could use a spare one


Promodmerc- Rookie Member

- Posts : 442
Join date : 2016-05-19
Age : 57
Location : Raytown MO
Re: 1991 Lamborghini Diablo VT
![]() by Skid Sun 19 Jun 2016, 11:42 pm
by Skid Sun 19 Jun 2016, 11:42 pm

Moral of the story..... don't use auto clear coat to seal masking tape edges on clear parts.
You have mail Dan.
Last edited by Skid on Mon 20 Jun 2016, 12:01 am; edited 1 time in total
_________________
Al.
Constructive criticism is always welcome.
“Success always demands a greater effort.” Winston Churchill
"Success is failure turned inside out" Unknown
Skid- Admin
- Posts : 7128
Join date : 2013-02-15
Age : 75
Location : Newcastle. Good Old Blighty. -
Guest- Guest
Re: 1991 Lamborghini Diablo VT
![]() by GaryDainton Mon 20 Jun 2016, 8:16 am
by GaryDainton Mon 20 Jun 2016, 8:16 am
Glad you tested before going on Al.
GaryDainton- Advanced Member
- Posts : 4433
Join date : 2014-03-06
Age : 56
Location : Bolton UK
Re: 1991 Lamborghini Diablo VT
![]() by Skid Mon 20 Jun 2016, 8:28 am
by Skid Mon 20 Jun 2016, 8:28 am
_________________
Al.
Constructive criticism is always welcome.
“Success always demands a greater effort.” Winston Churchill
"Success is failure turned inside out" Unknown
Skid- Admin
- Posts : 7128
Join date : 2013-02-15
Age : 75
Location : Newcastle. Good Old Blighty. -
Re: 1991 Lamborghini Diablo VT
![]() by Skid Sat 02 Jul 2016, 6:47 pm
by Skid Sat 02 Jul 2016, 6:47 pm
Masked up the replacement glass. Tested brushed on Tamiya clear on the roof section..... no fogging!!
Phew!!
Brushed Tamiya clear on the masking tape edges and let it dry for 24 hours, then a light mist coat and two semi wet coats!!
Happy chappie!!


_________________
Al.
Constructive criticism is always welcome.
“Success always demands a greater effort.” Winston Churchill
"Success is failure turned inside out" Unknown
Skid- Admin
- Posts : 7128
Join date : 2013-02-15
Age : 75
Location : Newcastle. Good Old Blighty. -
Page 2 of 3 • 1, 2, 3 ![]()
» Lamborghini Diablo V/T
» Lamborghini Muira.
» Lamborghini Reventon
» 1991 Subaru Legacy wagon
Skid's :: Works In Progress :: Road cars
|
|
|