
My way with roll cages.
+2
webby
Skid
6 posters

My way with roll cages.
![]() by Skid Wed 25 Sep 2013, 11:54 pm
by Skid Wed 25 Sep 2013, 11:54 pm
I want to share with you how I set about scratch building a roll cage.
Others will have their own opinions, this is just how I do it.
I think the first thing to say is this:
DON'T worry if everything isn't perfectly square. I used to go to great pains to do so but soon realised that once inside a tin top, most slight 'misalignments' are so hard to see, it's just not worth the stress to get them perfect.
And the second thing is, CHECK, CHECK and RE-CHECK at every stage. It's normal for me to have the chassis in and out of the body 4 or 5 dozen times during construction
So here we go.
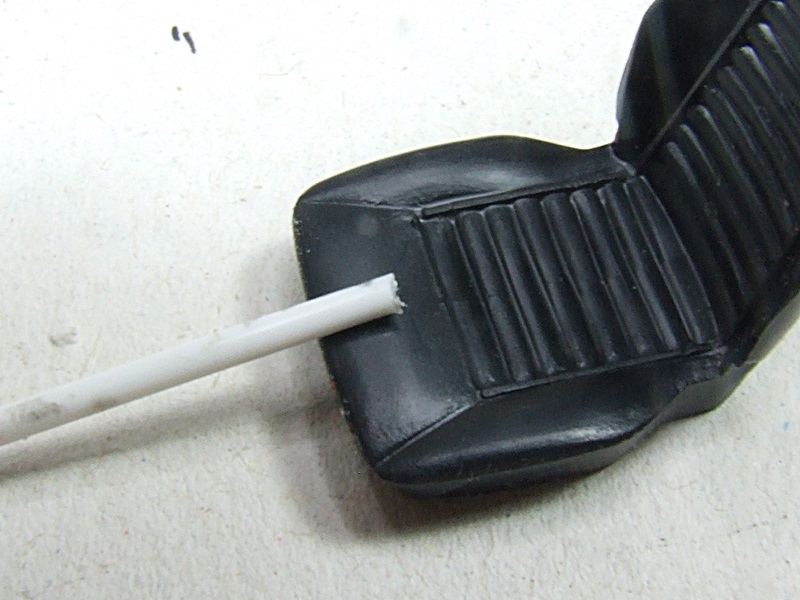
First I mock up the interior, holding the door cards and dash in place with a little MEK.

Now mark the rear hoop mounting points and drill suitable size holes all the way through the floor.

Next mark the positions of the front points, at the rear of the drill.
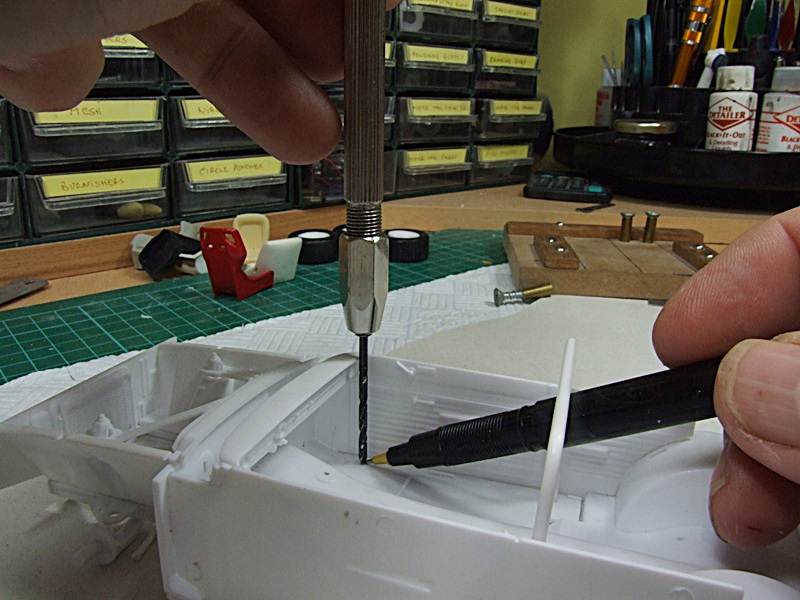
Make an adjustment for the drill width and and again drill all the way through the floor. This gives us a footprint from which to build.
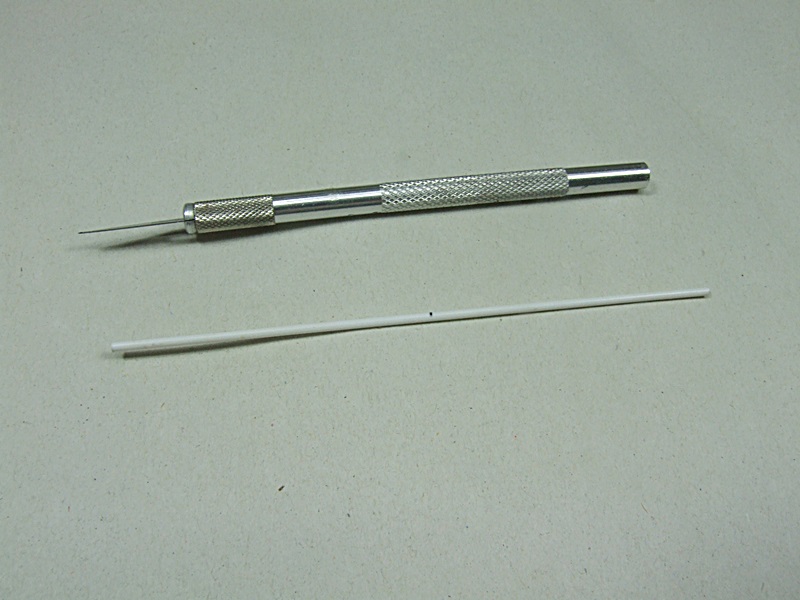
At this point I want to show you a little 'bender' I made up years ago. Construction shoud be self explanatory. It is a great aid in bending styrene, particularly in getting the radius's the same.

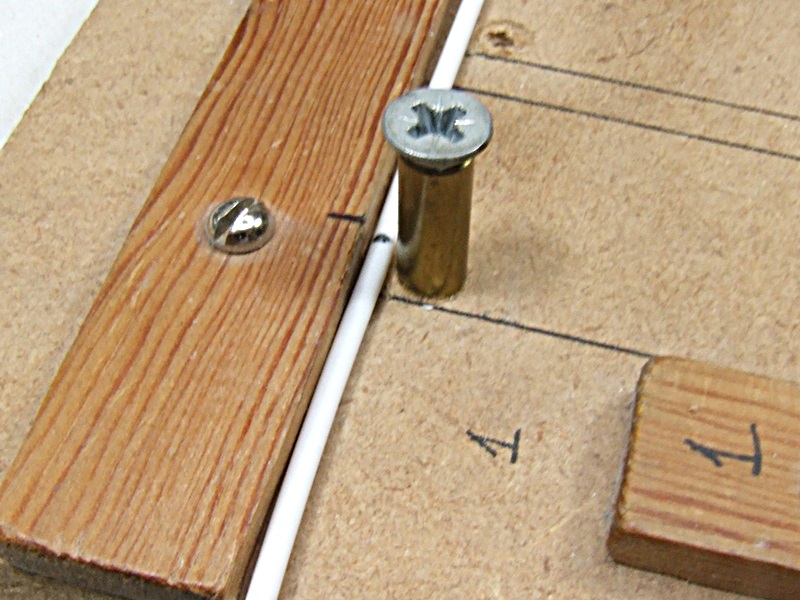
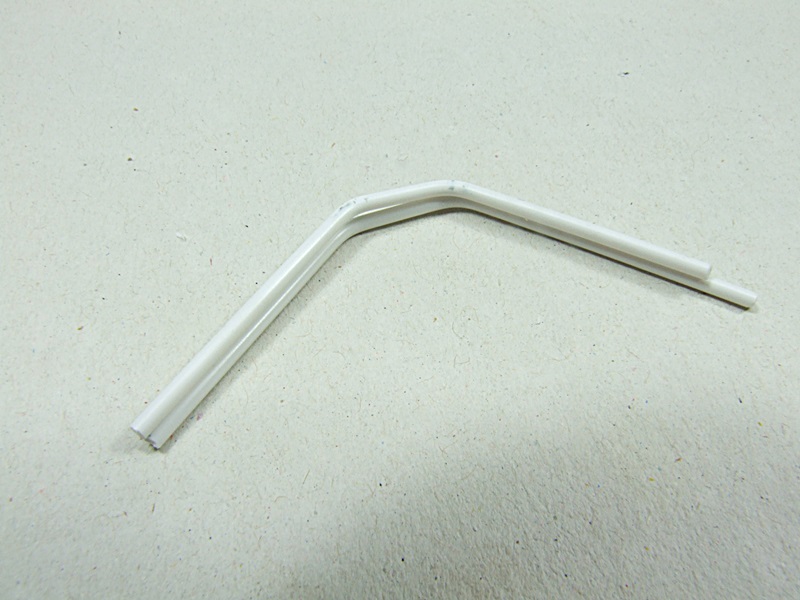
Now we need to create the main hoop. Cut a length of rod, more than you will need. (Width of the cage plus twice the height, plus about 24mm extra.) Mark the centre point.
Now measure the spacing of the rear set of holes. Do this centre to centre, left side to left side or right side to right side. It doesn't matter. Here you see I'm doing it centre to centre.

Now using the centre mark on the styrene, mark the centre points of the main hoop on the styrene rod.
Now place the rod in the bender. Note I have marked the centre point of the brass tube the better to line up the marks on the styrene.

Now hold the styrene in place and slowly bend past the 90 degree point. Well past it actuualy as it will try to regain it's original shape. Don't worry if it's not quite at 90 degrees.
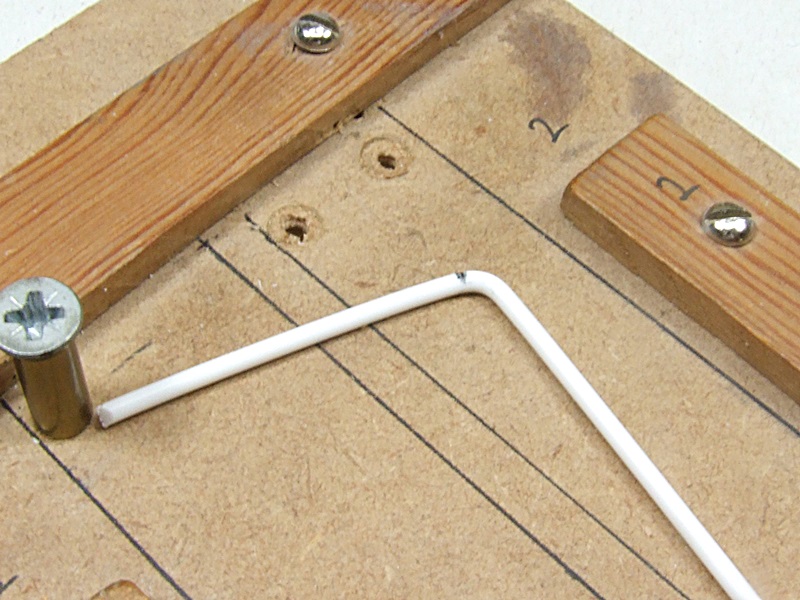
Then repeat for the other side. That's the tricky bit!! LOL.

Next insert the hoop into the holes pushing it well through the holes.


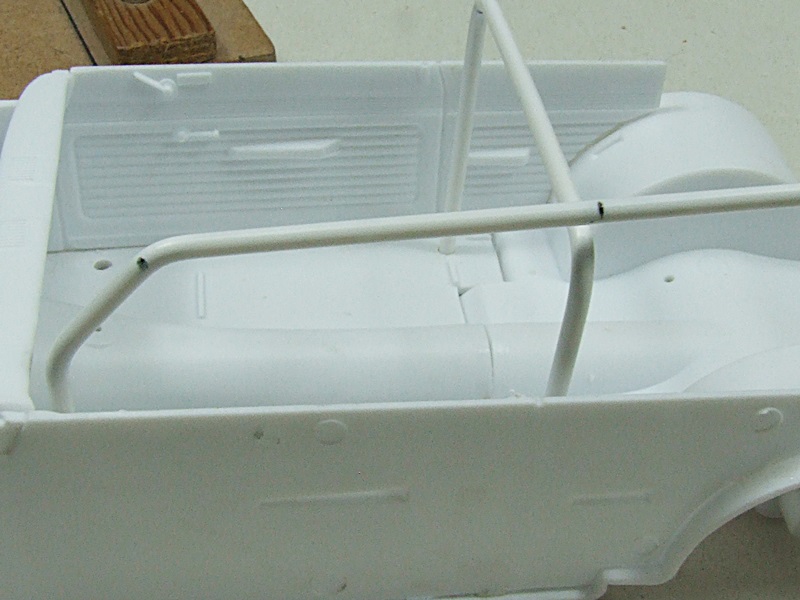
Now we need to turn our attention to the side bars.
With the body fitted, push a length of styrene through a front hole, making sure you have about 12mm poking through, and mark the bend point as shown. Make the bend at the same angle as the A pillar.

Place the styrene back in the hole and mark the second bend point.

Then make the bend. Repeat for the other side.
Place both back in the holes and mark the hoop attachment points cutting a tad longer than needed.
Now we need to make the 'welded joint'.
Just placing a square cut edge against the hoop, will work, but doesn't look good. We need a curve to the styrene just as in the real deal. To do this I made a little jig from mild steel. Again self explanatory as to contruction I think.

Place one of the side bar ends into the 'jig'. It needs to be the end that butts up against the main hoop. Make sure you have it aligned properly, so the the curve will fit properly to the main hoop.
Keep some pressure on the side bar while filing with the rat tailed file. Work slowly, a little at a time. It's easy to over do it.

It should come out a little like this. DON'T clean up the raggy edges. They will help fill any gap while fixing with MEK. My 'jig' is a bit worn now so this one is a little off centre. Don't worry about it though. It isn't THAT critical.
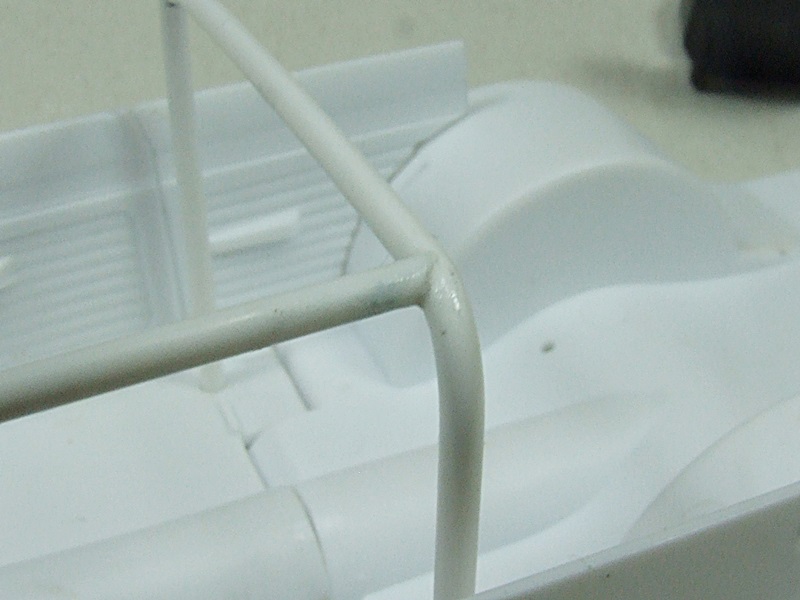
When you have the side bar finished, fit it into the forward hole and secure to the main hoop with MEK. Repeat for the other side.

Now we need to fit the top forward section. Measure a little long and make the curve at each end as above. Once happy with it, secure with MEK as before.
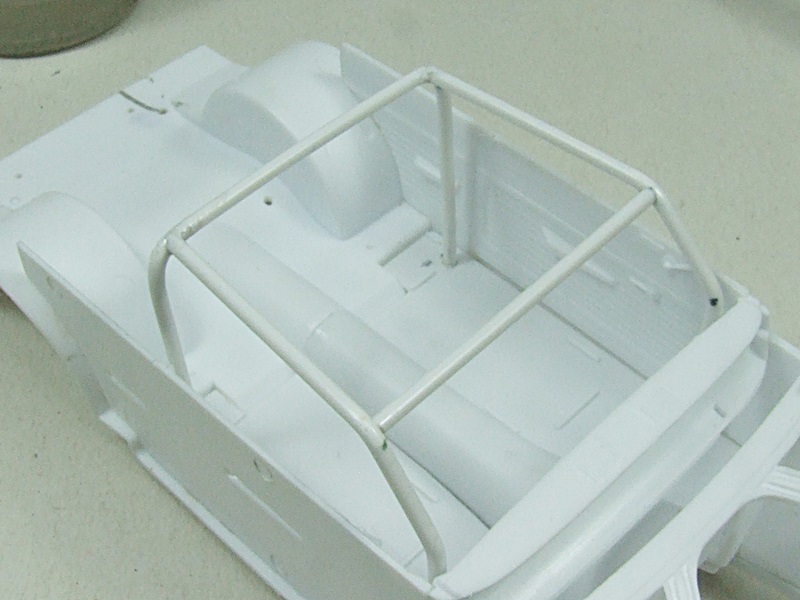
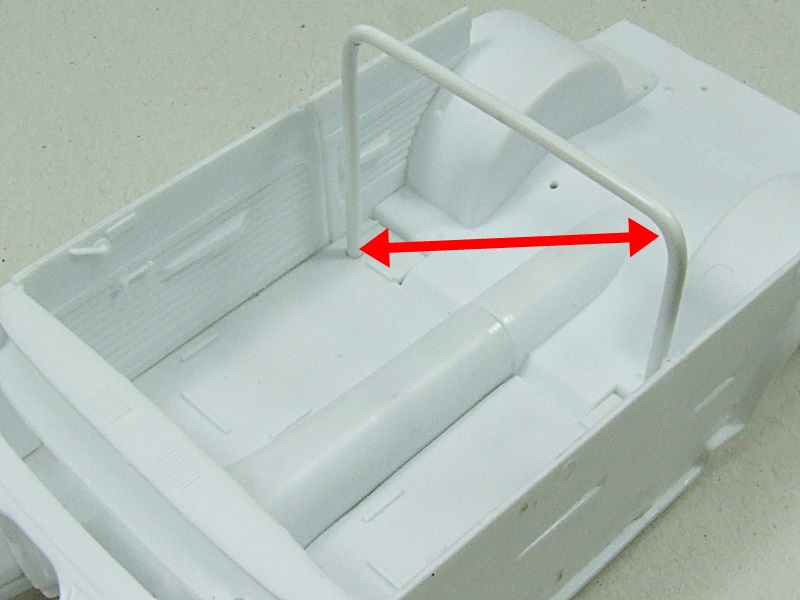
In the same manner, the main hoop cross brace is made. However, getting the curves and angles is a bit more tricky. They need to be at about 45ish degrees so I usualy do them free hand.
I forgot to take a photo of this step but I have indicated where it fits in this photo. Remember, the upper securing point is on the drivers side.
Now break apart the dash, door card and the cage. If you only used a tiny bit of MEK, this won't be difficult.
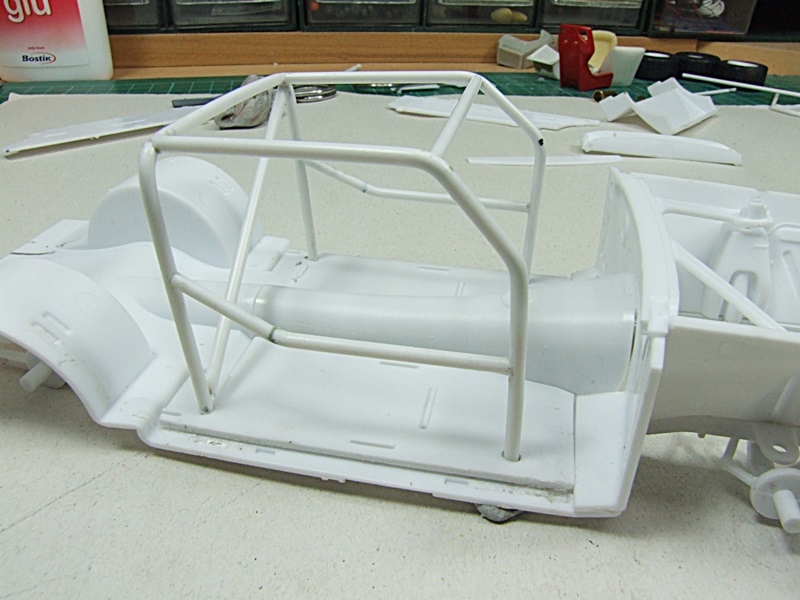
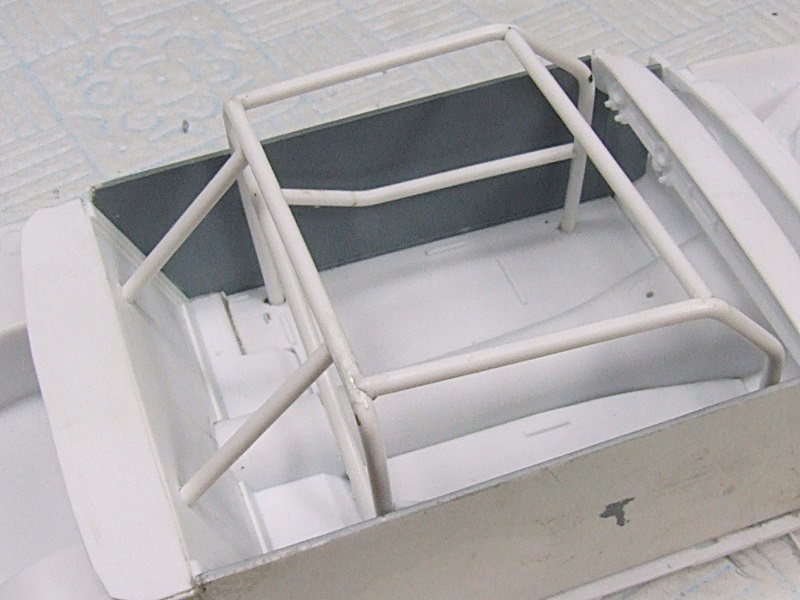
Now your cage should look something like this.
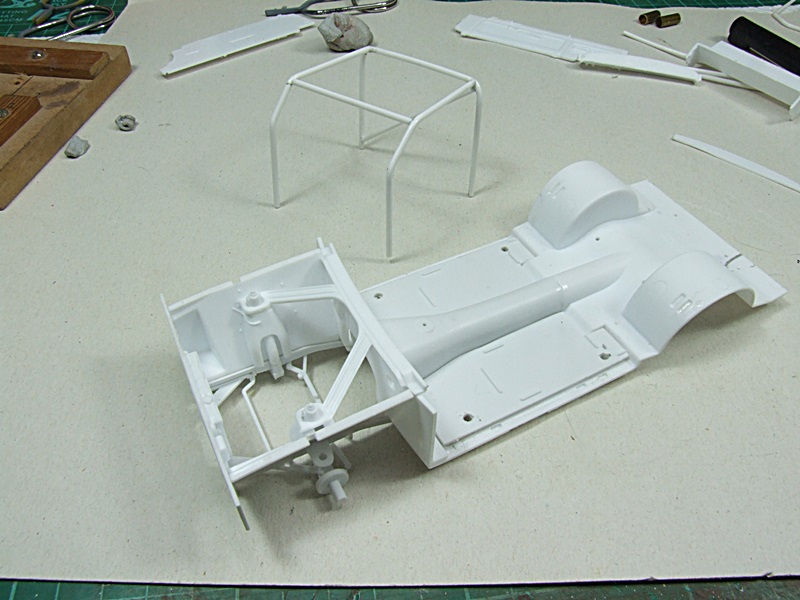
Clean up the bottoms of the cage legs and the holes in the floor. Place the cage back in the holes and press down so that about 25mm pokes out the underside of the floor.
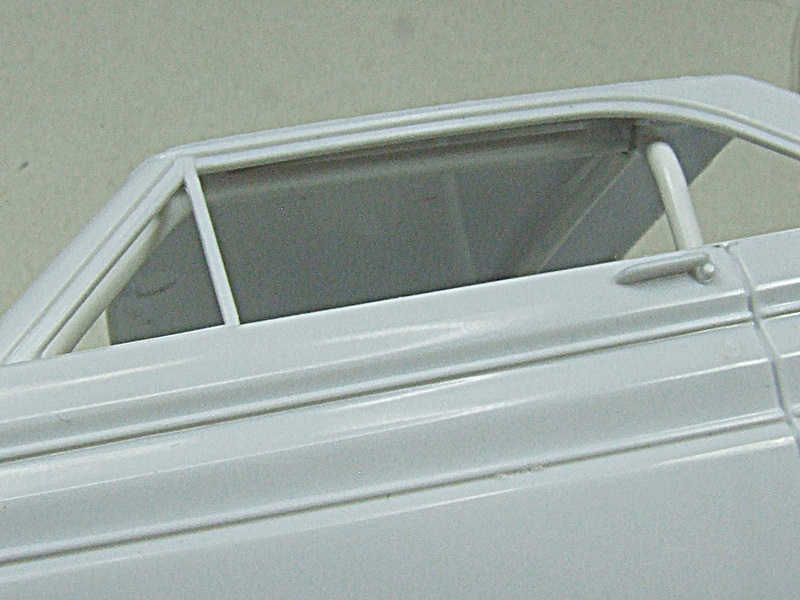
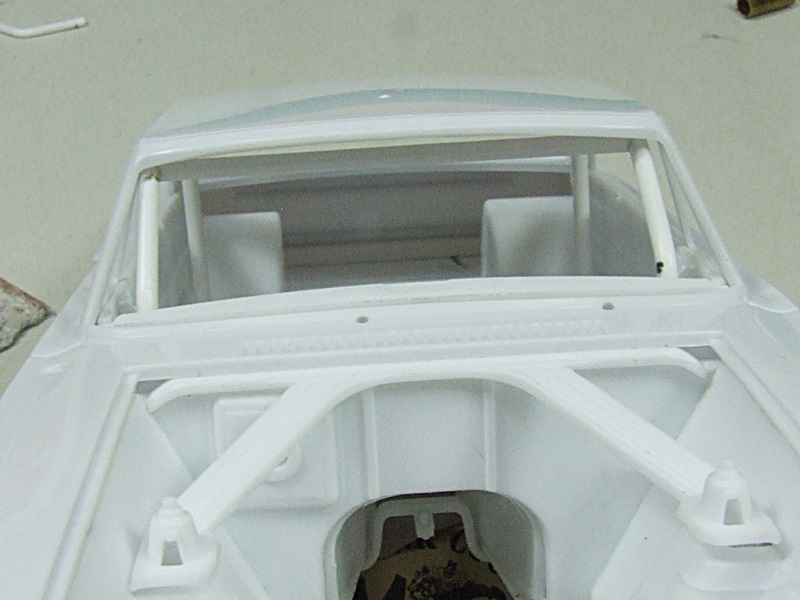
Next fit the window glass in place. This is important as it may well affect the final position of the roll cage. Here you can see that this one is of the one piece type and will definitley affect the final height of the cage.

Now fit the chassis/floor to the body with the hoop in place, then push the cage up into the interior until it touches the roof or it's where you want it and mark the length on the underside, as can be seen in the last photo. Cut to length.

When you have made the cuts and are happy with the postition of the hoop, tack it in place with a tiny drop of MEK. Just a tiny bit, as it will need to come out again later.
With the door cards removed we now have easy access for the side impact bars. Pretty simple on this build and done in the same way as the hoop cross brace.
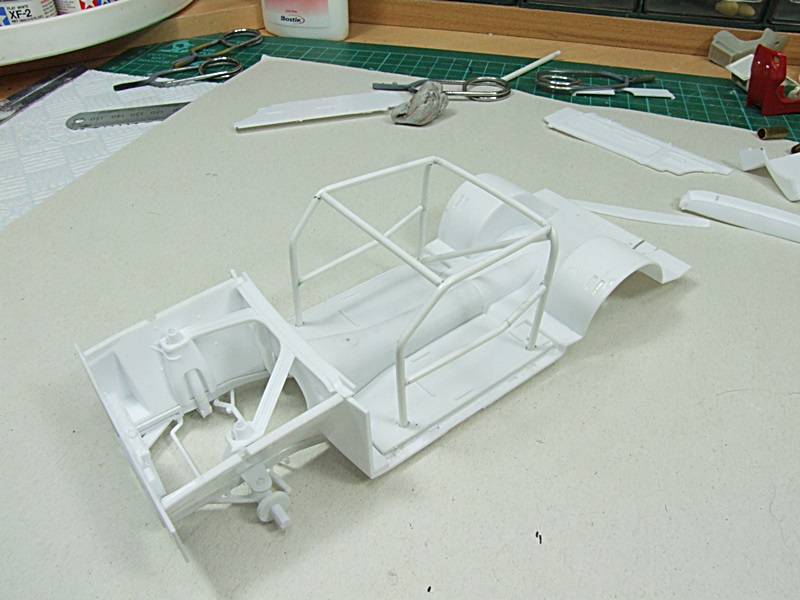
Apart from adding a couple of main hoop to rear of interior braces (done in the same manner) that's it for this one. There are many variations on roll cages and modern ones have a miriad of bars, some curved, some straight. All of thes variations can be scratch built in the manner I describe.
If you are painting the roll cage the same colur as the interior, you can now glue it in permanently. If not, carefully remove it for painting.
For roll cage padding and cable ties see HERE
Others will have their own opinions, this is just how I do it.
I think the first thing to say is this:
DON'T worry if everything isn't perfectly square. I used to go to great pains to do so but soon realised that once inside a tin top, most slight 'misalignments' are so hard to see, it's just not worth the stress to get them perfect.
And the second thing is, CHECK, CHECK and RE-CHECK at every stage. It's normal for me to have the chassis in and out of the body 4 or 5 dozen times during construction
So here we go.
First I mock up the interior, holding the door cards and dash in place with a little MEK.
Now mark the rear hoop mounting points and drill suitable size holes all the way through the floor.
Next mark the positions of the front points, at the rear of the drill.
Make an adjustment for the drill width and and again drill all the way through the floor. This gives us a footprint from which to build.
At this point I want to show you a little 'bender' I made up years ago. Construction shoud be self explanatory. It is a great aid in bending styrene, particularly in getting the radius's the same.
Now we need to create the main hoop. Cut a length of rod, more than you will need. (Width of the cage plus twice the height, plus about 24mm extra.) Mark the centre point.
Now measure the spacing of the rear set of holes. Do this centre to centre, left side to left side or right side to right side. It doesn't matter. Here you see I'm doing it centre to centre.
Now using the centre mark on the styrene, mark the centre points of the main hoop on the styrene rod.
Now place the rod in the bender. Note I have marked the centre point of the brass tube the better to line up the marks on the styrene.
Now hold the styrene in place and slowly bend past the 90 degree point. Well past it actuualy as it will try to regain it's original shape. Don't worry if it's not quite at 90 degrees.
Then repeat for the other side. That's the tricky bit!! LOL.
Next insert the hoop into the holes pushing it well through the holes.
Now we need to turn our attention to the side bars.
With the body fitted, push a length of styrene through a front hole, making sure you have about 12mm poking through, and mark the bend point as shown. Make the bend at the same angle as the A pillar.
Place the styrene back in the hole and mark the second bend point.
Then make the bend. Repeat for the other side.
Place both back in the holes and mark the hoop attachment points cutting a tad longer than needed.
Now we need to make the 'welded joint'.
Just placing a square cut edge against the hoop, will work, but doesn't look good. We need a curve to the styrene just as in the real deal. To do this I made a little jig from mild steel. Again self explanatory as to contruction I think.
Place one of the side bar ends into the 'jig'. It needs to be the end that butts up against the main hoop. Make sure you have it aligned properly, so the the curve will fit properly to the main hoop.
Keep some pressure on the side bar while filing with the rat tailed file. Work slowly, a little at a time. It's easy to over do it.
It should come out a little like this. DON'T clean up the raggy edges. They will help fill any gap while fixing with MEK. My 'jig' is a bit worn now so this one is a little off centre. Don't worry about it though. It isn't THAT critical.
When you have the side bar finished, fit it into the forward hole and secure to the main hoop with MEK. Repeat for the other side.
Now we need to fit the top forward section. Measure a little long and make the curve at each end as above. Once happy with it, secure with MEK as before.
In the same manner, the main hoop cross brace is made. However, getting the curves and angles is a bit more tricky. They need to be at about 45ish degrees so I usualy do them free hand.
I forgot to take a photo of this step but I have indicated where it fits in this photo. Remember, the upper securing point is on the drivers side.
Now break apart the dash, door card and the cage. If you only used a tiny bit of MEK, this won't be difficult.
Now your cage should look something like this.
Clean up the bottoms of the cage legs and the holes in the floor. Place the cage back in the holes and press down so that about 25mm pokes out the underside of the floor.
Next fit the window glass in place. This is important as it may well affect the final position of the roll cage. Here you can see that this one is of the one piece type and will definitley affect the final height of the cage.
Now fit the chassis/floor to the body with the hoop in place, then push the cage up into the interior until it touches the roof or it's where you want it and mark the length on the underside, as can be seen in the last photo. Cut to length.
When you have made the cuts and are happy with the postition of the hoop, tack it in place with a tiny drop of MEK. Just a tiny bit, as it will need to come out again later.
With the door cards removed we now have easy access for the side impact bars. Pretty simple on this build and done in the same way as the hoop cross brace.
Apart from adding a couple of main hoop to rear of interior braces (done in the same manner) that's it for this one. There are many variations on roll cages and modern ones have a miriad of bars, some curved, some straight. All of thes variations can be scratch built in the manner I describe.
If you are painting the roll cage the same colur as the interior, you can now glue it in permanently. If not, carefully remove it for painting.
For roll cage padding and cable ties see HERE
Last edited by Skid on Thu 26 Sep 2013, 10:27 am; edited 1 time in total
_________________
Al.
Constructive criticism is always welcome.
“Success always demands a greater effort.” Winston Churchill
"Success is failure turned inside out" Unknown

Skid- Admin
- Posts : 7129
Join date : 2013-02-15
Age : 75
Location : Newcastle. Good Old Blighty. -

Re: My way with roll cages.
![]() by webby Fri 27 Sep 2013, 12:34 pm
by webby Fri 27 Sep 2013, 12:34 pm
Now why did'nt I think of drilling holes in the floor pan?
Perhaps a "DOH" smilie is needed.
Thanks again Al.
Cheers,
Chris
Perhaps a "DOH" smilie is needed.
Thanks again Al.
Cheers,
Chris

webby- Moderator

- Posts : 2194
Join date : 2013-02-27
Age : 64
Location : Strathpine Australia. Built over WW2 airstrip
Re: My way with roll cages.
![]() by Guest Fri 27 Sep 2013, 2:03 pm
by Guest Fri 27 Sep 2013, 2:03 pm
When I have been derided for building model cars - as ‘playing with toys’
- my reply is that it is Engineering in miniature. This thread confirms that. Brilliant!
..and building a jig for the bends is a great idea.
- my reply is that it is Engineering in miniature. This thread confirms that. Brilliant!
..and building a jig for the bends is a great idea.
Guest- Guest
Re: My way with roll cages.
![]() by Guest Fri 27 Sep 2013, 6:10 pm
by Guest Fri 27 Sep 2013, 6:10 pm
I have seen a Cribbage board used for the bender. Makes it easier than building a jig and with all the holes many different things can be bent up.
Guest- Guest
Re: My way with roll cages.
![]() by Skid Sat 28 Sep 2013, 12:40 am
by Skid Sat 28 Sep 2013, 12:40 am
Your'e welcome Chris.
Thanks DAD!!
Thanks DAD!!
_________________
Al.
Constructive criticism is always welcome.
“Success always demands a greater effort.” Winston Churchill
"Success is failure turned inside out" Unknown
Skid- Admin
- Posts : 7129
Join date : 2013-02-15
Age : 75
Location : Newcastle. Good Old Blighty. -
Re: My way with roll cages.
![]() by Skid Sat 28 Sep 2013, 5:26 pm
by Skid Sat 28 Sep 2013, 5:26 pm
Finaly, the rear main hoop braces are added.
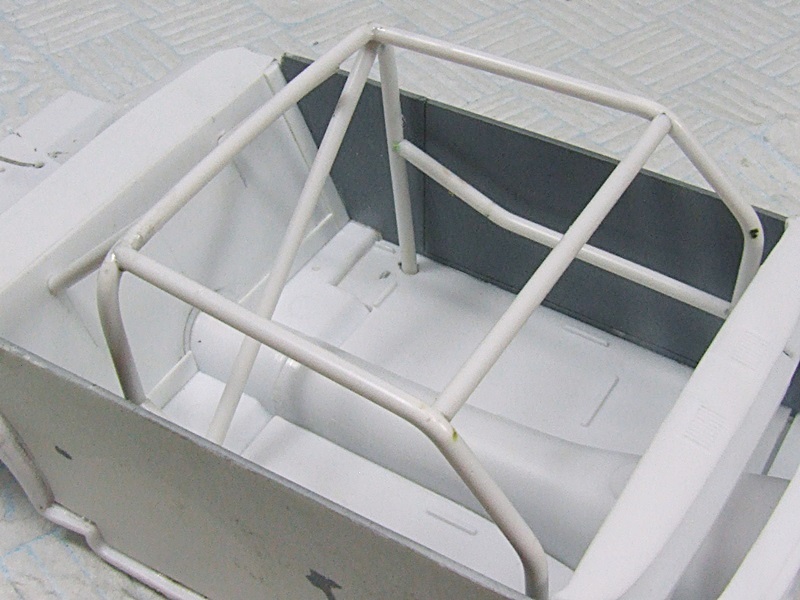


This is probably the easiest to do, as all that is required is to drill the rear panel, cut the brace slightly long, 'curve' one end and glue to the cage.
All that is now required, is a little fine sanding on the cage.
If you are painting the cage the same colour as the interior, you could now glue all six fixing points, and paint as a unit.
If the cage is going to be a differnt colour, remove and paint seperately.
On more modern cages there will be many other bars and even flat corner braces. There are miriad variations and almost no 'rules'.
The finished cage.

If you have any slight 'gaps' such as I have in the last photo, they can easily be taken care of but running a very thin 'bead' of two part epocy around them, then filing down as required.
This is probably the easiest to do, as all that is required is to drill the rear panel, cut the brace slightly long, 'curve' one end and glue to the cage.
All that is now required, is a little fine sanding on the cage.
If you are painting the cage the same colour as the interior, you could now glue all six fixing points, and paint as a unit.
If the cage is going to be a differnt colour, remove and paint seperately.
On more modern cages there will be many other bars and even flat corner braces. There are miriad variations and almost no 'rules'.
The finished cage.
If you have any slight 'gaps' such as I have in the last photo, they can easily be taken care of but running a very thin 'bead' of two part epocy around them, then filing down as required.
_________________
Al.
Constructive criticism is always welcome.
“Success always demands a greater effort.” Winston Churchill
"Success is failure turned inside out" Unknown
Skid- Admin
- Posts : 7129
Join date : 2013-02-15
Age : 75
Location : Newcastle. Good Old Blighty. -
Re: My way with roll cages.
![]() by Guest Sat 28 Sep 2013, 7:53 pm
by Guest Sat 28 Sep 2013, 7:53 pm
Very well written. Thanks for the tutorial Al.
Guest- Guest
Re: My way with roll cages.
![]() by Geezerman Mon 30 Sep 2013, 12:22 pm
by Geezerman Mon 30 Sep 2013, 12:22 pm
Great !
Thanks, Skid, I will definitely have to make one of those neat bending jigs !!
Thanks, Skid, I will definitely have to make one of those neat bending jigs !!

Geezerman- Advanced Member

- Posts : 3651
Join date : 2013-02-24
Age : 88
Location : Gulf coast of central Florids
Re: My way with roll cages.
![]() by Skid Mon 30 Sep 2013, 3:25 pm
by Skid Mon 30 Sep 2013, 3:25 pm
Glad you guys liked it.
As an afterthought, experimentation with sizes of brass tubing for the bender, eventauly led me 5.5mm or 9/32".
No need for you guys to have to experiment. Unless of course youwant to.
As an afterthought, experimentation with sizes of brass tubing for the bender, eventauly led me 5.5mm or 9/32".
No need for you guys to have to experiment. Unless of course youwant to.
_________________
Al.
Constructive criticism is always welcome.
“Success always demands a greater effort.” Winston Churchill
"Success is failure turned inside out" Unknown
Skid- Admin
- Posts : 7129
Join date : 2013-02-15
Age : 75
Location : Newcastle. Good Old Blighty. -
Re: My way with roll cages.
![]() by Gothic Kustomz Mon 30 Sep 2013, 9:33 pm
by Gothic Kustomz Mon 30 Sep 2013, 9:33 pm
Kewl, that has been my biggest issue, no holes in the floor DOH!, thanx for this.
Gothic Kustomz- New Member

- Posts : 103
Join date : 2013-02-27
Re: My way with roll cages.
![]() by Skid Fri 25 Oct 2013, 10:20 am
by Skid Fri 25 Oct 2013, 10:20 am
It makes things SO much easier GK
_________________
Al.
Constructive criticism is always welcome.
“Success always demands a greater effort.” Winston Churchill
"Success is failure turned inside out" Unknown
Skid- Admin
- Posts : 7129
Join date : 2013-02-15
Age : 75
Location : Newcastle. Good Old Blighty. -
Re: My way with roll cages.
![]() by Skid Fri 25 Oct 2013, 10:25 am
by Skid Fri 25 Oct 2013, 10:25 am
If you do Clay, let us all see it as you may come up wuth some improvments!!Geezerman wrote:Great !
Thanks, Skid, I will definitely have to make one of those neat bending jigs !!
_________________
Al.
Constructive criticism is always welcome.
“Success always demands a greater effort.” Winston Churchill
"Success is failure turned inside out" Unknown
Skid- Admin
- Posts : 7129
Join date : 2013-02-15
Age : 75
Location : Newcastle. Good Old Blighty. -
Re: My way with roll cages.
![]() by Johnag Thu 27 Feb 2014, 1:48 pm
by Johnag Thu 27 Feb 2014, 1:48 pm
Hi Al,
Great tutorial Sir, thank you, may I ask what size of rod do you use for making the cage please...
Many thanks...
Andy...
Great tutorial Sir, thank you, may I ask what size of rod do you use for making the cage please...
Many thanks...
Andy...
_________________
Andy...
Life isn't about how to survive the storm, but how to dance in the rain...

Johnag- Moderator
- Posts : 1576
Join date : 2013-10-12
Age : 58
Location : North Wales, U.K... -
Re: My way with roll cages.
![]() by Skid Thu 27 Feb 2014, 3:23 pm
by Skid Thu 27 Feb 2014, 3:23 pm
Hi Andy,
It depends on the dia if the roll cage tubing. However, I find 2mm works for most.
It depends on the dia if the roll cage tubing. However, I find 2mm works for most.
_________________
Al.
Constructive criticism is always welcome.
“Success always demands a greater effort.” Winston Churchill
"Success is failure turned inside out" Unknown
Skid- Admin
- Posts : 7129
Join date : 2013-02-15
Age : 75
Location : Newcastle. Good Old Blighty. -
Re: My way with roll cages.
![]() by Johnag Thu 27 Feb 2014, 6:53 pm
by Johnag Thu 27 Feb 2014, 6:53 pm
Hi Al,
Many thanks Sir...
Andy...
Many thanks Sir...
Andy...
_________________
Andy...
Life isn't about how to survive the storm, but how to dance in the rain...
Johnag- Moderator
- Posts : 1576
Join date : 2013-10-12
Age : 58
Location : North Wales, U.K... -
Re: My way with roll cages.
![]() by dogfish7 Sat 01 Mar 2014, 1:40 pm
by dogfish7 Sat 01 Mar 2014, 1:40 pm
Fantastic Tutorial Al! Use to hand bend, but definitely will build a jig now!
dogfish7- Intermediate Member

- Posts : 668
Join date : 2013-02-27
Age : 77
Location : Hoodsport, WA
Re: My way with roll cages.
![]() by Guest Sat 01 Mar 2014, 5:18 pm
by Guest Sat 01 Mar 2014, 5:18 pm
I can't find the tutorial now but will keep looking. It shows how to use a cribbage board to do the same thing. Plus you can move the pegs around for different size bends.
Guest- Guest
Re: My way with roll cages.
![]() by dogfish7 Sun 02 Mar 2014, 5:26 pm
by dogfish7 Sun 02 Mar 2014, 5:26 pm
Thought of a similar thing using the Midwest Products Easy Miter Box, which has 3 pins for such a purpose. 
dogfish7- Intermediate Member
- Posts : 668
Join date : 2013-02-27
Age : 77
Location : Hoodsport, WA
» Tip for building roll bars, roll cages. by Brent
» Roll on 2016...............
» Roll cage padding and cable ties.
» Roll on 2016...............
» Roll cage padding and cable ties.
Permissions in this forum:
You cannot reply to topics in this forum|
|
|