
vacuum former
5 posters

vacuum former
![]() by wisdonm Tue 30 Apr 2013, 5:15 pm
by wisdonm Tue 30 Apr 2013, 5:15 pm
I made one last year for under $10. This is what I did.
First I bought four (4) 3" X 7" nailing plates for 68 cents each. They are used for making trusses and such. You can get them at a home improvement store. While at the store I picked up a piece of 4" X 1" pine board that was four feet long in their bargain section for under $3.

I also used apiece of 1/4" thick plywood, floor underlayment, that I had laying around.
I started buy cutting two (2) pieces of the 3" pine 11" long. These will be the longer sides. I also cut the two (2) shorter sides 7" long. I used a 1 1/2" hole saw to drill a hole in one short side piece. This hole is where I attach my shop vac, so adjust the size of the hole to fit your equipment.
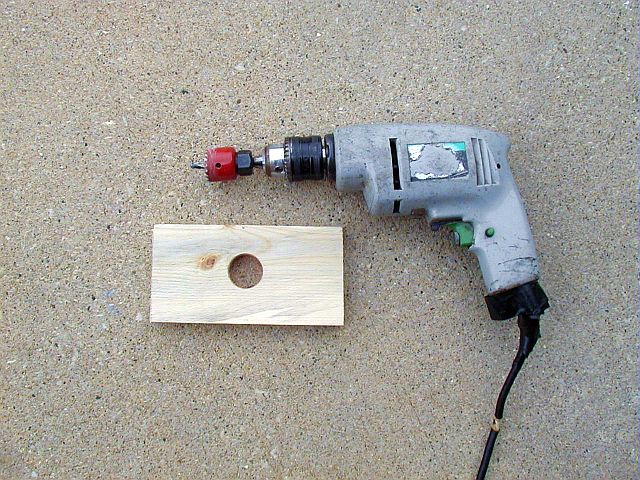
The box is simple enough to assemble. The longer sides fit inside the shorter end caps. The plywood bottom is then attached. The plates are then mounted to the top. I used simple nails for everything. It should look like this.

The seams should be sealed, but I didn't, and it works fine.
Here it is with the shop vac attached. It's just a slip interference fit.

You will also need to make some holders for your plastic. I made them from the same 1/4 inch plywood because the handle parts shouldn't get too hot to hold. As you can see, I made three different sizes. One is double ended. The large one will do a Corvette size body.

Here's how I use it.
1. Make sure the wife is not home.
2. If the object that you want to copy is solid, you can just place it on the nail plates with a piece of two-sided tape. If it is hollow, or has openings, close off the openings, like windows, from the inside, with tape.
3. I try to work on one end of the box. I then lay pieces of paper over the unused nail plate sections, to prevent vacuum loss. You must have one row of open holes all around your part.
4. I now tape a piece of plastic to the correct sized holder. I use masking tape and it helps to wrap the tape around the sides of the holder.

5. Make sure your vacuum source is attached to the box. Make sure it is turned on.
6. Heat your plastic over your wife's stove or other heat source. Start about six inches above the heat source with the plastic side upwards. As the plastic warms it will start to sag and then tighten again. This is the moment that you flip the holder over as you stretch it over your object. The plastic side of your holder should now be flat against the nail plate.
It might take a little practice to get the results that you want. If the part that you made isn't right, the plastic can be popped off your object with out removing it from the holder. The plastic can then be reused. Just heat it again and it will straighten out. This will usually work three times. I tend to get wrinkles after the third try.
Experiment with plastic packaging. Clear plastic makes realistic windows, and who said body parts can't start out clear. For Rent signs and food containers are a good source of styrene also.
First I bought four (4) 3" X 7" nailing plates for 68 cents each. They are used for making trusses and such. You can get them at a home improvement store. While at the store I picked up a piece of 4" X 1" pine board that was four feet long in their bargain section for under $3.
I also used apiece of 1/4" thick plywood, floor underlayment, that I had laying around.
I started buy cutting two (2) pieces of the 3" pine 11" long. These will be the longer sides. I also cut the two (2) shorter sides 7" long. I used a 1 1/2" hole saw to drill a hole in one short side piece. This hole is where I attach my shop vac, so adjust the size of the hole to fit your equipment.
The box is simple enough to assemble. The longer sides fit inside the shorter end caps. The plywood bottom is then attached. The plates are then mounted to the top. I used simple nails for everything. It should look like this.
The seams should be sealed, but I didn't, and it works fine.
Here it is with the shop vac attached. It's just a slip interference fit.
You will also need to make some holders for your plastic. I made them from the same 1/4 inch plywood because the handle parts shouldn't get too hot to hold. As you can see, I made three different sizes. One is double ended. The large one will do a Corvette size body.
Here's how I use it.
1. Make sure the wife is not home.
2. If the object that you want to copy is solid, you can just place it on the nail plates with a piece of two-sided tape. If it is hollow, or has openings, close off the openings, like windows, from the inside, with tape.
3. I try to work on one end of the box. I then lay pieces of paper over the unused nail plate sections, to prevent vacuum loss. You must have one row of open holes all around your part.
4. I now tape a piece of plastic to the correct sized holder. I use masking tape and it helps to wrap the tape around the sides of the holder.
5. Make sure your vacuum source is attached to the box. Make sure it is turned on.
6. Heat your plastic over your wife's stove or other heat source. Start about six inches above the heat source with the plastic side upwards. As the plastic warms it will start to sag and then tighten again. This is the moment that you flip the holder over as you stretch it over your object. The plastic side of your holder should now be flat against the nail plate.
It might take a little practice to get the results that you want. If the part that you made isn't right, the plastic can be popped off your object with out removing it from the holder. The plastic can then be reused. Just heat it again and it will straighten out. This will usually work three times. I tend to get wrinkles after the third try.
Experiment with plastic packaging. Clear plastic makes realistic windows, and who said body parts can't start out clear. For Rent signs and food containers are a good source of styrene also.
Last edited by wisdonm on Fri 10 May 2013, 7:03 pm; edited 4 times in total

wisdonm- Rookie Member

- Posts : 326
Join date : 2013-02-27
Location : Brookfield (Milwaukee), Wisconsin
Re: vacuum former
![]() by john2308 Tue 30 Apr 2013, 7:59 pm
by john2308 Tue 30 Apr 2013, 7:59 pm
Great idea :) Looks easy enough, might just try it. Thanks for sharing. John

john2308- Full Member

- Posts : 1142
Join date : 2013-04-10
Age : 79
Location : Phoenix, AZ
Re: vacuum former
![]() by pete s Tue 30 Apr 2013, 8:48 pm
by pete s Tue 30 Apr 2013, 8:48 pm
Cool idea. Thanks for sharing.
I have done some minor vac-forming in the past, but used a small former at work. Now that I am retired, I don't have access to it. I will have to make one of these. Vac forming is great for parts, and I have found that it is works better if you can have a gentle run-out outside of the part you are forming. Tough to do on a body, but fairly easy for small parts. It prevents wrinkles and excessive thinning of the plastic.
By the way, I don't have much of an issue with #1 on your list, as I do most of the cooking in my house :cheers: (my wife is still working).

pete s- Intermediate Member
- Posts : 797
Join date : 2013-02-26
Age : 73
Location : Beaverton, OR
Re: vacuum former
![]() by wisdonm Tue 30 Apr 2013, 9:16 pm
by wisdonm Tue 30 Apr 2013, 9:16 pm
You're right Pete. I would recommend having at least 1/2" clearance between your part and the inside edges of the holder. Undercuts, such as the sides on that Corvette, can make the new part impossible to remove. On the Vette, I made two vertical cuts on the rear valence and it popped right off. I only wanted the tops of the fenders anyway. To help get that gradual run out, it sometimes helps to elevate your object with maybe a 1/4" piece of plywood.
wisdonm- Rookie Member
- Posts : 326
Join date : 2013-02-27
Location : Brookfield (Milwaukee), Wisconsin

Geezerman- Advanced Member

- Posts : 3651
Join date : 2013-02-24
Age : 88
Location : Gulf coast of central Florids
Re: vacuum former
![]() by webby Tue 30 Apr 2013, 11:27 pm
by webby Tue 30 Apr 2013, 11:27 pm
I'll have to give it a shot. But please, replace the cord on your electric drill.
Thanks for sharing. I've got most materials "in stock"
Thanks for sharing. I've got most materials "in stock"

webby- Moderator

- Posts : 2194
Join date : 2013-02-27
Age : 64
Location : Strathpine Australia. Built over WW2 airstrip
Re: vacuum former
![]() by wisdonm Fri 10 May 2013, 7:18 pm
by wisdonm Fri 10 May 2013, 7:18 pm
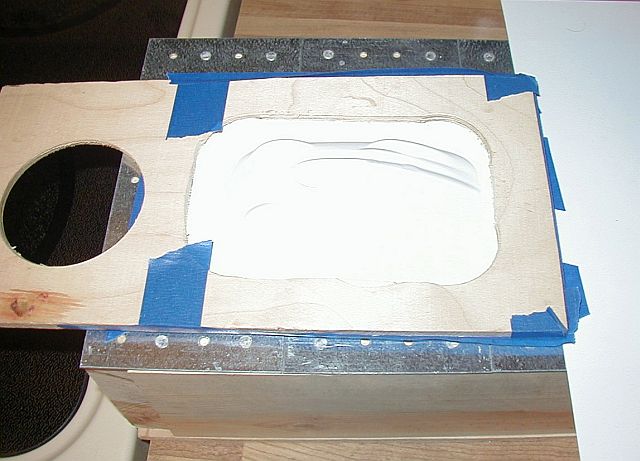
Yesterday was dyno test day. I did not know when I woke up this morning that today was vacuum form day. I needed parts for two builds, so I made some and also added two pix to the how-to above.
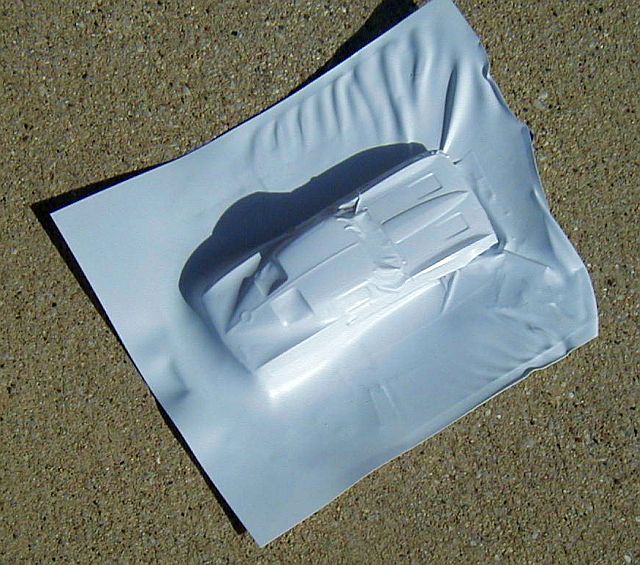
I needed some '40 Ford fenders. I vacuum formed them, but remember I mentioned to pay attention to under cuts. Severe under cuts will lock your part in place. See bottom half of pix below. If this should happen, I cool the plastic and part down with water, so that the parts don't get distorted.
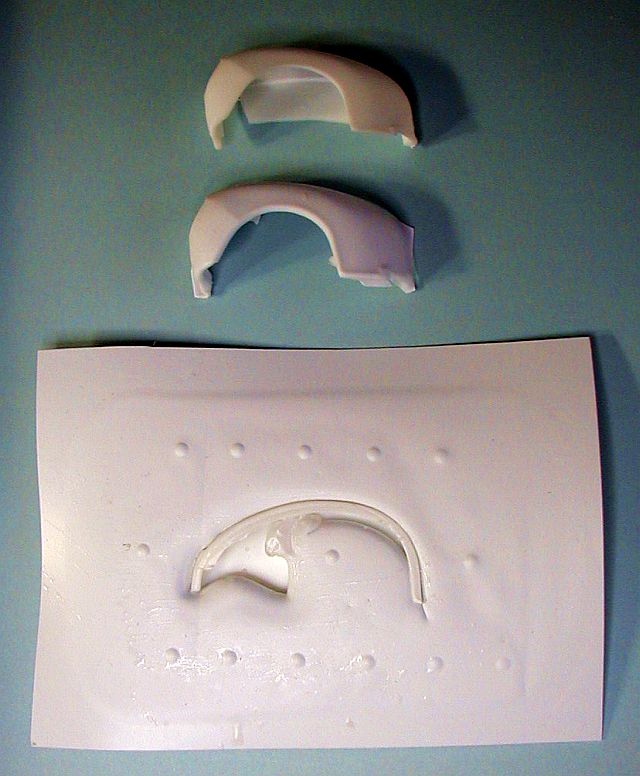
I then carefully cut the part free at a later time. See the top half of the pix. The part on the top is the original. The part on the bottom is the roughly trimmed copy.
I also made this.

I needed some '40 Ford fenders. I vacuum formed them, but remember I mentioned to pay attention to under cuts. Severe under cuts will lock your part in place. See bottom half of pix below. If this should happen, I cool the plastic and part down with water, so that the parts don't get distorted.
I then carefully cut the part free at a later time. See the top half of the pix. The part on the top is the original. The part on the bottom is the roughly trimmed copy.
I also made this.
wisdonm- Rookie Member
- Posts : 326
Join date : 2013-02-27
Location : Brookfield (Milwaukee), Wisconsin
Permissions in this forum:
You cannot reply to topics in this forum|
|
|