
AMT 72 Nova "Old Pro" - Ute Conversion
+4
disabled modeler
dublin boy
Skid
Spanky 19
8 posters
Skid's :: Works In Progress :: Road cars
Page 1 of 1

AMT 72 Nova "Old Pro" - Ute Conversion
![]() by Spanky 19 Thu 05 Mar 2020, 5:48 am
by Spanky 19 Thu 05 Mar 2020, 5:48 am
I've had two glue-bombs of the AMT 72 Nova "Old Pro" kit. With the demise of Holden, I decided to convert these Nova kits into a Sport Ute (maybe with right hand drive). It will still be a Nova ... with a bit of international flare.
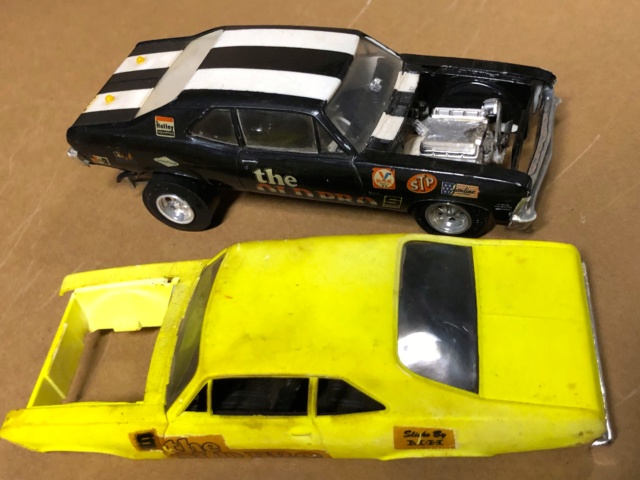
With coupe to truck conversions, they always seem to have a too-short wheelbase. To remedy this, I used tape to mark where the lengthening cuts will be made (5 mm width used here). On a side note, I stripped the paint using Easy-Off brand oven cleaner.

Here is where I am at tonight with the lengthened "bed". Still needs a little more work to dial in this conversion.

With coupe to truck conversions, they always seem to have a too-short wheelbase. To remedy this, I used tape to mark where the lengthening cuts will be made (5 mm width used here). On a side note, I stripped the paint using Easy-Off brand oven cleaner.
Here is where I am at tonight with the lengthened "bed". Still needs a little more work to dial in this conversion.

Spanky 19- Rookie Member

- Posts : 297
Join date : 2014-07-27
Age : 60
Location : San Antonio, Texas
Re: AMT 72 Nova "Old Pro" - Ute Conversion
![]() by Skid Thu 05 Mar 2020, 8:43 am
by Skid Thu 05 Mar 2020, 8:43 am
That's quite a project but a nice start Chris. 
_________________
Al.
Constructive criticism is always welcome.
“Success always demands a greater effort.” Winston Churchill
"Success is failure turned inside out" Unknown

Skid- Admin
- Posts : 7128
Join date : 2013-02-15
Age : 75
Location : Newcastle. Good Old Blighty. -

Re: AMT 72 Nova "Old Pro" - Ute Conversion
![]() by dublin boy Thu 05 Mar 2020, 6:33 pm
by dublin boy Thu 05 Mar 2020, 6:33 pm
I love the madness here Chris, keep going 

dublin boy- Moderator

- Posts : 3862
Join date : 2013-02-27
Re: AMT 72 Nova "Old Pro" - Ute Conversion
![]() by Spanky 19 Mon 09 Mar 2020, 1:23 am
by Spanky 19 Mon 09 Mar 2020, 1:23 am
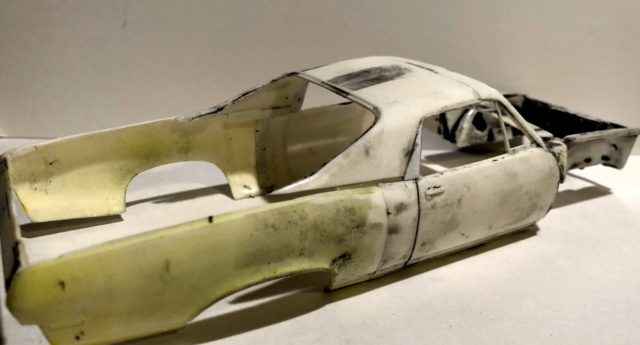
Made a few steps forward in dialing in the roof line.
In this picture note that the C-Pillar was elevated a few MM to counter the lower line created with the coupe's roof. Also, I did not care for the shrouded look of the C-Pillar.

Here is where I am at this evening. The top of the front window was lengthened about 3 MM then the C-Pillar line was straightened out with a filler piece which lined up with the door line. I also started the tail gate by adding a piece cut from the edge of the trunk (this also helps re-establish the rear width of the truck).
In this picture note that the C-Pillar was elevated a few MM to counter the lower line created with the coupe's roof. Also, I did not care for the shrouded look of the C-Pillar.
Here is where I am at this evening. The top of the front window was lengthened about 3 MM then the C-Pillar line was straightened out with a filler piece which lined up with the door line. I also started the tail gate by adding a piece cut from the edge of the trunk (this also helps re-establish the rear width of the truck).
Last edited by Spanky 19 on Thu 19 Mar 2020, 3:09 pm; edited 1 time in total
Spanky 19- Rookie Member
- Posts : 297
Join date : 2014-07-27
Age : 60
Location : San Antonio, Texas
dublin boy- Moderator
- Posts : 3862
Join date : 2013-02-27
Re: AMT 72 Nova "Old Pro" - Ute Conversion
![]() by disabled modeler Tue 10 Mar 2020, 10:41 am
by disabled modeler Tue 10 Mar 2020, 10:41 am
Coll idea. I need the Pontiac version of the Nova kit to make our old 74 GTO from we once owned been on my wish list for decades.
disabled modeler- Intermediate Member

- Posts : 979
Join date : 2016-05-22
Age : 60
Location : Quincy,IL. USA
Re: AMT 72 Nova "Old Pro" - Ute Conversion
![]() by Skid Tue 10 Mar 2020, 1:15 pm
by Skid Tue 10 Mar 2020, 1:15 pm
Nice work Chris. Keep at it.
_________________
Al.
Constructive criticism is always welcome.
“Success always demands a greater effort.” Winston Churchill
"Success is failure turned inside out" Unknown
Skid- Admin
- Posts : 7128
Join date : 2013-02-15
Age : 75
Location : Newcastle. Good Old Blighty. -
Re: AMT 72 Nova "Old Pro" - Ute Conversion
![]() by Spanky 19 Tue 10 Mar 2020, 6:29 pm
by Spanky 19 Tue 10 Mar 2020, 6:29 pm
Thanks guys ... been able to devote a bit of time to the build and work continues to rough-in the body.
The Nova' Coupe's C-Pillars curved inward and did not align with the rear fenders...they had to be pushed outwards a few millimeters. To aid in this, I scribed a relief on the inside of the C-pillar. I plan to attack the finishing body work in this area before attaching the bed ... being open and accessible makes the putty, sand, prime, repeat process much easier.

After pushing the C-pillar slopes outward to align with the fender (that relief cut allowed them to retain the new shape and not fight me), scrap plastic was used to fill the gab from the bottom of the roof pillar and the rear fender. The final angle of the trail edge of the C-Pillar still needs a lot of refinement. Also you can see the start of the bed made from sheet plastic.

Also turned my attention to the hood ... had to do something because I needed it flat versus the drag scoop.
I decided to use a Monogram Daytona Charger item modified by adding the front of one of the Nova's hoods and adjusting the rear curve to match the Nova's Cowl. Surprisingly, they were the same width.

Still a long way to go but liking how it is shaping up.
Thanks again for all the views/encouragement and those who make this community possible.
The Nova' Coupe's C-Pillars curved inward and did not align with the rear fenders...they had to be pushed outwards a few millimeters. To aid in this, I scribed a relief on the inside of the C-pillar. I plan to attack the finishing body work in this area before attaching the bed ... being open and accessible makes the putty, sand, prime, repeat process much easier.
After pushing the C-pillar slopes outward to align with the fender (that relief cut allowed them to retain the new shape and not fight me), scrap plastic was used to fill the gab from the bottom of the roof pillar and the rear fender. The final angle of the trail edge of the C-Pillar still needs a lot of refinement. Also you can see the start of the bed made from sheet plastic.
Also turned my attention to the hood ... had to do something because I needed it flat versus the drag scoop.
I decided to use a Monogram Daytona Charger item modified by adding the front of one of the Nova's hoods and adjusting the rear curve to match the Nova's Cowl. Surprisingly, they were the same width.
Still a long way to go but liking how it is shaping up.
Thanks again for all the views/encouragement and those who make this community possible.
Spanky 19- Rookie Member
- Posts : 297
Join date : 2014-07-27
Age : 60
Location : San Antonio, Texas
Re: AMT 72 Nova "Old Pro" - Ute Conversion
![]() by Spanky 19 Mon 16 Mar 2020, 4:26 pm
by Spanky 19 Mon 16 Mar 2020, 4:26 pm
Still pounding away at the body.
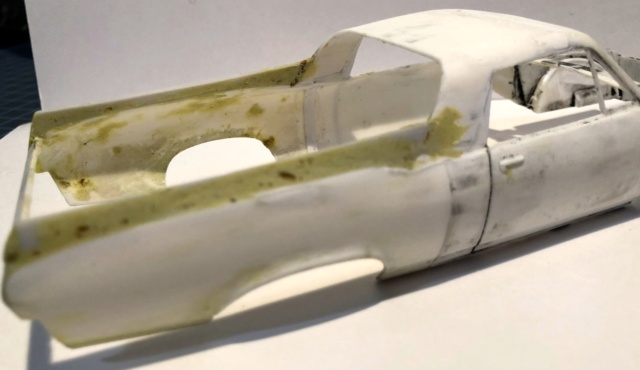
Here I shaved down the width of the C-Pillar. After studying Rancheros and El Caminos, I noticed the rear fenders are taller then stock fenders. Here, I added extensions cut from a scrap body taking care to try to retain the distinctive curve of the Nova's fender.

Filled in with my go-to filler used for major body work, Milliput. These shots show rough-sanding of the putty and then my first shot of primer on the bed and hood.

Here I shaved down the width of the C-Pillar. After studying Rancheros and El Caminos, I noticed the rear fenders are taller then stock fenders. Here, I added extensions cut from a scrap body taking care to try to retain the distinctive curve of the Nova's fender.
Filled in with my go-to filler used for major body work, Milliput. These shots show rough-sanding of the putty and then my first shot of primer on the bed and hood.
Spanky 19- Rookie Member
- Posts : 297
Join date : 2014-07-27
Age : 60
Location : San Antonio, Texas
Re: AMT 72 Nova "Old Pro" - Ute Conversion
![]() by dublin boy Mon 16 Mar 2020, 7:01 pm
by dublin boy Mon 16 Mar 2020, 7:01 pm
Coming along nicely.
dublin boy- Moderator
- Posts : 3862
Join date : 2013-02-27

webby- Moderator
- Posts : 2194
Join date : 2013-02-27
Age : 64
Location : Strathpine Australia. Built over WW2 airstrip
Re: AMT 72 Nova "Old Pro" - Ute Conversion
![]() by Spanky 19 Fri 20 Mar 2020, 4:19 pm
by Spanky 19 Fri 20 Mar 2020, 4:19 pm
Hope this post finds all my Skids Place friends in good health and spirits.
Work continues as I turn my focus on the bed and frame.
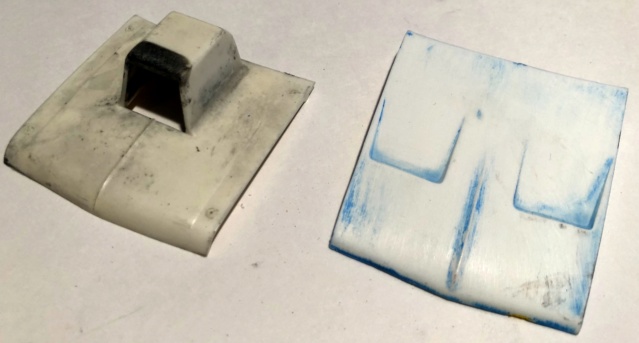
The stock frame had a kick up along with molded in wheel tubs that interfered with the truck bed.

So I cut out the tubs and added a relief line and flattened it out. Additionally, I added a 5MM strip my second behind the front subframe to match the lengthened body. As I sanded the part to narrow the girth a bit I weakened the joint and caused it to break in half. I added a strengthening strip of styrene that bends in with the sub frame rails. I did put these on the inside because I wanted a tight fit between the chassis and bed.


Next, I thought hard on the wheel tubs when the idea came to use the two over-size hood scoops to make them. My first try was about 2 mm too short so I cut them apart and added a lengthening strip. Here they are mocked up in the bed.


Work continues as I turn my focus on the bed and frame.
The stock frame had a kick up along with molded in wheel tubs that interfered with the truck bed.
So I cut out the tubs and added a relief line and flattened it out. Additionally, I added a 5MM strip my second behind the front subframe to match the lengthened body. As I sanded the part to narrow the girth a bit I weakened the joint and caused it to break in half. I added a strengthening strip of styrene that bends in with the sub frame rails. I did put these on the inside because I wanted a tight fit between the chassis and bed.
Next, I thought hard on the wheel tubs when the idea came to use the two over-size hood scoops to make them. My first try was about 2 mm too short so I cut them apart and added a lengthening strip. Here they are mocked up in the bed.
Spanky 19- Rookie Member
- Posts : 297
Join date : 2014-07-27
Age : 60
Location : San Antonio, Texas
Re: AMT 72 Nova "Old Pro" - Ute Conversion
![]() by RetiredMike Sat 21 Mar 2020, 4:16 pm
by RetiredMike Sat 21 Mar 2020, 4:16 pm
Great work, Chris. The body line looks similar to the smooth slopes of the late model Rancheros.

RetiredMike- Advanced Member

- Posts : 3525
Join date : 2013-04-27
Age : 73
Location : Valparaiso, Indiana
Re: AMT 72 Nova "Old Pro" - Ute Conversion
![]() by Mr Hirakawa Sun 22 Mar 2020, 1:03 pm
by Mr Hirakawa Sun 22 Mar 2020, 1:03 pm
The amount of effort going in here has to be respected.

Mr Hirakawa- Resident member
- Posts : 1528
Join date : 2015-11-11
Age : 52
Re: AMT 72 Nova "Old Pro" - Ute Conversion
![]() by Spanky 19 Wed 25 Mar 2020, 1:18 pm
by Spanky 19 Wed 25 Mar 2020, 1:18 pm
Turned another corner with my Ute build and permanently mated the bet to the body with 5 minute epoxy then turned my attention to the back window. Using a piece of plastic off a junk body I shaped a piece to fit in the opening with a slight sink.

Drew the outline then used a pin vise to help cut out the window.

Half round stock created the window trim.

A mock up of the frame. Still some work to fill the corners.
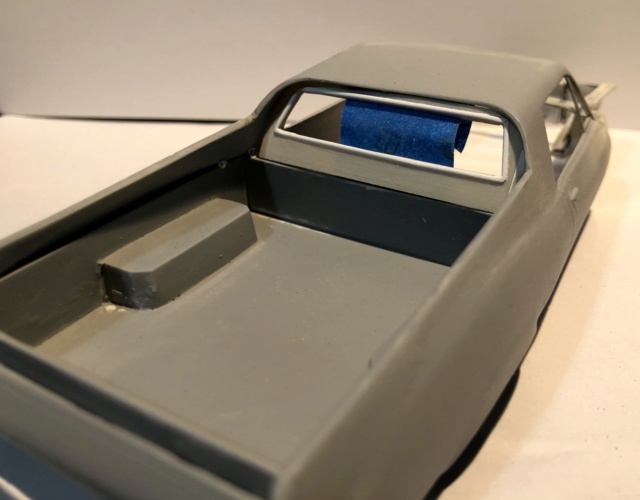
Next will be finishing the back glass and work up a tailgate and molding in the bed with a bit of putty.
Drew the outline then used a pin vise to help cut out the window.

Half round stock created the window trim.

A mock up of the frame. Still some work to fill the corners.
Next will be finishing the back glass and work up a tailgate and molding in the bed with a bit of putty.
Spanky 19- Rookie Member
- Posts : 297
Join date : 2014-07-27
Age : 60
Location : San Antonio, Texas
dublin boy- Moderator
- Posts : 3862
Join date : 2013-02-27
Re: AMT 72 Nova "Old Pro" - Ute Conversion
![]() by beowulf Wed 25 Mar 2020, 8:06 pm
by beowulf Wed 25 Mar 2020, 8:06 pm
dont know if this is of any interest......modern el camino they never built...sort of lol

beowulf- Resident member
- Posts : 2469
Join date : 2013-05-02
Age : 62
Location : Monkey Hanger Town, UK
Re: AMT 72 Nova "Old Pro" - Ute Conversion
![]() by Spanky 19 Thu 26 Mar 2020, 3:33 pm
by Spanky 19 Thu 26 Mar 2020, 3:33 pm
Paul, that was a cool video ... and surprising closely connected to my build (other then the ute conversion).
I was planning on giving the Nova a Pontiac vide. I had a big block pontiac engine from the Raiders Stage Coach which I had started quite a few years ago for a failed build. The block had been sanded and painted pontiac blue (didn't show well in the picture). I am also considering using early 70's Pontiac rims from the parts box matched to some big and littles.

Thanks again for all the comments and encouragement ... it keeps the plastic flying and the glue sticking.
I was planning on giving the Nova a Pontiac vide. I had a big block pontiac engine from the Raiders Stage Coach which I had started quite a few years ago for a failed build. The block had been sanded and painted pontiac blue (didn't show well in the picture). I am also considering using early 70's Pontiac rims from the parts box matched to some big and littles.
Thanks again for all the comments and encouragement ... it keeps the plastic flying and the glue sticking.
Spanky 19- Rookie Member
- Posts : 297
Join date : 2014-07-27
Age : 60
Location : San Antonio, Texas
Skid's :: Works In Progress :: Road cars
Page 1 of 1
Permissions in this forum:
You cannot reply to topics in this forum|
|
|