
Revell Monza
+2
Skid
Spanky 19
6 posters
Skid's :: Works In Progress :: Road cars
Page 1 of 1

Revell Monza
![]() by Spanky 19 Thu 28 Nov 2019, 9:55 pm
by Spanky 19 Thu 28 Nov 2019, 9:55 pm
On to my next build ... Revell's Monza "Street Machine." I picked this up at a local hobby shop that finds out of production kits at reasonable prices. The box was rough with some water damage and most of the parts off the spruce but it looks complete.

I started off by repairing the frame. A cross member at the front and back were broken.

I considered drilling a hole on opposite sides of the crack and pinning it. Nixed this idea because the plastic used is rather crisp and brittle. Instead, it was repaired by laminating "L" shape plastic stock to the damaged frame with liquid styrene glue.
There were a lot of molding flash and injection holes on the undercarriage. Because the injection pits were so close to the molded in fuel and break lines, I decided to sand all the detail off and start over. Starting with 150 grit, I progressed up to 800 grit. A bit of putty work was needed to recover from a poor attempt at scraping off some of the detail. It still needs a few primer - sand cycles to get it where I'll be happy with it.

I started off by repairing the frame. A cross member at the front and back were broken.
I considered drilling a hole on opposite sides of the crack and pinning it. Nixed this idea because the plastic used is rather crisp and brittle. Instead, it was repaired by laminating "L" shape plastic stock to the damaged frame with liquid styrene glue.
There were a lot of molding flash and injection holes on the undercarriage. Because the injection pits were so close to the molded in fuel and break lines, I decided to sand all the detail off and start over. Starting with 150 grit, I progressed up to 800 grit. A bit of putty work was needed to recover from a poor attempt at scraping off some of the detail. It still needs a few primer - sand cycles to get it where I'll be happy with it.

Spanky 19- Rookie Member

- Posts : 297
Join date : 2014-07-27
Age : 60
Location : San Antonio, Texas
Re: Revell Monza
![]() by Skid Fri 29 Nov 2019, 9:19 am
by Skid Fri 29 Nov 2019, 9:19 am
Nice job on reparing the chassis Chris. 
_________________
Al.
Constructive criticism is always welcome.
“Success always demands a greater effort.” Winston Churchill
"Success is failure turned inside out" Unknown

Skid- Admin
- Posts : 7128
Join date : 2013-02-15
Age : 75
Location : Newcastle. Good Old Blighty. -

Re: Revell Monza
![]() by dublin boy Fri 29 Nov 2019, 5:22 pm
by dublin boy Fri 29 Nov 2019, 5:22 pm
Always liked Monzas.
Never actually seen one. Nice start
Is that an IMSA racer converted to a Custom/Street Machine and what engine is in it Chris?
Never actually seen one. Nice start
Is that an IMSA racer converted to a Custom/Street Machine and what engine is in it Chris?

dublin boy- Moderator

- Posts : 3862
Join date : 2013-02-27
Re: Revell Monza
![]() by Spanky 19 Sat 30 Nov 2019, 3:47 pm
by Spanky 19 Sat 30 Nov 2019, 3:47 pm
DB, this kit is pretty much a street machine with IMSA style. Faust in the "Other Stuff" forum has a recent post that does an excellent review of this kit issued as the "Spyder" (along with the AMT and MPC Monza offerings). To add to his on-point comments, this kit shares the underpinnings of the Monroe Mustang from the same era. On the engine, it had Big Block style exhaust manifolds along with a front-sump (Ford style) oil pan. I thought about reversing it but that would require more suspension hacking to adjust the front cross member.
On to the progress:
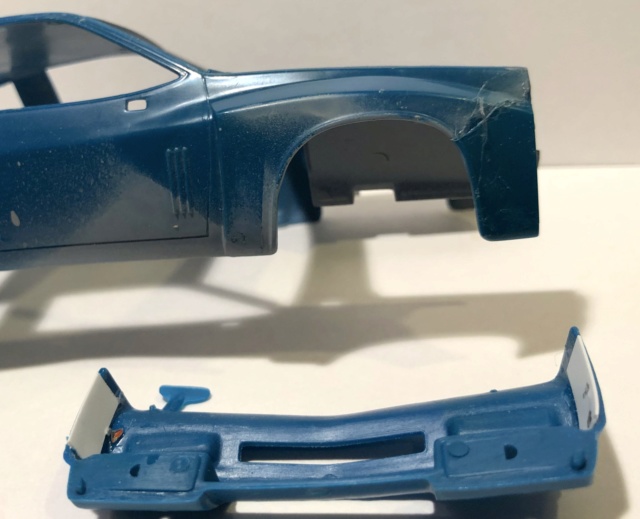
I never like molded in under hood details and the master cylinder was just awful. So out came the saw and knife to remove them.

In my earlier post I mentioned how brittle the plastic Revell used on this molding ... and true to form I cracked off a piece of the inner fender (in front of the molded in battery) during the hacking process. Also in this shot you can see a piece of plastic stock I glued to be the backing of the fill pieces.

Here is where I am at this morning with plastic stock used to fill the gaps. Up next ... putty, sand, repeat. Also note my fat fingers struck again and broke off the passenger side front fender leading edge. I also started on the engine with sanding the seam (on the transmission bottom, water pump and bell housing) with a coat of silver applied.

On to the progress:
I never like molded in under hood details and the master cylinder was just awful. So out came the saw and knife to remove them.

In my earlier post I mentioned how brittle the plastic Revell used on this molding ... and true to form I cracked off a piece of the inner fender (in front of the molded in battery) during the hacking process. Also in this shot you can see a piece of plastic stock I glued to be the backing of the fill pieces.
Here is where I am at this morning with plastic stock used to fill the gaps. Up next ... putty, sand, repeat. Also note my fat fingers struck again and broke off the passenger side front fender leading edge. I also started on the engine with sanding the seam (on the transmission bottom, water pump and bell housing) with a coat of silver applied.
Spanky 19- Rookie Member
- Posts : 297
Join date : 2014-07-27
Age : 60
Location : San Antonio, Texas

RetiredMike- Advanced Member

- Posts : 3525
Join date : 2013-04-27
Age : 73
Location : Valparaiso, Indiana
Re: Revell Monza
![]() by webby Wed 04 Dec 2019, 1:10 pm
by webby Wed 04 Dec 2019, 1:10 pm
Nice job on crude old kit. I've got the Sunbird version, complete with cart springs like yours.

webby- Moderator
- Posts : 2194
Join date : 2013-02-27
Age : 64
Location : Strathpine Australia. Built over WW2 airstrip
Re: Revell Monza
![]() by Spanky 19 Sat 07 Dec 2019, 4:07 pm
by Spanky 19 Sat 07 Dec 2019, 4:07 pm
Continuing to dial in the body on the Monza:
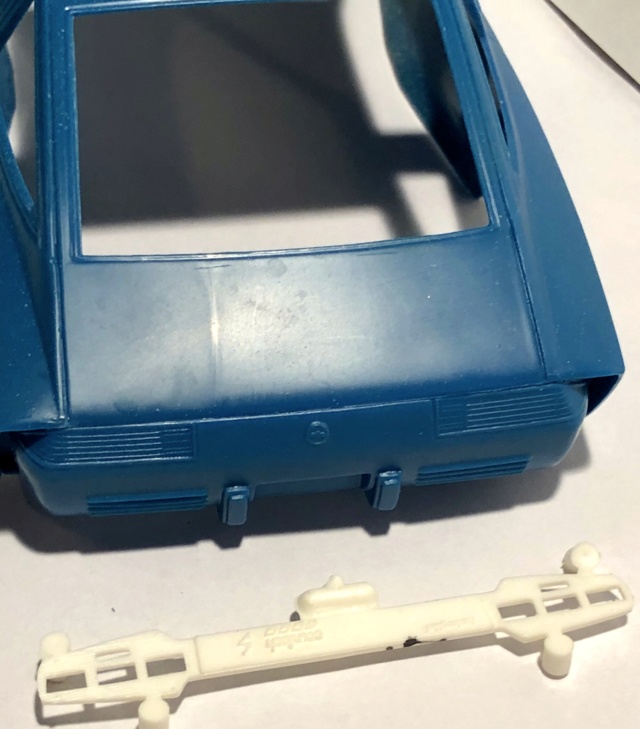
First, the connection joint for the front fascia had no mounting tabs or ribs. I added these from thin plastic to help with with aligning the part to the body. Also, the tabs helped make the joint substantial enough to aid in the repair of the break in the front fender along with being able to hold up to the putty & sanding & putty & sanding to come.
After blowing up the under-hood area I am pleased with how it turned out. After the glue dried on the fascia, it required a lot of leveling between the two surfaces. Tamiya putty followed the sanding to fill the seam.

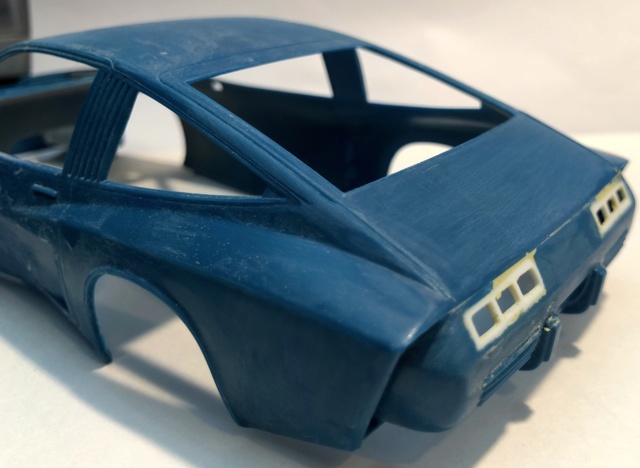
I am not very good at painting molded in details ... as with the rear lights on this kit. As an alternative, I grabbed this Lamborghini item from the parts box to use and decided to sand off the kit detail.
After cutting (and once again causing the brittle Revell plastic to break), I trimmed and molded in the tail lights with Milliput. This would have been easier if I had thought of the modification before glueing the rear fascia to the body ... but it worked out.
Chris
First, the connection joint for the front fascia had no mounting tabs or ribs. I added these from thin plastic to help with with aligning the part to the body. Also, the tabs helped make the joint substantial enough to aid in the repair of the break in the front fender along with being able to hold up to the putty & sanding & putty & sanding to come.
After blowing up the under-hood area I am pleased with how it turned out. After the glue dried on the fascia, it required a lot of leveling between the two surfaces. Tamiya putty followed the sanding to fill the seam.
I am not very good at painting molded in details ... as with the rear lights on this kit. As an alternative, I grabbed this Lamborghini item from the parts box to use and decided to sand off the kit detail.
After cutting (and once again causing the brittle Revell plastic to break), I trimmed and molded in the tail lights with Milliput. This would have been easier if I had thought of the modification before glueing the rear fascia to the body ... but it worked out.
Chris
Last edited by Spanky 19 on Sun 08 Dec 2019, 6:27 am; edited 1 time in total
Spanky 19- Rookie Member
- Posts : 297
Join date : 2014-07-27
Age : 60
Location : San Antonio, Texas
Re: Revell Monza
![]() by dublin boy Sat 07 Dec 2019, 6:18 pm
by dublin boy Sat 07 Dec 2019, 6:18 pm
First time a Countach has been cut up to make a Chevy!
dublin boy- Moderator
- Posts : 3862
Join date : 2013-02-27
Re: Revell Monza
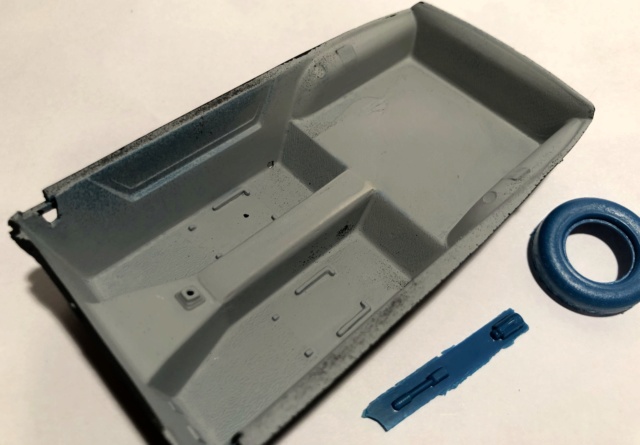
![]() by Spanky 19 Fri 13 Dec 2019, 3:26 pm
by Spanky 19 Fri 13 Dec 2019, 3:26 pm
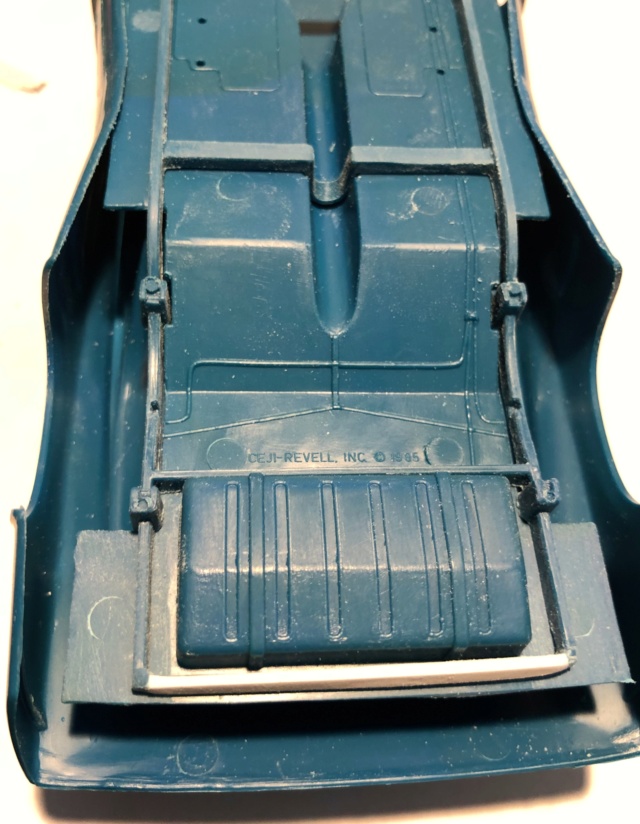
Up next ... on to some minor refinements to the interior tub.
Never a big fan of the molded in spare tire and did not like the fire extinguisher blob on the console. Also pleased with the look of the new rear tail lights.

Took my time with the back of an 11-Blade and was able to cut out the offending pieces (this time without breaking the brittle plastic used to mild this kit).

After plugging the openings with scrap plastic followed by (at the time of this shot) two putty - sanding - primer cycles.
Never a big fan of the molded in spare tire and did not like the fire extinguisher blob on the console. Also pleased with the look of the new rear tail lights.
Took my time with the back of an 11-Blade and was able to cut out the offending pieces (this time without breaking the brittle plastic used to mild this kit).
After plugging the openings with scrap plastic followed by (at the time of this shot) two putty - sanding - primer cycles.
Spanky 19- Rookie Member
- Posts : 297
Join date : 2014-07-27
Age : 60
Location : San Antonio, Texas
RetiredMike- Advanced Member
- Posts : 3525
Join date : 2013-04-27
Age : 73
Location : Valparaiso, Indiana
Re: Revell Monza
![]() by KatsZenJammer Sun 15 Dec 2019, 4:55 pm
by KatsZenJammer Sun 15 Dec 2019, 4:55 pm
Great work on this especially given the brittle plastic you mentioned. The tail lights look great and the other modding is coming along really well.

KatsZenJammer- Resident member
- Posts : 2600
Join date : 2016-05-20
Age : 57
Location : Vancouver, BC
Re: Revell Monza
![]() by Spanky 19 Wed 01 Jan 2020, 1:01 am
by Spanky 19 Wed 01 Jan 2020, 1:01 am
Thanks again for all the comments & encouragement.
After some minor refinements, I decided to progress forward with a box stock - shelf build.


After some minor refinements, I decided to progress forward with a box stock - shelf build.
Spanky 19- Rookie Member
- Posts : 297
Join date : 2014-07-27
Age : 60
Location : San Antonio, Texas
Re: Revell Monza
![]() by KatsZenJammer Sat 11 Jan 2020, 4:34 pm
by KatsZenJammer Sat 11 Jan 2020, 4:34 pm
Looking good! I really like that body colour.
KatsZenJammer- Resident member
- Posts : 2600
Join date : 2016-05-20
Age : 57
Location : Vancouver, BC
RetiredMike- Advanced Member
- Posts : 3525
Join date : 2013-04-27
Age : 73
Location : Valparaiso, Indiana
» '78 Monza S
» BMW Z1 (Revell)
» Monza S drag car
» Chevrolet Monza
» Ferrari 312B, Clay Regazzoni. 1970 Italian GP, Monza. MFH, 1/12.
» BMW Z1 (Revell)
» Monza S drag car
» Chevrolet Monza
» Ferrari 312B, Clay Regazzoni. 1970 Italian GP, Monza. MFH, 1/12.
Skid's :: Works In Progress :: Road cars
Page 1 of 1
Permissions in this forum:
You cannot reply to topics in this forum|
|
|