
1935 Delahaye 135 - Heller 1/24
Skid's :: Works In Progress :: Road cars
Page 3 of 4 •  1, 2, 3, 4
 ![]()
Re: 1935 Delahaye 135 - Heller 1/24
![]() by Guest Tue 19 May 2015, 8:37 pm
by Guest Tue 19 May 2015, 8:37 pm
Guest- Guest
Re: 1935 Delahaye 135 - Heller 1/24
![]() by Skid Tue 19 May 2015, 10:41 pm
by Skid Tue 19 May 2015, 10:41 pm
You can do it though.
_________________
Al.
Constructive criticism is always welcome.
“Success always demands a greater effort.” Winston Churchill
"Success is failure turned inside out" Unknown

Skid- Admin
- Posts : 7128
Join date : 2013-02-15
Age : 75
Location : Newcastle. Good Old Blighty. -

Re: 1935 Delahaye 135 - Heller 1/24
![]() by RetiredMike Thu 21 May 2015, 5:30 pm
by RetiredMike Thu 21 May 2015, 5:30 pm

The front spread is a little tight for mating of the hood. It's confirmed by tightness in the fit of the grill in the filler pieces, but it can be forced open to fit. Ignore the radiator position - it's a loose fit to hold up the hood.

I originally cut styrene to fit inside the opening of the rear fender to preserve the 'panel lines', but it proved to be too close to the wheel hub. So that was removed, cleaned up and replaced with larger pieces that lay on top of the fender, giving more clearance. Filler will smooth out the joint and hopefully keep tthe curves looking good.

Thanks for the support,
Mike

RetiredMike- Advanced Member

- Posts : 3525
Join date : 2013-04-27
Age : 73
Location : Valparaiso, Indiana
Re: 1935 Delahaye 135 - Heller 1/24
![]() by Guest Thu 21 May 2015, 6:08 pm
by Guest Thu 21 May 2015, 6:08 pm
Guest- Guest
Re: 1935 Delahaye 135 - Heller 1/24
![]() by Skid Thu 21 May 2015, 6:10 pm
by Skid Thu 21 May 2015, 6:10 pm

_________________
Al.
Constructive criticism is always welcome.
“Success always demands a greater effort.” Winston Churchill
"Success is failure turned inside out" Unknown
Skid- Admin
- Posts : 7128
Join date : 2013-02-15
Age : 75
Location : Newcastle. Good Old Blighty. -
Re: 1935 Delahaye 135 - Heller 1/24
![]() by Guest Thu 21 May 2015, 6:42 pm
by Guest Thu 21 May 2015, 6:42 pm
Guest- Guest
Re: 1935 Delahaye 135 - Heller 1/24
![]() by harron68 Thu 21 May 2015, 7:36 pm
by harron68 Thu 21 May 2015, 7:36 pm
harron68- Advanced Member
- Posts : 3616
Join date : 2013-02-28
Age : 73
Location : MIDWEST
Re: 1935 Delahaye 135 - Heller 1/24
![]() by RetiredMike Wed 27 May 2015, 5:43 pm
by RetiredMike Wed 27 May 2015, 5:43 pm
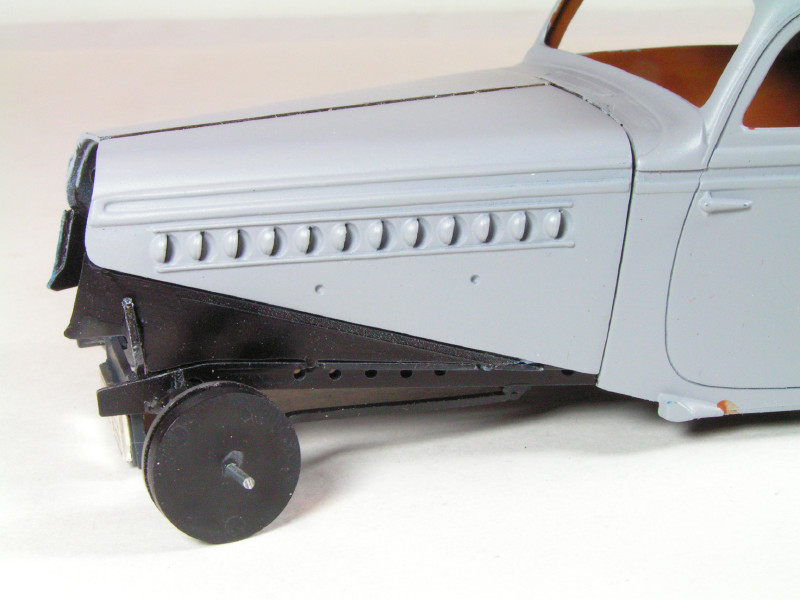
This is what the original plan was for the rear skirt. It was an insert that fit snugly, but it didn't allow much clearance for the wheel.

This is what it ended up like with a larger styrene piece being placed over the opening and blended in.

It'll give about an extra 1/16th inch clearance for the wheel.

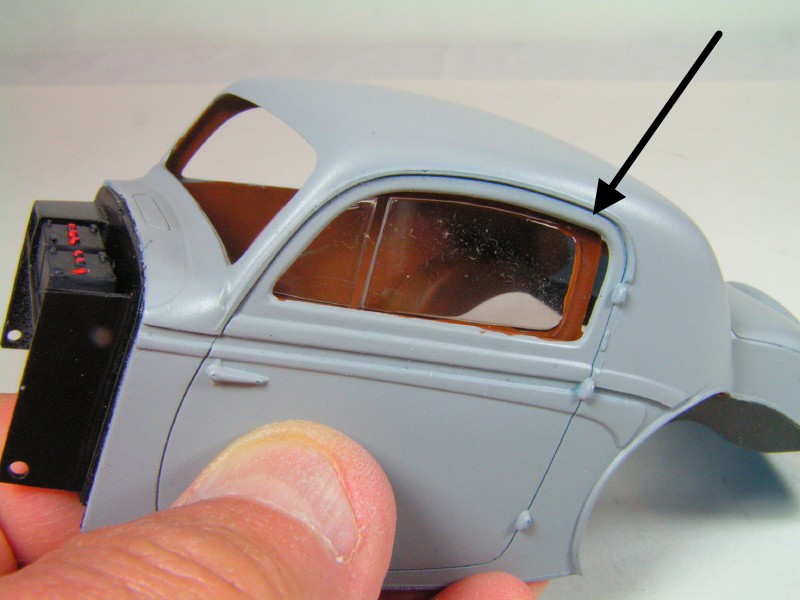
When I attached the rear inner fender, I just chose my spot, not paying attention to the interior door card/window piece that mounts to the inside. It contacts the contour of the inner fender and determines where it will set. The inners were removed and reattached at the very edge relocating the door cards.

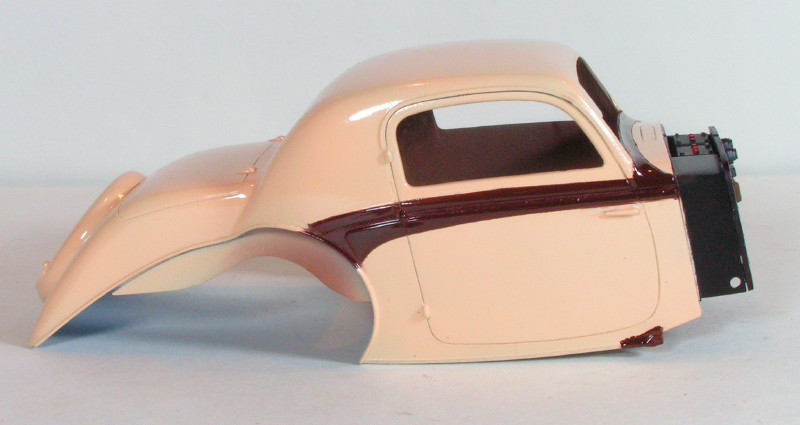
Got some color on the body and hood. Still wondering how I'll adress the little area that should mate to the rear corner of the front fenders. That little area will be painted the fender color. I don't want to paint the fenders after attachment, because of Murphy's law where the darker paint will get onto an area its not supposed, no matter how well it's masked.


It's getting very interesting. Any suggestions?
Thanks,
Mike
RetiredMike- Advanced Member
- Posts : 3525
Join date : 2013-04-27
Age : 73
Location : Valparaiso, Indiana
Re: 1935 Delahaye 135 - Heller 1/24
![]() by Guest Wed 27 May 2015, 6:25 pm
by Guest Wed 27 May 2015, 6:25 pm
Guest- Guest
Re: 1935 Delahaye 135 - Heller 1/24
![]() by Skid Wed 27 May 2015, 6:45 pm
by Skid Wed 27 May 2015, 6:45 pm
For the front.... two things spring to mind:
1: Go with a single colour. Not all were two colours. Spray the fenders and then attach. You could even fill the gap with filler after the fenders have been sprayed and attached, then using a .3mm AB, blow in some body colour.
2: I think maybe you are little too shy of masking. However, if you mask carefully, making sure to burnish down well, then give the area a couple of coats of clear, you shouldn't get bleed under.
HTH
_________________
Al.
Constructive criticism is always welcome.
“Success always demands a greater effort.” Winston Churchill
"Success is failure turned inside out" Unknown
Skid- Admin
- Posts : 7128
Join date : 2013-02-15
Age : 75
Location : Newcastle. Good Old Blighty. -
Re: 1935 Delahaye 135 - Heller 1/24
![]() by Guest Wed 27 May 2015, 7:03 pm
by Guest Wed 27 May 2015, 7:03 pm
i would shave off the little piece on the body and then fix it to the mudguard (fender) then shape and fill as required ... or just shave/sand the bit off and build a new "point" to the mudguard from scratch.
Guest- Guest
Re: 1935 Delahaye 135 - Heller 1/24
![]() by RetiredMike Thu 28 May 2015, 12:45 am
by RetiredMike Thu 28 May 2015, 12:45 am
Snake, I'm considering shaving the piece off the body because it just looks odd. I think it would look better as a single bullet end.
RetiredMike- Advanced Member
- Posts : 3525
Join date : 2013-04-27
Age : 73
Location : Valparaiso, Indiana
Re: 1935 Delahaye 135 - Heller 1/24
![]() by Dave from Pleasanton Thu 28 May 2015, 2:05 am
by Dave from Pleasanton Thu 28 May 2015, 2:05 am
As to the two tone, how about if you paint the fenders off the car, then mask the body to protect it from the glue as you attach it. Figuring you will use CA. If you are using styrene glue then stick it together and paint it one color.
Really like your approach to the skirts this time around. Much sleeker and more in keeping with the car's style.

Dave from Pleasanton- New Member

- Posts : 237
Join date : 2014-07-20
Re: 1935 Delahaye 135 - Heller 1/24
![]() by Geezerman Thu 28 May 2015, 12:12 pm
by Geezerman Thu 28 May 2015, 12:12 pm
With the xtra care you're taking, this will be a stunning model !!
Nice work !


Geezerman- Advanced Member
- Posts : 3651
Join date : 2013-02-24
Age : 88
Location : Gulf coast of central Florids
Re: 1935 Delahaye 135 - Heller 1/24
![]() by RetiredMike Sat 06 Jun 2015, 12:02 am
by RetiredMike Sat 06 Jun 2015, 12:02 am
Well, I decided to put the front end on just as it was intended and hope I don't mess it up. When looking at the cream color with a splotch of the planned dark blue, i felt the cream was a little too warm toned for blue. So, I'm going with a cream and brown scheme, again Testors enamel.

It looked good, so I went ahead with masking off the body for the accent stripe. There will be a chrome piece to go inside of the stripe splitting it in two.
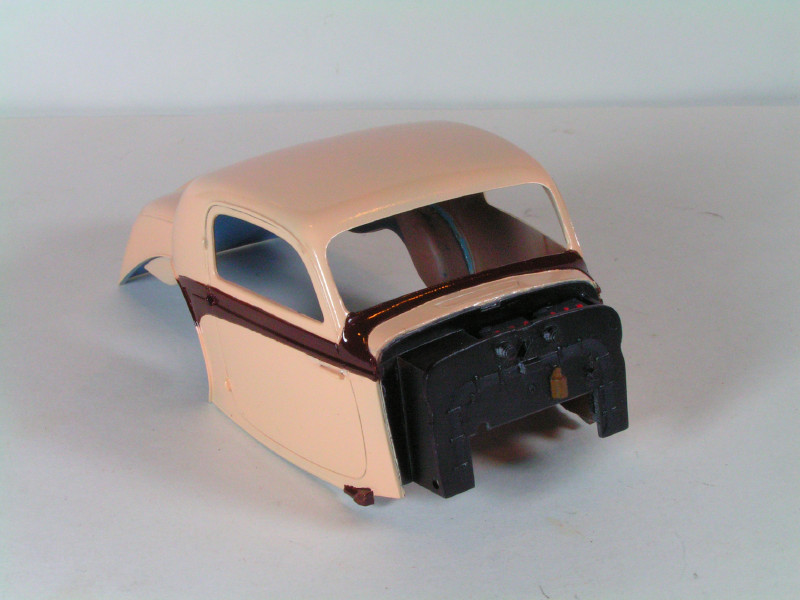


Now, it'll get some time to cure before I put a clearcoat on it.
Well, I put the clearcoat on the body and it finally happened - Murphy's Law. A 3 inch long black hair got onto the top of the body. I tried to pick it off with a pin, but it was too fine to get a grip on. So, I'm letting it dry, will sand it down and put another color coat on and recoat with clear.
This is a photo of the suspect culprit - but she's denying any responsibility.

Thanks for looking and your comments,
Mike
RetiredMike- Advanced Member
- Posts : 3525
Join date : 2013-04-27
Age : 73
Location : Valparaiso, Indiana
Re: 1935 Delahaye 135 - Heller 1/24
![]() by Skid Sat 06 Jun 2015, 12:08 am
by Skid Sat 06 Jun 2015, 12:08 am
As for the cat.............. got seven of them, been there etc!!! LOL
_________________
Al.
Constructive criticism is always welcome.
“Success always demands a greater effort.” Winston Churchill
"Success is failure turned inside out" Unknown
Skid- Admin
- Posts : 7128
Join date : 2013-02-15
Age : 75
Location : Newcastle. Good Old Blighty. -
Re: 1935 Delahaye 135 - Heller 1/24
![]() by Dave from Pleasanton Sat 06 Jun 2015, 3:08 am
by Dave from Pleasanton Sat 06 Jun 2015, 3:08 am
Dave from Pleasanton- New Member
- Posts : 237
Join date : 2014-07-20
Re: 1935 Delahaye 135 - Heller 1/24
![]() by Guest Sat 06 Jun 2015, 7:02 pm
by Guest Sat 06 Jun 2015, 7:02 pm
Guest- Guest
Re: 1935 Delahaye 135 - Heller 1/24
![]() by RetiredMike Fri 12 Jun 2015, 6:42 pm
by RetiredMike Fri 12 Jun 2015, 6:42 pm
I tried switching over to the interior, most of which gets installed into the body before it gets attached to the chassis. The decal for the dash detail is one piece as shown below. However, it's too big to fit on the flat area of the dash. The gauge edges will end up curling over the raised portions, looking really stupid. Just what I needed in this build - more aggravation. So I'll probably do a cut and paste rearranging things on the dash to fit. Heck, you'd need a magnifying glass to see anything inside anyway.

Time to look for another project before I lose it with this one.
Mike
RetiredMike- Advanced Member
- Posts : 3525
Join date : 2013-04-27
Age : 73
Location : Valparaiso, Indiana
Re: 1935 Delahaye 135 - Heller 1/24
![]() by Skid Fri 12 Jun 2015, 7:33 pm
by Skid Fri 12 Jun 2015, 7:33 pm
_________________
Al.
Constructive criticism is always welcome.
“Success always demands a greater effort.” Winston Churchill
"Success is failure turned inside out" Unknown
Skid- Admin
- Posts : 7128
Join date : 2013-02-15
Age : 75
Location : Newcastle. Good Old Blighty. -
Re: 1935 Delahaye 135 - Heller 1/24
![]() by Dave from Pleasanton Fri 12 Jun 2015, 11:37 pm
by Dave from Pleasanton Fri 12 Jun 2015, 11:37 pm
Dave from Pleasanton- New Member
- Posts : 237
Join date : 2014-07-20
Re: 1935 Delahaye 135 - Heller 1/24
![]() by Geezerman Sat 20 Jun 2015, 11:42 am
by Geezerman Sat 20 Jun 2015, 11:42 am
Color combo rocks! Perfect for this classic !
Geezerman- Advanced Member
- Posts : 3651
Join date : 2013-02-24
Age : 88
Location : Gulf coast of central Florids
Re: 1935 Delahaye 135 - Heller 1/24
![]() by Guest Sat 20 Jun 2015, 6:23 pm
by Guest Sat 20 Jun 2015, 6:23 pm
Guest- Guest
Re: 1935 Delahaye 135 - Heller 1/24
![]() by RetiredMike Sun 21 Jun 2015, 1:51 pm
by RetiredMike Sun 21 Jun 2015, 1:51 pm
RetiredMike- Advanced Member
- Posts : 3525
Join date : 2013-04-27
Age : 73
Location : Valparaiso, Indiana
Re: 1935 Delahaye 135 - Heller 1/24
![]() by RetiredMike Wed 24 Jun 2015, 11:25 pm
by RetiredMike Wed 24 Jun 2015, 11:25 pm
I removed the center doodads from the decals and rearranged things to fit.

Chrome strips have been inserted on the body and hood. The windows have been cut out to view the interior a little bit. Still have to insert the chrome strips next to the vent windows.


Mike
RetiredMike- Advanced Member
- Posts : 3525
Join date : 2013-04-27
Age : 73
Location : Valparaiso, Indiana
Page 3 of 4 • 1, 2, 3, 4 ![]()
» 1935 Morgan
» 1935 Morgan
» 1935- Morgan 4/4
» 1935 Hillman Minx (1:1 WIP)
Skid's :: Works In Progress :: Road cars
|
|
|