
SteamCycle Dio Base & Accessories
Skid's :: Works In Progress :: Dioramas
Page 4 of 6 •  1, 2, 3, 4, 5, 6
 ![]()

RetiredMike- Advanced Member

- Posts : 3525
Join date : 2013-04-27
Age : 73
Location : Valparaiso, Indiana
Re: SteamCycle Dio Base & Accessories
![]() by KatsZenJammer Sat 03 Aug 2019, 5:30 pm
by KatsZenJammer Sat 03 Aug 2019, 5:30 pm

Curt - Yeah, it's definitely a 'not wanting to let go' kind of contradictory feeling ("Woo Hoo! It's finally Done ... now what do I do ..."). I guess spending 5 years on a self imposed grinder of an endurance test can affect ones thinking process, lol.
Well, the end of recovery time approaches - getting in some last pics of the recent progress.
The binary propellant 'magazines' if you will. The top one is the reload, featuring the offset lock nipples to ensure proper configuration. The bottom shows the 'quick release' styled junctions.

The beginnings of the prototype plumbing for the propellant. You can also see that one of the 'quick release' junctions has been replaced - the first was lost to the inevitable 'tweezer pop' phenomenon.

Working up the idea - side shot and bottom view.
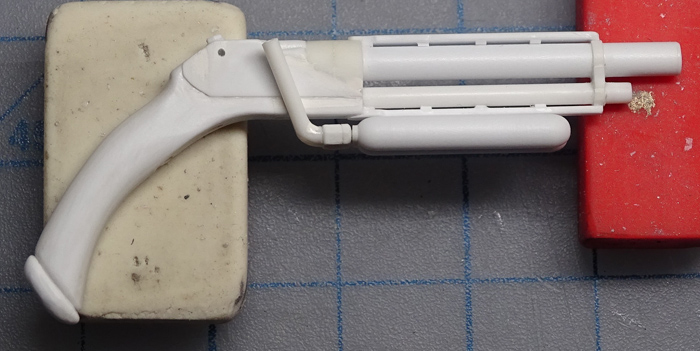

You can kind of see the little hex nut at the top of the plumbing - this is to accommodate the 22 gauge brass wire which will comprise the other aspects of the plumbing.

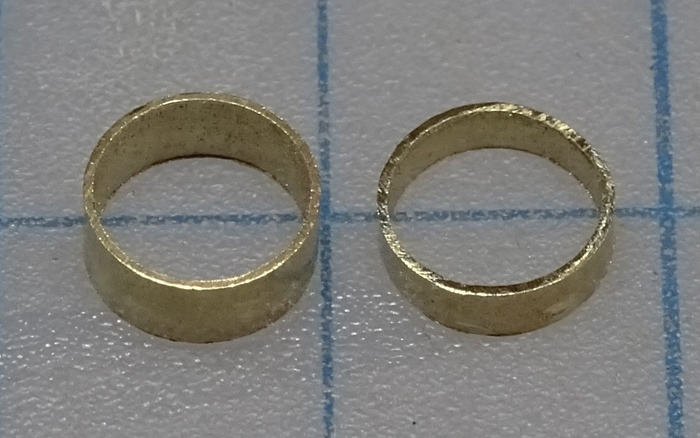
Mounting 'rings' afixed to the scope in preparation for the mount work up.

And it would not be one of my builds if there wasn't a screeching of the brakes on a concept. Literally I was doing dishes when a new thought popped into the noggin - thus the plumbing undergoes a chop.

Forgot to document a few steps, oops. You can see the new propellant mount set up underneath, the two 'quick release' looking thingys have been affixed together to a mount which seats on the underside of the pistol body. Up top you can see the bottom of the main scope mount with the hinge point worked up.

Given that the plan was for the pistol be be a Steampunk indulgence I'm pleased with how it's turning out so far. It will be big and chunky and loaded to excess. Of course it is also inspiring me to make more weaponry of different styles but I am exercising discipline and focusing on the next things to make rather than allowing myself to become distracted. It is very tempting, I must say ...

KatsZenJammer- Resident member
- Posts : 2600
Join date : 2016-05-20
Age : 57
Location : Vancouver, BC
Re: SteamCycle Dio Base & Accessories
![]() by RetiredMike Sat 03 Aug 2019, 7:57 pm
by RetiredMike Sat 03 Aug 2019, 7:57 pm
RetiredMike- Advanced Member
- Posts : 3525
Join date : 2013-04-27
Age : 73
Location : Valparaiso, Indiana
Re: SteamCycle Dio Base & Accessories
![]() by GaryDainton Sun 04 Aug 2019, 11:02 am
by GaryDainton Sun 04 Aug 2019, 11:02 am

GaryDainton- Advanced Member
- Posts : 4433
Join date : 2014-03-06
Age : 56
Location : Bolton UK
Re: SteamCycle Dio Base & Accessories
![]() by KatsZenJammer Sat 10 Aug 2019, 10:40 pm
by KatsZenJammer Sat 10 Aug 2019, 10:40 pm
Bit of a backlog here, took a lot pf photos in an effort to better document the development.
On the left is the mounting for the propellant tanks, on the right is the other half of the scope mount.

Test of the scope mount.

Adding flourishes to the scope mount bits.


Nut and bolt detail for the hinge, this is the 'cap' and the other side is the removable bolt head and pin.

The clips for the scope lens covers. These were formed from the thin brass PE sheet frame material.

Scope mount half affixed to the scope.

Test fit of the set up to insure nothing conflicts.

The Parts So Far.

And a re-do of the bottom half of the scope mount. The first iteration looked a bit too much like a stylized crown shaped mask so additional curves were added to lengthen the mount.

Some more plumbing set up and some 'panels' to imply accessibility to the innards. This is where more modern sensibilities creep in. And to balance that I also extended the barrel a touch by adding a flare - this touch kept moving from 'go' to 'no' throughout the thought process and finally I decided I needed to add it.

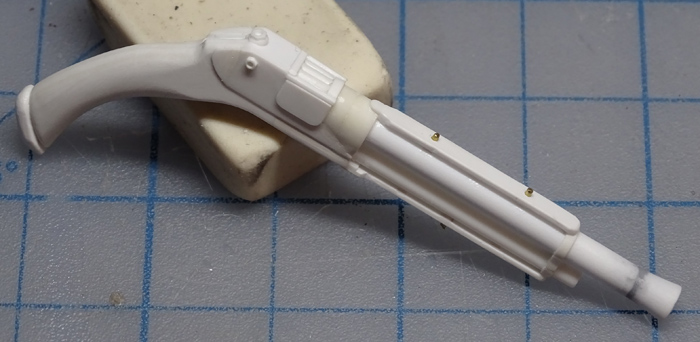
Teeny little bits for the adjustable rear scope mount. The handle shown was my first try at the trigger, though I made a new trigger from copper wire I kept the plastic one just in case. A little reshaping, glue it to a hex nut and voila.

Adjustable rear mount in place.

Something to note - the grid lines are in 1/2 inch increments, hopefully this will clarify the scale reference.
Further details include some more plumbing, a sort of securing bracket for the twin propellant tanks and maybe a ringbolt at the base of the handle for a loop cord sling thing. The idea of carving or embossing the handle is floating around but is still very much in the 'maybe' zone because of the work involved.
KatsZenJammer- Resident member
- Posts : 2600
Join date : 2016-05-20
Age : 57
Location : Vancouver, BC
Re: SteamCycle Dio Base & Accessories
![]() by GaryDainton Sun 11 Aug 2019, 12:42 pm
by GaryDainton Sun 11 Aug 2019, 12:42 pm
These extra pieces will really inject some atmosphere in the final display.

GaryDainton- Advanced Member
- Posts : 4433
Join date : 2014-03-06
Age : 56
Location : Bolton UK
Re: SteamCycle Dio Base & Accessories
![]() by RetiredMike Sun 11 Aug 2019, 2:44 pm
by RetiredMike Sun 11 Aug 2019, 2:44 pm
RetiredMike- Advanced Member
- Posts : 3525
Join date : 2013-04-27
Age : 73
Location : Valparaiso, Indiana
Re: SteamCycle Dio Base & Accessories
![]() by KatsZenJammer Thu 15 Aug 2019, 7:15 pm
by KatsZenJammer Thu 15 Aug 2019, 7:15 pm
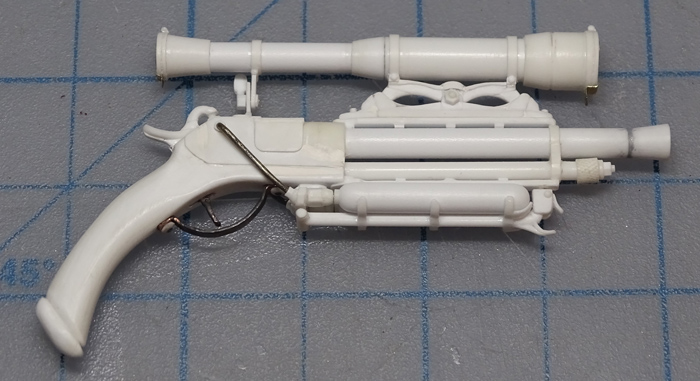
Two shots of the developed plumbing - nothing makes a firearm more Steampunk like plumbing. This is where the work moves from practically possible to Steampunk magic machinery.


The securing brace for the propellant tanks. The spine was formed from square rod and bits. The hinge is styrene rod. The ribs were cut from styrene tube.
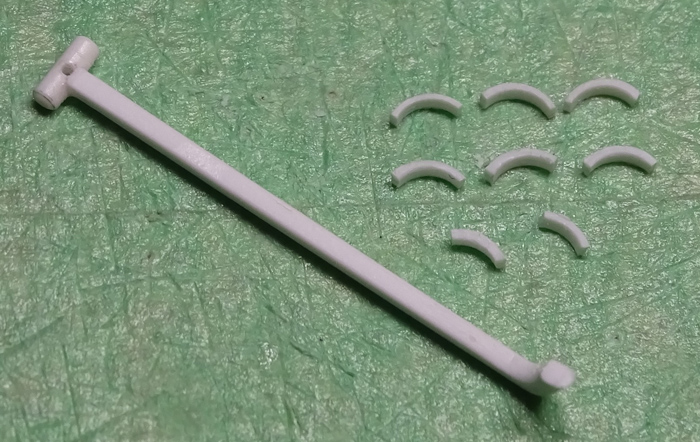
Locking mount and details added.

Side ribs in place as well as the latch to unlock the brace.

Test fit.

The done for now pics. The metal bits have been blackened with Jax. Further detailing on the handle is pending, possibly an 'embossed' embellishment or maybe some basic carving. For now I'm putting this aside to allow the subconscious to chew slowly and completely before moving into the next phase.

Initial bits for the goggles. These are cut from 9mm brass tube which scales up to roughly 2 - 2 1/4 inches in diameter. These bits may find their way into the finished product or not ... for now it's experimentation time.
And the gauntlets are also moving into the practical experimentation phase. For both goggles and gauntlets I'm facing the need to go beyond styrene - the Magic Sculpt stuff is one of the candidates (thanks for the reference, Gary) but I'm also considering card stock paper for the gauntlet armour segments. Or I might get lucky and find some action figure accessories at a yard sale, lol.
KatsZenJammer- Resident member
- Posts : 2600
Join date : 2016-05-20
Age : 57
Location : Vancouver, BC
Re: SteamCycle Dio Base & Accessories
![]() by Guest Thu 15 Aug 2019, 7:29 pm
by Guest Thu 15 Aug 2019, 7:29 pm

What are you going to do for your next build? I am stoked to see what you come up with.
Guest- Guest
Re: SteamCycle Dio Base & Accessories
![]() by Skid Thu 15 Aug 2019, 10:18 pm
by Skid Thu 15 Aug 2019, 10:18 pm
_________________
Al.
Constructive criticism is always welcome.
“Success always demands a greater effort.” Winston Churchill
"Success is failure turned inside out" Unknown

Skid- Admin
- Posts : 7128
Join date : 2013-02-15
Age : 75
Location : Newcastle. Good Old Blighty. -

Re: SteamCycle Dio Base & Accessories
![]() by GaryDainton Fri 16 Aug 2019, 7:16 am
by GaryDainton Fri 16 Aug 2019, 7:16 am
https://www.ebay.com/itm/1-6-scale-POPTOYS-EX22-Henry-V-King-of-England-GLOVES/362727274284?hash=item54743af72c:g:xjYAAOSwFcxdVXb~
GaryDainton- Advanced Member
- Posts : 4433
Join date : 2014-03-06
Age : 56
Location : Bolton UK
Re: SteamCycle Dio Base & Accessories
![]() by KatsZenJammer Sat 17 Aug 2019, 6:26 pm
by KatsZenJammer Sat 17 Aug 2019, 6:26 pm
Curt - the next thing moving onto the plate is a Tamiya 1/24 Karmann Ghia which was started 15 - 18 years ago then boxed. I think the engine is set up with some detailing already but the rest is pretty much still on the sprue trees. The plan for this is to make it more or less OOB with some additions, maybe a mod or two and it will be a test bed for my attempts to do a clean body paint (which has always been an obstacle for me).
Gary - thanks for that link. I'm not in the habit of buying stuff off the Net but that may still happen. The photos are definitely great for reference.
So the whole goggles thing stymied me which resulted in my getting around to painting some tools. The screw and nut driver handles all got a base prime using Tamiya acrylic grey. The screwdriver handles were then coated with a Humbrol matte colour sort of like cappucino and the nut driver handles with a Humbrol matte colour somewhere between sand and beige. Sorry about the unspecific colour ID's but the Humbrol cans only have numbers and not names. Then the screwdriver handles got a semi-dry-brush of a Humbrol matte green and the nut driver handles got Humbrol matte purple.

Trying out a new-sih Tamiya matte acrylic called Dark Iron. The base coat was Tamiya matte black then the hammer head and the whole adjustable wrench got a light coat of Dark Iron. There was also a bit 'extra' brushed on in splotches to mimic the imperfect finish of metal tools from that era.

The driver handles after some dry brush layering using earth tones, mostly tan, light brown and sepia (the paint was Humbrol and Testors, the colours are descriptive and not the actual brand names). The hammer handle got some Testor's rust as an underlay followed by Tamiya matte hull red over top.

Further development - the driver handles get more layering to try and create that 'used to be painted' wood look and the 'grommets' (or whatever they're called) get metallic paint (Humbrol enamel). The hammer handle also got more layering to age the finish and the hammer head got some dry-brushed highlights using Tamiya acrylic gunmetal.

A shot of the spanners in process. Base coated in Tamiya matte black followed by Testors matte enamel gunmetal. I took this before the painting was complete to show the difference between the black and gunmetal.

The spanners got a coat of Tamiya acrylic dark iron over top of the gunmetal then all of these bits got a semi-dry-brush of Tamiya acrylic hull red applied splotchily to mimic old corrosion and wear. More to come on these.

I should note that the primer coats were done with AB but everything else has been hand brushed. The AB will come back into play when it's time for clear coats and shading.
And then there's the 'cord windings' for the handles.
KatsZenJammer- Resident member
- Posts : 2600
Join date : 2016-05-20
Age : 57
Location : Vancouver, BC
GaryDainton- Advanced Member
- Posts : 4433
Join date : 2014-03-06
Age : 56
Location : Bolton UK
Re: SteamCycle Dio Base & Accessories
![]() by RetiredMike Sun 18 Aug 2019, 1:28 pm
by RetiredMike Sun 18 Aug 2019, 1:28 pm

RetiredMike- Advanced Member
- Posts : 3525
Join date : 2013-04-27
Age : 73
Location : Valparaiso, Indiana
Re: SteamCycle Dio Base & Accessories
![]() by Guest Sun 18 Aug 2019, 2:51 pm
by Guest Sun 18 Aug 2019, 2:51 pm
Why would you spend all that time taping real tools to those big sticks.

Those are brilliant Katz!
Guest- Guest
Re: SteamCycle Dio Base & Accessories
![]() by Geezerman Wed 21 Aug 2019, 11:56 am
by Geezerman Wed 21 Aug 2019, 11:56 am
WOW ! I have been remiss in keeping up ! That pistol is awesome !!!
I just have to keep checking in ! !


Geezerman- Advanced Member
- Posts : 3651
Join date : 2013-02-24
Age : 88
Location : Gulf coast of central Florids
Re: SteamCycle Dio Base & Accessories
![]() by KatsZenJammer Sat 24 Aug 2019, 6:31 pm
by KatsZenJammer Sat 24 Aug 2019, 6:31 pm
So whilst the research and pondering over the goggles continues I am pushing on with painting. The pliers get a coat of the enamel off-silver mix I used on the Steamcycle build over a primer coat of Tamiya acrylic matte black.

The basic pliers get a wash of Tamiya acrylic gunmetal and the tongue and groove pliers a wash of Tamiya acrylic dark iron to differentiate between them slightly. Next comes the darkening and dirtying using a combo of AB and regular brush work.

The pistol handle gets some more attention. First I cut a template out of business card stock, then used that to cut a plastic blank which you can see next to the handle. Then tape was laid onto both sides of the blank and a checker pattern roughly inked on. This is part of the overall Plan A section but there is a Plan B which will come into effect.

The basic line pattern was carved into the handle with different X-Acto and Excel blades then the lines were darkened with gel ink from a graphics pen.

Then I tried to carve out a basic checker grip pattern ... however, both sides wound up being a bit too asymmetrical for the scale and so we move on to Plan B.

I was hoping the checker grip would work but Plan B was always there just in case. First I took advantage of the checker carving and cut out the shape area smooth and inset slightly. Then there was a couple of hours trying out different bits of PE cut offs to see which ones would best suit the insets. The choice wound up being the leaf vines.

And the other side. The PE was affixed using thin CA and filed/sanded to help smooth out the surface.

In a past post I mentioned that there would be more detailing on the dagger but that has been curtailed after further consideration. So once the tools have been painted to near completion the other batch of accessories will find their way into the paint zone.
And soon I hope to figure out how I want to make the goggles.
KatsZenJammer- Resident member
- Posts : 2600
Join date : 2016-05-20
Age : 57
Location : Vancouver, BC
Re: SteamCycle Dio Base & Accessories
![]() by Gee Pee Sat 24 Aug 2019, 7:42 pm
by Gee Pee Sat 24 Aug 2019, 7:42 pm

Gee Pee- New Member

- Posts : 21
Join date : 2019-08-22
Location : West Lorne, Ontario
GaryDainton- Advanced Member
- Posts : 4433
Join date : 2014-03-06
Age : 56
Location : Bolton UK
Re: SteamCycle Dio Base & Accessories
![]() by KatsZenJammer Sat 31 Aug 2019, 5:07 pm
by KatsZenJammer Sat 31 Aug 2019, 5:07 pm
So back to the occasional craft cycle as I return to work still nursing a sore shoulder *violin music plays.* But some stuff got done so here we go.
Handle wrap time. I started with the hammer and adjustable wrench using left over rigging cord from the ship build of 5 years ago. Basically I try to figure out a way to complete the wrapping so it stays in place on its own then secure it with careful application of thin CA. This darkens the cord as well as locking it into place, plus the CA seals the fibres to make painting easier.


Above is the photo of how I wrapped the pliers handles - holes drilled through the handle itself and 'over wrapped' to sort of hide the pass through. Then after the CA is applied carefully cut off the strands and hide them as best as possible.
Below is the pliers set ready for further shading and stuff.

I'm not used to the new posting format, I'm getting the images instead of the html codes so separating the photos is proving to be finicky.
And I finally made the choice and procured me some Milliput fine white epoxy putty. I'm hoping to start the experiments with the stuff and proceed to proof of concept tests soon. But because I have never worked with Milliput before the plan is to sculpt some unrelated things to familiarize myself with the properties and working time and all that. The advantages of Milliput that I've seen are that you can add onto existing bits with more of the same and also the stuff can hold thin shapes quite well. Wish me luck ... and expect some weirdness, lol.
KatsZenJammer- Resident member
- Posts : 2600
Join date : 2016-05-20
Age : 57
Location : Vancouver, BC
Re: SteamCycle Dio Base & Accessories
![]() by GaryDainton Sun 01 Sep 2019, 7:46 pm
by GaryDainton Sun 01 Sep 2019, 7:46 pm
GaryDainton- Advanced Member
- Posts : 4433
Join date : 2014-03-06
Age : 56
Location : Bolton UK
Re: SteamCycle Dio Base & Accessories
![]() by RetiredMike Mon 02 Sep 2019, 2:25 pm
by RetiredMike Mon 02 Sep 2019, 2:25 pm
RetiredMike- Advanced Member
- Posts : 3525
Join date : 2013-04-27
Age : 73
Location : Valparaiso, Indiana
Re: SteamCycle Dio Base & Accessories
![]() by Skid Mon 02 Sep 2019, 5:44 pm
by Skid Mon 02 Sep 2019, 5:44 pm
_________________
Al.
Constructive criticism is always welcome.
“Success always demands a greater effort.” Winston Churchill
"Success is failure turned inside out" Unknown
Skid- Admin
- Posts : 7128
Join date : 2013-02-15
Age : 75
Location : Newcastle. Good Old Blighty. -
Re: SteamCycle Dio Base & Accessories
![]() by KatsZenJammer Sat 07 Sep 2019, 6:10 pm
by KatsZenJammer Sat 07 Sep 2019, 6:10 pm
The hand tools get some shading grey on the handle wraps and the screwdriver handles. The shine is from the shading grey itself as it is transparent and semi-gloss in finish.

Adventures With Milliput - I'm not going to go through a tutorial of basics, there are many such vid's available on YouTube which go into great detail and provide lots of tips and stuff. After viewing a bunch of them I chose to go with Superfine White for the fine grain - thus all of my experiences will be with that. There are also standard grade versions in yellow-green, terra-cotta and even black - I may try one of those in the coming weeks.
But before I dove into the making of specific stuff there was the need for some 'practical play time' to familiarize myself with the working stages and properties of the stuff. First, after you knead/mix the two parts it starts off Very sticky - this stage is great for filling and adding to existing parts. For those who wish to sculpt with it I recommend waiting a few minutes (about 10 - 15) until the tackiness has reduced somewhat, but not too long because the window for active sculpting is only about 30 minutes or so. This might seem like a lot but when you get focused it can go by in an eyeblink.
For my learning curve project I decided to make a billfold, that is the thing that looks like a stick of gum. With the leftovers I sort of stream of consciousness'ed a surreal cartoon penguin looking blob. I roughly rolled the Milliput onto the cutting mat when it was a bit sticky so getting it off was a trick but that mistake turned into an unintentional leather-ish texture which I used for the billfold - a case of turning an 'oops' into an 'okay.' This pic was taken 4 hours after the initial mixing by which time it was hard-ish but still kind of rubbery feeling, difficult to quantify using technical terms. Think of a tread on an off-road tire.

The next practice zone involved carving and shaping using knives and pins and stuff. The billfold got the stitching detail and some cleaning up on the edges. The texture I spoke of shows better in this pic - this is how it came off the cutting mat and all I did was slightly smooth it during the initial shaping/sculpting. The penguin blob morphed into a weird armoured looking mutated pineapple thing - all of the carving was done with X-Acto knives and pins/spikes.

The next step for play time is painting - the billfold gets a 'primer' base of Tamiya acrylic matte black applied with AB (this occurred while I was base coating the other accessories). The dry Milliput took the colour well but required several light coats for compete saturation. Also, the armoured pineapple penguin blob got some more detail carving, subtle stuff that doesn't show all that well. Maybe I could submit the blob thing to the Pokemon franchise or something ...

Next up on the play time experiment list is further painting on the billfold and some colour for the armoured blob. The billfold was not meant for the dio accessories group but if it works out it's easy enough to toss into the mix.
If anyone has questions about the Milliput feel free to ask, I'll try to provide the best info that I can.
As well the oiler can, lighter rod, knife and pistol are staging for colour. Hopefully there will be pics of those things in the near future.
KatsZenJammer- Resident member
- Posts : 2600
Join date : 2016-05-20
Age : 57
Location : Vancouver, BC
Re: SteamCycle Dio Base & Accessories
![]() by GaryDainton Sun 08 Sep 2019, 8:32 am
by GaryDainton Sun 08 Sep 2019, 8:32 am
GaryDainton- Advanced Member
- Posts : 4433
Join date : 2014-03-06
Age : 56
Location : Bolton UK
Page 4 of 6 • 1, 2, 3, 4, 5, 6 ![]()
» Steampunk Harley - Tamiya 1/6 HD FLH Classic 'extreme' kit bash (Very Photo Heavy)
» A Steamcycle - an extreme kit bash/scratch build
Skid's :: Works In Progress :: Dioramas
|
|
|