
Steampunk Harley - Tamiya 1/6 HD FLH Classic 'extreme' kit bash (Very Photo Heavy)
Page 21 of 25 •  1 ... 12 ... 20, 21, 22, 23, 24, 25
 ![]()
Re: Steampunk Harley - Tamiya 1/6 HD FLH Classic 'extreme' kit bash (Very Photo Heavy)
![]() by KatsZenJammer Sun 19 Aug 2018, 9:09 pm
by KatsZenJammer Sun 19 Aug 2018, 9:09 pm

So after I set the seat aside for the bottom to cure properly I felt the 'itchy fingers' need and so I decided to give the frame a dark grey undercoat. This turned into a multi-hour task because I tried not to spray too much dk grey onto the myriad brackets and attachments. Though it was finicky work it also gave me a great feel for what will be involved when I start adding additional colours. Oh, I used Tamiya acrylic dark grey, the standard stuff.

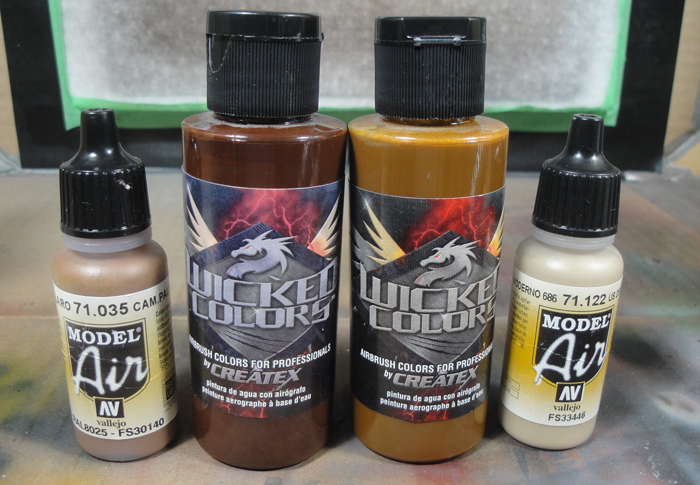
I took this photo out of sequence but arranged it to come first. These are the 4 colours involved in trying to make the seat look like old leather - Vallejo I picked up at the LHS and the Createx Wicked Colors from the art supply shop I bought my airbrush from three some years ago. They are also arranged in order of application. And I also picked up the proprietary paint thinners/reducers to avoid unexpected consequences of unknown chemistry.
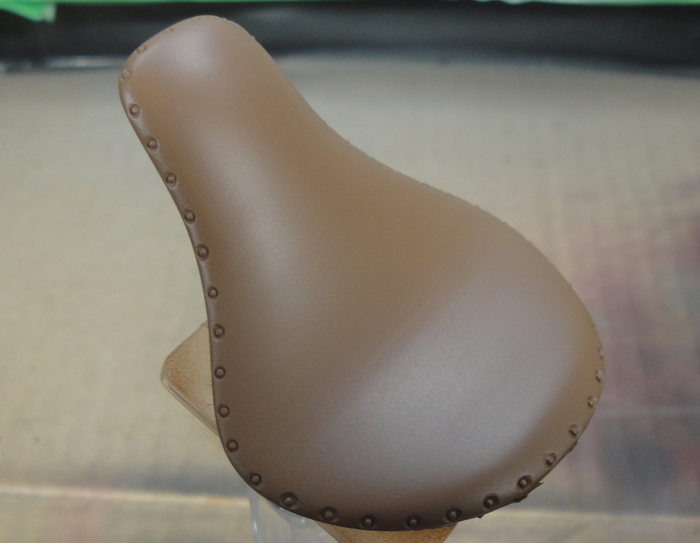
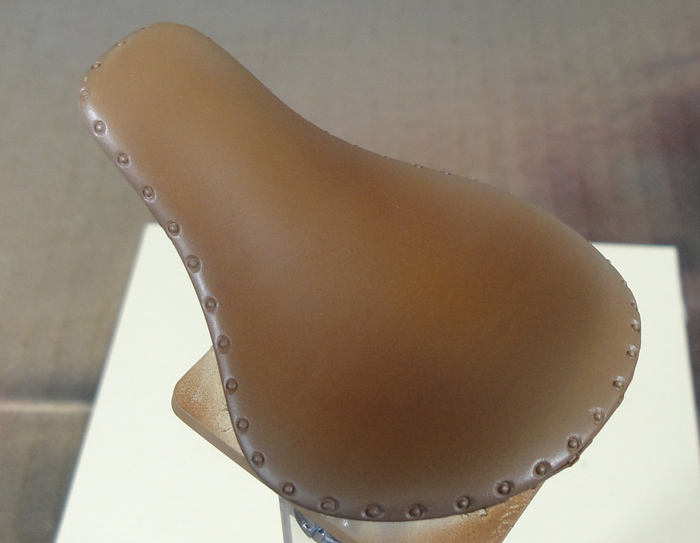
The first coat with Vallejo Camo Pale Brown. I thinned the paint quite a lot but it still covered like it was thick which surprised me. If I wasn't looking for an old, used look I would simply do some washes to add depth then call it done but of course I'm going to complicate matters for myself, lol.
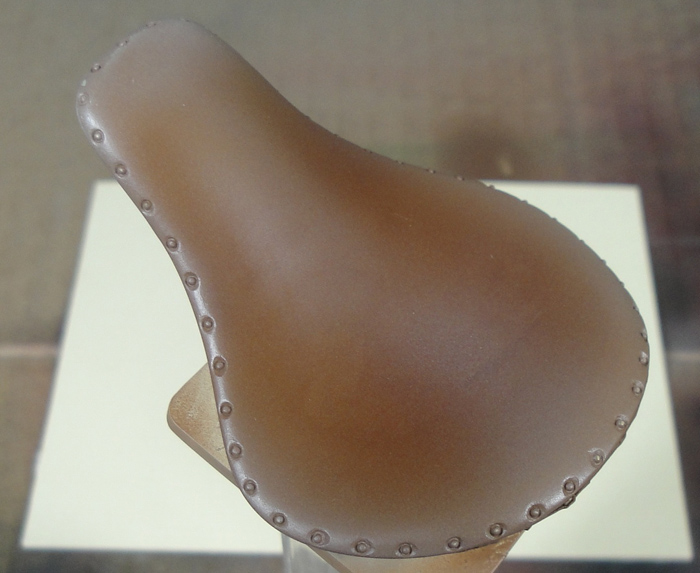
After a thin application of Createx Wicked 'Detail' Burnt Umber - I thinned the stuff to almost transparent and gave the whole seat a light wash then went back and 'darkened' the places where such would occur. Oddly, though it was burnt umber it seemed to have lightened the base brown a touch.

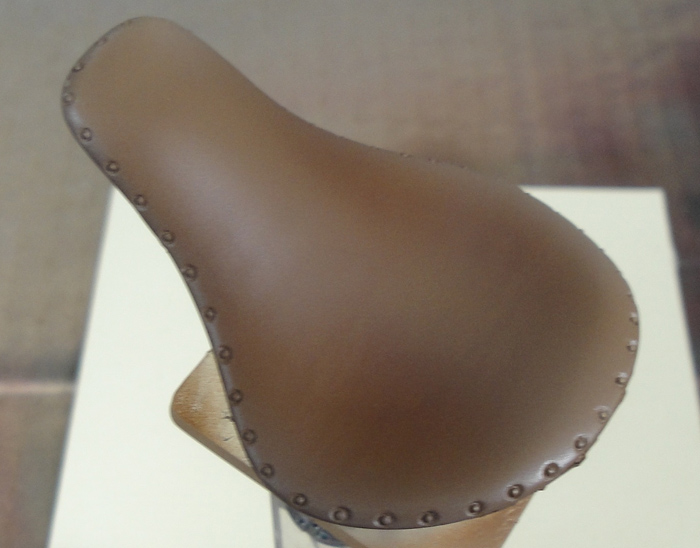
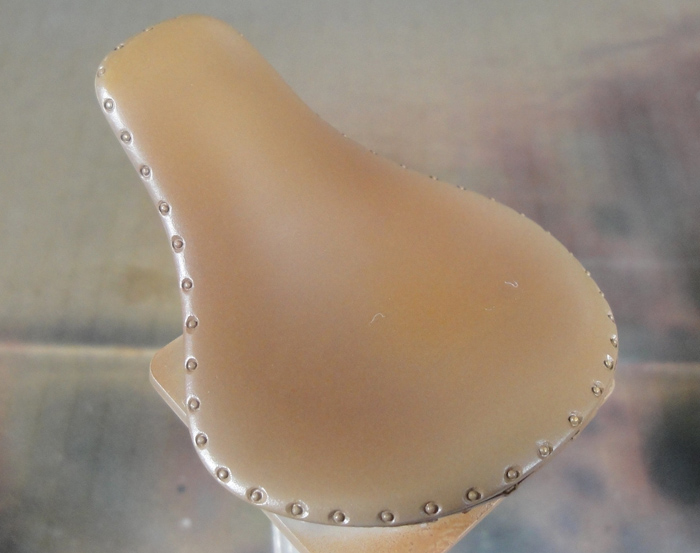
After the thin application of Createx Wicked 'Detail' Yellow Ochre. In the line up photo this stuff looks brown but when thinned out it pales nicely. Here I applied it to the 'highlight' portions, where the leather would be sun bleached or worn.

A light coat of Vallejo Matte clear and let it sit overnight.

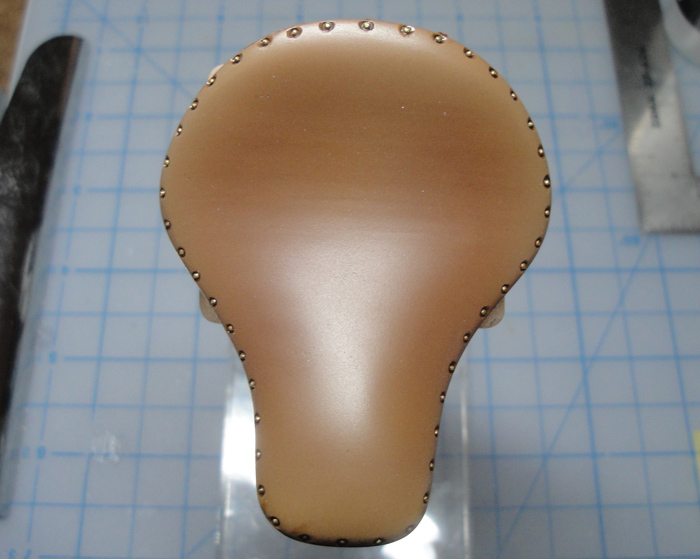
It looks darker but it isn't - a side effect of the lighting I guess. Here I went in with very, very thinned out Vallejo U.S. Desert Armour tan and highlighted the highlights. What looks like light glare is actually the tan paint.
I went back to the Vallejo Camo Pale Brown but thinned it may more than the base coat. Then I deepened the darker areas and knocked down the tan parts just a smidgen.
Again with really thinned out Createx Detail Burnt Umber to reinforce the darker areas.
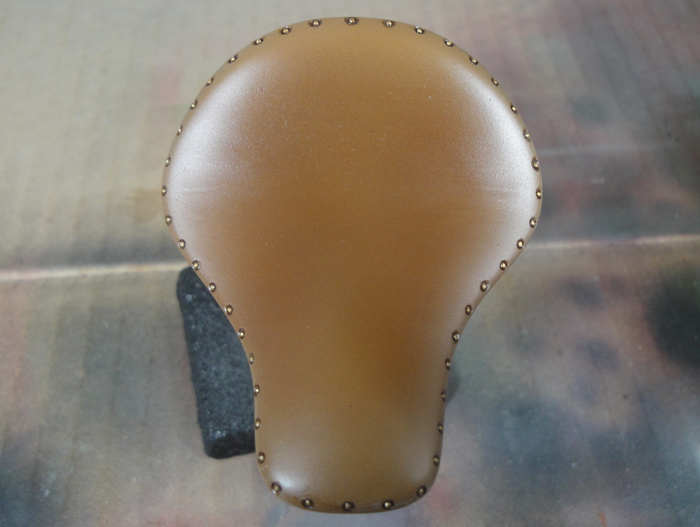
And again with really thinned out Createx Detail Yellow Ochre to reinforce the highlights.

And another coat of Vallejo Matte Clear.
The large variances in colour are an artifact of the lighting and stuff, especially the last one - I might have had an extra light on or something. After this I'll be carefully exposing the brass nubs around the perimeter followed by going in with some of the Golden brand Shading Grey to dirty the dark portions and pop out highlight areas. Depending on how that works I may or may not do some dry brushing to help add some depth to the wear, this will depend on how the dirtying works out. Then it will be assessment time to see if it looks shiny enough, too shiny, whatever and adjusting as necessary with semi-gloss or matte clear.
Trying to get in as much 'shooting' as I can because the beginning of September will be busy with guests and such so I will be on hiatus during that time. This is an unavoidable side-effect when the work bench occupies the guest room, lol.
Nothing exceeds like excess ...

KatsZenJammer- Resident member

- Posts : 2600
Join date : 2016-05-20
Age : 57
Location : Vancouver, BC
Re: Steampunk Harley - Tamiya 1/6 HD FLH Classic 'extreme' kit bash (Very Photo Heavy)
![]() by GaryDainton Mon 20 Aug 2018, 3:48 pm
by GaryDainton Mon 20 Aug 2018, 3:48 pm

GaryDainton- Advanced Member
- Posts : 4433
Join date : 2014-03-06
Age : 56
Location : Bolton UK
Re: Steampunk Harley - Tamiya 1/6 HD FLH Classic 'extreme' kit bash (Very Photo Heavy)
![]() by Guest Mon 20 Aug 2018, 5:53 pm
by Guest Mon 20 Aug 2018, 5:53 pm
Guest- Guest
Re: Steampunk Harley - Tamiya 1/6 HD FLH Classic 'extreme' kit bash (Very Photo Heavy)
![]() by KatsZenJammer Mon 27 Aug 2018, 12:45 am
by KatsZenJammer Mon 27 Aug 2018, 12:45 am
Gary & Curt - yes, I'm exposing the brass nubs, not once but twice. They are made from 20 gauge brass wire, I rounded the end of the wire then clipped a bit of it off and inserted them into holes. The 'sunken' effect is just opening the hole a bit using a slightly larger drill bit, kind of like countersinking screws but without making it flush. It was the easiest way I could think of to simulate the effect of using brass rivets to secure leather upholstery.
After cleaning off the brass nubs the first time and then adding in some brown iron oxide around the nubs with a brush to help with the sunken contrast.

Then I went back and added very diluted shading grey around the nubs - I didn't want to use straight black because that would be too much contrast.
Back to airbrushing with very diluted brown iron oxide to fill in some transition zones and general touch ups.
Now in with shading grey for some real dirtying - I went on until the voice in my head told me to stop. The photo makes it look darker than it is to the eye.

Seal it up all nice with several coats of matte clear.

Then I re-exposed the brass nubs, this time being careful to only clean off the tops. Added the shiny parts with Tamiya acrylic semi-gloss clear. At this point the voice told me to let the seat cure then put it away so I did. There might be some later adding of specific effects, like maybe a touch of gloss to pop up the dirty, shiny leather look. Or not, we'll have to see when the time comes.

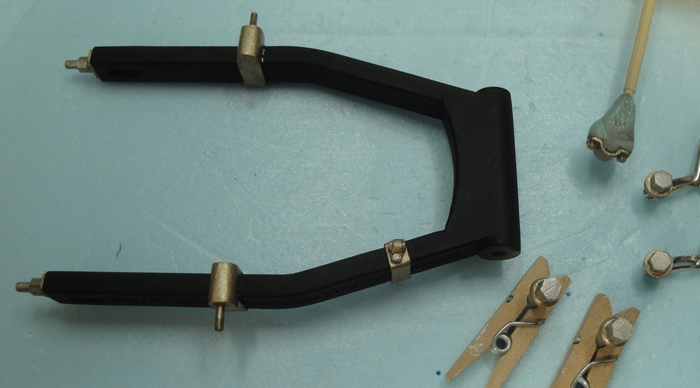
Previously I showed the frame painted dark grey, here's the yoke which will also be the same colour as the frame. I thought about continuing onto the front forks but I have other ideas for that.

Sorry for the light quality in these next photo's, trying out a makeshift photo booth set up. Instead of going with a straight up black for the frame I decided to make things complicated, what else is new. These shots are of the parts after shooting transparent Quinacridone Red (the actual name) from the Golden acrylic line, 2 thin coats. Though it doesn't show very well, there is an actual red tint there.


Next was transparent Dioxazine Purple (also Golden acrylic) which wound up looking almost royal purplish over the red after 3 thin coats. Again, apologies for the weird lighting.


So the seat is 'mostly done' and the frame and yoke are on the way. The next steps for the frame/yoke will be going in with shading grey, probably 3 or 4 coats, followed by final darkening with really diluted matte black. The idea is to get a deep tone that is not exactly black but will appear that way to the eye. Not sure if I want it matte, semi or gloss - the Victorians were big into shiny paint so I have some thinking to do.
Once that part is done then comes the painting of the clamps, brackets and all the other accessories attached to the frame and yoke. That ought to be fun - and by fun I mean eye hurtingly, neck achingly, hand shakingly strenuous because I want to do them by by hand and not AB.
Nothing exceeds like excess ...
KatsZenJammer- Resident member
- Posts : 2600
Join date : 2016-05-20
Age : 57
Location : Vancouver, BC
Re: Steampunk Harley - Tamiya 1/6 HD FLH Classic 'extreme' kit bash (Very Photo Heavy)
![]() by Guest Mon 27 Aug 2018, 4:11 pm
by Guest Mon 27 Aug 2018, 4:11 pm
Guest- Guest
Re: Steampunk Harley - Tamiya 1/6 HD FLH Classic 'extreme' kit bash (Very Photo Heavy)
![]() by GaryDainton Mon 27 Aug 2018, 8:39 pm
by GaryDainton Mon 27 Aug 2018, 8:39 pm
GaryDainton- Advanced Member
- Posts : 4433
Join date : 2014-03-06
Age : 56
Location : Bolton UK
Re: Steampunk Harley - Tamiya 1/6 HD FLH Classic 'extreme' kit bash (Very Photo Heavy)
![]() by KatsZenJammer Sun 02 Sep 2018, 4:50 pm
by KatsZenJammer Sun 02 Sep 2018, 4:50 pm
Coming up on the guest-induced hiatus as the workshop reverts to its original status as guest room -- there's a lot of re-organizing about to happen, lol.
So I cleared the PE detail off the yoke arms for the next steps. Here you can see the colour as it was after set up work.

After the first brush wash with a diluted mix of flat black and hull red. I went with the traditional brush method because that allowed me to make the wash blotchy and uneven, though that doesn't show too much here.

A few more brush wash coats followed by a light AB unifying coat then some matte clear to seal it up. The 'black' isn't really black but its dark enough to look it in regular lighting.

The beginning of the brush wash on the frame - you can sort of make out the difference along the bottom of the frame where the left bits have been washed and the right side hasn't.

After the first wash coat. The colour is still slightly visible in this light.

A few more brush wash coats, an AB unifying coat and matte clear to seal it.

It doesn't show very much in the photos but I also took some time to add extra darkening to the parts of the frame and yoke based on 'usage staining' ideas, around where stuff would be exposed to soot or grease, that sort of thing. I'm still debating the final sheen, still comparing the ideas of glossy paint versus semi-gloss, old paint. Maybe it will wind up being a bit of both.
Letting the pieces air for as long as possible before I put them away for the hiatus. After that the plan is to start on the additional bits like clamps and mounts and all that stuff.
I'm still leery about using anything other than acrylics in the AB at this stage, mostly because all my experience so far has been acrylic and water based stuff. I do plan on shooting some enamels and Alclad lacquers but that might have to wait a few months or so while I accumulate more experience. Even though I've had the AB for 3 years this is the first time I've been using it frequently for an extended period of time.
The hiatus will give me an opportunity to think things through without that self-imposed feeling of needing to get stuff done. And maybe get in some LHS visits to stock up on more and different colours. Speaking of which, I am very impressed with Vallejo paints and I heartily endorse them, but Tamiya acrylics will always occupy a special place in my heart.
So a slight break in my active posting of progress, hopefully not too long but it could be up to a month or so. I will be popping in to check out what everyone else is up to - vicarious hobbying when the actual is not possible.
Nothing exceeds like excess ...
KatsZenJammer- Resident member
- Posts : 2600
Join date : 2016-05-20
Age : 57
Location : Vancouver, BC
Re: Steampunk Harley - Tamiya 1/6 HD FLH Classic 'extreme' kit bash (Very Photo Heavy)
![]() by GaryDainton Sun 02 Sep 2018, 5:51 pm
by GaryDainton Sun 02 Sep 2018, 5:51 pm
GaryDainton- Advanced Member
- Posts : 4433
Join date : 2014-03-06
Age : 56
Location : Bolton UK
Re: Steampunk Harley - Tamiya 1/6 HD FLH Classic 'extreme' kit bash (Very Photo Heavy)
![]() by KatsZenJammer Sat 15 Sep 2018, 6:50 pm
by KatsZenJammer Sat 15 Sep 2018, 6:50 pm
Nothing done so no pics. What I've been doing is research on painting effects, Victorian schemas, era-specific machinery and conventions on use of paint and that sort of thing. I was planning to do some small hand painting on the frame - all those accessories, mounts and brackets - then got side tracked by the scads of information available on dioramas.
So I've committed to making a dio base for the steamcycle. Instead of something elaborate like the ones for military style battle/action scenes I'm thinking just the base, no building frontage, and it will be simply a curbside set up with a sidewalk, kerb and cobblestone (technically called 'sett' stone) roadway. Maybe a hitching post to add that 'period' feel to it. Not a lamp post as at 1/6 scale it would be way too tall for convenient display.
After collating and reviewing the different ways of making scale cobbled roads I've chosen to go the route of individual bricks (more like tiles) made from DAS white air dry clay. This stuff is referred to as 'paper clay' because it is an acrylic polymer with 'vegetable' binders (cellulose to be exact) and when dry it shows little fibres and stuff instead of the 'rock' texture of regular kiln dry clay.
I'll go into more detail about the decisions and techniques and stuff when I start the separate WIP thread for the dio - not for a while because I don't want to get too distracted from the main build once I get my workshop back - but basically it comes down to needing a solid base to support the weight of the steamcycle centre stand feet so styrofoam isn't an option and just working on a clay base and adding the texture would take more work at this scale than making the bricks separately.
I've already begun experimenting with different methods to lock down the process and it looks like things are working out quite nicely. I'll make sure to take pics so that I can post 'how to' stuff in the dio WIP when it comes time for that. And, of course, this will also mean that my plan to make a bunch of accessories is also now a going concern though I think for that stuff I'll be venturing into the world of epoxy clays and such (thanks Gary for that long ago reference which is now becoming very handy).
Currently it looks like things will return to 'build world' configuration by early October. In the meantime I'll just have to content myself with making paper clay tiles and going out to restaurants that milady and I normally wouldn't frequent lacking a proper excuse. I'm sure I'll be able to endure the wait - gourmet meals aren't a perfect substitute for hobbying but, hey, at least I don't have to cook as much.
KatsZenJammer- Resident member
- Posts : 2600
Join date : 2016-05-20
Age : 57
Location : Vancouver, BC
Re: Steampunk Harley - Tamiya 1/6 HD FLH Classic 'extreme' kit bash (Very Photo Heavy)
![]() by GaryDainton Sat 15 Sep 2018, 8:05 pm
by GaryDainton Sat 15 Sep 2018, 8:05 pm
GaryDainton- Advanced Member
- Posts : 4433
Join date : 2014-03-06
Age : 56
Location : Bolton UK
Re: Steampunk Harley - Tamiya 1/6 HD FLH Classic 'extreme' kit bash (Very Photo Heavy)
![]() by Skid Sun 16 Sep 2018, 9:56 am
by Skid Sun 16 Sep 2018, 9:56 am
I think your decision to have it on a simple base is very wise. Why distract from such a beautiful model with a complicated base? Keep the focus on the steam cycle.
_________________
Al.
Constructive criticism is always welcome.
“Success always demands a greater effort.” Winston Churchill
"Success is failure turned inside out" Unknown

Skid- Admin
- Posts : 7128
Join date : 2013-02-15
Age : 75
Location : Newcastle. Good Old Blighty. -

Re: Steampunk Harley - Tamiya 1/6 HD FLH Classic 'extreme' kit bash (Very Photo Heavy)
![]() by Geezerman Thu 27 Sep 2018, 12:38 pm
by Geezerman Thu 27 Sep 2018, 12:38 pm
This final painting phase will be more than interesting !
Once again, Thank you for sharing this !!


Geezerman- Advanced Member
- Posts : 3651
Join date : 2013-02-24
Age : 88
Location : Gulf coast of central Florids
Re: Steampunk Harley - Tamiya 1/6 HD FLH Classic 'extreme' kit bash (Very Photo Heavy)
![]() by KatsZenJammer Mon 22 Oct 2018, 12:06 am
by KatsZenJammer Mon 22 Oct 2018, 12:06 am
And we're back. The first use of the AB was to lay some matte black on the centre stand. I hadn't realized how high the contrast was when I took this photo. The details will probably be more visible in later photos, lol.

The work on the frame progressed nicely. First I set up two base colours - off-gold and off-silver - and got busy with a good old fashioned brush. Here's an undercarriage view.
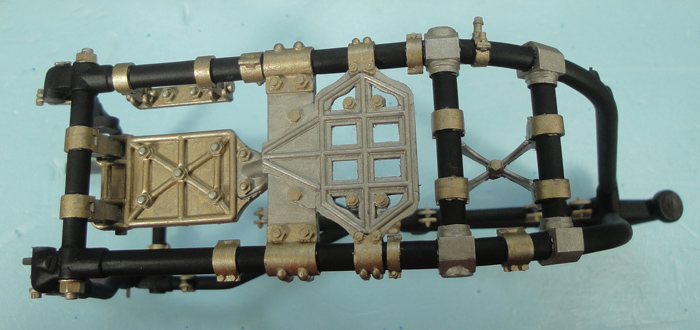
There's a little clean up which will be followed by some clear matte then the dirtying.
The yoke and some bits with paint applied. The clear matte and dirtying thing will follow as well.
The metal colours are enamels, a mix of Humbrols for the off-gold and some Testors and Humbrol for the off-silver. I forget the exact mix because they are both modifications of previously customized colours. The idea is that with dirtying and detailing they will kind of fade into the background clutter but the eye will notice they aren't 'straight from the bottle' colours.
The front forks will likely be the next developed part along with the wheels. For the wheels I'm considering using Alclad - I must admit I am a bit intimidated by this shift to lacquers but the wheels are a feature part and deserve the attention. This will also be the first time I push a lot of lacquer through the AB so I am concerned about the O-rings. But I got the AB to use stuff like Alclad to begin with, lol, so I guess its time to grow some and take the leap.
Nothing exceeds like excess ...
KatsZenJammer- Resident member
- Posts : 2600
Join date : 2016-05-20
Age : 57
Location : Vancouver, BC
Re: Steampunk Harley - Tamiya 1/6 HD FLH Classic 'extreme' kit bash (Very Photo Heavy)
![]() by Skid Mon 22 Oct 2018, 12:25 am
by Skid Mon 22 Oct 2018, 12:25 am

_________________
Al.
Constructive criticism is always welcome.
“Success always demands a greater effort.” Winston Churchill
"Success is failure turned inside out" Unknown
Skid- Admin
- Posts : 7128
Join date : 2013-02-15
Age : 75
Location : Newcastle. Good Old Blighty. -
Re: Steampunk Harley - Tamiya 1/6 HD FLH Classic 'extreme' kit bash (Very Photo Heavy)
![]() by GaryDainton Mon 22 Oct 2018, 9:37 am
by GaryDainton Mon 22 Oct 2018, 9:37 am
GaryDainton- Advanced Member
- Posts : 4433
Join date : 2014-03-06
Age : 56
Location : Bolton UK
Re: Steampunk Harley - Tamiya 1/6 HD FLH Classic 'extreme' kit bash (Very Photo Heavy)
![]() by KatsZenJammer Wed 24 Oct 2018, 8:30 pm
by KatsZenJammer Wed 24 Oct 2018, 8:30 pm
A bit of time off (in a good way) and the morphing of the hobby room to paint mode have resulted in progress.
The centre stand gets some Vallejo gunmetal. I can report that as far as acrylic metallics go the Vallejo is definitely superior for the AB. The pigment flakes are much finer then the Tamiya ones I've tried but I also recommend thinning the Vallejo even though this isn't supposed to be necessary. Also, multiple thin coats are a must - it took 4 thin coats to get to this saturation.

After some transparent blue followed by transparent purple (Golden brand stuff).

Followed by some matte black wash - diluted Tamiya. The contrast makes this look much more black than to the eye. Next is some clear matte then some additional shading for subtle shadow effect.

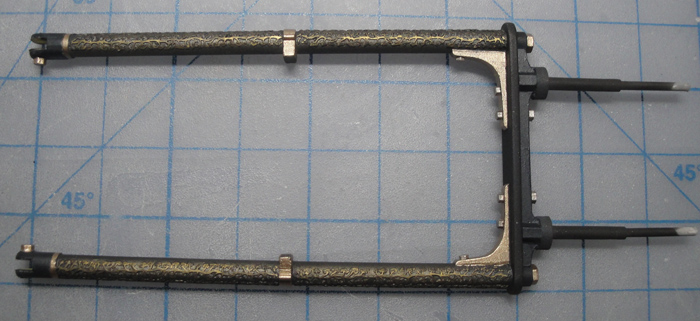
Two tone base primer application on the main forks.

Working the multi layer 'almost black' on the dark grey primer - not trying for an exact match to the frame but within the same range.
The black primer portion gets gunmetal which will be added to as well.

Two tone primer on the secondary forks - much more gunmetal planned for this part

Again with multi layer on the grey and gunmetal on the black. Also the PE detailing is going to be re-exposed after a coat of clear matte.

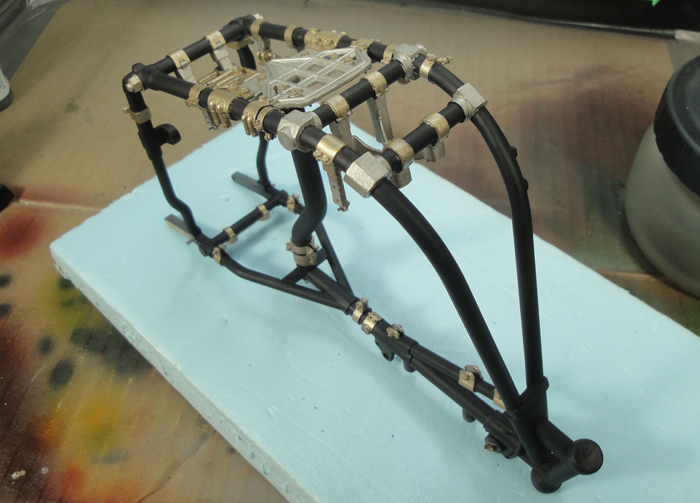
Back to the frame which has now been 'dirtied' with a combo of pinpoint brush black 'crud wash' and AB shading grey. Trying to keep the mechanics in mind, portions of the supports and brackets are darker than other parts. Seal it all with clear matte and I call it mostly done ... at least until I realize stuff I've forgotten, lol.

The yoke after the same treatment as the frame.

I didn't take a photo of the hex bolts/nuts and stuff but trust me, those are being treated the same as the main parts. Also, not included in the photos of the forks, the various bolts/nuts and the 'hinges' are developing. I'll try to remember to include the little stuff in the next set of photos.
The current near future focus is to set up the frame with wheels and centre stand. Frame and yoke are at the set aside stage, centre stand almost there, forks in process which leaves the rear shocks and the extensions which secure the rear fender (essential to the set up) as well as the assemblies for front and back wheels. This will include the brake discs, brakes and the drive wheel. Thankfully the fenders do not have to be included at this stage.
I suppose now would be a good time to start thinking about painting the rubber tyres ...
Nothing exceeds like excess.
KatsZenJammer- Resident member
- Posts : 2600
Join date : 2016-05-20
Age : 57
Location : Vancouver, BC
Re: Steampunk Harley - Tamiya 1/6 HD FLH Classic 'extreme' kit bash (Very Photo Heavy)
![]() by GaryDainton Thu 25 Oct 2018, 7:01 am
by GaryDainton Thu 25 Oct 2018, 7:01 am
GaryDainton- Advanced Member
- Posts : 4433
Join date : 2014-03-06
Age : 56
Location : Bolton UK
Re: Steampunk Harley - Tamiya 1/6 HD FLH Classic 'extreme' kit bash (Very Photo Heavy)
![]() by KatsZenJammer Sun 28 Oct 2018, 5:56 pm
by KatsZenJammer Sun 28 Oct 2018, 5:56 pm
The PE detailing on the forks is re-revealed from under the initial coats. This is a bit touchy to do but with a sharp edge and careful, slow work it comes out pretty nice.


Then a coat of clear matte followed by some dirtying - the clear matte on the brass PE helps the follow up to adhere more uniformly instead of doing that surface tension pooling at the edges thing. Next comes the detailing of the bits with the old fashioned brush.


Some bolt heads and the centre stand after dirtying. Trust me when I say that the centre stand isn't actually black black but kind of shady and slightly uneven (on purpose).

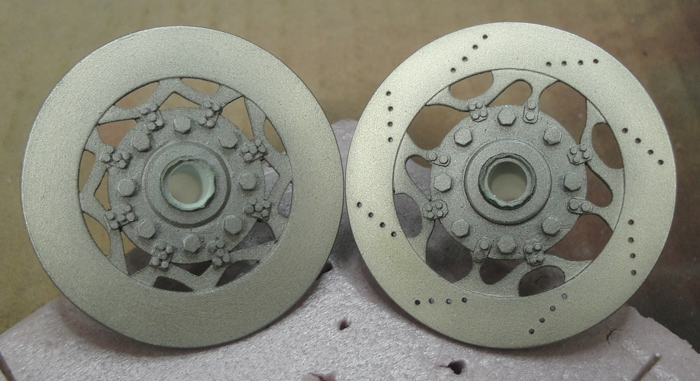
And I finally bit the bullet and shot Alclad for the first time this build. Before working on the wheels I chose to experiment on the brake discs. First a layer of Magnesium over everything followed by a misting of Gold Titanium on the discs themselves. This will be followed by a coat of clear matte then the detailing will begin.
My report on Alclad metallics - it's more difficult with a 0.35 mm tip on the AB. All my reading on using Alclad informed me of this fact and I adapted as best I could. Basically, with such a tiny tip it's best to shoot a bit at a time then flush the AB with thinner/cleaner before going on. Otherwise it clogs at lower pressure and requires an almost wide open paint flow for even spray. I'm not thinning the Alclad because it's already thin enough out of the bottle. The fact that the Alclad supply I have is 4 years old probably has a lot to do with these issues, I'm noticing some clumping in the pigments. And make sure you flush the crap out of the AB afterwards, lacquer has a habit of eroding rubber O-rings and all that.
And all of this is just part of the adventure. I'm still planning to do the wheels with some Alclad though I know my subconscious is trying to come up with an alternative - fussy paint is a bother.
Nothing exceeds like excess ...
KatsZenJammer- Resident member
- Posts : 2600
Join date : 2016-05-20
Age : 57
Location : Vancouver, BC
Re: Steampunk Harley - Tamiya 1/6 HD FLH Classic 'extreme' kit bash (Very Photo Heavy)
![]() by GaryDainton Sun 28 Oct 2018, 6:19 pm
by GaryDainton Sun 28 Oct 2018, 6:19 pm
May be worth investing in some new Alclad, not worth struggling with paint that's past its best and this project deserves top quality, Very much enjoying the progress.
GaryDainton- Advanced Member
- Posts : 4433
Join date : 2014-03-06
Age : 56
Location : Bolton UK
Re: Steampunk Harley - Tamiya 1/6 HD FLH Classic 'extreme' kit bash (Very Photo Heavy)
![]() by KatsZenJammer Sun 04 Nov 2018, 5:25 pm
by KatsZenJammer Sun 04 Nov 2018, 5:25 pm
I may go and get me some fresher Alclad as you suggested, however I'm going to keep messing with the stuff on hand to see if more experience with it helps me. There is also the option of not going with it on the wheels but to use it for smaller machinery to add that pop behind or on top of the acrylics.
Continuing on with the forks - going in with the old fashioned brush on the primary fork to paint the brackets and other details with the same enamels as I used on the frame bits.

Here I had to commit to a colour for the head lamp mount which will carry over to the other parts of the brackets. In the end I went with Tamiya metallic grey acrylic and the off-gold enamel for the nut/bolt details.

After a coat of clear matte followed by dirtying and stuff and a final coat of clear matte. Sorry for the contrast in this photo - it's hard to see that the head lamp mount piece has also been darkened to near iron-ish tones.

The secondary fork with the clamps and stuff painted with off-gold enamel. Also, I forgot to mention that there are portions, like the ends of both sets of forks, which were painted with Testor's matte gunmetal enamel.
A coat of clear matte followed by dirtying then more clear matte - again sorry about the contrast.

I don't know the exact name for these, I'm calling them fender braces. On the original kit these were chromed but I chose to unite them with the rest of the frame/fork motif so they underwent the same multi-layer blackening and detail exposing as the rest of it.

Soon it will be time to start assembling the whole springer fork set up - this will likely be the first portion of the steam cycle to be 'put together' for real. Kind of a minor milestone (among many) and I'm looking forward to it.
Mulling over how things are going to proceed with the brake discs as far as further base colours (if any) and the detailing. Next in the painting queue are the brake callipers and rear shock absorbers - here I might utilize Alclad for base coating. Or not ... we'll have to see what winds up happening.
The wheels and the tyres might prove to be a sub-adventure in and of themselves. Still doing research on the painting rubber thing.
Nothing exceeds like excess.
KatsZenJammer- Resident member
- Posts : 2600
Join date : 2016-05-20
Age : 57
Location : Vancouver, BC
Re: Steampunk Harley - Tamiya 1/6 HD FLH Classic 'extreme' kit bash (Very Photo Heavy)
![]() by GaryDainton Sun 04 Nov 2018, 8:32 pm
by GaryDainton Sun 04 Nov 2018, 8:32 pm
All coming together very nicely and most enjoyable. Again the 'picking out' of the etch is superb.

GaryDainton- Advanced Member
- Posts : 4433
Join date : 2014-03-06
Age : 56
Location : Bolton UK
Re: Steampunk Harley - Tamiya 1/6 HD FLH Classic 'extreme' kit bash (Very Photo Heavy)
![]() by KatsZenJammer Mon 12 Nov 2018, 12:07 am
by KatsZenJammer Mon 12 Nov 2018, 12:07 am
So the front forks got some penultimate dirtying (and clear matte) then was assembled. I was quite pleased with the overall effect and soon I'll have to do a test assembly of it to the frame and such for my own self-assurance.

Returning to the brake discs, first there was Alclad followed by clear matte and here is the detailing of the hub nuts and stuff using the same enamels as before (off silver and off gold) as well as Testor's steel enamel.

This is the set up I slapped together for shading detail of the brake discs. Spinning them was easier than trying to follow curves freehand with either brush or AB. Luckily I had a drill with a variable speed trigger so it only ran at about 100 rpm initially, otherwise the spin rate would have been unworkably high.

Brake discs after dirtying and then 'staining' using the drill rig. I used both AB and regular brush and the medium was the shading grey diluted so that it took numerous coats. The hub dirtying was done with Tamiya matte black diluted to near-wash consistency then shaded with shading grey through an AB. The difference in their colours is purposeful - I wanted the rear brake disc to look 'sootier' then the front.

The drive sprocket wheel gets some specific primer. Matte black around the rim and for the hub and Tamiya acrylic matte hull red for the rest. I decided to freestyle this and not mask anything. Call it precision AB shooting practice.

My initial thoughts about painting this part all metallic were pushed aside by looking at photos of old steam locomotives and old farm machinery. So the hub got Vallejo gunmetal but the rest got Vallejo fire red as base colour. After curing this gets clear matte then comes the detailing.

The rear shocks are being set up for painting but nothing photo worthy at this time. Along with the consideration of the wheels and tyres, the front and rear fenders have been drifting in and out of my thoughts as of late. Something tells me that I will be committing to a colour scheme in the near future and I would not be at all surprised to discover that either red or perhaps a burgundy will fill out the missing part.
Nothing exceeds like excess.
KatsZenJammer- Resident member
- Posts : 2600
Join date : 2016-05-20
Age : 57
Location : Vancouver, BC
Re: Steampunk Harley - Tamiya 1/6 HD FLH Classic 'extreme' kit bash (Very Photo Heavy)
![]() by GaryDainton Mon 12 Nov 2018, 11:07 am
by GaryDainton Mon 12 Nov 2018, 11:07 am
Last edited by GaryDainton on Mon 12 Nov 2018, 3:11 pm; edited 1 time in total
GaryDainton- Advanced Member
- Posts : 4433
Join date : 2014-03-06
Age : 56
Location : Bolton UK
Re: Steampunk Harley - Tamiya 1/6 HD FLH Classic 'extreme' kit bash (Very Photo Heavy)
![]() by disabled modeler Mon 12 Nov 2018, 11:40 am
by disabled modeler Mon 12 Nov 2018, 11:40 am
disabled modeler- Intermediate Member

- Posts : 979
Join date : 2016-05-22
Age : 60
Location : Quincy,IL. USA
Re: Steampunk Harley - Tamiya 1/6 HD FLH Classic 'extreme' kit bash (Very Photo Heavy)
![]() by KatsZenJammer Sun 18 Nov 2018, 7:16 pm
by KatsZenJammer Sun 18 Nov 2018, 7:16 pm
So, getting back to the drive sprocket - a shot of clear matte followed by detailing with regular brush. I also chose to dry brush some off-gold onto the hub at the same time as detailing the nuts and bolts.

Stage one 'dirtying' with matte black 'almost wash' and a regular brush. This is followed by another coat of clear matte.

And after more AB application of shading grey and some more clear matte. There was going to be more dirtying if required but I was happy with the result and so have set this piece aside to await assembly.

On the topic of Green ... this first coat had been laid down when I read Gary's comments about that colour. The shocks are not going to be farm tractor green but I wanted to distinguish them in some way. The base coat is a mix of Badger green (generic and very bright) and Vallejo gunship green.

Next comes Golden turquois (phthalo) transparent which had blue tones and nice, deep richness - this is two to three coats shot with the AB.
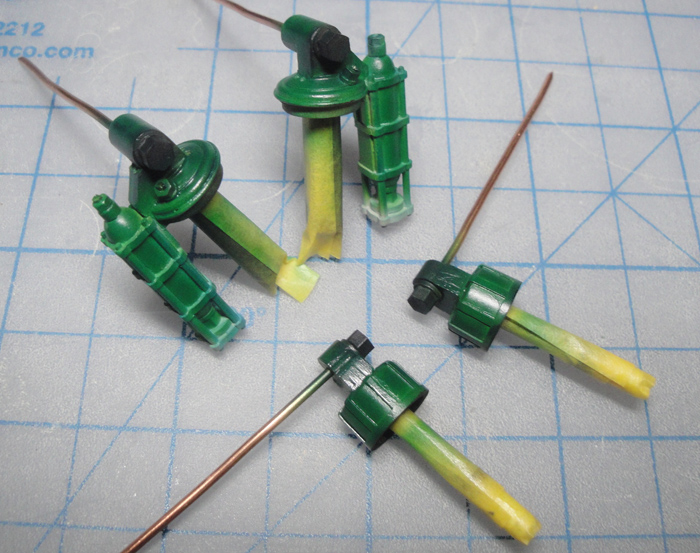
After a coat of clear matte comes the detailing with regular brushes. The same off-gold and off-silver I've been using so far as well as some of the Testor's matte gunmetal..

After stage one regular brush dirtying with almost wash matte black and a coat of clear matte. The top and bottom mounts got an extra coating of the grime wash. After this will be the shading grey overall darkening and such - the plan is to make the green not so green but not black.

Practicing precision AB work - the little hydraulic cylinders on the brake callipers also got a similar green treatment to the shocks while the bodies of the callipers will (hopefully) wind up almost black after all is said and done.

The braces started with a base coat of Vallejo gunmetal followed by Vallejo bright brass. The brass was diluted to almost nothing so it gave the braces highlights and not a smooth brassy coat.

There are still bits of detail that have to be re-affixed to the shocks and brakes, namely all the little brass and copper wire bits. Kind of thinking about if they should go on before the AB shading or after ... more on this later.
At this point things are going somewhat smoothly in that there have not been major errors or re-thinks. But now that the wheels are moving closer to the paint box this might not remain the case, lol.
The fenders have also been bubbling upwards in the list and along with them the tanks. The plan is to have the same colour scheme for fenders and tanks and so far the idea of red/burgundy as the colour is getting the most traction. As these are the major 'showpieces' for the colour scheme there's been a lot of percolating in the think tank.
And handlebars ... can't forget those ...
Nothing exceeds like excess.
KatsZenJammer- Resident member
- Posts : 2600
Join date : 2016-05-20
Age : 57
Location : Vancouver, BC
Re: Steampunk Harley - Tamiya 1/6 HD FLH Classic 'extreme' kit bash (Very Photo Heavy)
![]() by Sponsored content
by Sponsored content
Sponsored content
Page 21 of 25 • 1 ... 12 ... 20, 21, 22, 23, 24, 25 ![]()
» Tamiya 1/6 Harley Davidson Fat Boy Lo
» Tamiya 1/6 Harley Davidson FLH1200
» Steampunk Ducati
» '57 Salvage bash-up
|
|
|